Previously, baths were used exclusively for hygienic purposes. But in recent years, a lot has changed, including the bathhouse - now it is a real health center. Modern requirements for the construction of baths are somewhat different from previous ones. According to the updated layout, there should be several separate rooms inside with a total capacity of 4 to 12 people.
DIY sauna projects
Unfortunately, today there are no standard projects for the construction of such baths, and the instructions and advice that can be found on the Internet do not always cover the issue in detail, and sometimes even mislead visitors. In a word, there are no universal requirements for the construction and arrangement of baths, and therefore people use their own designs. And this leads not only to unjustified expenses, but also to a direct violation of safety regulations.
Bathhouse project 6x3
Note! First of all, the bathhouse should be functional, and not turn into an amateur museum.
To avoid such mistakes, you should be aware of all the requirements for the construction process. Of course, requirements may vary for different types of baths. Private baths do not have to follow the same rules as public baths. But if we talk about hygiene requirements, then they must be followed, otherwise the consequences can be very negative. For example, fire safety rules are often not followed in private baths, which often results in fires.
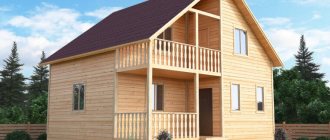
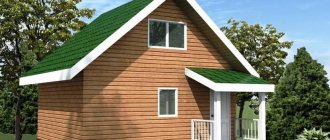
Bathhouse project on two floors
Consumables
Often, when making country baths, dried coniferous trees are used (they have excellent absorbent properties), although deciduous trees are often used. It is not advisable to use pine for flooring and shelves, as it releases resin at high temperatures.
Types of wood for baths
The shelves and floor must be made without nails, which will allow the top layer of wood, subject to the aggressive effects of soap and water, to be removed annually by jointing. Perhaps everyone already knows that heated nail heads can cause burns.
Finishing a bath with linden Finishing a bath with alder
Stones
For laying stones, it is best to use jadeite, diabase, and soapstone. All of them are not afraid of high temperatures and do not crack from water, and their evaporation is beneficial for the body. It is best to choose stones with a slight roughness, which will help water stay on the surface longer.
Cracked stones must be promptly replaced with new elements.
Setting up a sauna in your home will allow you to enjoy beneficial procedures at almost any time, so if you have the desire and opportunity, it is better to pamper yourself and your family with this type of bathhouse.
Bathhouse placement
Placing a bath Placing a bath Placing a bath
Having understood the material, you can begin to study the basic requirements for placement. A bathhouse requires a favorable external environment - green spaces of coniferous or deciduous trees - and maximum distance from dust and noise. Ventilation is required. You should also take into account the fact that you will need sewerage, water supply and electricity.
Photo
Miniature bathhouse with dressing room
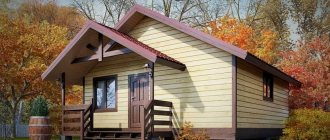
Frame-panel bathhouse with porch
Mini sauna
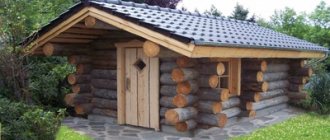
Small bathhouse - wild log house
Waiting room
Waiting Room
The first room of any bathhouse is the waiting room. It should accommodate 2/3 of the number of seats in the steam room. Regarding the arrangement, there must be clothes hangers, a place for shoes, as well as an appropriate number of chairs.
Bathhouse layout
Bathhouse project 6x4
Prices for various types of construction boards
Construction boards
Erection of the roof
For small buildings, the ideal solution is a pitched roof. It is necessary to plan its production at the design stage. It is very important to be able to raise one wall higher than the other. When this is done, in the case of a wall made of brick and foam block, waterproofing made of bicrost or roofing material is laid on the upper end. Additional beams are mounted on it, which will serve as a Mauerlat. They are attached to the base using anchor bolts or walled-in studs. Beams are laid on top onto which the sheathing will be placed. They can be secured to the Mauerlat using metal corners.
Bathhouse with a pitched roof
In another option, the walls are made the same. Ceiling beams are laid on the Mauerlat. On one side, vertical boards are installed that will form a pediment, from which the rafters are lowered onto the other wall. At the point where they adjoin the Mauerlat, they are cut to the required angle. They are secured with metal corners. To make it easier to maintain the roof in one plane, the two outermost elements are installed first. A string is stretched between them, which will serve as a level.
Rafter system of a pitched roof
The ceiling must be insulated. A vapor barrier is attached to the top of the ceiling crossbars. Thick foil can play this role. Insulation in the form of mineral wool is placed in the space between the beams. Additionally, it is covered with plastic film. The inside is hemmed using wooden lining or polished edged boards. Read more about insulating the ceiling in a bathhouse here.
Insulation of the ceiling in the bathhouse
Note!
For a house made of timber, when attaching the rafter legs to the mauerlat, it is better to use floating corners. This is necessary to prevent the roof from skewing during shrinkage.
Locker room
There should be twice as many seats in the locker room as in the steam room. It is necessary that each visitor have at least 1.2 m² of free space. Also in the locker room it is necessary to install cabinets measuring 187x56x40 cm (height, depth, width). The distance between cabinets should be at least 1.5 m, and between them and the wall - 0.85 m. The floor should be sloped towards the waste bins, the coating should be smooth and easy to clean.
Locker room
Frame walls
After the foundation is erected, an additional foundation is made for such a structure. It is carried out according to the example of the grillage discussed above. For the corner posts we will need exactly the same timber as for the base. In addition, you will need to stock up on edged boards with a length equal to the height of the future walls, a width equal to the width of the grillage and a thickness of 5-10 cm.
Construction of a bath frame
- At the base, it is imperative to check the diagonals so that they are the same. It is attached to the concrete foundation using anchor bolts. It is advisable to recess the head. For this purpose, a countersunk groove is made in advance. Waterproofing made of bicrost or roofing felt is laid under the grillage on a concrete foundation.
Pie wall frame bathTo secure the corner posts, a tenon with dimensions of 5x5x5 cm is made at the end. A corresponding hole is made in the base. The beam is installed and leveled. It is fixed using metal corners. Jibs are also installed that will hold it.
- The top trim is made. This is a beam that will connect the racks together.
- Additional vertical beams are installed every 50–60 cm. They are strengthened with oblique struts.
- At the locations of windows and doors, embedded lintels are installed for rigidity.
- Floor joists are installed. For them, you can use a beam measuring 15x10 cm. In order for them to be secured in the best possible way, a cut is made in the grillage to half the width of the board. A cut is made in the joists and placed into the cut. Fastening is carried out with self-tapping screws; additionally, internal metal corners can be installed.
- The floor is insulated. In the case of a strip foundation, waterproofing in the form of a membrane or film is placed in the resulting space. Expanded clay is poured from above up to the beams. A separate layer of hydrobarrier is laid on the logs; it is secured to the boards using a construction stapler. Insulation is placed in the cavity between the joists. This can be mineral wool, polystyrene foam or penoplex. Everything is covered with a finished floor on top. If the foundation is columnar or pile, then first you will need to hem the beams from below, and then lay the hydraulic barrier and insulation.
- The outside walls are covered with facing material.
- A hydraulic barrier is laid on the inside. Insulation is inserted into the space between the vertical boards. You can use the same as for the floor. Finishing can be done using a block house or other suitable material.
Frame on a pile foundation
Shower room
The correct location of the shower is between the steam room and the locker room. The number of showers is calculated so that for every four places in the steam room there is one cabin. Shower diffusers are installed at an angle of 30ᵒ at least 1.7 m from the floor.
Shower room
Shower room
Note! A hand shower is the most convenient, as it allows you to thoroughly wash your entire body after bath procedures.
The water temperature in the shower should not exceed +45ᵒС. Hangers and soap racks should be easy to clean. Typically, the walls in this room must be washed to a maximum height of 2.2 m, and everything above (including the ceiling) is covered with lime-based plaster with a small amount of antifungal substances.
Shower room
Light-colored non-slip tiles are used to cover the floor; a slope must be made towards the garbage bins, which are often covered with grates. There is a separate place for drying - there you need to install a tap with a long hose to make it more convenient to carry out wet cleaning.
Prices for the range of floor tiles
Floor tile
Construction of brick walls
For a bathhouse, it is better to use red brick, which has undergone heat treatment and has a lower thermal capacity. To calculate the amount of material needed, you need to calculate the area of each wall. To do this, the width is multiplied by the length. Then you need to divide this number by the area of one brick. The area of the masonry joints can be neglected, because you will still need to make a reserve in case of battle or marriage.
Calculation of the number of bricks
The wall can be erected using several methods:
- in two bricks with external insulation.
- with air gaps, they are about 6 cm;
- with a layer of insulation between two rows of bricks.
Work begins with the construction of corners. This is an important process because... It is they who will subsequently ensure the correctness of the entire structure. In order to maintain the vertical level of the future walls, two metal profiles of 5x5 cm and a length equal to the height of the future walls are dug into the corners. They are leveled and secured with jibs. A fishing line is stretched between them to the height of one row. After it is laid, the line is rearranged to the height of the next one. The thickness of the seam should be about 20-25 mm. It should be applied at a distance of no more than a meter so that it does not have time to dry. Additionally, the plane is checked using a bubble level. If the second and third types of masonry are chosen, then it is necessary to ensure a bandage between the two walls. This is achieved by laying two bricks transversely opposite each other at certain intervals. Also, each row should be offset by half a brick to ensure the overall interweaving of the entire plane.
Brick wall laying
A lintel must be installed over windows or doorways. Usually it is reinforced concrete. You can purchase it ready-made or pour it directly on site. It should extend beyond the openings by at least 25 cm. Supports are installed and a wooden board is mounted on them. Two rows of bricks are laid out on edge. Between them there are reinforcement rods, which should also extend 25 cm beyond the opening, and it is better to bend them to intertwine them with the existing masonry. Concrete is poured inside. After complete hardening (usually 10-12 days), the lower supports can be dismantled and the logs removed.
Brick lintel
Steam room
Steam room, dimensions
The capacity of the steam room should be such that the stay is comfortable and, most importantly, safe. Each person should have at least 2 cubic meters of space, the optimal room height is 2.3-2.6 m.
Bath room design table
Note! It is highly undesirable to equip steam rooms with a volume exceeding 40 cubic meters!
The ceiling and walls are sheathed with dried absorbent wood, which does not have knots and does not emit resin at high temperatures. The most suitable breeds include:
- pine;
- alder;
- poplar.
The doors to the steam room are made of wood (although, if desired, you can resort to using modern heat-resistant glass) and are installed so that they open outward. Do not varnish wooden elements under any circumstances.
With further arrangement, the steam room is equipped with at least two shelves at a height of more than 40 cm from the floor. In this case, the distance between the top shelf and the ceiling must be more than 1.4 m. The shelves must be smooth.
Dimensions of a shelf for a bath, example
Shelf sizes
The presence of metal elements and fasteners in a steam room is excluded, as it can cause burns. The floor is covered with a concrete screed or smooth ceramic tiles, with a slope towards the waste bin located outside the room. High-quality air exchange is another important requirement for a steam room. If you plan to install lamps, then this should be done exclusively above the door.
Steam room
Note! For safety reasons, it is recommended to place a board or lathing on the floor, otherwise you may slip on a wet surface.
How to arrange the interior
Finishing materials are presented on the market in such a wide palette that their choice will allow you to realize any idea in any style. The main thing is to combine the originality of the interior with ease of use and not clutter the space with unnecessary details .
Wooden objects, ladles, brooms as decor, and hand-woven rugs on the floor are suitable for a Russian bath. The style of the chalet will be recreated by bouquets of fragrant herbs, tablecloths, tea sets, and hunter’s attributes. High ceilings and accent lighting deepen the contemporary style.
Furniture is chosen depending on the size of the bathhouse . The dressing room can be marked with a wooden hanger, and a small cabinet is sufficient to store cleaning supplies. Don't forget about a bench for easy changing.
A wooden table, sofa or soft chairs will be placed in the relaxation room. You can equip the walls with shelves for storing dishes and accessories for the bath.
The walls are wooden or painted in light colors. All items perform specific functions, nothing superfluous. The furniture and interior are in harmony with each other .
Which project you should choose depends on the type of bathhouse, since each requires its own conditions and materials . The traditional project includes a dressing room, washing room, and steam room. The remaining rooms and areas are planned based on the size of the site. The bath complex may include a swimming pool, an attic, and a veranda. The premises can perform combined functions. Popular wood projects require additional treatment and protection, and foam block buildings represent the most budget-friendly option. The style of the bathhouse is created using materials, furniture, and decorative items. The interior should be practical, environmentally friendly and safe.
Cooling and relaxation area
In order to cool the body, a separate room is set up in the bathhouse (or it is taken outside). The minimum area of the pool is 6 m², and the depth is 1.3 m. It is important that it is possible to lower the water level for children to at least 0.5 m. The area of the pool is calculated as follows: 50 cm² per place in the steam room. The pool is located next to the steam room.
Swimming pool in the bathhouse
Swimming pool in the bathhouse
The walls and bottom of the pool are lined with light, non-porous and easy to clean material (for example, frost-resistant tiles). The bottom is sloping towards the drain. Also, for a comfortable descent, you should take care of steps with railings.
The floor next to the pool is also sloping towards the waste bins. Water will be supplied through a special hole in the bottom, and its excess will be drained through a special groove into the sewer. If the water level is 50 cm or less, then it must be changed all the time.
Note! The maximum permissible temperature is +10ᵒС, which fully complies with modern recycling standards.
Installation of a swimming pool in a bathhouse
Water should be regularly chlorinated (maximum chlorine concentration - 0.3 mg/l). In addition to water, snow can be used for cooling, as well as ordinary fresh air in a closed structure connected to the bathhouse.
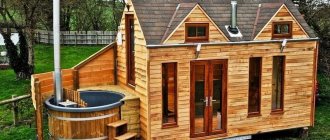
Bathhouse project with a swimming pool
The area of the cooling zone is calculated as follows: 2 m² for each place in the steam room. The room is furnished with benches in the required quantity, it is desirable to have green spaces.
Find out how to make a bath font with your own hands by studying several interesting options in our article.
Roof
Roof vapor barrier
The cost of construction is affected by the design of the roof. The best option in terms of cost is single-slope, gable. Hip roofing is suitable for attic structures. The terrace is covered with the same roof as the bathhouse, with a single rafter system.
The step between the rafters is made according to the project calculations. For the adjacent, protruding terrace, which is built later, separate rafters and sheathing for the roofing are installed. The area for the extension is planned and fenced off in advance.
The following roofing materials are used: roofing felt, soft tiles, ondulin, corrugated sheets. It all depends on the design features of the project.
Toilet
Toilet in the bathhouse
In the bathhouse it is necessary to make at least two toilets:
- one of them is connected to the shower;
- the other is more expected.
Each booth must have:
- toilet;
- wash basin;
- mirror;
- box for toilet paper;
- hanger hook.
Toilet in the bathhouse
Toilet in the bathhouse
The height of the cabin must be at least 1.8 m, all surfaces are finished with light-colored and easily washable material. The floor is made with a traditional slope; the presence of cracks and holes is unacceptable. A washbasin is installed in front of each cabin.
Bathhouse project with toilet
Forced ventilation is installed.
How to make ventilation in a bathhouse
Bath ventilation system
Flooring
For a sauna, it is recommended to choose floors made of natural wood. For beauty, it is possible to decorate with artificial stone. You can refuse additional thermal insulation.
In addition to wood, it is appropriate to use granite and ceramic tiles. The main thing is to choose an option with a rough surface.
Heating device
The heating device can be either an electric or a conventional heater. In the first case, the only mandatory conditions are grounding and waterproofed wiring.
Heating device
If we are talking about a stone or brick oven, then there will be more requirements:
- the furnace is installed on a special foundation;
- the walls and floor next to it are covered with heat-resistant material (for example, asbestos);
- the oven should be located as far as possible from the shelves;
- the chimney is also insulated;
- It is advisable to build a brick screen made of good brick around the stove.
Prices for fireplaces and stoves
Fireplaces and stoves
Bake
But the most important element for creating a sauna remains the stove. She may be:
- Conventional wood-burning, independent of external energy sources. This design ensures fairly cheap operation of the sauna, the creation of soft steam, and a high heating rate. But when installing a wood-burning stove, additional costs will be required to install a chimney, and the risk of fire increases several times.
- New-fashioned electric, capable of heating to a fixed temperature and providing maximum fire safety.
A sauna with an infrared stove still causes quite a lot of controversy. It is believed that such heating does not provide a therapeutic effect other than intense sweating.
Utility and other premises
Utility and other rooms of the bathhouse
Detergents and other household chemicals are stored in such rooms. The walls here are covered with washable finishing materials up to a height of 1.8 m. Hot/cold water is supplied. Dirty and clean linen are stored separately.
Also in the bathhouse you need to think about places for a medical kit and a room for massage. If desired, you can arrange a solarium. The area of the massage room is calculated as follows: 7 m² for each massage table. Sources of UV radiation are installed in the solarium. The area of the solarium is determined at the rate of 6 m² per seat, the height must be at least 3 m.
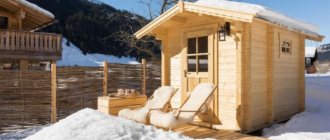
Features of a sauna inside the house
A do-it-yourself sauna in the house has some features that must be taken into account when planning this washing and relaxation complex:
- A Finnish sauna can be heated not only with wood, so it is characterized by increased fire safety.
- The sauna does not require a separate building and does not take up much space: 3 square meters can comfortably fit up to 4 people, and a 5-meter room can accommodate 5-6 people.
- The ideal ceiling height is considered to be 2.1 meters. This allows you to install standard doors, avoid hot drafts, create cozy air circulation, and maintain optimal temperature and humidity.
Unlike a traditional bath, the sauna does not require water supply: the shower and washing area are located in a separate room.
Climatic conditions
Temperature
In the end, I would like to pay attention to the temperature. Each room is equipped with a thermometer. At the same time, in the steam room the device should have a scale of up to 150ᵒC, and it itself should be mounted no closer than 1 m from the heating device, 20 cm from the ceiling and 1.5 m from the floor.
Control and measuring instruments for baths
Recommendations for choosing software
The programs have similar functions, but are designed differently, have a different interface and different function names.
This speaks to the importance of researching each specific product before trying it.
Professional program for designers ArchiCad
Nobody wants to study everything for the sake of comparison, so we give the following advice:
- You need to make sure that the program is Russified. Training in your native language, if you are not a programmer, will be faster.
- Look online to see if there are video lessons posted. This is a quick and easy way to learn new programs.
- Not all programs can calculate wooden structures. If there is no such function, then the product is useless.
- The program should also be able to create details of the required material. If this function is available, you can immediately order ready-made boards, already sawn for the finished project.
- 3D visualization is available to any product, but earlier this point was important.
- Learn about ways to purchase the program. There is no point in buying for one-time use. It would be great if the product has a demo version.
Accurate calculation of lumber
Knowing all the parameters, you can speed up the selection of software.