Our habit of solving small everyday problems on our own is ineradicable. And it’s not even about saving money, although they are never superfluous. There is something very attractive and understandable about living in an interior that is not only lovingly conceived, but also independently realized.
But do-it-yourself repairs of modern plumbing fixtures can be complicated by the variety of designs of the same faucets. Today we will tell you how to disassemble a ball mixer and repair it. This will help you avoid resorting to the help of specialists if the problem can be fixed on your own.
Determining Ball Valve Position
To determine whether a ball valve is open or closed, you need to pay attention to the position of the handle. When it is perpendicular to the axis of the device, then the passage in the shut-off valve is blocked for the working medium. If the handle is parallel to the pipeline, the ball valve is in the open position.
How to open a ball valve if the handle is broken
Ball valves are the most effective shut-off devices for cold and hot water pipelines. They are simple in design, do not require special maintenance, and perform their function for a long time.
But sometimes some difficulties arise. One of them is when the ball valve does not turn when trying to turn off the water. The solution to this problem is described in this article.
Lubricant to make the task easier
In case the parts are stuck tightly and do not want to turn, lubricant will come in handy. You need to lubricate the clamping nut with it and wait a couple of minutes. It is best to use special silicone grease for these purposes. If it is not there, you can use VD-40.
At the end I will add: before starting to “reanimate” the tap, it is better to turn off the water, if possible. When designing a crane, there is always a risk that it will permanently break. Personally, I do not recommend dealing with old, completely rusted taps, or with cheap Chinese ones. It is better to replace them immediately.
Features of the crane restoration procedure
It is worth understanding that the process of restoring a ball valve is quite simple, but it still requires careful attention. The big risk of this procedure is that during its execution there is a high risk of completely breaking the tap or injuring your hands, which is possible if the valve does come off.
In order not to break the edge on the rod, it is recommended to use a high-quality open-end tool rather than an adjustable wrench. During the installation of the handle, the threads of the fastening element and the rod should be lubricated with any grease or graphite lubricant. This will make it much easier and faster to remove the butterfly next time.
To avoid problems with the operation of the ball valve, you should turn it several times a month. The use of high-quality fittings at the time of installation of the element also helps to avoid its sticking.
In order for the ball valve to serve as long as possible, it is necessary to screw it on at least 4-5 turns.
A simple solution to the problem
We all know that after a certain time the taps begin to jam. It is enough not to turn the handle for 7-8 months, and problems will already arise. Salts dissolved in water become sour, and the parts of the water tap become rusty.
What do they usually do in such a situation? That's right, turn the valve with pliers. It seems that the more force you apply, the faster the faucet will give way. No. In practice, the handle most often breaks off. The last time I managed to completely tear off the tap. Therefore, when the next jam occurred, I decided to consult a plumber I knew. This is what he advised me:
To resuscitate a soggy faucet, you need to remove the handle. Under it there is a clamping nut that compresses the seal. It is necessary to loosen it a little and twist the rod in different directions (work it out).
Tapping
To start, you can try tapping the stuck area using a small hammer, wrench or other suitable tool. The movements should be numerous, but not very strong, so as not to damage the structure. This process will help if the scale layer is small. In this way, the surface of rust and deposits can be deformed, which will help unscrew the mechanism.
Key Usage
If, after removing the screw and wing, it was not possible to turn the rod manually, this can be done using an adjustable or open-end wrench that strictly matches the size of the screw. Using little effort, gradually loosen the rod from side to side. This will clear the surface of the ball from deposits.
Do not use pliers or pliers. Ball valves are made of fragile materials that are easily damaged.
All actions should be carried out carefully and with little effort, literally one millimeter at a time. Sudden movements and excessive use of force can lead to complete destruction of the valve or failure of the system, which will lead to dire consequences.
Do not carry out independent measures to open a jammed mechanism on the riser with hot water and heating system!
Bath-shower switch
Ceramic
Reliable, practical type of switch, unified in principle of operation and part of the elements with ceramic valve axle boxes, maintenance is identical. For replacement or revision it is enough:
- remove (unscrew) the wing plug;
- unscrew the fastening screw;
- remove the lamb;
- unscrew the head.
Button
The switch is located on the spout. When pulled, the spring-loaded button lifts the rod, allowing the medium to enter the shower head. The switch is held in the raised position by the water pressure.
The presence of a spring is potentially fraught with breakage and jamming of the rod. Typical faults:
- flow from the shower and spout at the same time;
- There is no lock at the top or return button.
Failures are eliminated by changing the rod gaskets or spring accordingly. The algorithm is explained in the video:
Ball
The switch represents a sphere with three holes connecting the channels: cold, hot, shower. Introduces the principle of operation: https://varion.ru/blog/sharovyy-pereklyuchatel-dush-vanna/.
Common problems:
- leak along the rod or fitting joint;
- incomplete blocking of the flow to the watering can or spout.
The first reason is wear of the rod or butt gaskets, respectively. The second situation is caused by a loose fit of the sphere to the saddles. They fix it by tightening the fittings with seats, grinding the ball, or replace parts from the repair kit.
Sequence of operations:
- disconnect the gander, shower head;
- remove the ball handle plug;
- Unscrew the screw, remove the handle;
- unscrew the central seal;
- Unscrew the inserts with pressed seats using a hex key;
- clean parts from deposits;
- set the sphere to the “closed shower” position;
- install and screw the inserts until they touch the ball, tighten the central fitting;
- put on the handle, adjust the rotation force of the ball, alternately evenly tightening the inserts with a hexagon;
- fix the handle, attach the spout, shower;
- check the result.
Diverter for two showers
Diverters installed between the hull and the jib are typical. The stock shower remains in place and is controlled by a central ball or ceramic valve. The metal hose of the second watering can is connected to the diverter fitting and is controlled by a built-in spool or push-button switch. Failures are similar to those of built-in push-button and spool switches.
General view of a spool diverter, main elements.The spool switch is simple, so it works stably. To disassemble, remove the handle, unscrew the fitting, and remove the eccentric. After unscrewing the adapter, push out the plunger. Maintenance consists of cleaning the cavity, eccentric, and plunger from lime. Leaks are eliminated by changing gaskets. Rarely does the eccentric's leading pin break off. The seals on the eccentric rod may require replacement.
Rules for disassembling a ball mixer
If neither tightening the nut nor cleaning the aerator helped eliminate the problem, then you will have to change the gaskets or the “ball” itself.
As already mentioned, the mixing chamber cannot be partially repaired - it is not dismountable. And to replace it, you will have to disassemble the entire mixer, and at the same time check the safety of other internal elements.
To work, you will need the usual tools from a home craftsman's kit: an adjustable wrench, pliers, a screwdriver (straight, Phillips or hex - depends on the screw with which the faucet is equipped).
Step-by-step instructions for disassembling the ball mixer:
- Turn off the water supply, then open the tap to drain the remaining liquid from the pipes.
- Using a screwdriver or a regular knife, pry up the decorative plug on the mixer body and remove it.
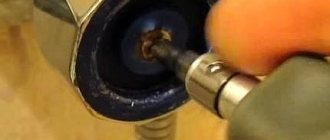
- Unscrew the screw located under the plug.
- Remove the lever handle (if the faucet has not been unscrewed for a long time, significant force may be required). In order not to damage the chrome-plated outer coating of the case, it is advisable to work with a key or pliers through a thin cloth or napkin.
- Now you need to remove the cap. To do this, you can use an adjustable wrench or place the pointed end of a screwdriver at an angle to unscrew the part counterclockwise with light pressure. If the faucet is old, the cap may “stick” and not respond to light pressure. In this case, you can lightly tap the screwdriver handle with a hammer so that the part “moves away.”
- After the ring is unscrewed and removed, inside the mixer you will see a dome-shaped part - a cam and a washer. They need to be picked up with pliers, pulled out and washed to remove all dirt and lime deposits.
- Now you can remove the “ball” itself from the mixer, wash it from dirt and carefully examine it using the same magnifying glass. If microcracks, grooves, chips or other damage are found, the part should be replaced with a new one. In order not to make a mistake with the diameter, take the damaged “ball” with you - it will be easier to choose a suitable analogue in the store.
- After this, you need to remove the rubber valve seals - the so-called “seats”. They can also be damaged or simply lose elasticity over time, and a loose fit of the “seats” to the ball chamber can cause water to leak inside the faucet. Such parts are not difficult to find on sale, and they are inexpensive, so even if during a visual inspection you do not find any defects in the rubber, but the faucet has been working for quite a long time, you just need to replace the seals for preventive purposes. Applying plumbing lubricant after installation will help extend the life of the seals.
- Then inspect the tension springs located inside the “saddles”. If they are damaged, weakened or sagging, pick up new ones.
- The entire internal cavity of the mixer must be rinsed and cleaned, after which reassembly can begin.
- Springs are inserted into the “saddles”, then each element is placed all the way into the recess. A thin layer of silicone grease is applied to the ball, then the part is installed inside the body so that the limiting protrusion coincides with the groove.
- Now you need to put the plastic parts back in place - the “cam” and the dome washer. There shouldn’t be any difficulties at this stage, because there is a groove on the body that easily aligns with the protrusion on the “cam”.
Types of breakdowns
The ball cartridge is fixed in the housing using rubber seats. There is free space between these elements. If it becomes clogged, it will cause a malfunction. Even a small speck is enough to break the seal. As a result, the rubber seat becomes deformed. The ball mount fails.
Also, one of the most common troubles is a blockage in the shutter. In this case, you can even do without repairs, and the problem can be solved with simple cleaning. But to do this you will have to disassemble the tap. But after assembly, everything will fall into place again and the device will work like new.
Often, all breakdowns occur due to water flowing in the pipes. She's very tough. It does not depend at all on what type of mixer is installed. In order not to change plumbing fixtures frequently, experts recommend installing filter elements. Another nuisance is water that flows from under the rotary handle. Here it is enough to tighten the connection.
Preparation and necessary tools
Before you start dealing with a stuck compound, you need to be properly prepared. Armed with the right tools, we will unscrew the fastening element faster and, most likely, will not even damage it. One key obviously won't do the trick. You will need a whole set. What will be most useful to us in this matter are:
- heads with a knob;
- impact wrench;
- socket wrench;
- set of spanners.
When starting work, you should not forget about your own safety:
- Never use damaged tools.
- When unscrewing, proceed counterclockwise.
- Check that the key is securely fastened.
- To avoid injury, always wear gloves.
A plumber I know suggested how to restore a ball valve without calling a technician
Recently we had a little trouble - the ball valve installed on the inlet to the heating tank jammed. We called a plumber, who repaired everything, and then gave valuable advice on how to resuscitate this part if the same thing happens to it again. To be honest, his recommendation already once helped us avoid calling a specialist and unnecessary waste of money.
Features of two-valve mixers
The task of a mixer with separate taps is to connect hot and cold water and supply it to the tap in a single stream of a certain temperature.
Despite the fact that many consider this type of mixer to be outdated, it is not losing its position in the market. At a price lower than that of a single-lever, a double-valve is absolutely not inferior to it in terms of technical characteristics, and sometimes even surpasses it.
A distinctive feature of such a device is the presence in its body of two valve heads (faucet axle boxes). They serve as a locking mechanism.
Valve heads can be of two types:
- With elastic gaskets made of rubber, silicone or leather;
- With ceramic discs.
Regardless of the type of head, both rubber gaskets and ceramic discs will work equally well in the same housing, since they are interchangeable.
Typical faults
With careful use, without applying any special effort to the device, the product can serve without breakdowns for a long time. However, more often these cranes are operated differently and fail.
Typical malfunctions include a leak when the lever is in a locked position, or low pressure when the pressure in the water supply is normal. Regulations are also often violated. It is impossible to adjust the water to the desired temperature, since mixing is carried out chaotically. Before repairing ball bathroom faucets, you need to determine the cause of the problem.