The roof truss system consists of various elements, which together provide the rigidity and reliability of the frame structure. Let's consider why it is installed and whether a ridge run is always necessary in the system. Let's get acquainted with the types of beams and how to provide them with high strength with respect to bending and tearing loads. Read to the end, and you will learn about methods of splicing rafter pairs together, and about the recommendations of craftsmen for connecting rafters in various designs.
Ridge purlin on a gable roof Source krysha-expert.ru
Gable rafter system with a load-bearing ridge
A rafter system with a load-bearing ridge is one of the simplest and most common schemes of layered rafter systems for the implementation of a gable roof. With proper execution of the rafter and ridge support areas, one of its enormous advantages is the virtually complete absence of horizontal support of the rafters.
The rafters must have special support platforms (cuts) for support on the mauerlat (top trim) and the ridge. The depth of the cuts should not exceed 1/4 of the width of the board used, and the resulting support area should be at least 38 mm.
The skate can be made in a variety of ways. The main requirement for it is the absence of significant deflection under the influence of vertical loads, otherwise a horizontal expansion of the rafters will appear.
Bearing wall
If there is a load-bearing wall in the center of the house, it can be used to absorb and transmit loads from the ridge. The ridge can be a mauerlat mounted on top of the wall, or a horizontally laid board with a cross-section of at least 38×140 laid on vertical posts with a cross-section of at least 38×89, installed in increments of no more than 1.2 m.
Ridge beams
As a load-bearing ridge, you can use ridge beams made of various materials and having different designs. It is necessary to take into account that the subsidence of the ridge under a vertical load in the rafter system under consideration inevitably leads to the emergence of horizontal thrust forces at the ends of the rafters. At the same time, the maximum amount of movement of the ends of the rafters is limited and linearly depends on the ridge subsidence, which makes it possible to take it into account when designing.
The simplest to design and calculate are ridge beams made from three or more fused boards. To make ridge beams for large spans, it is possible to use LVL beams and flat trusses.
Material selection criteria
When deciding what is the best way to cover the roof of a house, and how cheap it is to make the final estimate, you have to explore many options. When choosing a roofing material, evaluate the following parameters:
Weight
The first parameter you should pay attention to. Additional weight increases the load on the roof structure, which will require strengthening the rafter system and sheathing; the total cost will increase
Reliability. The material must be practical and durable, so weather factors are taken into account when choosing it. Different types of roofing material behave differently in difficult conditions (frost, heat, heavy snow or wind). Failure to comply with the rules will shorten the service life of the coating.
Decorative qualities. The roof is an important decorative element of the design of the house. The color and texture of the selected material can be emphasized with additional details. Forged elements are suitable for a metal roof, and ceramic elements are suitable for a tiled roof.
Decorative roof elementSource pinterest.com
Economical. If you are planning a roof of complex shape, you cannot do without a team of specialists capable of performing complex installation. This can significantly affect the cost of work. Also, on complex roofs the amount of waste increases.
Physical qualities. When choosing, evaluate the flexibility of the material. If the roof is metal, the choice will be affected by the type of metal and its thickness. In areas with snowy winters, it is necessary to remember that snow comes off differently from different materials (it lingers and cakes on a rough surface).
The issue of sound insulation is relevant for all types of roofs. Noise can become a problem not only due to the characteristics of the roof covering (metal tiles or metal sheets). Incorrect installation results in the structure resonating even with small gusts of wind. To prevent rain noise from becoming a problem, several techniques are used:
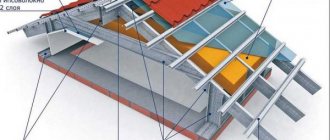
- A soundproofing layer is installed. In most cases, this function is accomplished by mineral wool insulation 200 mm thick.
- Roofing materials with a noise-absorbing effect are used.
- Set up an insulated attic.
Roof with attic spaceSource dukesroofing.com
Self-attachment of ridge beams for the roof of a house
The rafter structure is the basis of any roof. Therefore, its creation must be treated with special attention. When installing a roof, most people turn to professionals, fearing that they will not be able to cope with the task on their own.
The rafter structure is the basis for the pitched roof.
But if the total area of the building does not exceed 100 m2, then the roof frame can be made independently.
The main difficulty that novice craftsmen face is attaching the rafters and ridge girder. But if you choose the right ridge beam and plan all stages of work in advance, then no difficulties usually arise during installation.
Preparatory stage of work
Types of rafter systems.
A ridge girder is a horizontal beam that is located in the upper part of the roof at the junction of 2 slopes. Typically, ridge beams are used as a beam. This type of lumber is specially designed for heavy loads. But before purchasing material, it is necessary to calculate the angles of inclination of the roof slopes. It is generally accepted that the smaller this angle, the cheaper it will cost to build a roof. Calculations should be based not on economic benefits, but on technical characteristics. It is necessary to take into account the load on the rafters and the estimated weight of precipitation (especially in winter). That is why in central Russia the fastening of the rafters is positioned so that the slopes are located at an angle of 45°. This type of roofing is considered optimal.
Next, you should select the required building material. A truly reliable roof can only be provided by a lightweight but sufficiently strong structure. Therefore, it is wiser to opt for lumber made from pine. For the roof frame, a board is usually used, the dimensions of which do not exceed 20x5x600 cm. In addition, it is necessary to purchase a ridge beam with a section of 20x20 cm.
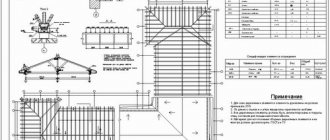
Figure 1. Roof ridge diagram.
When choosing materials, it is necessary to consider not only their size. You need to pay attention to quality. Never buy unseasoned lumber. After some time, the fastening of the rafters, assembled from such boards, will certainly fail. Accordingly, the entire roof is deformed. Remember that wood is considered ideal if its moisture content does not exceed 20%.
Before constructing the roof, all materials must be carefully prepared. They are checked to exclude the presence of rot or parasites and treated with antiseptics. This will ensure the durability of the rafters. If you are not going to install the fastening immediately, then prepare the materials for storage. To do this, select a dry and well-ventilated area. Do not place boards and timber on the floor. Place slats under them. The same base should be between each row of boards. The distance between them should be at least 1.5-2 cm. This is the only way to ensure free air circulation. Otherwise, moisture may accumulate in the wood and mold fungi will begin to multiply.
How to calculate the length?
This size of the ridge girder is also directly related to the angle of the roof . To determine the length of the top beam of the hip roof rafter frame, you need to draw a section of the hip roof along the axis of the ridge.
The drawing will produce a trapezoid, the top side of which is the ridge itself, and the base is the width of the facade wall. The lower angles are equal to the calculated roof slope angle.
If you lower perpendiculars from the vertices of the figure to the base, you get two rectangles, where the opposite leg to the angle of inclination “A” is the height of the roof Hk. By multiplying the height by tg “A”, we get two segments that need to be subtracted from the length of the base of the trapezoid. The resulting segment will be equal to the length of the skate.
Reference. To determine the design parameters of the hip roof rafter frame, including the ridge, you can contact one of the online services. On the Internet, select a calculator and fill in the service windows with the initial data. The output is the desired values.
Installation of roof ridge
Before starting work, draw up a diagram for fastening all roof elements. An example of such a scheme is shown in Fig. 1.
Roof rafters.
Only with the help of such a drawing will you be able to correctly determine the required dimensions and think through the fastening of the rafters, which will be most effective for the selected roofing material.
A ridge beam is usually a crossbar located at the top of the roof structure. It is necessary in order to evenly redistribute the pressure of the roof onto the walls of the house. Installing such timber yourself is not the easiest job. And it must be approached with full responsibility.
First of all, you need to calculate the length of the timber you will need. Usually, when building traditional Russian houses, there are small protrusions on the sides of the roof. As a rule, their width does not exceed 1.5 m. The entire structure must be calculated so that the fastening of the ridge beam covers the entire length of the canopies.
Waterproofing is laid on the base of the roof (usually roofing felt is used for it) and the edges of the insulation are folded around the beam. Next, the structure is strengthened with reinforcement. To do this, take 2 rods of 40 cm each and fix them on the sides of the beam. It is wiser not to drill out the beam itself, otherwise cracks may appear on it.
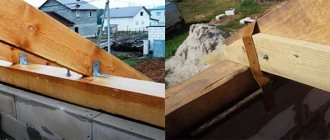
How to perform a hard connection
Fastening, as already noted, can be performed using rigid and sliding technologies.
When fastening with notches, first of all it is necessary to prepare notches on each individual rafter. The height of such a notch should be no more than 1/3 of the height of the beam. Each rafter must be rested against the Mauerlat using prepared notches and secured with two nails driven into the sides of the rafter board. For additional fixation, you need to hammer in a third nail, only this time vertically. This method has become the most widespread and is traditionally used in the construction of roofing systems of any level of complexity.
In accordance with the second method of fixing the rafters to the mauerlat (stripe method), you must first prepare additional bars 1 m long. They will be hemmed to the rafters, and the wooden beams will directly rest against the surface of the mauerlat. The bars are fixed using the previously discussed corners.
If one end of the rafter is fixed using the rigid joint method, the other end must be fixed “slidingly”. The properties of wood are such that it tends to change its volume depending on weather conditions. And if both ends of the beam are rigidly fixed, this will inevitably provoke an increase in the level of loads on the walls and quite quickly lead to a violation of their strength and, in general, deformation.
Ridge beam extension
To carry out further work you will need the following tools:
- saw (if the lumber you choose has a significant thickness, then it is wiser to use electric or gas-powered tools);
- electric plane;
- perforator;
- hammer;
- building level and plumb line.
The roofing plate is installed using anchor bolts.
Sometimes the beam needs to be increased, since the standard 6 m is not enough for the roof ridge. It is more convenient to carry out this procedure directly at the construction site, because the extended structure can be quite difficult to transport to the roof.
The place where the beam fastening seam will go must be selected so that it lies on the ceiling (for example, a wall). Remember that a long beam needs additional support.
To provide vertical support, a sufficiently thick board is taken, to which 2 pieces of timber are attached to the sides. As a result, you should have an open frame in which the bars will serve as vertical supports for the beam. The junction of 2 bars on the ridge should be on this frame.
The sections of timber that will form the ridge are fastened together with sufficiently long (at least 2 m) boards. To do this, the ends of the beam are laid in the place provided for them, their correct location is checked using a level and they are sewn together with boards on the sides. With this method of fastening, the dimensions of the ridge beam are unimportant. The whole structure turns out to be quite reliable.
Installation of roofing mauerlat
Scheme of preparation of the truss structure and counter-lattice.
Mauerlat is a roofing element that is necessary to connect the rafters to the load-bearing wall of the building and properly redistribute the total load. To form such a structure, it is necessary to choose even boards, since they must fit tightly to the wall surface. Therefore, all bulges on the lumber must be removed in advance.
Installation of the Mauerlat begins with a waterproofing layer. All nodes are secured with anchor bolts no less than 20 cm long. Sockets for them must be formed in advance, calculating their location so that the heads of the bolts are between the fastening elements of the rafters and do not interfere with further installation. Sometimes the standard length of boards for the mauerlat is not enough. But they can also be increased.
Next they move on to the installation of rafters. But first you need to determine the required number of frame ribs. To do this, calculate the total length of the roof and divide it by 1.3 (the approximate distance between the rafters). The length of the roof is divided by the resulting number and the number of rafters is determined. For example:
When calculating, fractional numbers must be rounded up. Thus, you will need 12 ribs (6 on each side). Once the required number of rafters has been determined, you can get the exact size between them:
The rafters must be fastened at 2 levels: on the ridge beam and the mauerlat.
Peculiarities
A gable roof, unlike a single-pitch roof, requires a more detailed calculation, since along its center line (and not only) these slopes rest on each other, delimiting and balancing the load from their actual weight. Rafter-gable structure - boards, pieces of timber and individual beams of different shapes and cross-sectional areas. For installation, mainly coniferous timber (for example, pine) is used - unlike larch, it can withstand significantly greater loads. This beam with a side of 15 cm (square section) is laid along each of the load-bearing walls of the building. Fastening is achieved using anchors, rods with “self-tapping” threads and studs with a diameter of 16 mm. This is the Mauerlat - it transfers a uniform load from the rafters to the walls of the building.
Installation of roof rafters
Roof insulation and installation of tiles.
Markings for the ribs must be done in advance. Moreover, the marks should be located both on the ridge and at the attachment point at the pediment. The middle of the edge formed by 2 boards will fall on these lines. The distance between them should be no more than 0.5 cm.
The basis for fastening the rafters to the ridge beam should be scraps of timber 25-35 cm long. Using self-tapping screws, they are fixed to the ridge so that the rafter supports are positioned exactly perpendicular to the beam. The same bases are formed on the Mauerlat. But in this case, the length of the bar should not exceed 20-22 cm.
The rafters are laid, grabbing them on each side with 1 nail, and checking the accuracy of their location, and then fixing them rigidly. First, install the frame ribs on one side of the slope, then on the other. The rafters are installed first from the edges of the roof. Using the resulting triangles, the correct installation of other ties is checked. To do this, a cord is pulled between them along the entire structure. It will serve as a guide for installing the remaining rafters.
After the fastening of the rafters located on the edge is completed, you need to fix the central ribs. Next, the support, which is located at the junction of the ridge beam, can be removed. The necessary rigidity and stability of the entire truss structure has already been provided, and it does not require additional support.
The remaining ribs are installed in pairs. That is, first they install a couple of ribs from the end of the house, then move on to its pediment. This installation method will ensure proper load redistribution.
Section calculation
To select the cross-section of a ridge beam, it is necessary to carry out a calculation based on two indicators:
- for deflection;
- and calculate the fracture strength.
- First, you need to determine the internal stress that occurs in the beam when bending under the influence of an external load. This value should not be greater than the calculated bending resistance of the material, which can be found in the table or in SNiP number II-25-80. We find the internal stress using the formula: Σ = M:W, where:
- Σ is the desired value, which is determined in kg per cm²;
- M – maximum bending moment (kg X m);
- W is the moment of resistance to deflection at the selected rafter section (found by the formula bh²: 6).
- The deflection of the purlin must be compared with the normalized value, which is equal to L/200. He should not exceed it. The deflection of the beam is found by the formula f = 5qL³L:384EJ, where:
- J is the moment of inertia, which is determined by the formula bh³:12, where h and b are the dimensions of the purlin section;
- E – the value of the elastic modulus (for coniferous wood it is equal to 100 thousand kg/cm²).
First you need to calculate the bending moment. If there are several of them on the beam diagram, then after the calculation the largest one is selected. Next, to determine the dimensions of the beam section, we can arbitrarily set the beam width parameter and then determine its required height using the formula: h = √¯(6W:b), where:
- b is the beam width we set in cm;
- W is the bending resistance of the run, the value is determined by the formula: W = M/130, where M is the largest bending moment.
You can do the opposite, set an arbitrary width of the purlin and calculate its height using the formula b = 6W:h². After you calculate the dimensions of the purlin section, it must be checked for deflection using the formula from point 2.
Attention! It is better to include a small margin of safety in the calculated deflection value.
When the ridge beam is designed for deflection, it is necessary to compare this value with the value L:200. If the deflection in the longest section does not exceed this value, then the section of the beam is left as it turned out. Otherwise, it is necessary to increase the height of the run or use additional supports from below. In the latter case, the resulting section must be double-checked by again performing the calculation taking into account the supports used.
The resulting values for the width and height of the ridge must be rounded up. In principle, this calculation is not difficult to perform. The most important thing is to indicate the values in the required units of measurement, that is, do not get confused when converting meters to centimeters and back.
Each roof is based on a large number of beams, rafters, posts and purlins, which are collectively called the rafter system. Over the centuries-old history, many types and methods of its organization have accumulated, and each has its own characteristics in the construction of nodes and cuts. Let's talk in more detail about what the rafter system of a gable roof can be and how the rafters and other elements of the system should be attached.
The final stage of installation
The upper edge of the rafters must be additionally fixed. To do this, the opposite ribs are pulled together using metal plates, securing them with self-tapping screws. After the entire rafter structure is installed and securely fastened, the protruding parts of the boards must be sawed off. For this work it is more convenient to use a hand saw. Particular attention should be paid to the corners of the ribs, which are located on the ridge beam. If you leave protruding parts of the ribs, it will be difficult to install the roof covering correctly.
The last thing you need to do is mount the bows. Bows are boards located approximately in the middle of the triangle formed by the rafters. Such a jumper is necessary in order to remove excess load from the roof slopes. Bows reduce the deflection of the roof covering and the entire rafter structure under the weight of snow in winter or their deformation during strong winds.
The location of the bows depends on the height of the ridge beam. When constructing one-story houses, the ridge is raised to a height of 3.8-4.3 m. In this case, the bow must be secured exactly in the middle of the rafter triangle. This arrangement will help take the load off the roof, but at the same time the attic space will be spacious enough for a person of average height to move freely in it. The entire installation of the roof frame requires approximately 2 working days.
The main thing
Ridge purlin is a support beam for the upper ends of the rafter legs.
In terms of integrity, the beam can be made of solid wood or assembled from individual pieces.
To reduce the risk of sagging of the purlin, support pillars are installed under the nodal connections of the assembled beam.
The rafters can be connected end-to-end (with or without a groove joint), overlapping with longitudinal cuts at the ends of half the thickness of the workpiece, supported by a ridge beam.
For rigid fixation, nails, self-tapping screws, metal plates with perforations for hardware, threaded rods or bolts with washers and nuts are used.
For movable fixation, metal corners and counter lugs are more often used.
Source
Design of a gable roof truss system
In cross-section, a gable roof is a triangle. It consists of two rectangular inclined planes. These two planes are connected at the highest point into a single system by a ridge beam (purlin).
Gable roof diagram
Now about the components of the system and their purpose:
- Mauerlat is a beam that connects the roof and walls of a building, serves as a support for rafter legs and other elements of the system.
- Rafter legs - they form the inclined planes of the roof and provide support for the sheathing under the roofing material.
- Ridge purlin (bead or ridge) - combines two roof planes.
- A tie is a transverse part that connects opposite rafter legs. Serves to increase structural rigidity and compensate for thrust loads.
- Lezhny - bars located along the mauerlat. Redistribute the load from the roof.
- Side purlins - support the rafter legs.
- Racks - transfer the load from the purlins to the beams.
There may still be fillies in the system. These are boards that extend the rafter legs to form an overhang. The fact is that to protect the walls and foundation of the house from precipitation, it is desirable that the roof ends as far from the walls as possible. To do this, you can take long rafter legs. But the standard length of lumber of 6 meters is often not enough for this. Ordering non-standard is very expensive. Therefore, the rafters are simply extended, and the boards with which this is done are called “fillies”.
There are quite a few designs of rafter systems. First of all, they are divided into two groups - with layered and hanging rafters.
The difference in the design of layered and hanging rafters
Calculation of optimal height
The height of the ridge significantly affects the size of all four slopes, and this in turn depends on the amount of consumables. The higher the ridge, the more materials will be needed , the more expensive a hip roof will cost the developer. Only an accurate calculation of the roof height will help you find the optimal parameter.
The height of the ridge girder directly depends on the angle of inclination of the roof, which in turn is tied to the standard snow load. To determine the optimal roof slope angle, the developer refers to SNiP 2.01.07-85. Using the map, they find the area where the house will be built and, accordingly, using the table, find the standard snow load. Each standard corresponds to a recommended roof slope angle.
For calculations, make a drawing of a cross-section of a hip roof, where:
- the sides of an isosceles triangle are ordinary rafters;
- “A” – roof inclination angle, base span length.
The algorithm for calculating height can be represented by the following formulas:
The real values of the tangent of angle “A” and the length of the span of the house are substituted into the formula. As a result, the height of the ridge is calculated - Hk. By multiplying the height of the ridge by sine “A”, the length of the ordinary rafter leg is obtained.
With hanging rafters
These are systems in which the rafter legs rest only on the external walls without intermediate supports (load-bearing walls). For gable roofs, the maximum span is 9 meters. When installing a vertical support and a strut system, it can be increased to 14 meters.
The good thing about the hanging type of gable roof rafter system is that in most cases there is no need to install a mauerlat, and this makes the installation of rafter legs easier: there is no need to make cuts, just bevel the boards. To connect the walls and rafters, a lining is used - a wide board, which is attached to studs, nails, bolts, crossbars. With this structure, most of the thrust loads are compensated, the impact on the walls is directed vertically downwards.
Types of rafter systems with hanging rafters for different spans between load-bearing walls
Gable roof rafter system for small houses
There is a cheap version of the rafter system when it is a triangle (photo below). Such a structure is possible if the distance between the external walls is no more than 6 meters. For such a rafter system, you can not make calculations based on the angle of inclination: the ridge must be raised above the tie to a height of at least 1/6 of the span length.
But with this construction, the rafters experience significant bending loads. To compensate for them, either rafters of a larger cross-section are taken or the ridge part is cut in such a way as to partially neutralize them. To give greater rigidity, wooden or metal plates are nailed on both sides at the top, which securely fasten the top of the triangle (also see the picture).
The photo also shows how to extend rafter legs to create a roof overhang. A notch is made, which should extend beyond the line drawn from the inner wall upward. This is necessary to shift the location of the cut and reduce the likelihood of the rafter breaking.
Ridge knot and fastening of rafter legs to the backing board with a simple version of the system
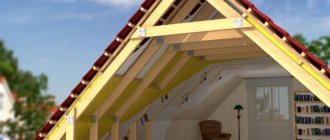
For mansard roofs
An option with the installation of a crossbar - used when organizing a living space under the roof - an attic. In this case, it serves as the basis for lining the ceiling of the room below. For reliable operation of a system of this type, the crossbar cut must be hingeless (rigid). The best option is in a semi-frying pan (see picture below). Otherwise, the roof will become unstable to loads.
Rafter system of a gable roof with a raised tightening and a crossbar insertion unit
Please note that in this scheme there is a Mauerlat, and the rafter legs must extend beyond the walls to increase the stability of the structure. To secure them and dock them with the Mauerlat, a notch is made in the form of a triangle. In this case, with an uneven load on the slopes, the roof will be more stable.
With this scheme, almost the entire load falls on the rafters, so they need to be taken with a larger cross-section. Sometimes the raised puff is reinforced with a pendant. This is necessary to prevent it from sagging if it serves as a support for ceiling cladding materials. If the tie is short, it can be secured in the center on both sides with boards nailed to the nails. With a significant load and length, there may be several such belays. In this case, too, boards and nails are enough.
For large houses
If there is a significant distance between the two outer walls, a headstock and struts are installed. This design has high rigidity, since the loads are compensated.
Gable roof rafter system for a large span and ridge and rafter insertion units
With such a long span (up to 14 meters), it is difficult and expensive to make the tie in one piece, so it is made from two beams. It is connected by a straight or oblique cut (picture below).
Straight and oblique cut for connecting the tie
For reliable joining, the connection point is reinforced with a steel plate mounted on bolts. Its dimensions must be larger than the dimensions of the notch - the outermost bolts are screwed into solid wood at a distance of at least 5 cm from the edge of the notch.
In order for the circuit to work properly, it is necessary to make the struts correctly. They transfer and distribute part of the load from the rafter legs to the tie and provide structural rigidity. Metal pads are used to strengthen connections
Fastening struts for a rafter system with hanging rafters
When assembling a gable roof with hanging rafters, the cross-section of lumber is always larger than in systems with layered rafters: there are fewer load transfer points, therefore each element bears a greater load.
Description of the architectural element
A ridge girder is a horizontal beam that is installed at the top of a pitched roof. The element serves as both a supporting and connecting element for the rafter legs, similar to the spine for the skeleton. It is not technically necessary to install a cross beam, but its presence greatly simplifies the installation of the frame for roofing in compliance with the vertical and horizontal levels. In addition, the timber helps to increase the resistance of the entire structure to mechanical loads from natural phenomena.
Types of purlins
There are two options for purlins depending on the ridge beam used. Technically, in most cases, solid elements are the key to reliability and maximum structural strength. The same can be said for the support part for the rafter legs. However, in the case of long spans between the gables of the house, the massif under its own weight, due to the increased bending load, will be deformed and unevenly exert excessive pressure on the frame of the slopes. That is, the high probability of roof destruction with this approach can be considered unjustified.
Reinforced purlin made of solid timber
If for compact buildings the optimal solution is a solid ridge beam, then for large structures it would be more rational to prefer a composite girder. In this case, to eliminate deformation processes of the assembled support, it is necessary to install vertical posts under the nodal connections. At the same time, this measure is a drawback if you plan to equip an attic space on the roof for recreation, work or living.
With layered rafters
In gable roofs with layered rafters, the ends rest on the walls, and the middle part rests on load-bearing walls or columns. Some schemes push through the walls, some don't. In any case, the presence of a Mauerlat is mandatory.
The simplest version of layered rafters
Non-thrust schemes and notch units
Houses made of logs or timber do not respond well to thrust loads. For them they are critical: the wall may fall apart. For wooden houses, the rafter system of a gable roof must be non-thrust. Let's talk about the types of such systems in more detail.
The simplest non-thrust rafter system diagram is shown in the photo below. In it, the rafter leg rests on the mauerlat. In this version, it bends without pushing the wall.
A simple non-braced gable roof system with layered rafters
Pay attention to the options for attaching the rafter legs to the Mauerlat. In the first, the support area is usually beveled, its length being no more than the section of the beam. The depth of the cut is no more than 0.25 of its height.
The top of the rafter legs is laid on the ridge beam, without fastening it to the opposite rafter. The structure results in two pitched roofs, which in the upper part are adjacent (but not connected) to one another.
It is not recommended to do such a scheme without experience: at the slightest inaccuracy in execution, expansion forces appear and the structure becomes unstable.
The option with rafter legs fastened at the ridge part is much easier to assemble. They almost never push against the walls.
Option for attaching rafters without bracing to walls
To operate this scheme, the rafter legs at the bottom are attached using a movable connection. To secure the rafter leg to the mauerlat, one nail is driven from above or a flexible steel plate is placed from below. See the photo for options for attaching rafter legs to the ridge girder.
If you plan to use heavy roofing material, it is necessary to increase the load-bearing capacity. This is achieved by increasing the cross-section of the rafter system elements and strengthening the ridge assembly. It is shown in the photo below.
Reinforcing the ridge assembly for heavy roofing material or for significant snow loads
All of the above gable roof schemes are stable in the presence of uniform loads. But in practice this practically never happens. There are two ways to prevent the roof from sliding towards a higher load: by installing a screed at a height of about 2 meters or by struts.
Options for rafter systems with contractions
Installing contractions increases the reliability of the structure. In order for it to work properly, it needs to be secured to them with nails at the places where it intersects with the drains. The cross-section of the timber for the scrum is the same as for the rafters.
Schemes of rafter systems for gable roofs with contractions
They are attached to the rafter legs with bots or nails. Can be installed on one or both sides. See the figure below for attaching the screed to the rafters and ridge girder.
Attaching the screed to the rafters and ridge beams
In order for the system to be rigid and not “creep” even under emergency loads, it is enough in this option to ensure rigid fastening of the ridge beam. In the absence of the possibility of its horizontal displacement, the roof will withstand even significant loads.
Installing a frame under the roof
The correct connection of the rafters at the ridge is an important point that helps ensure a long service life of the roof. The main thing is to find the optimal solution regarding the choice of fasteners and methods of fixing elements. Let's take a closer look at each point.
An example of splicing rafters using metal plates
Fastener selection
Initially, wooden wedges, pins, linings, dowels, bars of various sections, metal staples and nails were used to assemble the rafter system. Today, on trading floors, fasteners are presented in an improved assortment. For example, with the help of nail and perforated plates, threaded hardware and anchor systems, the connection of rafters is carried out at a higher level of reliability and strength. The main thing is to choose the right products according to the permissible loads.
The listed options refer to devices for ensuring rigid fixation of rafters to each other. If the structure is assembled on top of a new house, then it is characterized by shrinkage during the first 5 years. The difference can reach 200 mm. This can lead to deformation or destruction of individual elements or the frame as a whole. To avoid this, another solution is being considered for how to connect the rafters - a hinged or sliding fastening. It can be represented by a plate in the form of a flat eye and a perforated corner. The end of the second is inserted into the eye and bent to minimize the active “movement” of the rafters away from the supporting element. It can be like a mauerlat, a ridge girder.
standards for ventilation in a private house Sample of fasteners to ensure a sliding connection of rafters with a Mauerlat or ridge
Methods for connecting rafters
The nodal areas at the top of the roof are the basis for the formation of the ridge. This is a loaded part of the frame system, so it is important to ensure a reliable and rigid connection of the rafters to each other. Let us consider in detail the methods tested in practice:
Here, the rafter legs in the end parts are trimmed so that direct contact as tight as possible is formed in the cut areas. A pair of workpieces is fixed using two nails. Each of them is hammered at an angle in the direction from top to bottom from the first to the second board. As a result, the hardware may intersect inside the knot, so one of the nails is driven in with a slight offset in relation to the other.
To strengthen the assembly formed by direct joining of rafters, metal plates with perforations are used. The linings are attached on both sides using nails or wood screws. This ensures the tension of the elements and eliminates the possibility of them cracking under the influence of lateral loads.
An example of unreliable formation of a straight joint of rafter legs
A technically correctly assembled rafter system consists of vertically assembled legs. To ensure this, when placing two elements on top of each other, the end parts at the junction are cut along the workpiece to half the thickness. Here the types of fastenings for the rafter legs at the ridge are through.
The boards/bars are tightened together using a threaded rod or a bolt and nuts with wide washers. The latter are often used from plastic material so that the products do not cut into the body of wooden rafters.
Here, tie-down of the rafter pair is not required. The blanks at the ends are trimmed so as to ensure a tight fit of the cut to the side of the beam. The rafters are fixed to the horizontal beam with nails that are located at an angle. Additionally, corner perforated plates are installed, often with self-tapping screws.
Many craftsmen choose corners with fins - these are reinforced samples that are designed to withstand increased load. Another solution is to fix sealing inserts made from wooden blanks between the boards and to the beam. As a result of this approach, the top of the rafter system is not pointed, but trapezoidal in cross section.
An example of installing rafters on a ridge girder
Another method, technically a little more complicated in terms of execution, is connecting the rafters into a groove. Here the direct joining method is combined with the formation of a protrusion on one end of the leg and a geometrically similar shaped hole on the other. The elements are fastened using a wooden dowel; galvanized nails are additionally used.
Recommendations for working with various structures
The roof structure can have a different cross-sectional shape. The most common of the two straight slopes. Interesting solutions are also a hip, round or arched roof. Let's look at how the rafters are attached to the ridge in each of the options.
An example of an arched roof structure
Gable roof
The rafters can be attached to the ridge beam in pairs or apart. If direct joining of the upper ends is performed, then it is recommended to construct two runs: base and transverse. In regions with strong gusts of wind, the rafter system must be strengthened in two ways: in the area of the ridge girder, the legs are fixed with metal corners; in the lower part, an additional connection of vertical elements with the mauerlat or walls is formed using strong wire or construction staples. Regardless of the choice of method for attaching the rafters to the ridge beam, cutting grooves on them is allowed only in the end part to make a groove connection.
Hip roof
Here, rafter blanks are cut into inclined beams with fixation using crossbars and ties. If there is one purlin, support consoles are installed, which extend beyond the rafter frame (by 100-150 mm). In the case of two ridge beams, so-called ridges are placed under the feet - short boards 50 mm thick.
Arched and round roof
The arched structure is assembled by analogy with the gable one, only the angle with a large turn is maintained. A round or spherical shape is created by installing rafter legs, the upper ends of which will converge to one design point. They are interconnected with an overlap, in addition they are tightened with metal clamps.
Layered rafter systems with struts
In these options, for greater rigidity, rafter legs, also called struts, are added. They are installed at an angle of 45° relative to the horizon. Their installation allows you to increase the span length (up to 14 meters) or reduce the cross-section of beams (rafters).
The brace is simply placed at the required angle to the beams and nailed on the sides and bottom. An important requirement: the strut must be cut accurately and fit tightly to the posts and rafter leg, eliminating the possibility of it bending.
Systems with rafter legs. The top is a spacer system, the bottom is a non-spacer system. The correct cutting nodes for each are located nearby. Below are possible strut mounting schemes
But not in all houses the average load-bearing wall is located in the middle. In this case, it is possible to install struts with an angle of inclination relative to the horizon of 45-53°.
Rafter system with off-center vertical girder
Systems with struts are necessary if significant uneven shrinkage of the foundation or walls is possible. Walls can settle differently on wooden houses, and foundations can settle on layered or heaving soils. In all these cases, consider installing rafter systems of this type.
What are the types of runs?
Purlins can be integral or composite.
Solid purlins are made from one piece of wood and are laid with their ends on opposite gables of the walls.
However, over long lengths, due to the fact that they are subject to severe bending loads, they become too bulky. They are so bulky that their production is expensive, and installation is possible only with the help of lifting mechanisms. Meanwhile, this is not necessary if lightweight roofing materials (for example, ondulin) are installed.
In addition, they will almost immediately bend under their own weight.
For large lengths of the ridge girder, it is rational to make it composite. To ensure that loads do not deform or destroy it, it is necessary to install a vertical stand on which the girder will rest and transfer part of the existing loads.