In private homes, the “Malysh” electric pump is often used for household needs. However, over time, like any other device, it can break down. Let's figure out what to do if the Baby pump works, but does not pump water: the reasons for such phenomena, ways to solve problems, the design of an electrical appliance and the nuances of repair.
Pump model "Malysh-M" Source prom.st
Why assemble the pumping station yourself.
First of all, it seems to me that you should assemble the pumping station yourself if you already have some of its components, usually the most expensive ones. This is a pump and a hydraulic accumulator. Because the cost of the pump is approximately half the cost of the pumping station, respectively, the hydraulic accumulator is approximately a third. That is, it makes no sense to buy a new pumping station if your accumulator is crushed in winter or the pump burns out for some reason. You can buy both separately and simply replace what is broken; fortunately, the pump fasteners and the hydraulic accumulator mounting platform are, as a rule, standard and you can connect one to the other without much difficulty.
Another reason to assemble a pumping station yourself may be a discrepancy between your requirements and the characteristics of the equipment of the finished pumping station. For example, you need a pump with higher pressure or water flow than the pumping stations offered to you, and what suits you in terms of characteristics does not suit you in terms of cost or reliability. Either the dimensions of the pumping station are too large for the place where you are going to put it, or you are not satisfied with the capacity of the hydraulic accumulator, and so on. You just need to keep in mind that the final cost of the pumping station may well be much more than what you planned.
The third, most common option is when you are forced to assemble a distributed pumping station because the water is very deep or the water source is quite far from the house. As a rule, in this case, a powerful submersible pump is used, and a hydraulic accumulator with an automation unit is installed somewhere at home.
DIY plumbing. Water supply for the dacha. Pump "Baby".
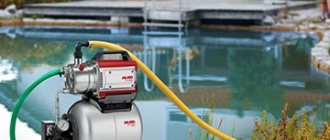
In order to get rid of the disadvantages of a self-priming system, you need to use a submersible pump. Since the pump is located deep in the water, it will never freeze and runs quietly.
I decided to use a reliable and inexpensive Russian vibration pump “Malysh” as a submersible pump. I have liked it for a long time, simple and reliable, the first pump served me for about 15 years, although it was made in the USSR and with a quality mark. And modern Chinese analogues are quite reliable (2 seasons work for me). It is better to choose a pump with an upper water intake - then there is less chance of sucking sand from the bottom of the well. The pump capacity is about 500 l/hour at a pressure of about 30 m (see https://ooo-comfort.ru/elektronasosy_malysh). The cheapest pumps can be bought at the Leroy Merlin store. In 2010, I bought a Chinese equivalent there for 700 rubles. At our dacha, one Malysh pump provides a shower, 2 washbasins, a kitchen faucet and a toilet. Of course, if you don’t turn on all the taps at the same time, but this doesn’t happen in life. The shower and one faucet work fine from the pump. If this is not enough, then you can connect 2 Babies in parallel.
Is a hydraulic accumulator really necessary?
A reasonable question: is it possible to do without a hydraulic accumulator?
In principle, this is possible, but with a conventional automation unit the pump will turn on and off very often, reacting even to insignificant water flow. After all, the amount of water in the pressure pipeline is small, and the slightest flow of water will lead to a rapid drop in pressure and an equally rapid increase when the pump is turned on. It is precisely so that the pump does not turn on every time you “sneeze” that they install a hydraulic accumulator, at least a small one. Since water is an incompressible substance, air is pumped into the accumulator, which, unlike water, is highly compressible and acts as a kind of damper that regulates the accumulation and flow of water. If there is no air in the accumulator or too little air, then there will be nothing to compress, that is, there will be no accumulation of water. Ideally, the capacity of hydraulic accumulators should be only slightly less than the debit of your water source, and the pump, in this case, will turn on only when some fairly decent supply of water has been used up, i.e. very rarely, but for a long time. But then it will be a very expensive savings scheme.
Now pumping stations with improved automation units with built-in dry-running protection have appeared on sale, which smoothly start and stop the pump and regulate its power depending on the set pressure. It is believed that, in principle, they do not need a hydraulic accumulator. But all this works well only in the absence of voltage surges, which our outback and holiday villages cannot boast of. And, unfortunately, stabilizers do not always save you from this disaster. In addition, the price of such a station is very often much higher than usual, which, it seems to me, does not justify itself.
Main types of malfunctions and their causes
All faults can be reduced to two types:
- electrical part;
- mechanical part.
In turn, each of them can be divided into two subgroups. This is a complete inoperability and partial disruption of work.
Partial loss of pump functionality does not necessarily mean a violation of regulation. Sometimes the reason lies in the failure of its individual parts. But let's start in order.
Type #1 - electrical faults
The most common malfunction is coil failure. Complete burnout or breakdown of insulation on the housing. Detachment from the compound body occurs less frequently. There is only one reason for the malfunctions - dry operation, without water, which causes the coil to overheat.
Then the insulation burns, the compound burns out and, due to the difference in thermal expansion of different materials, the filling delaminates and the yoke falls out of the body.
Sometimes the pump stops pumping altogether, but the housing may break. This is the most unpleasant breakdown, which can only be avoided by following the operating rules.
When troubleshooting, you will have to disassemble it. Thanks to its simple design, you can independently disassemble it into its component elements
Type #2 - mechanical failure
There is a complete variety of causes and consequences:
- Liming of parts. Occurs from pumping hard water. This is a white limescale deposit similar to limescale in a kettle. This is not particularly noticeable during operation, but after long-term storage, for example in winter, the lime may jam the piston. The malfunction is rare; as a rule, it only makes disassembly more difficult and slightly reduces the pump’s performance.
- Violation of the integrity of the body. The impression is that it was precisely cut with a file or router. Usually the top edge of the body. The reason is simple - contact with the concrete surface of the well during operation.
- Pump working cavity clogged . For example, sand. Sand and pebbles, branches, algae - all this disrupts the tightness of the valve to the bed. Not critical, but unpleasant - the pump does not develop the required power.
- Loosening of threaded connections. Occurs from vibration, occurs infrequently. For example, the nuts securing the piston are loosened. The consequences can be the most dire - up to the destruction of the hull.
- Violation of rubber properties . Leads to a decrease in pump power. In rare cases, complete cessation of performance occurs.
The most capricious part and sensitive to the weakening of rubber properties is, oddly enough, a massive shock absorber. Too elastic rubber contributes to the core breaking, too hard - a decrease in vibration amplitude and loss of power.
In addition, when the core is rotated in the shock absorber, the projection of the base of the rod (a part called an anchor is pressed onto the rod) does not completely coincide with the yoke and is less attracted to it. A hard piston moves water worse. A broken piston does not pump at all.
When the valve loses elasticity, it works worse, but the pump does not fail completely. We also observe when the valve adjustment is violated.
Sometimes there is simply a loss of power. Often the reason is to turn on the pump again without immersing it in water. Most often this happens due to neglect of operating rules.
For example, hanging a pump on a steel cable and without a shock absorber - the pump mount must be shock absorbent! Therefore, the kit includes a fishing line or nylon cord and a shock-absorbing ring for fastening.
Knowing the design of the Malysh series pumps, you can handle the repair of the units yourself without any problems.
Ready-made automation systems.
Of all the ready-made automation systems for pumping stations, our domestic development Vistan, designed exclusively for organizing a pumping station based on a vibration pump, especially stands out. I am not a supporter of the use of vibration pumps in water supply systems of private and country houses, but I cannot help but pay attention to this device due to the great popularity of “Kids”, “Rucheykov”, etc. in the post-Soviet space.
Wistan and its connection diagram.
There are a lot of flattering reviews about this device on the Internet. In life, unfortunately, not everything is so rosy. So, in short.
Advantages:
— Special development for vibration pumps;
— Automatically maintains the pressure in the system at 1.5-2.0 bar;
— Has built-in protection against dry running;
— Has a built-in voltage stabilizer, can work with voltage from 160 to 250 Volts;
— Can work without a hydraulic accumulator, smoothly changes the pump power;
— Smooth start and stop of the pump;
— Has overcurrent protection: 5 Ampere fuse;
— Automatically resumes operation when the parameters are restored: network voltage, the appearance of water pressure at the pump pressure (dry running).
— Easy to install and dismantle the circuit: the manufacturer recommends using a ½-inch flexible liner.
— The pump must create a pressure at the inlet to the device of at least 3.0 bar: not every vibration pump is capable of this, given the difference in height between the water surface in the well (well) and the location of the Wistan.
— Water flow is limited by the internal cross-section of the flexible line, or you need to install a hydraulic accumulator.
— Dry running protection is solved in a unique way: the device turns off the pump if the inlet pressure does not rise above 0.8 bar in 10 seconds. Those. There is actually water, and the pump pumps it properly, it just doesn’t have enough strength to raise the pressure to the required level.
— There is no way to regulate the pressure in the system.
— High price of the device compared to the cost of vibration pumps. The cost of the “Wistan + pump” set is comparable to the cost of a ready-made pumping station, which is not of the poorest quality (and the Chinese ones are one and a half times cheaper).
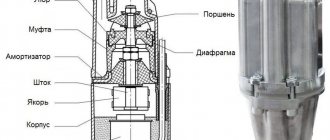
Unit design
The operation of vibration pumps is based on the inertial principle. The units of the unit impart oscillatory movements to the liquid, which are transmitted over a considerable distance. The main elements of the pump are:
- frame;
- vibrator;
- stock;
- spring;
- piston;
- valve.
The vibrator imparts oscillatory movements to the liquid using electromagnetic elements. These include a coil of copper wire and a U-shaped core.
These parts are located in a housing and filled with thermoplastic polymer resin (compound) to protect them from aggressive environments. In addition, the compound isolates electrical parts from interaction with the metal of the housing.
The vibrator includes an anchor with a rod attached to it. This unit is driven by electromagnetic force, and it returns to its original position due to a spring. At the top of the case there is a rubber valve, which most often fails.
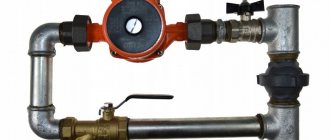
Schemes of pumping stations.
The most common scheme of a pumping station is when all its elements are assembled together, as one reader wrote: “pump on a barrel.”
In this case, the automation unit is placed at the pump head, and water is directed to the hydraulic accumulator through a separate pipe or flexible connection. It turns out that you can install a pump and a hydraulic accumulator (HA) in different places by simply replacing the outlet to the HA with a longer one. But the best option would be to install the automation unit on the GA by connecting the unit’s manifold to the pump with a pipe. Then we get a distributed pumping station, where the pump can be located, for example, in a well (or in a well for a submersible pump), and the HA is located in a warm house. Continuing to improve our scheme, we can find the most convenient place for the automation unit. I imagine such a place is the cold water distribution manifold, where the automation unit will maintain constant pressure (after all, this is exactly what we need). The hydraulic accumulator, in this case, can be placed under the bathtub or in any other free place in the bathroom, and a pressure pipeline will be connected to the pump. The pump itself can be placed closer to the source of water supply and away from the house, so as not to hear its noise, or you can buy a submersible pump (again, no noise in the house). Thus, by placing the elements of the pumping station in places where it is convenient and not conspicuous, you will get maximum comfort when operating the water supply at home: “like in an apartment.” The main thing is not to forget what and where you stuffed it.
You may be interested in similar materials::
- Where to install the pumping station. The question seems simple only at first glance. In order to find a location for a pumping station, I mean a pumping station.
- Repair and operation of pumping stations. A pumping station is no longer just a pump with an electric motor, it is a set of equipment designed to supply water from a well, well, etc.
- Choosing a pump for a pumping station. Hello, dear readers of San Samych. It seems to me that there is no need to repeat the truism that the pump is the “heart” of the water supply system.
Source of the article: https://sansamuch.ru/sobiraem-nasosnuyu-stanciyu-sami/
DIY plumbing. Water supply for the dacha. Pump "Baby".
For an automatic pumping station you will need (minimum equipment):
– Baby pump 750 rub.
– 3/4″ inch reinforced hose, for pressure up to 6-8 atm (for connecting the pump in the well with the hydraulic accumulator in the house and further to the point of water collection)
– coarse filter 50 rub.
– hydraulic accumulator, capacity min. 20 l – about 1000 rubles.
– 3/4 inch check valve (placed in front of the hydraulic accumulator) 100 RUR.
– pressure gauge at 6 atm. 160 rub.
– pressure switch model RDM 5 price approx. 500 rub.
– a fitting with 5 nipples (five-piece) for connecting the entire equipment to each other.
– clamps for securing hoses, sealing gaskets, flax for sealing threads.
All these are standard products, you can buy them in one Leroy Merlin store in Moscow or on the market, but more expensive. Prices are indicative for 2010.
The water supply system is installed as follows. A hydraulic tank with an automation system is installed in a barn or in a house and is connected to a pump in the well with a hose and electrical wiring. Water is supplied to consumers from the hydraulic tank through a pipe. And now more details. We assemble the automation unit: we connect two electrical wires with plugs to the pressure switch, screw a filter, a pressure gauge, a pressure switch onto the five-piece, and screw the entire structure into the hydraulic accumulator. We connect a check valve to the filter with the flow direction towards the hydraulic tank. the “Baby” pump with a flexible hose to a check valve. From the five-piece on the hydraulic accumulator we lead a pipe or hose to the consumer. Everything is done with hydraulics, now electrics. We install two sockets for the pump control system - one in the well and connect the pump plug to it, the second in the barn or in the house where the hydraulic accumulator with automatic equipment is located and connect the pressure relay output voltage plug to it. We install another socket next to the hydraulic accumulator, connect 220 V to it, lower the pump into the well and plug in the second plug of the pressure switch into the network. ALL. The water supply for the dacha is ready! The pump works and supplies water to the tank with an automatic system. As soon as the pressure in the tank reaches the set value, the relay will operate and turn off the pump. The maximum and minimum pressure in the system is regulated by a pressure switch.
This type of to my dacha I leave the pump in the well for the winter. I drain the water from the pipes of the water supply system and the hydraulic accumulator at the very end of the season, much later than in the first option with a self-priming pump. The hydraulic accumulator has a rubber container inside and is not afraid of freezing. And one more piece of advice - to easily drain water from the system, I recommend placing a tee and a ball valve between the check valve and the filter.
How did YOU solve the issue of water supply for your dacha or country house? Write your opinion in the comments or ask a question and we will definitely answer.
We recommend reading: https://dachasadko.ru/vodosnabgenie_na_dache/
In conclusion, I would like to draw your attention to the fact that our site is actively developing and there will be many interesting articles ahead. Therefore, subscribe to our website and you will immediately receive a new article in your email and will not miss anything.
Support us - share the link on social networks!
Features and purpose of the pressure switch
The water pressure switch for the pump is designed to ensure the normal operation of the entire water supply system. As a rule, almost no automatic control devices are installed at pumping stations. A certain level of control is provided by the relay itself.
The pump control relay is a small unit in a plastic box with springs inside. Springs are necessary to adjust the two extreme positions of the system. One position is responsible for turning the system on, and the other for turning it off.
The relay itself works in conjunction with a hydraulic accumulator. It consists of a metal tank filled with water. Inside the tank there is a bulb made of rubber or a special membrane. Air is pumped into this bulb. The air expands the membrane walls and creates the required pressure in the tank.
As the amount of water in the accumulator decreases, the bulb receives less resistance and the pressure drops. At certain pressure levels, the well pump activation relay will do its job. The pump will turn on and begin pumping water until the pressure in the container is equalized to the highest level.
Thus, a relay for a water pump is perhaps the most necessary device that completely controls its operation and ensures the autonomy of all processes. All you need to do is connect and configure the relay. These devices are connected to water supply and electricity.
There is also special automation for pumps; the pressure switch in this case is an electronic device with a regulator or screen. The electronics feature more flexible and simpler setup. Yes, and it has many more functions.
It is worth noting that pressure switches or its analogues are used not only at domestic pumping stations. It is also used to regulate the operation of heating systems and even the fuel supply in a car.
The relay for the heating pump does not operate on pressure, but by measuring the temperatures of the incoming and outgoing liquid. Which, however, is completely natural. After all, in heating it is not so much the pressure that is important, but the efficiency of heating radiators or heating circuits.
Electrical repair
You can do minor repairs to electrical components yourself. First, you need to carefully disassemble the vibration pump, and if the compound has peeled off, you can fill the resulting voids with epoxy glue.
To repair the reel,
it must be rewinded .
It is necessary to remove the failed copper wire and install a new one. At the same time, when unwinding the old wire, it is necessary to count the number of turns or layers of wire. A heat-resistant, enamel-coated winding wire with a thickness of 0.65 mm is usually used. After replacing the winding, wires with a cross section of 0.75 mm in double insulation are soldered to both of its terminals. Then the finished coil is installed in the housing and filled with epoxy resin.
It is worth noting that such actions are not always successful unless you have the skills of an electrician. It is best not to repair the water pump with these faults yourself, but to take it to specialized workshops or buy a new unit.
Functions: operating principle of a pressure switch
Pumping stations are usually not equipped with automation to monitor and control work. At the same time, turning on and off the pumping equipment in autonomous mode is extremely necessary, because performing these operations manually will require constant attention to the system and will not allow the inhabitants of the house to go about their business, work and rest.
A sufficient level of control is provided by the pressure switch. It is a block with a plastic casing. Inside the housing there are two springs, each of which is “responsible” for setting the value of the extreme position (parameters for turning the pump on and off).
Diagram of a water pressure switch for a pump
The relay is functionally connected to a hydraulic accumulator, which contains water and compressed air; the media come into contact through a flexible elastic membrane. In the working position, the water in the tank presses on the air through the dividing partition, creating a certain pressure. As water is consumed, its volume decreases and the pressure decreases. When a certain value (set on the relay) is reached, the pump turns on and water is pumped into the tank until the value set on the second spring is reached.
The connection diagram for a water pressure switch for a pump provides for connecting the equipment to a water supply system, a pump and an electrical power supply network.
Varieties
The manufacturer offers several versions of the “Malysh” pump of different modifications.
- "Baby". This pump is equipped with a bottom liquid intake function. One of the most powerful modifications, suitable for working in thick water. But at the bottom it doesn’t show itself in the best way. Often collects silt and dirt, clogging the interior space.
- "Baby-M" The model is equipped with top fence functions. The power is not as high as the previous version. But on the other hand, it has the function of sifting out dirt and silt from the bottom. Owners of this model often experience overheating, since as a result of a drop in water level, the pump is exposed to air and overheats.
- "Baby-K." Equipped with a bottom fence function. Grounded. It is equipped with a powerful motor, which affects the cost. Not equipped with a dirt filter.
- "Baby 3". The model is suitable for narrow wells and boreholes. Has compact dimensions. Power is low.
Types of pumps Baby Source santprice.ru
Choosing an installation location
For correct operation of the equipment, the pressure switch must be connected to the pump in such a way as to avoid the influence of turbulence and sudden pressure changes when the pumping equipment is turned on and during its operation. The best place for this is in the immediate vicinity of the hydraulic accumulator.
Before installing the pressure switch, pay attention to the operating mode recommended by the manufacturer, in particular, the permissible temperature and humidity values. Some models can only work in heated rooms.
In the classic scheme for connecting a pressure switch to a deep-water pump for an autonomous water supply, the following equipment is installed in front of the relay:
- pumping unit,
- check valve,
- pipeline,
- flow shut-off valve,
- drainage to the sewer,
- filter for preliminary (coarse) cleaning.
When using many modern models of surface-type pumping units, installing a water pressure switch for a pump can be much simpler: block installation is carried out when the relay is installed together with the pump. The pumping unit has a special fitting, so the user does not need to independently search for the most suitable installation location. The check valve and filters for water purification in such models are often built-in.
Connecting the pressure switch to a submersible pump can also be done by placing the hydraulic accumulator in the caisson and even in the well itself, since waterproof design of the control equipment is often required and the operating conditions of the pressure switch may allow its location in such places.
The connection diagram for a pressure switch and a pumping station with a surface pump differs slightly from the diagram with a submersible unit in the sequence of arrangement of some elements
Obviously, the choice of installation method and location depends on the design of the equipment; usually all recommendations in this regard are indicated by the manufacturer in the accompanying documentation.
Malysh pump maintenance
In order for the pump to serve for a long time and properly, it is necessary to comply with the operating and storage conditions recommended by the manufacturer. In this case, the manufacturer guarantees its normal operation for two years. The pump does not require complex maintenance and care, and simple rules are not difficult to follow.
After the first installation of the device in the well, you need to let it work for one or two hours, and then remove it and carefully inspect the body and components to detect any malfunctions. If everything is fine, then the vibration pump can be put back in place and used further, leaving it immersed in water for a long time.
Periodically, at least once every three months, and if possible, then every hundred hours of operation, the unit must also be inspected. If traces of friction are found on the housing, it means that it was installed incorrectly and during operation came into contact with the walls of the water intake excavation.
To avoid this, you need to set it level and put an additional rubber ring on the body.
If the inlet holes become clogged, they must be carefully cleaned without damaging the rubber valve. For cleaning, it is best to use a tool with a blunt end.
If the pump is not used in winter, it must be removed from the well, washed and dried thoroughly. During storage, the unit should be placed away from heating devices and also protected from direct sunlight.
Connecting a pressure switch
There are two commonly used schemes for connecting the pump automation and pressure switch. The method recommended by the manufacturer is always indicated in the accompanying documentation, but it will be useful to familiarize yourself with the possible schemes.
Important: When working, you must follow the sequence: first, the relay is connected to the water supply, and then to the electrical network.
On the pipeline
The relay is mounted on the pipeline (the choice of location is made taking into account the above rules and recommendations). Installation is carried out using a tee connected to a transition fitting (it can be replaced by a drain hose).
Through the fitting
The hydraulic accumulator is equipped with a fitting having five outputs, to which they connect:
- pipeline from the source of water intake,
- relay,
- pressure gauge,
- pipeline supplying water to the house,
- the hydraulic accumulator itself.
The relay, in turn, is connected to a submersible or external pump and a 220 V power supply.
Connection diagram of the water pressure switch to the submersible pump
The following recommendations apply to both options:
- The need to seal threaded connections using hemp and sealant or using FUM tape,
- In order to make the connection, you will need to rotate the device on the fitting, but an alternative would be to use an “American” connection.
- The electrical connection must be made using a cable, the cross-section of which is selected in accordance with the power of the pumping unit (usually equipment no more than 2 kW is used, for which a conductor with a cross-section of 2.5 sq. mm is sufficient).
- Connection terminals are usually marked for easier installation, however, if such markings are missing, this will not be a big problem - the purpose of each terminal is not difficult to determine from the diagram.
- The presence of a grounding terminal makes grounding of the equipment mandatory.
All the nuances are determined by the connection diagram for a submersible pump with a pressure switch or a similar connection for an external pumping unit supplied with the equipment.
Common breakdowns
Most often, problems are caused by worn out seals.
There are a number of reasons that accelerate this process:
- Uneven shaft movement, especially with frequent runout.
- The unit cover bolts are too tight. Oil seals cope best with the sealing task when they have sufficient moisture, which can be judged by the seepage of liquid drops through the packing.
- Engine overheating.
- The repair technology was violated, for example, not all o-rings were replaced.
In addition to problems with seals, pump breakdowns occur due to insufficient accurate centering of the housing and power unit. In this case, both the seals and bearings are destroyed, leading to failure of the unit, and such problems can only be solved by a major overhaul.
Lack of proper care of bearings (their regular lubrication) can also pose a threat.
Equipment selection rules
- For autonomous water supply systems, you should choose a relay for household use. Such systems are characterized by basic parameters: the maximum pressure value is no more than 5 atmospheres, operating pressure values are usually in the range from 1.4 to 2.8 atm.
- When setting up the relay, it is important to remember that the magnitude of the difference between the limit values (settings on the springs) directly affects the volume of water that the pump, with such settings, will pump into the accumulator reservoir. A large volume means that the pumping unit will turn on less often, but the technical capabilities of the system must not be exceeded in this regard.
- You should not save excessively by purchasing a relay of unknown origin. Such equipment will not only fail to ensure correct operation, but will also most likely cause damage to other equipment included in the system.
- Connecting the automatic pump and pressure switch together with a high-quality pressure gauge installed next to the relay will allow you to monitor the operating parameters of the system and help detect violations at an early stage, when there are still no external manifestations.
If the pump is running but the water is not pumping
There are three steps to solve this problem.
Step 1. Slightly loosen the lock nut that is located where the water enters. This action should slightly reduce the efficiency of the device.
Step 2. The rubber cuff may be damaged. This can only be checked after disassembling the pump. They look quite small (4 cm in diameter), and they don’t cost much.
Step 3. The pumping rod is damaged. Repairing a device with a faulty pumping rod is a very complex procedure. You will need the old pump as a parts donor. In addition, getting to this part is very difficult, and you cannot do it without special equipment.
Setting up the pressure switch
To configure the pressure switch, it is necessary to set the operating pressure in the system. To do this, after assembling the circuit, the equipment should be turned on and wait for automatic shutdown when the relay is activated. After this, the roof is removed and the settings are performed in the following sequence:
- Loosen the nut that presses the smaller spring.
- Set the required minimum pressure value (pump activation parameter). Rotating the large spring nut clockwise increases the set pressure value, and in the opposite direction decreases it.
- Having opened the tap, they empty the system, monitoring the automatic response threshold using a pressure gauge. If the result is unsatisfactory, adjust the setting.
- The pump shutdown parameter can be adjusted in the same way by rotating the nut on the second (smaller) spring.
Rewind the reel
If you need to rewind the vibration pump coil, prepare the following consumables and tools:
While rewinding the coil, you will need to melt the epoxy compound. It is toxic, so carry out the work outside or in the garage. Place the filled electromagnet on the tile and wait until the epoxy heats up to 165 degrees. This will be visible from the toxic haze that appears.
Carefully knock the electromagnet out of the housing on a wooden object, while the electromagnet looks straight down. When the magnet changes its position, remove it. We clean the heated body from epoxy resin, using a screwdriver or a metal brush.
We knock the electromagnet out of the coil with a wooden wedge.
We do not clamp the coils in a vice, we only hold them with our hands.
Once the magnet is removed, unwind the coil, removing all the epoxy.
Using a winding machine, wrap the spool completely. Here you can do without a machine, but it will take longer to wrap it by hand.
Solder the ends of the wire to the main part, now we mount the electromagnetic core into the coil body. We solder the power cable to the beginning of the new winding. It is permissible to “seat” the coils by lightly tapping the core.
After mixing the epoxy with the plasticizer and adding the hardener, we pour it into the vertically fixed body of the device. Fill the compound to the top of the electromagnet, wait 10 minutes and add the compound again (after filling all the cracks, it will settle). After 24 hours, we assemble the pump and check its functionality.
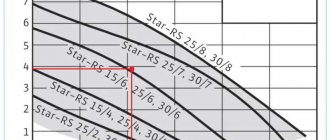
Review of popular models
There are two types of pressure switches: mechanical and electronic, the latter are much more expensive and are rarely used. The market offers a wide range of devices from domestic and foreign manufacturers, making it easier to select the required model.
RDM-5 Gilex (15 USD) is the most popular high-quality model from a domestic manufacturer.
RDM-5
- range: 1.0 - 4.6 atm.;
- minimum difference: 1 atm.;
- operating current: maximum 10 A;
- protection class: IP 44;
- factory settings: 1.4 atm. and 2.8 atm.
Genebre 3781 1/4″ (10 cu) is a budget model made in Spain.
Genebre 3781 1/4″
- body material: plastic;
- pressure: upper 10 atm;
- connection: threaded 1.4 inches;
- weight: 0.4 kg.
Italtecnica PM/5-3W (13 cu) is an inexpensive device from an Italian manufacturer with a built-in pressure gauge.
Italtecnica PM/5-3W
- maximum current: 12A;
- working pressure: maximum 5 atm;
- lower: adjustment range 1 - 2.5 atm.;
- upper: range 1.8 - 4.5 atm.
The pressure switch is the most important element in the water intake system, providing automatic individual water supply to the house. It is located next to the hydraulic accumulator, the operating mode is set using adjusting screws inside the housing.
Briefly about the main thing
There are several versions of the Baby pump on the market. All its modifications, like any other devices, are subject to breakdowns. They are observed in the electrical or mechanical part. Another common reason why the Baby pump does not pump is deformation of the housing and its liming.
You can deal with problems on your own. To do this, you need to study the structure of the device and disassemble it sequentially. Electrical and mechanical checks are carried out. Quality assembly completes the process.
It is recommended to check the Baby’s readiness for work in a small container before diving to depth.
“Aquarius” is the best solution for home water supply
The market offers consumers a huge selection of pumping equipment. For a home water supply system, the best option is a submersible pump for wells and wells “Aquarius” from domestic manufacturers. The units have long proven themselves to be high-performance, long service life and high-quality workmanship. In addition to these advantages, the price of the product is several times lower than that of imported analogues with similar characteristics.
The submersible pump operates underwater. It is often undesirable to remove the unit from there. “Aquarius”, like all submersible analogues, is made in the form of an elongated capsule. The body is made of stainless steel. There are 2 loops on the top for securing the safety rope. In the center there is a pipe for fixing the supply pipe. The power cable enters the housing through a sealed connection. Inside the housing there is an electric motor, on the shaft of which impellers are mounted in a separate working chamber. In terms of design and method of water intake, Aquarius is classified as a centrifugal unit.
The surface-mounted unit is superior to a submersible well pump in its ease of start-up. It is enough to apply power, and the blades will immediately begin to capture water, supplying it to the system. To start a surface pump, you will have to pump water into the intake pipe and working chamber with an impeller through the filler hole. Aquarius pumps are produced in various capacities and sizes. In everyday life, models with a diameter of 110–150 mm are used, depending on the cross-section of the well casing pipe.
The video tells how to choose a pump and what models there are: