Household appliances of this type have long become an indispensable attribute for most households. Purchasing and connecting washing machines to sewerage and water supply has long become commonplace and most of us know how it’s done.
However, in this article we will dwell on the issue in detail and analyze all the nuances of connecting to water supply and sewerage, what methods exist, what tools and materials we will need, and how to avoid common mistakes.
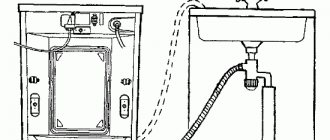
But first, let's briefly learn how to connect a washing machine: the hose for connecting cold water is screwed at one end to the water pipe, and the other to the filler fitting of the machine. The end of the drain hose at a certain height is connected to the sewer system. Below, we will look at all the processes in more detail.
Draining methods
Some people prefer to install large equipment without the help of specialists. Such actions help them save on the wages of the master, and fully ensure the quality of their work. There is an opinion that to drain dirty water during washing, it is enough to place the drain hose in the bathtub or sink. This is not true. It is much better to connect the machine to the sewer using the necessary equipment.
When connecting, do not twist or squeeze the drain hose - this will interfere with normal water flow.
| Basic connection methods | ||
| Connection type | Advantages | Flaws |
| Connection via siphon outlet | Reliable and secure connection; exposed parts can be covered with a decorative panel. | It may be difficult to connect to the siphon if it is too far away |
| Connection directly to the sewer | Used if the siphon is located too far from the car. | Difficulty connecting |
| Hose outlet to plumbing | The easiest way to connect. The height of the sides of the plumbing does not affect the drainage. | There is a high risk of the drain hose tearing off the side of the bathtub or sink and flooding the floor |
Connecting the drain via a siphon
Draining the washing machine directly into the sewer
Direct drain to the bathroom
Installation features
Actually, most of the information has already been told, all that remains is to assemble the purchased components in accordance with the design idea.
Pipes are assembled from the riser (inlet pipe) towards the consumer. In other words, the pipes that are closest to the drainage point into the common house riser are installed first.
At each connection, the pipe should fit into the socket of the previous one by approximately 50 mm. If the cuff in the socket is too tight and you cannot insert the outlet, then you need to lubricate the cuff with liquid soap or detergent - things will go much easier.
Plastic pipes are cut using any available means: a grinder, a hacksaw. You can even do the cutting with a regular wood hacksaw. The main thing is to clean the cut edge from all kinds of burrs - burrs inside the pipe will cause blockage, and burrs on the outside will prevent the parts from being assembled properly.
Some craftsmen practice applying silicone (sealant) to the cuffs of assembled parts - supposedly the joint becomes even more airtight. The effect of silicone is very doubtful, because polypropylene (which is what plastic drainage systems are made from for indoor use) is a chemically resistant plastic and silicone does not stick to it properly.
“Correct” pipes should be assembled together with some effort and not leak without additional sealants. However, it happens that parts are assembled together too easily - components from different manufacturers, used parts, etc. In this case, of course, you can use silicone sealant. The main thing during assembly is to apply it not to the cuff (because part of the sealant will get inside the pipe), but to the pipe along the outer diameter.
In some situations, it is necessary to secure two parts together so that during operation one does not come out of the other. This should absolutely not be done using self-tapping screws, which some craftsmen screw into the end of the socket. The sharp tip of the screw sticking out inside the pipe will collect hair and cause a blockage. If for some reason the assembled unit experiences mechanical stress to “undocking”, both parts need to be secured using brackets or other fastening techniques.
To form and control the required pipe slopes, it is very convenient to use a laser level. Having built a horizontal beam slightly higher than the horizontal beam, you can control the slope by placing a tape measure on the controlled areas and comparing the distances from the pipe to the beam.
That's basically all. We have covered the main points of installing a sewer system in a bathroom, and perhaps I will add something over time.
Draining water into the bathtub and toilet
One of the most common ways to drain dirty water is by attaching a hose to the side of a plumbing fixture. However, with strong water pressure, the toilet lid may not hold the device, as a result it breaks off and heavily floods the bathroom floors.
Placing the flush hose on the edge of the toilet is dangerous
If the hose is positioned incorrectly, the toilet lid may also open slightly and the hose may slide off the side. The same actions occur if the surface of the plumbing is unstable. To prevent a flood, the outlet must be fixed to the side using a plastic hook included with the machine.
Draining waste water into the bath
Plastic holders
The advantage of this method is the ease of connection to the water drainage system. People don’t have to bother with pipes and siphons when connecting. In addition, the height of the bathtub side often varies from 60 cm to 80 cm. However, such a machine drain system in the bathroom also has a number of disadvantages.
Polypropylene drain elements
To regulate the quality of production, which produces plastic sewer pipes of various sizes, the table TU 4926-002-88742502-00 is used. According to the conditions specified in the document, the diameter of the finished product can be 50, 100 and 150 mm. The wall thickness parameter varies from 3 to 5 mm and depends on the value of the circumference. Such products can be used when installing risers, or for organizing a discharge line from a plumbing fixture.
It may be mentioned that well-known global manufacturing companies use polypropylene in the manufacturing process of industrial pipes. The circumference of such products can reach 1.2 meters.
Disadvantages of draining plumbing
With this kind of drainage, the plumbing fixtures are constantly in contact with dirty water. Rarely does water penetrate directly into the drain. Usually the edge of the hose only reaches the edge of the side of the plumbing fixture. When such a drain is made, the flowing water constantly contaminates the plumbing. The drainage of the toilet does not make it possible to use the toilet normally, which leads to additional inconvenience.
Water from the drain hose may contaminate the bathtub
One of the most important drawbacks is the drain hose getting tangled around the edges of the bathroom plumbing. This leads to damage to floors and flooding of neighbors. Moreover, the hose falls due to both carelessness of users and strong vibrations during rinsing or spinning. When the pump turns on, it can also break. This is due to the strong water pressure.
Connection methods via a siphon or directly into the sewer do not have such disadvantages. The complexity of the connection is justified by the tightness, the exclusion of water leaks, the cleanliness of the plumbing and the presence of unpleasant odors.
When is it necessary to replace?
It may be necessary to replace the hose with a new one in several cases:
- insufficient length of the existing one;
- material wear.
If the integrity of the hose is damaged, it is recommended to replace it completely. Repair with clamps is not advisable due to poor reliability and short service life. For the same reason, it is not recommended to extend the missing length.
A clogged hose is not a serious reason to replace the part. If it is not worn, it should be cleaned and returned to its place. But in cases where, in addition to the blockage, there are cracks and general wear and tear, it is better to replace it in order to prevent a serious leak from occurring.
Connection to the sewer system using a siphon
To connect the drainage system this way, you need to install a siphon high under the sink. This will prevent water from returning to the machine. It is not easy to connect the drain under the sink; if the drain hose is short, it needs to be extended. The maximum size is indicated in the instructions for the machine. The only drawback of extension is the increased load on the pump. An additional section of the hose increases water pumping and the pump wears out faster.
Connection to the sewerage system via a siphon
The plastic siphon is equipped with a pipe to which the hose is connected. This connection must be secured with a coupling in order to prevent the penetration of unpleasant sewer odors into the machine and to seal the connection. The drain pipe allows water to enter the drain pump.
With this connection, dirty water is drained into the sewer without hindrance. There are no water leaks under the siphon above the floor. This is due to the sealing of the siphon using a rubber cuff.
In the bathroom, you can easily do what you need to do, since the sink or toilet is not occupied by a hose. Water flows directly into the sewer through a siphon. The only thing that may bother you is the liquid coming through the drain pump and slightly gurgling in the neck of the sink.
Options
The standard marking for cast iron pipelines is from DN 50 to DN 400. Products that do not have sockets, that is, with smooth sides, have an increased margin of safety. Their length is three meters. SMU pipes can be produced in lengths of 15 cm or more.
The wall thickness of a cast iron pipe is almost identical to plastic products and is 4-5 mm. However, despite similar dimensions in length, wall thickness and diameter, the weight of the metal structure is 10 times greater than the weight of the plastic pipeline. For clarity, a meter of metal product will weigh about 15 kilograms. Accordingly, a plastic pipe of identical dimensions will weigh only 1.5 kilograms.
How to install a siphon
People often think about which washing machine siphon to use and how to connect it. Ideally, the new siphon is equipped with a pipe to which a hose is connected to drain the water. First, the product is connected to the neck of the sink. It is installed not in a horizontal, but in a vertical position. If this rule is not followed, leaks may occur.
The position and height of the connection also plays a very important role. Where the back cover is located, the drain hose must be at a height of at least 60 cm. The drainage system may be located lower. The back cover of the washing machine is usually equipped with a special fastener at the top, to which you can attach a hose to drain the water.
Connecting the siphon to the sewer pipe and to the pipe coming from the machine
Some craftsmen believe that the system should not be too tight, believing that the gaps prevent partial backflow of dirty liquid. This does not always work, so the system must be sealed. To prevent backflow, a special valve called an anti-siphon is used. After installing the siphon, you need to open the tap to check the connection.
After this, connect the drain hose using a cuff or adapter. If there is no cuff, then for tightness the adapter must be tightened with a clamp at the connection point. Often people use siphons that can be built into walls. One part of such a siphon is directed towards the sewer pipes, the second - outwards, to which a drain hose is connected and tightened with a clamp. To connect the machine as quickly as possible, a cold water outlet is installed nearby.
Installing a built-in siphon for a washing machine
If you do not want to connect a drainage system with a siphon in the bathroom, you can connect the machine directly to the sewer.
Size and place of application of PVC products
The production of polyvinyl chloride pipes is regulated by GOST R 51613-2000 , or the VSN 48-96 . For the production of pressure parts the specified GOST is used, and in the production of non-pressure parts the standard is applied.
According to the data given in the standard, the diameter of non-pressure PVC sewer pipes can be:
- 50mm.
- 90mm.
- 110mm.
At the same time, plastic pipes for sewerage, the dimensions of which in length range from 0.5 to 8 meters, have an internal wall thickness of at least 3.2 mm.
GOST R 51613—2000
Differences between pressure pipelines and non-pressure pipelines
The differences between pressure pipelines will be significant from the specified parameters of non-pressure systems. For example, the number of standard sizes of these products is 13 pieces. At the same time, PVC sewer pipes, diameter sizes range from 63 to 315 mm.
The presence of such a choice of sizes plays into the hands of construction organizations. However, the following pipe diameter options are often used:
- 7.5 cm. The product is used for making taps in bathrooms.
- 10 and 11 cm. Such parts are used for carrying out the external pipeline and riser.
- 20 and 30 cm. The products are used for drainage systems in industrial buildings.
Diameter of pipes - internal and external sewerage systems
How to connect a machine without using a siphon
Making a direct connection to the sewer is not difficult, the main thing is to use a tee and follow all the height rules. A tee with a diameter of 50 mm is installed in the socket of a plastic sewer pipe.
A plastic or polyethylene tee is mounted as follows:
- first you need to remove the old siphon;
- then insert the adapter;
- after this the tee itself is installed.
Sometimes it is necessary to use an additional plastic tube to connect to the sewer drain. How to connect the drainage system directly to the sewer?
Installing such a drainage system in the bathroom is easy:
- first you need to lower the hose into the pipe;
- then fix;
- and then connect hermetically.
If the connection is not airtight, sewer odors will enter the room.
It is not for nothing that the back cover of the washing machine is equipped with a special fastener for the hose, which is located much higher than the area from which the hose comes out. If it is in the correct position, even when the pump is turned off, dirty water does not flow back into the machine. If the cover does not have such fastening, you should make an S-shaped bend of the hose yourself.
Connecting the washing machine drain to the sewer
It is worth noting that a straight hose can always lead to the backflow of dirty water, and even well-washed clothes can “smell” with sewer odors. This is why it is so important to position the hose correctly. The adapter is used to improve sealing.
By the way, the same actions are performed when a hose needs to be replaced. Then the back cover is removed and the hose to which the drain pump is connected is replaced. Some washing machines are designed in such a way that when replacing the drain hose, the top cover of the machine must also be removed, which is put back in place after replacing the hose.
Dimensions of metal products
Sewage pipes made of cast iron can be divided into several types based on their functionality:
- S.M.U. These products do not have a detachable connection, that is, both sides will be smooth;
- SME. A bell is installed at one end. The other side of the product is smooth.
The size specified in the marking characterizes the internal diameter. For example, the index DN 100 will mean that the parameter is 100 mm. In this case, the total volume of the product, including the walls, is 110 mm.
Connection height
When connecting a drainage system, a parameter such as height must be observed. The pump-out pump has limited power, so the hose must be placed at a height of 80 cm near the machine itself, and at a height of 60 cm or higher near the sewer.
If the hose is positioned lower, the machine pump can wear out quickly. Manufacturers also do not recommend extending the hoses by more than one and a half meters, or using low-quality materials - the pump may work slower or break.
Standards for connecting a washing machine to a siphon
The end of the hose, located at a level of 60 cm from the floor or higher, must be led into the sewer outlet and secured with a cuff or elastic band measuring 3.2x4 cm, overlapping with the pipe. When connecting to the outlet, the hose must not be in the water.
If the outlet is not equipped with a check valve, with an S-shaped connection this effect can be achieved due to the air gap. The lowest part of the hose should be located 50 cm from the floor or higher. If the sewer pipe is located below 50 cm, when connecting a drainage system without a siphon, a “siphon effect” may be created and a constant sewer smell may occur.
Advantages of plastic
Any structural element made from the above materials has the following advantages:
- Resistant to a variety of chemicals, for example, solvents or alkalis.
- Strength , allowing the part to be immersed in the ground at a distance of up to 16 m.
- a smooth surface inside , creating an obstacle to the formation of plaque.
- Low weight . With a length of one hundred centimeters, an element with a circumference of 110 mm weighs about 1.5 kg.
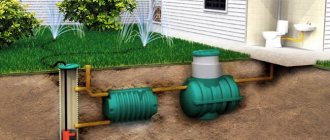
How to connect a drain in a private house without a sewer system
At a dacha or in a private house there may be no sewerage system, in which case the drainage is carried out “overboard”. If there is no sewerage system in the house, you should not place a drain hose up to 500 cm long on the floor. A long hose collects an amount of water commensurate with the volume of liquid in the drum. Therefore, water can constantly be filled and drained.
It is not difficult to install a drainage system at your dacha; just install a large water tank and lower a hose into it. For pressure, install 2 tanks of water on the 2nd floor of the house.
Connecting the drain of a washing machine in a private house
If there are no large tanks at your dacha, and the water pressure is excessively low, you should think about purchasing a pumping station. This is necessary, because low water pressure leads to breakdowns of the washing machine.
PET pipes and where they are installed
When manufacturing polyethylene parts, GOST regulations 22689.2-89 are used. These products can be of four varieties with a diameter of 40 , 50 , 90 , or 110 mm . When low-density polyethylene is used in production, the wall thickness of the finished product does not exceed three millimeters.
High pressure PET is used to produce pipes with small circumferences. The wall thickness parameter will be equal to:
- 3 millimeters for elements with a diameter of 4-5 cm.
- Five millimeters for products with a diameter of 9-11 cm.
The length of the pipe can be nine meters. This parameter depends directly on the diameter. The larger it is, the longer the product will be.
Removing shipping parts
After the washer is unpacked, you need to check and remove all transport parts that provide rigid fixation of the tank and other rotating parts, which are thus protected from damage during transport.
These parts will be bolts, holders, rods and brackets that need to be disconnected. It should be noted that if the machine is turned on before the shipping parts have been removed, this may cause irreversible damage and may cause the machine to fail.
The main type of transport parts are bolts. With their help, the tank is fixed, which, after unscrewing, should hang on springs. This is the normal operating condition of the tank. These holes, which remain after the bolts are removed, are usually plugged by the plastic plugs supplied with the kit.
The brackets provide additional rigidity for transportation, and they also help secure the power cord and drain. Sometimes additional transport beams are placed between the tank and the body, which can be removed after the machine is tilted slightly forward.
These transport parts that you removed should actually be stored in case of moving the machine to a service center, to a new apartment or cottage, they should be mounted back to avoid damage to the machine during transportation.
The correct procedure for removing shipping parts can be found in the owner's manual that came with your machine.
Stage #7 - test activation
Having completed all the work described above, you need to check the correct installation by starting the washing machine one by one to operate in all modes.
The final stage of work is to check all systems of the washing machine. It must be carried out strictly according to the instructions and affect all sides of the connection.
To do this, you need to inspect all the assembled components, and then conduct a test run of the machine without laundry, during which you need to pay attention to the following options:
- the period of time (it should be short) during which the tank is filled;
- no leaks;
- correct functioning of the drain;
- uniform rotation of the drum;
- good spin;
- full heating of water, which occurs 5-7 minutes after the completion of water collection.
At all stages of operation of the unit there should be no extraneous sounds.
You can install and connect to communications yourself not only a washing machine. We suggest that you read the installation instructions for the dishwasher. The step-by-step guide we offer will provide effective assistance in carrying out the work yourself.
Place the legs of the car straight
In order for a new assistant to wash for a long time, without breaking or overloading, a necessary condition is the strict horizontality of its upper part. In this case, the drum will be positioned without distortions, rotating smoothly and without shaking. The maximum deviation from the horizontal that is permissible is only two degrees.
To achieve the desired horizontalness, use the adjustment of the legs of the machine - all models have such adjustment. We check the result using a level, twisting the legs until it is satisfactory. There should be no rubber mats, pieces of linoleum or blocks placed under the legs of the washing machine - the automatic machine is installed directly on the floor, preferably on concrete. It, unlike wood, for example, provides excellent shock absorption.
Leveling the machine legs.
Prevention measures
Usually, a clogged washing machine hose occurs on its own. Small objects cannot get into it, as they will get stuck in the pump or drain filter.
This can be avoided by following these rules:
- Wash items using a special bag;
- Use water softeners;
- Regularly descale the machine;
- Wash only using powder - automatic;
- Before washing, turn clothing pockets inside out and remove all foreign objects from them.