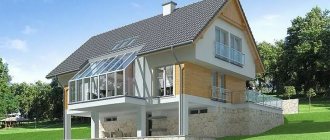
Outdoor brick fireplaces are a decoration for any country house or cottage
If you need to build an outdoor fireplace, then first we determine the place where the future fireplace-barbecue will be located. It is best to place it in accordance with the wind rose, so that the smoke emanating from the fire is carried outside your area. If this condition cannot be met, then you will have to install a chimney that will draw out this smoke. You can eliminate drafts in the area of the fireplace using a fence or decorative wall.
Types of fireplace grills
In addition to the purely practical properties that a barbecue oven will have, you need to remember about its aesthetic characteristics.
Beautiful barbecues are a real decoration of even the most sophisticated landscapes. Brick structures look especially impressive. They look great on any site, are multifunctional, strong and durable. Since fireplaces are designed to heat rooms, this factor must be taken as a basis. There is no point in heating the street, wasting firewood to no avail. It is better to adapt the grill to the gazebo, even if it is open. Some of the heat will still remain under its roof. Also a good solution is to build a brick barbecue in close proximity to the terrace.
At the place of installation, fireplace barbecues can be as follows:
- Free-standing without canopy or chimney. Externally, they are practically no different from the simplest barbecues. The only difference is the presence of an open hearth.
- Freestanding with chimney and roof. Such buildings look very impressive. When designed appropriately, they look like a stove from a fairy tale.
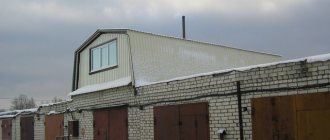
- Combined with one of the buildings on the site. Attach a barbecue to a house, gazebo, veranda or bathhouse. Less often, outdoor fireplaces and barbecues are built next to garages or sheds.
They make barbecues with a hearth made of steel, brick or stone. Metal structures are decorated with artistic forging. Stone and brick themselves look quite beautiful; they are rarely finished.
An outdoor stove can have a wide variety of shapes. Depending on the size and layout of the site, stoves of the following configuration are built:
- semicircular;
- triangular;
- square;
- trapezoidal;
- with broken lines.
In small buildings it is better to install a corner grill. In addition to saving usable space, such a structure looks compact and neat. Tables and shelves can be made folding, using them only during cooking and feasting near the barbecue.
Any combined grill is done in stages. Let us dwell on the sequence of construction of this structure.
Useful tips and general recommendations for beginners
To make not only a beautiful, but also a durable fireplace yourself, you must follow the recommendations of experts:
although the outside foundation hardens already on the 2nd day, inside it is still fragile, so walls cannot be erected right away;- first it is better to place a row of bricks without mortar, see how they lie, make the necessary trims and only then fix them;
- constantly monitor the horizontality and verticality of each row;
- the solution on which the firebox elements are laid takes several days to prepare, this is due to the need to sift and soak the clay;
- You can use the barbecue only 2 weeks after completion of construction, so that the masonry is completely hardened.
Brick barbecue projects: drawings, photos
Features: the length of the firebox should not exceed 1 m - this is enough for 8-10 skewers at a time. The width should be consistent with the length of a standard skewer - 47-62 cm. The height of the frying area is ideally just above the waist of the person who will cook.
Since a stationary barbecue often becomes the central decorative element of a site, this should be taken into account when designing and choosing a location. Its reverse side looks like a solid brick wall, so it is advisable to position the structure so that it is not visible from the reverse side. Or provide for its decoration taking into account fire safety.
Project No. 2 - simple heating fireplace
The dimensions of this structure are 112 x 65 cm, height – 2022 mm. The internal size of the portal is 52 x 49 cm. Accelerated heating of the room is provided due to the convective air channel. The set of building materials looks like this:
- clay solid brick – 345 pcs.;
- the valve used in the chimney is 250 x 130 mm;
- 2 steel equal angle corners 45 mm wide and 70 cm long;
- metal sheet 500 x 700 mm.
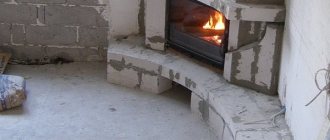
The peculiarity of the masonry of the fireplace shown in the diagram is the placement of a large number of bricks at the base on an edge. Above, a narrow long channel is arranged where the heated air of the room moves. Let's move on to the construction algorithm:
- The first tier is solid, consisting of bricks placed “on the butt”. On the second tier, a heating channel with a cross-section of 65 mm is formed, on the third, the base of the firebox is laid.
- From the 4th to the 9th rows the portal walls are erected. The duct moves inside the back wall of the fireplace. On the 9th tier, corners are placed - floor supports.
- Tier No. 10 – firebox overlap. On the 11th row, the front stones extend 130 mm, the 12th tier is a fireplace mantel. The convective channel is divided into 2 narrow shafts.
- Rows 13-25 make up the smoke box. The heating channel ends at the 14th tier.
- Row No. 26 covers the flue, which narrows to the chimney. The valve is installed on the 27th tier.
- The remaining rows 28-31 form the beginning of the chimney.
The test fireplace lighting technique is demonstrated in the latest video:
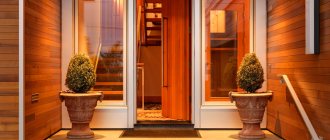
Installation of beautiful decorative fireplaces for the home
Before you start building your brainchild, we recommend that you familiarize yourself with its structure.
So, the fireplace consists of:
- A firebox made of fireclay. This is where a miracle happens—fuel combustion.
- The portal is located outside the firebox and creates a decorative load.
- The grate, which is located under the firebox and helps the combustion process occur, supplies air from below to support the fire.
- An ash pan is a metal compartment that serves as a collection point for ash.
- The area in front of the firebox prevents sparks from the fire from falling onto the floor in front of the fireplace, and also serves as a decorative element.
- Hailo is the first source of smoke in front of the chimney.
- Gate valve for regulating air supply.
How to make a barbecue out of brick with your own hands at the dacha - step by step instructions
A lot depends on the model you choose to build a barbecue with your own hands, and not just the quantity and quality of bricks you will need. Some people think that since they are involved in such an interesting construction project, they need to choose tips on how to make a barbecue out of brick with your own hands in the country, step-by-step instructions
, which concern large, multifunctional ovens.
This includes a fireplace for baking dishes in heat-resistant dishes, a tandoor for preparing delicious oriental dishes, a built-in barbecue grill and, last but not least, a large grill that can accommodate a dozen skewers.
Moreover, all such splendor takes up not only a lot of space, requiring a canopy or a full-fledged gazebo with a barbecue, but also requires a significant, strong foundation, the construction of which is as important a point of work as laying out bricks.
That is why always evaluate your daily or weekly needs before choosing a model and tips on how to make a brick grill with your own hands. Step-by-step instructions with photos
in this case, it can stretch either over several pages, or it will literally take several photos if you settle on the simplest, but quite functional model.
The barbecue structure itself, if you still want to make it look like a stove and not a metal model, is similar to all similar structures, such as a do-it-yourself fireplace.
There is a ash pit that provides draft and oxygen flow for the combustion of coals, there is a place for burnt ash, the so-called ash pan, there is a chamber for direct combustion of firewood and the formation of coals, as well as a hole for a pipe, brick or metal of your choice.
All components are made of brick, only its quality depends on your budget. A compromise and the most popular solution is to build the “hottest” part of the structure - the combustion chamber - from refractory fireclay bricks, and lay out the rest with red brick, which is approximately 3-4 times cheaper than fireclay bricks.
How to make a simple brick grill with your own hands step by step instructions
To figure out how to make a simple brick grill with your own hands, step-by-step instructions
We will definitely find it useful, as well as photo or video lessons from those who have already walked a similar path.
There are several stages, all of them are quite important, because without proper planning and a masonry scheme, you will have many questions during the work process, and if you do not build the foundation correctly, it will not be strong or level enough, then all the work will go down the drain in a few years and the building will have to be redone. A simple barbecue in its structure is quite similar to a barbecue for a summer house. After all, the most important thing for him is the hearth, inside which the firewood will burn, turn into coals and give off its high-quality heat to the skewers with food, which are located above. All this does not require complex diagrams at all, so for how to make a barbecue out of brick with your own hands, quick step-by-step instructions
will not take very much time.
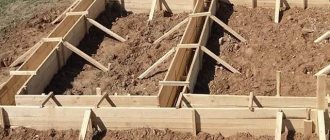
For a simple model we choose a strip foundation, this way you can save a large amount of mortar and reinforcing elements. Trenches are dug in the shape of the future masonry, formwork is laid out with old boards or pieces of slate, into which metal mesh or rods for reinforcement are laid and the whole thing is filled with mortar. The screed takes from several days to a week to dry according to the technology, depending on the composition of the dry mixture; it is better to withstand this period so that the screed does not crack. When the site is ready, we begin laying out the bricks, guided by the order scheme that you came up with initially, or that you saw on the Internet. It should indicate both the location of the bricks and their type, so as not to get confused. At the end of each row, while the solution has not yet set, we use a level to check the evenness of the masonry; this is a mandatory procedure.
If the design provides recesses, a place for laying out a barbecue grill, ventilation holes or a small auxiliary tabletop, then all this is done immediately, without waiting until the last row is laid. At the end, you need to decide whether to leave the grill in the same form as you put it together or decorate it like a country architectural object.
The decoration can be decorative plaster (of course, you should choose a special composition for working with high temperatures), facing bricks, tiles imitating natural stone, and even natural stone itself.
Installing a stove in a wooden house
Since floors on wooden beams are usually designed for a load of no more than 200–300 kg/m², a light stove weighing up to 750 kg can be placed on them, but even in this case, in order to reduce point pressure, it is recommended to build a wooden podium with a non-flammable coating underneath it . More “weighty” devices will have to be installed on the ground floor and a personal foundation will be made under them.
Installing a fireplace on a separate foundation in a wooden house
As in a stone house, there should be a protective platform made of ceramic or stainless steel under the stove, protruding in front of the firebox by 45–50 cm, and on the sides by at least 15 cm. Between the back wall of the device and the wall of the house ( from any material), it is necessary to provide a gap of at least 20 cm and create a non-flammable barrier here. It is carried out mainly in the form of a wall structure made of a metal frame, filled with stone wool slabs and sheathed with gypsum fiber sheets, magnesium fiberglass boards or other materials of the NG category.
In a wooden house, even if the fireplace is half a meter away from the wall, it must be protected by non-combustible clinker, ceramic or stone cladding. Of course, all wooden surfaces must be treated with fire retardants.
It should be noted that many regulatory documents regulating the distances from stoves to combustible wooden structures are somewhat outdated today. They do not take into account the features of modern materials and equipment, which make it possible, in particular, to change the distance from the heating device to combustible structures without violating fire safety requirements. In practice, regulatory authorities generally agree with the manufacturer's recommended installation parameters, which comply with strict European regulations. And SNiP 41-01-2003 directly says that it is necessary to adhere to the manufacturer’s instructions. For example, the Tulikivi company allows the installation of its stoves and fireplaces 3 cm from a wall made of non-combustible materials and 15–20 cm from a wall made of combustible materials.
What materials are used?
Outdoor fireplaces, which are equipped with a barbecue or barbecue, can be made from the following materials:
To build a furnace you will need the following materials:
- brick;
- stone;
- metal;
- concrete blocks.
There is also a scheme for constructing stoves from clay, cinder block and some other materials, but in any case a certain level of resistance to high temperatures should be ensured (for example, using heat-resistant finishing elements).
Unlike heating devices that are located inside the house, the requirements for outdoor installations are increased. They must be built from high-quality materials that can withstand the negative effects of the environment.
Foundation construction
When building stoves on the street with your own hands, with or without a barbecue, barbecue, you must definitely choose the optimal location for this structure. It should be kept at a great distance from flammable materials and from building windows. After identifying a piece of land on which to build a stove, begin building the foundation.
- Dig a hole 0.7-1 m deep. Its width should be 10-15 cm greater than the width of the oven.
- When the foundation trench is ready, fill it completely with crushed stone.
- Compact the material in the hole.
- Soak the crushed stone with cement-sand mortar.
- After the foundation has hardened, waterproof its horizontal surface using several layers of roofing felt.
Reinforced foundation for a barbecue fireplace
If you are building a massive outdoor fireplace, then you must reinforce the foundation. After constructing the base of the fireplace, wait a month, after which you can begin laying the body.
Spit and other devices
In order to provide maximum functionality to your brick barbecue, it should be equipped with as many accessories as possible. A banal device for preparing barbecue is not worth starting a grandiose project on the scale of a country house.
In the process of laying a fireplace for picnics, it would be nice to also provide a spit on which you can cook a whole small lamb. A device on which you can hang a cauldron would also be useful. In other words, a barbecue oven should become your summer kitchen, only much more functional.
806d9bee2ae82c964ba00b857b11994f.jpe
In the process of laying the side walls of the portal, somewhere at the level of the fourth or fifth brick, you need to make recesses in the bricks on both sides opposite each other.
To ensure that they do not move relative to each other, a pipe is threaded into the recesses, which must remain there until all work is completed. Today, many people have beautiful stoves in their dachas, but not many people have one in which you can take and roast a wild boar on a spit.
Outdoor fireplace cost. Indoor fireplace vs outdoor fireplace
One of the hottest home improvement trends is outdoor fireplaces. While this trend may not be as important to those living in the South, those in the midlands or further north can greatly benefit from the benefits of an open fireplace. Not only are they much cheaper than an indoor fireplace, but they are also much more practical - they extend the time you can use your backyard.
You can install all types of outdoor fireplaces, not just gas ones. As with indoor models, you will need a chimney to burn wood. Gas or electric models will require gas lines and wiring.
Elegant tiled fireplace
Recommendations from experts
The following tips will help improve the quality of the design and the aesthetics of its appearance:
- round the sides of the stove - this will make it look more attractive;
- lay the ash pit made of bricks, with the edges cut at an angle (45°) - the ash will crumble freely during operation;
- to shrink the bricks, use a rubber hammer - this is effective and does not damage the material;
- install doors so that you can open them with your left hand (for left-handed people with your right hand);
- When installing stove fittings, use a level;
- For a firebox made of fireclay bricks, lay them on edge - the space will be used efficiently and food will cook faster;
- Fireclay bricks and ceramics should not come into contact - be sure to lay basalt cardboard between them.
To set up a barbecue with a brick stove, you will have to spend a lot of time and effort, but the result will pay for it all many times over. A well-organized design will last a long time, and it can be used to prepare a variety of dishes.
Required materials and tools
The set of tools in this case looks much more modest:
- Building level;
- Water level;
- Plumb line, tape measure and pencil;
- Two different spatulas;
- Hammer;
- Rubber hammer;
- Screwdriver.
Additional materials are not included in the finished fireplace kit, so you will have to go to the hardware store with the following list:
- Self-tapping screws with a set of wide washers;
- Plastic dowels for self-tapping screws;
- Heat-resistant mastic and sealant;
- Foil-coated 50 mm thermal insulation boards;
- Profiles for drywall;
- Several sheets of drywall;
- Two grilles for ventilation windows.
We lay the walls
Laying a stove with a barbecue or barbecue with your own hands must comply with certain rules:
- the firebox must be laid from heat-resistant materials that can operate normally at elevated temperatures;
- the construction of the device body can be carried out using ordinary materials;
- under the stove body you need to build a strong and level base from several rows of bricks. The evenness of the podium should be checked using a building level;
- the walls must be laid with ligation of the seams;
Arranging a classic outdoor fireplace
- during the construction of the walls, it is necessary to install grates that will supply the outdoor fireplace with the necessary amount of air;
- fasten the stove door to the masonry using welded embedded parts;
- starting from the sixth row of masonry, build a base for the combustion chamber. Lay the brick crosswise so that a small part of it protrudes. This is useful for attaching barbecue nets or if using a grill;
- The wall thickness depends on the dimensions of the stove and ranges from 120 mm to 250 mm.
Basic structural elements and requirements for them
To build an outdoor fireplace with your own hands, you need to properly arrange all its structural elements.
The stove must consist of the following parts:
- foundation;
- firebox;
- furnace body;
- chimney.
Pouring the foundation for an outdoor fireplace
The foundation is an essential element of every brick stove. Its size and configuration depends on the total weight of the device. Most often, strip foundations made of concrete are used with a laying depth of 30 to 70 cm. To make the foundation even more reliable, reinforcement is used with metal wire with a diameter of 6-8 mm in increments of 150-250 mm.
The area of the combustion chamber in the stove should be 70% of the total area of the fireplace portal. This size will be optimal and will ensure maximum productivity of the device. The height of the firebox is calculated as 2/3 or ¾ of its width. The depth of the chamber should be no more than 1/3-2/3 of its height.
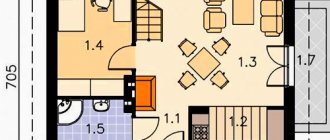
Fireplace cross-section in plan at the firebox level
The walls of the firebox must be made at a certain slope:
- back plane – 20°;
- side walls – 45°.
In this case, the rear wall should have the required slope already from 1/3 of the height of the firebox. This is necessary to create the maximum temperature in the stove, due to which its productivity increases several times.
Dimensions of the chimney channel relative to the stove power [ads-mob-1][ads-pc-1]
Outdoor stove complex
The cross-sectional area of the smoke exhaust duct should be 1/8-1/15 of the total area of the combustion chamber. But keep in mind that the minimum permissible chimney size is 140 mm x 270 mm. Its length should be greater than the height of the firebox, which will ensure good traction.
The chimney is made in the form of a pyramid with the walls inclined at an angle of 30°. Its inner surface must be smooth to ensure unhindered removal of combustion products. It is not allowed to install any protrusions in the chimney.
A characteristic feature of structures that are located on the street is that there is no need to provide elements that regulate the air supply to the combustion chamber.
Construction design
The basis for the success of any event is competent planning, the correct choice of building materials and strict adherence to technology and safety measures during work. Initially, you need to decide on the place where the stove will be installed. After this, you should draw up diagrams and drawings of each element of the barbecue.
The paper displays information regarding the following structures:
- foundation;
- the order of each fragment;
- fireplace;
- frying oven;
- chimney;
- roof.
If it is planned to create a universal frying complex, then an oven, a smokehouse and a hob with a hole for a cauldron are additionally developed. A washstand, sink and cutting tables are provided.
Based on the data obtained, construction materials are calculated. They are purchased with a small margin of 10-15% to cover errors in calculations, defects and damage during transportation.
What you need for work
To make a fireplace for a home, two types of bricks are used: solid and fire-resistant. The inside is laid out last because it can withstand high temperatures. In addition, this type of brick is capable of storing heat for a long time and warms up slowly. For the solution, use a mixture that is sold in special stores or you can make it yourself using clay and sand. The consistency should be like thick sour cream.
If a wood-burning fireplace for a summer house is built with a closed firebox, then you will need doors made of metal and fire-resistant glass. You also need to buy a damper, a vent door and a cleaning door. For the chimney you will need a steel pipe.
Tools include a spatula, a construction level, a grinding machine, a tape measure, a container for mixing the mortar, a trowel, and fittings.
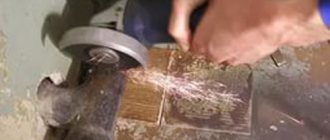
Note! For beginners, when cutting and chopping bricks, it is better to use a grinder with a circle along the concrete thread. Then there will be less waste and translation of material.
As soon as everything for the work has been assembled, they begin installing a wood-burning fireplace for the dacha with their own hands.
Order and layout of masonry
https://youtube.com/watch?v=oylkEIHYiII
Having removed the formwork and waited until the concrete has hardened, the most important stage begins - laying bricks. Markings are applied to the slab, indicating the dimensions of the future structure. You need to apply the level again and make sure that the surface is horizontal. If significant errors are found, they are eliminated.
Rows from the first to the fourth must be laid with a spoon dressing. In front of the fifth row, a 40x40 mm corner is placed on the front side - it will act as a kind of support. To create bases for the pallet and shelf, the sides of the fifth row are placed with a tying bandage.
The spoon dressing should be followed when laying rows six to eight. Row number nine is made in the same way as row five to form supports for the table top and grille.
At this point, the construction of the table can be considered complete. Next, the barbecue oven with your own hands will be built only from the roaster side. Bricks are laid again using a spoon bandage from the tenth to the fourteenth rows. In front of the fifteenth row, a metal corner is again placed on the front side, acting as a support for the stove vault. The fifteenth row is laid.
1f8683af01cdd717f398a2a01b5a2186.jpe 5b6027f1fd565a39b7d9f054b8937253.jpe d4c248074f8a46e4f1b275d8d06f7af7.jpe
Then you need to arrange a gradually tapering vault. It can be done by alternating the splint and spoon ligaments, gradually moving them to the center. In the sixteenth row, stitching is done on the front side, spoon stitching is done on the sides. In the seventeenth row, on the contrary, in the eighteenth row we change again. The resulting protrusions can be arranged according to their purpose.
From the nineteenth to the twenty-first rows are laid with spoon masonry.
The twenty-second poison begins the pipe. In the twenty-third row, the necessary narrowing is made and work continues in the same sequence to the desired height. The higher it is, the better the traction will be.
In the penultimate row, windows are made to remove smoke. The last row will be laid completely.
The work can be considered completed. While the solution dries, all that remains is to think about the exterior finishing and reliable protection from the vagaries of nature.
We recommend reading the instructions for making a false fireplace with your own hands
Finishing work
It is necessary to install shelves, a finishing countertop, a frying grid and a tray for coals. The latter is made from a sheet of steel with folded edges. The minimum side height is about 5 cm.
You can take the grate from your old oven or buy a new chrome model. The main thing is that it fits in size. Tabletops and shelves are made of moisture-resistant material.
The top of the pipe should be covered with a stainless steel roof. This will protect the smoke windows from rain. The monolithic slab is covered with tiles or porcelain stoneware to prevent moisture from penetrating inside.
You can build a full-fledged gazebo around the barbecue stove, the canopy of which will cover the structure
It is very important that flammable objects and materials are located away from brick walls, which become very hot.
By welding the smoking chamber, the functionality of the stove will expand.
Video instruction
Conclusion
Building a barbecue oven with your own hands is not difficult if you plan each stage competently and slowly and prepare well for the work. The most important stage is masonry. The longevity of the service of the entire structure will depend on the quality of its implementation.
f865172a8d51505597d87f00badffcfb.jpe
Preparation of tools and materials
To make your own fireplace, you need the following set of tools:
- Master OK;
- Mason's hammer or rubber mallet;
- Notched and regular spatula;
- Buckets for mixing the solution;
- Hammer;
- Screwdriver;
- Construction mixer or drill with an appropriate attachment;
- Building level;
- Water level;
- Plumb;
- Roulette;
- Pencil or marker;
- Bulgarian;
- Device for cutting tiles.
The list of required materials is as follows:
- Red stove brick brand M-200;
- Facing brick;
- Steel corners with a section of 50x50 mm;
- Steel strips measuring 50x5 mm;
- Self-tapping screws with wide washers;
- Plastic dowels for self-tapping screws;
- Heat-resistant masonry mixture;
- Heat-resistant mastic;
- M500 grade cement and sand;
- Thermal insulating foil material in the form of plates;
- Minirite slab (required for installing a fireplace in a wooden building);
- Ceramic tiles or porcelain stoneware;
- UD and CD profiles for drywall;
- Drywall sheets;
- Set of decorative grilles for ventilation windows;
- Heat-resistant sealant.
Block barbecues
Popular barbecue model made of blocks and bricks
Portable block grill
We removed two blocks and now it’s no longer a grill, but a barbecue
The main feature of this project is that you can always disassemble it, put it in the back of a car and transport it wherever you need it. Since there is no mortar, glue, nails or anything like it in its design, the block grill can be easily moved with minimal effort. You can install it anywhere and forget about it, as the design is weather-resistant and requires no maintenance at all. How to build a grill, I think, instructions are not needed.
If we're talking about blocks, check out a few more options. Here is a collapsible barbecue grill made from blocks with a shelf. It can be assembled like a construction set, anywhere, and after a picnic, it can also be disassembled and stored in a shed until the next event. But it is advisable that you have a permanent area lined with tiles or stones; usually there are always crowds around the grill, everyone wants to see how meat is fried, proven by practice. Therefore, it is not a bad idea to provide a paved path, it can be made of the same material as the site, then you have a chance to preserve the lawn.
And here is another barbecue made of blocks, complete with a bench made of the same material. If you put cushions on the bench and hang a couple of lanterns, you’ll get a very cozy place. And, most importantly, you can make all this beauty yourself. Everyone loves barbecue, and if you decorate everything with imagination, it will delight your family and guests, but in fact, you don’t need to do almost anything, just drag the blocks around for an hour :)
Here's a step-by-step tutorial on how to make a BBQ grill out of blocks. This is a stationary structure with finishing and an upper frame. However, for such designs there is no need for instructions; you can put together any combinations yourself. Photo source www.woohome.com/diy-2/cool-diy-backyard-brick-barbecue-ideas
Grill smokehouse made of blocks
Or this kind of grill and smokehouse, on which you can cook a lot of things at once. This project is labor intensive, but simple and can be completed in just one day. The job doesn't require a lot of skill—it's not like you'll be stirring anything or inserting rebar supports—but you do need to be precise when laying the foundation.
All materials are available, although sheet metal will likely be the most expensive component, so take the time to shop around.
The main thing is to make a plan.
First, sit down and decide what size grill you want. The author decided that he needed a 1.5 x 2.5 m barbecue, which, of course, commands respect. After this, you need to decide at what height the work surface will be, so to speak. In this case it is 60 cm.
Next, you need to think about where you are going to place the holes to place the charcoal. For a grill this large you will need holes at both ends. This is needed for two purposes. First, heat is needed at each end to distribute it evenly across the entire surface. Secondly, having two holes on opposite ends will help with temperature as you can now control the air flow.
Regarding materials. The quantity will naturally depend on the size. In addition to the blocks and metal grating, you'll need a metal roof—corrugated metal roofing is used to cover the pit during cooking. This material can be purchased at most hardware stores, but you won't cook on a galvanized surface as it releases toxins. However, it works great as a coating without any danger of contamination.
Yes, there are also metal corners, they are needed to support the block and as supports for the grille.
Step-by-step photos of production:
Photo source caughtsmokinbbq.blogspot.co.uk/2011/10/how-to-build-bbq-pit.html
Installation technology
Installation of a factory fireplace kit is carried out using the following technology:
- Connection to the chimney . Since the weight of the finished structure is much less than a capital fireplace, it can therefore be installed even on the top floor of a building. The fireplace simply crashes into an existing chimney using conventional technology, more details about which can be found in the corresponding article.
- Installation of the base . The same tiles or porcelain stoneware are used as the base. The base material is secured using heat-resistant mastic.
- Dry assembly . Before installing the fireplace, it is worth checking the kit for completeness, for which you just need to assemble all the elements without using a solution.
- Leveling the firebox . In order for the design to work correctly, you need to think in advance about how to install the fireplace correctly. The firebox in factory fireplace kits is usually installed on legs equipped with adjusting bolts that allow the structure to be adjusted according to its level.
- Taping the blocks with tape . When assembling the structure dry, it is advisable to seal them with tape around the perimeter. This operation allows you to quickly and painlessly remove all traces of mastic from the floor after installation.
- Installation of fireplace blocks . First, the ends of the blocks are coated with mastic using a narrow spatula. In this case, you need to use a little mastic so that it does not protrude beyond the edges of the blocks. The supporting elements are also smeared and installed in their place, after which the external blocks can be installed. The installed blocks must be checked for alignment before the mastic hardens. During installation, it is worth taking masking tape and using it to secure the blocks so that they do not fall apart while the mastic is in a fresh state.
- Decoration . Since the standard factory kit does not include finishing elements, they will need to be purchased separately. Cladding a cast iron fireplace can easily be done with artificial stone, which is easy to install and looks good.
- Assembling the chimney duct . The technology for creating a chimney duct looks the same as in the previous case, but thanks to fusing the chimney into the wall, you can get by with a single-chamber duct that does not require division into sections. At the end of installation, openings are cut in the surfaces of the box for installing ventilation grilles.
Conclusion
There are many types of fireplace designs, and the complexity of their arrangement varies over a fairly wide range. The described installation technologies are quite simple, so you can safely use them when assembling a fireplace yourself. In any case, before installing a fireplace with your own hands, you need to carefully and in detail study each stage of this work, so as not to encounter unexpected difficulties in the process.
Do-it-yourself stove installation
Before starting work, the installation location, the layout of the brick stove, and the availability of all building materials are clarified.
The foundation is planned first; how deep and wide it will be depends on your plans. It also depends on the plans whether a concrete platform will be built near the stove, what additional functions the outdoor stove will perform, and what material will be used.
For masonry you will need the following: sand, cement, crushed stone, rubble, reinforcement, refractory bricks, facing tiles and a trowel.
Roofing felt is spread on top of the concrete foundation in two layers; it will serve as a barrier to moisture. You need to lay them in a checkerboard pattern, the standard laying is half a brick.
Add clay as a binding solution, so it will be resistant to high temperatures, and if you use only cement and sand, the structure will crack.
Check each row with a horizontal level. In order to fasten the walls together, reinforcement or a metal corner is taken.
122054a47c82abd08dd6051beb95a47b.jpe
After the installation is completed according to your drawings, you need to treat the seams - cement mortar is made and rubbed into the seam. Afterwards, when the solution has not yet dried, you need to remove the excess and embroider with the means at hand.
You can use a pipe as a chimney or lay a brick chimney, gradually reducing the width of the pipe from the stove.
A stove in the yard, just like a home stove, requires care; you need to constantly keep it clean, since with each subsequent cooking, cleaning will become more and more difficult, and the appearance will be spoiled.
Any owner will want to be proud of his construction in a private house or country house. Because it will always be in sight and constantly in use. Having spent a small amount of money on building materials, you will forget about the unstable collapsible grill and enjoy your vacation.
Furnace piping
In rare cases, a room is heated by a stove due to convection currents. The very status of the device implies the most efficient use of released energy. Therefore, the heating system is supplied with a coolant, which can be water circulating through pipes or air moving under the influence of forced convection. Connecting the coolant channels to the furnace is called piping.
Some problems associated with the installation of a fireplace stove are concentrated in the incorrect installation of the main line. With water heating, circulation is provided by a pump or it is carried out due to natural convection. In the second case, it is important to maintain a certain slope of the line, since a reverse slope will lead to stagnation of liquid. In a closed heating system (case 1), the slope does not matter, but the system has strict requirements for tightness. Even a small amount of trapped air will stop circulation.
The water circuit with which the fireplace stove is equipped has an inlet and an outlet for connection to the main line. If they are not specifically marked, then you must remember that the hot water outlet is located below the cold water inlet.
Heating circuit connection diagram
Piping the air duct is not difficult, but laying the line under the panels or covering it with plasterboard is a labor-intensive process. A furnace that uses air as a coolant is equipped with a fan system that drives air through the main line. By adjusting the supply dampers, you can direct heat selectively to different rooms.
Good to know: What is an electric mini oven, how does it work
Instructions for making a portable barbecue
The model of a collapsible barbecue consists of four legs, walls with holes and a bottom. You need to think over and draw your option in advance.
The list of required tools includes:
- grinder,
- welding machine,
- drill and drill bits,
- mounting hardware.
Step-by-step instruction.
- On a sheet of metal it is necessary to measure and draw the bottom and walls.
- The metal “pattern” is cut out using a grinder, the edges are folded and connected with a weld.
- Drill holes for air.
- You can make slits on the walls for fixing skewers.
- The easiest way to make support legs is from a metal corner, welding (or screwing) them to the base of the box.
The art of fireplace insertion
Different types of trees make good fuel for a wood-burning fireplace. You should not use logs from coniferous trees such as spruce or pine. This is due to the fact that it burns out quickly and a lot of soot forms on the walls of the chimney duct. The best option would be birch or oak. They are distinguished by: long burning, hot flame, good heat retention and high level of efficiency. For kindling you should use splinters, paper, brushwood and wood chips. After they flare up, you need to add larger logs.
Firewood for the fireplace and interior design. Stylish and original
Tips and instructions explain how to make a fireplace in your home on your own and save money, since the services of professionals are quite expensive, and not everyone can afford to call them. A fireplace for heating a home is an excellent alternative to stoves. It fits perfectly into the interior of the room and decorates it. Having created it, you can feel the warmth and comfort, enjoying the burning of the flame in the evening.
Walling
If you lack experience, it is recommended to use the developed diagrams for the construction of a barbecue. They do not carry any secrets, just to get a strong firebox with the ability to install a grate and a brazier, you need to properly tie the bricks. After laying 2-3 layers, you will have to take a short break, otherwise the weight of the entire fireplace will fall on the bottom layer of the mortar that has not yet hardened.
The process of laying an outdoor fireplace
So, after the foundation has completely hardened, you can begin laying the barbecue.
- The structure is made of half a brick, as it is not subject to heavy loads. Complex fireplaces are already being built in brick. Strength will be created by the staggered laying method. It involves shifting all the bricks by half a brick cyclically.
- When forming one row, before moving on to the next, do not forget to insert fastening elements for shelves and grids. For this purpose, metal products or bricks are used, laid perpendicular to the row and forming protrusions inside the firebox. If this nuance is overlooked, you will have to dismantle the entire grill.
- The fryer is mounted on the completed fasteners. It must have holes through which the air necessary for combustion will flow.
Steak grill
The considered variant of the firebox structure is the simplest and can be complicated by closed structures. But you should not start your first independent work with complex options, because the complication leaves a certain imprint on almost all parameters: the formation of a row, jumpers, the number of rows, etc.
Preparing for bricklaying
Brick and concrete are the best materials widely used for constructing a fireplace. Bricks should be prepared before laying, namely, all rough, uneven specimens, as well as those with cracks and chips, should be rejected. They must have a perfectly flat surface.
Advice! The strength of the masonry can be increased by placing the brick in water for a few minutes to allow the air to escape.
Fireplaces for a private home are an excellent option for heating; this requires clay. It needs to be prepared in advance. Two days before laying, soak the clay in water. During this period of time, add water little by little and mix the solution. You should get a homogeneous mass.
This material will be perfectly complemented by the following publications:
- Fireplace in a wooden house: can it be installed or not?
- How a biofireplace works: consideration of the design and principle of operation
Choosing a place for a stove with a brick grill
When deciding on an outdoor grill, you need to take into account many details. One of them is the right choice of location.
One of the important points is the direction of the smoke. If it constantly ends up in the neighboring area, then it will definitely not be to everyone’s liking. To check, you need to light a fire and trace the direction of the smoke.
37214fada9087ab723fea82ee925e66f.jpe 0a146e87efd0f6467385b03601f23762.jpe
For a brick kiln to be safe, you need to build it taking into account:
- distance from trees and other plantings;
- distance from buildings - smoke should not reach them;
- remoteness of other flammable objects;
- protection from wind and rain - a canopy can be provided;
- artificial lighting or the possibility of providing it so that you don’t have to cook in the dark.
You might think about installing a brick oven near the gazebo or building such a structure in the future. In warm weather, you can gather in it - the owner does not need to stray far from the food being prepared, and the fresh air will only whet your appetite.
Interesting examples in the landscape of the site
To create a relaxation area with a fireplace, it is not necessary to allocate a separate place on the site or in the garden. If the area is small, an open hearth can be built on the terrace.
If the size of the estate allows, then a gazebo with a fireplace is chosen as an alternative option.
They are installed away from living quarters, so there will be no smoke smell in the house. The entire space of the recreation area is decorated in the same style so that it looks beautiful and fits harmoniously into the overall design of the site.
Projects of brick barbecues with a stove
The brick barbecue project with a slab is another important stage and the next step after finding the right place. First you need to think about the configuration and dimensions of the future stove. It’s better to start with a sketch to visualize everything clearly.
You can draw up a project yourself, find a ready-made version on the Internet, or contact specialists. The drawing is important for clarity and determining the sequence of work and calculation of materials.
Brazier oven with closed stove
A grill with a closed hob is equipped with walls on the sides and back. The stove will only be open from the front. At the same time, such a grill can be equipped with an oven.
The closed-type cooking stove is attractive because it makes the food special. Cooking is reminiscent of a Russian oven.
Brazier oven with open stove
A brazier with an open stove is attractive because less material is required to construct the structure. Another advantage is more space. There is nothing above the stove, so you can use containers of any height.
Important points when installing a fireplace outdoors
To ensure that your outdoor fireplace is safe for you and your neighbors, consider the following points for its installation:
- It is not recommended to install it near bushes, trees or wooden structures. This can be fraught with negative consequences.
- It is best to choose an open space for installation that will be well ventilated.
- You shouldn't put a fireplace in a low area, because if it rains and you have to cook, you might just end up in a puddle.