To heat private residential buildings, electrical equipment is used that is connected to a household or industrial AC network. A detailed analysis of the operating principle and technical parameters makes it possible to find out which boiler is better - a heating element or an electrode one. The reliability of the heating circuit installed in the building depends on the correct choice of heating device.
Heating elements for anti-corrosion liquids
Heating elements for anti-corrosion liquids - heating devices are in demand in many areas due to their functionality. Various media are heated to a given temperature limit: chemical additives, mixtures of acids, which are then used for their intended purpose in the preparation of concrete mixtures, flushing pipeline networks. Heating elements for anti-corrosion liquids - used for heating chemicals. additives in concrete or mixtures of acids for flushing pipelines.
Types and applications
Heating elements for anti-corrosion liquids are made mainly of U-shaped double-ended ones. The heaters operate in a wide range of working fluids. Marking in the form of the letter P indicates that the heaters work safely with acids, alkalis, oils, and other aggressive materials.
Heating elements for household use are made of metal alloys that are resistant to corrosion and have high electrical resistance. They are hermetically sealed and have a long service life.
In industry, heating elements for anti-corrosion liquids made of chemically inert glass are in demand.
Main technical characteristics
Technical parameters of heating elements:
- length up to 6 m;
- diameter: 6-18 mm;
- working environment: alkalis, acids, aggressive liquids;
- material of manufacture: stainless steel, titanium, etc.;
- power: depends on length, voltage, diameter data;
- voltage: up to 380 V.
When choosing products, pay attention to the type of heating element, marking, and area of application.
Summarizing
Electrode installations have increased reliability and safety in the event of a liquid supply interruption, but the equipment requires the preparation of a special solution. When the device operates, stray currents arise that destroy metal parts of the structure.
Equipment production is carried out by small companies, while electrode boilers do not provide energy savings. Therefore, it is recommended to use standard heating devices with heating elements produced by large companies in homes.
conclusions
- It is generally accepted that heating a house with electricity is not cheap. This is certainly true if we mean only payment according to tariffs. However, to the price of heating you need to add the cost of the equipment, as well as the costs of its maintenance and repair.
- If you compare bills for electricity, firewood, coal, pipes, boilers and other equipment, you can come to the conclusion that private heating with electricity is cheaper than solid-state boilers, stoves and other systems alternative to gas heating.
- In addition to money, there is another argument in favor of electric heating - it saves time: turn it on, leave and forget. The only downside is a sudden power outage.
Below, watch a video about how we managed to create cheap heating with electricity for a large private house.
Operating principle of heating elements
The heating element works according to the following principle. When connected to the network, the internal spiral is heated and energy is transferred to the thermal conductor and the outer shell. The heat is then transferred to the surrounding fluid, air or solid material.
When heating a heating element immersed in oil or water, convection currents are created around the tube, which mix the coolant and contribute to its uniform heating.
Electric boilers are known for their reliability and maintainability. They do not have many complex parts, so they are easy to operate and maintain.
In liquid-free heating devices, the heating temperature is usually limited so as not to damage surrounding parts or cause a fire.
To speed up heat transfer, they often use a fan, which circulates air both inside the device and in the room surrounding it.
Radiator electric heating at home
Installation diagram of the heating element in the radiator
Before installing the heating element into the heating system, you need the parameters of the radiator. The main one is the diameter of the connecting pipe. Currently, manufacturers produce products in two sizes - 1/2 and 3/4 inches. Then a comparative analysis of the heating parameters is carried out before and after installing the heating element.
Connecting the heating element to the existing heating
If it will be used as an additional method of heating water, you need to take into account the change in hydraulic pressure when passing through the radiator. Since the flow diameter of the system this month will be smaller, it is recommended to install a pump of higher power.
They are often installed in old cast iron batteries. Before performing work, you must first check the direction of the thread of the pipe (right or left) and also measure its diameter. Then you should follow this scheme:
- Coolant drain. It is prohibited to install a heating element into a heating radiator if there is water in it;
- Checking the battery level. Even at a slight angle of inclination, the likelihood of air pockets significantly increases;
- Installing the heating element into the pipe. To seal the holes, you must use the gaskets supplied with the heating element or make them yourself;
- Installation of a unit with a thermostat, if included.
An example of installing a heating element in a cast iron radiator
After this, you need to fill the system with water. Using the installed Mayevsky crane, possible air pockets are removed. Before switching on, to ensure safety, a tester is used to check any possible heating coil-battery circuit. If there is one, you need to dismantle the heating element and install it again, improving the sealing.
Radiator electric heating
When organizing heating using heating elements made by yourself, installation of a pipeline is not necessary. A heating element must be installed on each radiator. At the same time, it is possible to install models of different power depending on the thermal conditions in a specific room of the house. The advantages of such a system are as follows:
- Saving on the purchase of materials and reducing the labor intensity of installation work;
- If you use a heating element with a thermostat for heating and a temperature sensor connected to it, the degree of heating of the room will be adjusted automatically;
- Minimum system heating inertia.
But all these positive qualities can be offset by the total cost of service. Therefore, before heating with electric heaters, you need to calculate not only the cost of purchasing materials and components, but also the subsequent costs of electricity. Only after this should a heating system of this type be introduced.
Warehouse storage of heaters
The warehouse containing tubular electric heaters must meet the requirements of GOST 15159-69 for light (L) storage conditions:
- heated storage must provide protection of products from precipitation;
- storage temperature from +5 to +40°C;
- relative humidity not higher than 80% at a temperature of 25°C.
Anti-corrosion protection is provided by wrapping the products in waxed paper and placing them in covers made of polyethylene film. Storage can be carried out in transport containers or without packaging. For this purpose, an internal packaging option (VU-0) is provided in accordance with GOST 9.014.
Operational production control
To improve the quality of manufactured products during the production of heating elements, mandatory intermediate control and testing are performed:
- measuring the resistance of the spiral - after performing step 6;
- high-voltage testing of heater insulation using a breakdown device - items 10, 12, 16;
- thread quality control – clause 14;
- measurement of insulation resistance value – item 18;
- control of heater sizes – items 11, 16, 21;
- control of the resistance of the heating element - clause 21.
Method 7 - infrared heaters (the most economical)
Infrared heaters are considered the most economical of all types of electric heaters. They do not need heating elements and water pipes. Infrared heaters heat objects, not the room. Then the heated objects heat up the air. If an electric boiler can be compared to a kettle, then an infrared boiler can be compared to a microwave oven.
Infrared panels are especially popular. They are installed on the ceiling or walls of residential and industrial premises. Since the heating area is increased, the room becomes warmer faster than usual. Such a panel can be used as an independent heating source or as an addition to an existing system. An infrared heater goes well with electrode boilers. For example, an infrared heater can only be turned on in spring and autumn, when it is too early to turn on the main heating, or when it suddenly gets cold outside.
Pictured is a GROHE infrared panel, Germany
PS or answer to those who like to calculate NPV
There are specialists (usually with an economic education) who could say: “All this is nonsense! The author cites figures that are far from the real economy - he cites bare numbers, but in reality it is necessary to consider at least NPV (net present value), and then the whole picture may not be so rosy at all!”
Such arguments look ironclad. But only until we take and calculate this terrible NPV. Simply put, we can calculate how much we would earn if we had an amount of 145,000 rubles. and we could have bought an induction electric boiler, but we decided to save money and bought a shadow one for 40,000. And the saved money (105,000 rubles) would have been deposited in the bank at interest, and we would have even made money on it. Every year we would gain about 10% (in fact, most likely even less). By the end of the 5th year, we could withdraw 169,100 rubles from the bank. Those. would have received an additional 60 thousand in profit. There would be no limit to the joy until we returned to the calculations for our heaters. During the same time, we lost 321,940 rubles. - more than 5 times more than they earned. As they say, the miser pays twice. And then he pays extra.
Manufacturing technology and sequence
The production process of electric heating elements is divided into separate operations. You can see the stages in chronological order below:
- Cutting pipes into blanks along the length of heating elements;
- Cleaning workpieces from oil by annealing the tubular shells of electric heaters;
- Countersinking and straightening, with degreasing of tubes with acetone;
- Cutting wire to size for rod contacts;
- Rolling threads onto rods;
- Spiral winding;
- Washing the spirals and contacts in a degreaser and drying;
- Welding spirals to rods;
- Drying, sifting and magnetic separation of filler;
- Assembly of heating elements, filling with filler under pressure to give it a monolithic structure;
- Rolling and crimping of the assembled tube, cutting the ends to a given size;
- Additional firing for increased flexibility;
- Applying markings to the surface of the shell;
- Thread rolling and rod cleaning:
- Removing excess filler from the ends of the heating elements along the length of the insulators;
- Bending heating elements in accordance with the drawing;
- Running in and cleaning of ends;
- Insulator insertion and sealing;
- Calibration of contact rods;
- Screwing washers and nuts onto the contacts;
- Carrying out acceptance tests, packaging and transfer of products to the warehouse.
As a rule, it is carried out using a pipe cutting machine and a circular knife. After cutting the pipe into blanks, the blanks are packed into bundles.
The shells are annealed in a muffle furnace at a temperature of 400 degrees. A chamber electric furnace is used for annealing.
At this stage, a countersink machine or countersink is used. The tube is cleaned with acetone using a metal cleaning rod.
It is carried out using an SRS-2 automatic machine or a chopping knife and a rotating table.
Using a calibration ring, a thread rolling die and a machine, the rods are threaded.
A special machine for winding spirals allows for maximum precision and maintains high production speed.
The metal bath is filled with degreaser, which does not need to be completely replaced: workshop workers add it as it evaporates.
The spiral is welded to the contact rods using spot welding. A contact electric welding machine is responsible for the operation of spot welding.
The filler is dried in a muffle furnace at 600 degrees and sifted through a special sieve.
Heating elements are assembled on a special stuffing stand, with strict adherence to temporary standards. They are filled with a mixture of periclase and quartz sand. This is one of the longest stages in creating an electric heater.
Trimming the ends of the heating element must be carried out with high precision and even higher speed. Only experienced workshop workers are allowed to do this work.
Produced at lower temperatures, which minimizes emissions into the environment.
Symbols with basic information about the heating element, corresponding to GOST, must be applied by impact, laser or electrochemical methods.
These steps are also carried out using a press and machine. The rods are cleaned with special knives.
This stage is carried out using a special tool - a cutter. The accuracy of the work is determined using a caliper.
Electric heaters are bent either using a machine or using a workbench and a device for manual bending.
The ends of the heating element are cleaned using a special knife.
Another point that requires utmost care from workshop workers. Immediately after this stage, the insulation resistance value is measured
This step is carried out using a calibration ring. The process takes place in a special oil bath.
The nuts are screwed onto the contacts using a nut head.
Each product is packaged with the utmost care to minimize the risk of damage during transit.
Additional functions of electric heaters
Above we discussed the simplest designs of devices that do not have any built-in adjustment mechanisms.
The thermoregulation unit can have mechanical or electronic automation. The latter is more accurate, but is demanding on the parameters of the home electrical network
But electric water heaters can be equipped with simple automation that provides the device with additional functions.
These include:
- Thermoregulation . Heating elements with a built-in thermostat for heating have a temperature sensor that is triggered when the working environment is heated to a certain level. The electric heater is adjusted from the outside of the flange.
- Antifreeze . This function is provided by a simplified thermostat, which operates only when the temperature drops to 0-2°C. It prevents water from freezing in heating pipes, consuming a minimum of electricity.
- Turbo heating , which provides forced heating of the working environment during the initial start-up of equipment. It must be remembered that the electrical wiring of the room must withstand a short-term increase in power.
There are not many devices that support additional functions, because the operation of heating devices as a whole is often regulated using a separate automation unit.
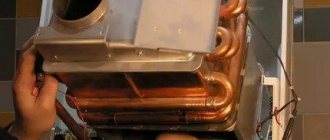
Internal structure of electric heaters
It is convenient to consider the device using the example of a tubular model. An electric heater is a ceramic or metal tube filled with a thermal conductor with a spiral located inside. In the place where the tube is fixed to the flange there are insulating bushings that make it impossible for the conductive spiral to contact the heating element body.
Most models of heating elements use similar components, but their durability may vary depending on the build quality
The electric heater is mounted primarily with a flange connection, which allows the internal environment of the heating device to be sealed from the external space. The disadvantage of this design is the impossibility of replacing the spiral if it burns out internally.
Advantages
Infrared heated floor advantages and disadvantages, main characteristics and installation principle
Compared to open “boilers”, dry structures have many advantages. For example, let's look at just a few of them:
No scale on the heating element
The rate of formation of this unpleasant layer is affected by the quality of the water and the surface area of contact between the heater and the liquid. The harder the water in your area, the faster scale will form. A thick lime layer reduces the quality of water heating, and the operating life of the heating element is reduced.
The dry heating element is protected from such trouble. In this case, direct contact with water does not occur. This means there is no scale on the heater either.
Compact dimensions
A dry heating element is relatively small in size and takes up much less space than its “wet” counterpart. Thus, the size of the storage tank itself is reduced. Most often, manufacturers install two or even three heaters in one device. This allows the consumer to independently regulate the load. If you need to quickly heat a large volume of water, turn on all the heating elements at once and you will get hot water in just a few minutes.
Even if one of the heaters burns out, nothing bad will happen. During the repair period, you will simply use one of the remaining ones and will still be left with hot water.
Excellent performance
This is another advantage of dry heating elements. Since there is practically no scale formation on such a heater, the speed of obtaining hot water increases significantly. In this case, much less electricity is consumed than when heating water with a “wet” heating element.
By itself, each dry heating element installed in a boiler most often has a lower power than a similar option with a “wet” element. But since water heaters of this type usually use several heating elements, the total power will be significantly lower than that of a “wet” tubular heater. And the consumer can decide whether to use it in full or partially.
TOP 3 best water heaters with dry heating elements Timberk
- Timberk SWH FED1 80 V
- Timberk SWH RE15 50 V
- Timberk SWH RED1 100 V
Ease of maintenance
Water heaters with a dry tubular element have one important feature. They are designed in such a way that if the heating element suddenly fails, you don’t even have to drain the water from the tank to replace it. It is enough to unscrew the protective flange, remove the element, inspect or repair it and insert it back.
Long service life
Due to the lack of contact with scale, dry heating elements have a long service life. One such element is enough for an average of 5 years of uninterrupted operation. While boilers with conventional heating elements fail once every 2-3 years. At current prices for components, this allows you to save a lot.
Dry start protection available
Absolutely all models with a dry heater are equipped with a protection system against switching on without water. If there is no water in the heater tank, the system simply will not allow the unit to turn on. Dry start protection will prevent the tubular heater from burning out. Even if for some reason it does not work, the failure will only affect the heating element. Other boiler systems will not be affected.
Variability
Many dry heating elements have a completely identical design. This allows the same element to be used for different tank models. So in case of repair, you will not have problems with components.
No problems with air locks
Water heaters equipped with dry heating elements are not at risk of developing internal air locks. For models with “wet” heaters, this can result in expensive repairs.
See also -
Peculiarities
Electric water heaters are in great demand, due to which such products are presented in a wide variety on the market.
The demand for such devices is determined by the high cost of hot water supply, as well as periodic shutdowns of hot water in some areas. The latest models of boilers have a special element, due to which water is heated in a closed container. It is an internal battery. Such a device is usually called a heating element. Based on the accepted abbreviation, the heating element stands for “tubular electric heater.”
The device is assembled from a wire spiral, which is placed in a metal sheath, due to which the wires do not come into contact with water, but heat the tube. In the heater, such a part is located inside, in contact with water during operation. As a result of the passage of current through the heating element, the liquid in the boiler is heated. The metal tube is usually made of stainless steel or copper alloy. Electric heating elements are the main elements of water heating tanks of any type. The electrical network serves as the power source for the device.
Everyone knows that water and electricity together pose a danger to humans, which is why manufacturers are trying to produce devices that have a high level of safety.
Heating elements installed in water heaters can be of two types. Each type of element has specific features.
Possible faults
According to experts, the service life of heating elements in boilers is approximately 5 years. Most often, the most common cause of equipment failure is hard water. To extend the service life of the device, regular preventive maintenance is needed, which consists of cleaning the anode and the heating element itself from any scale that has appeared.
The main sign that the heating element is broken is a lack of heating and automatic protection is triggered. There are several options for checking an element for its functionality:
- Using a simple light bulb. To do this, you need to assemble a serial network, which consists of a light bulb and a heating element connected to electricity. If the light is on, then everything is fine with the heating element and there is no need to replace it.
- Using a tester, you need to determine the resistance of the heating element. If the resistance is zero, then the heating element must be changed.
Replacement of elements must be done with devices that fully correspond to the boiler capacity. The steps in this case are as follows:
- First you need to turn off the power and water supply. Afterwards, the liquid is drained from the storage container and the top cover of the device is removed.
- Then you need to check the input terminals using a phase meter for the absence of current.
- The bolts that directly secure the heating element are unscrewed, then the wiring cable is removed.
- It is imperative to determine the condition of the contacts of the new heating element. They must be dry.
- Then, simultaneously with the heating element, the anode, which is intended for protection, is also replaced.
- When installing a new element, only high quality seals are used without any defects.
- Installation is performed in the same way, but in reverse order.
- At the end, the storage tank must be filled with water, and the remaining air must be drained from the tap, which is designed to supply hot water. Afterwards, all that remains is to connect the water heater to the electrical network and check its functionality.
Filling the radiator with water
How much liquid is needed for such a heater?
Mistake #10
When filling a radiator, you don’t want it to end up 100% full of water.
Filling occurs through the hole of the already installed passage plug. First, fill the radiator up to the neck.
Then you set it perfectly level and unscrew the plug or the Mayevsky valve (not the fitting itself), draining the excess volume.
If the battery is already hanging on the wall, you can use a small watering can with a tube or hose stretched over the spout.
Mistake #11
Try not to use regular tap water.
The water should be soft. A hard one will kill your heater very quickly.
Distilled or rainwater is best (it's free). As a last resort, water from an osmosis filter.
Just enough water is needed so that it stops flowing through the hole under the Mayevsky tap. That is, the liquid level should end exactly at the level of the small hole in the passage fitting.
When pouring water along the edge of the hole, you will automatically get the desired level of the liquid column, which will ensure uniform, proper circulation.
One section of a cast iron battery (MS 140-500) holds about 1.5 liters of water. In aluminum (height 500mm) - no more than 0.35-0.45 liters. The required volume is calculated by the number of ribs.