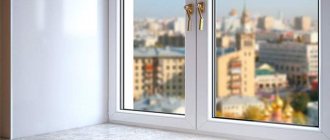
After installing plastic windows, the window opening does not look the best: foam, pieces of plaster stick out, and the wall material is visible in places. All this “beauty” is closed in various ways, the most practical, fast and inexpensive of which is plastic slopes. It is better to make them from sandwich panels (two layers of plastic with polypropylene foam between them). They are dense, durable, made of good material.
There are two main methods for installing plastic slopes: with and without a starting profile. Both come with step-by-step instructions and photos. Decide for yourself how to attach slopes to plastic windows. Both methods give good results.
Material properties
Plastic slopes made of sandwich panels
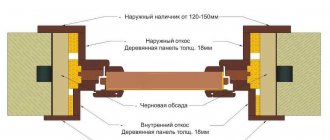
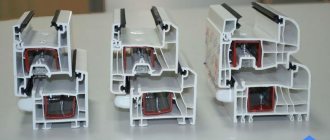
The structure of standard panels looks like a sheet, the outer side of which is solid-sheet PVC, the inner side is sheet polystyrene, and there is insulation in the middle. That is why this finishing option was called the American word - sandwich panel. They differ only in the material of the facing side, and the installation remains the same for any type.
Important! People call sandwich slopes – warm slopes. This is due to the insulation that is present in the panel
Once you have already imagined what they are, I will tell you about their advantages:
- Despite their popularity, they remain accessible to everyone due to their reasonable price.
- This is not just a building element, it is also an independent device that has its own set of components.
- The interior is filled with mineral wool or foamed polystyrene - this indicates the non-flammability of the structure.
- Excellent thermal insulation performance, as well as additional sound insulation, is achieved with their help.
- This finishing method is durable and strong.
- If you do the installation yourself, you must strictly follow the installation technology. In this case, resistance to moisture and mold will be at a high level.
Sandwich panels for finishing slopes
For those who have decided to change the windows in their house or apartment and install the slopes with their own hands, I will give you advice: you need to wait at least 24 hours after installing the windows and only then finish the slopes with sandwich panels. The advantage of installing a sandwich over plastering is that installation by hand does not require painting skills and is a clean method.
It is important not only to correctly install the slopes, but also how to cut the panels. It is better to cut plastic elements with a circular saw on plastic or aluminum. At the same time, a fine tooth pitch can cope with the task perfectly. In addition, the material must be cut at a temperature of +5 degrees Celsius - if the temperature regime is not observed, then due to a decrease in impact strength, chips may appear on the cut line. If the slopes are finished with PVC sandwich panels, then you can cut them with many tools. But the most optimal one is a hacksaw for metal; it can also be used for wood. You need to cut face up and with a slight angular inclination. At your own peril and risk, you can cut with a grinder, but if you apply a little too much pressure, the panel may break.
Varieties
When renovating an apartment in a new building or replacing windows, you will have to choose how to finish the openings after installing modern structures with double-glazed windows.
Window slopes can be finished using the following materials:
- plasters;
- drywall;
- gypsum fiber;
- plastic panels.
What materials are most often used for installing slopes?
There are three most commonly used methods of giving slopes an aesthetic appearance, each of them is good in its own way and can be used in combination with insulating material. So, PVC panels can be installed on window slopes, plasterboard can be glued or fixed to the sheathing, or the surface can be leveled with a plaster and putty mixture.
Slopes made of PVC panels
For finishing using this technology, plastic lining and auxiliary fittings are used. They help to hide the edges of the panels at the junctions of horizontal and vertical surfaces, as well as at the lines where they join the window frame and at the outer corners of the slopes.
Slopes made of plastic panels look very nice
In addition to the usual PVC lining, sandwich panels specially manufactured for this purpose are used for cladding, which consist of layers of plastic and foamed polystyrene. This material will facilitate installation, since you will not have to separately adjust and install the insulating material. In addition, this approach also often allows you to do without some elements of fittings.
Sandwich panels perform both decorative and insulating functions
Like regular lining, sandwich panels are great for decorating slopes around plastic windows, especially since, if desired, you can choose the desired PVC color that will be in full harmony with the shade of the window frame.
It is quite possible to install plastic slopes yourself, without resorting to the help of craftsmen - you just need to study the installation instructions and scrupulously follow them during the work.
Plastered slopes
This finishing method can be called traditional. High-quality surfaces will last a long time without losing their neat appearance. However, it should be noted that without a layer of insulating material, plaster cannot become an effective barrier to the cold coming from the window opening. The disadvantages of this method include the labor intensity and duration of arrangement, since the solution is applied in several layers, each of which must dry well. In addition, plastering work requires certain experience in its implementation, and without it, it is quite possible to ruin the surface, wasting time and money.
The old proven method of plastering slopes does not lose its relevance
The process of finishing slopes with plaster mixtures is quite “dirty”, and since it takes a lot of time (sometimes it takes from one and a half to two weeks), the room where the work is being carried out will need to be cleaned daily or not used at all.
Plasterboard slopes
Often, apartment and house owners prefer to decorate window slopes with plasterboard. This material is easy to install, it can be used together with insulation, the sheathing is quite durable and perfectly levels surfaces. In essence, drywall is dry plaster, but its installation is much faster than the “wet” version. This method does not cause large pollution in the room during work and does not require much experience to perform it. It is enough to follow the already tested instructions to carry out the finishing carefully and correctly.
Drywall slopes are very convenient for installation work.
Today, several types of drywall are produced, and one of them (GKLV, greenish in color) can withstand high humidity - it should be given preference for the design of slopes. Difficulties during the installation process can be caused not by the installation of the material itself, but by its subsequent finishing for applying a decorative coating - this is a primer and putty. Without these works, “dry plaster” can quickly become unusable, since it has a rather fragile structural structure and can be used for a long time only when covering the cuts and finishing the surfaces.
Advantages and disadvantages
Positive technical characteristics of the material:
- Thanks to the surface structure of sandwich panels, which is similar in appearance to the structure of plastic windows and window sills, the material does not require additional decoration or processing.
- If we compare the panels with drywall, the latter clearly loses, as it is susceptible to cracking and getting wet as a result of the influence of condensation. Sandwich panels are reliably protected from this effect, thanks to the plastic coating.
- The panels provide better thermal insulation. Although the product itself does not allow cold to pass through, most often the structure is additionally insulated, but this is done more in order to immobilize the panel and obtain a reinforced bond of the material with the window block using polyurethane foam.
- Cleaning the surface of the panels is not difficult. Any stains can be easily removed from the plastic coating using a cloth soaked in soapy water.
- The panels are easy to install. which does not require any special skills.
- Long service life - according to the indicators specified by the manufacturer, it is 15-20 years.
The presence of shortcomings in sandwich panels is mainly due to the quality of the material itself:
- Poor quality panels, as a result of the influence of high temperatures, usually formed due to direct sunlight, can become deformed and acquire a yellow tint.
- In addition, poor quality also affects the durability of products, which, if manufactured unscrupulously, leaves much to be desired.
When purchasing, it would be a good idea to pay attention to the manufacturer and make sure that the seller has certification of the product
Installation instructions
After installing new windows, you need to wait a day for the final polymerization of the polyurethane foam and after that you can begin finishing. Installation of window slopes made of sandwich panels is done according to the following principle.
- Initially, you need to take the dimensions of the window openings. All parameters of the places where finishing will be carried out are measured (parameters may sometimes differ even with a fairly large scatter).
- Window openings are prepared for installation. All weak parts of old plaster and masonry are removed and replaced. All surfaces must be treated with antiseptic agents to protect against the formation of mold and mildew. Excess polyurethane foam is trimmed from the windows.
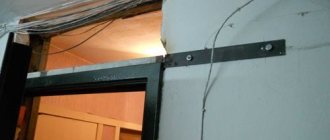
- A starting “P” profile is installed around the perimeter. It is attached to the surface of the opening with self-tapping screws, in the corner formed by the cut of the wall and the window frame. The fastening pitch is 150-200 millimeters. From above and below, sections are inserted into the installed profile to the entire depth of the opening.
- Panel blanks are prepared to the required size. The cutting of individual elements is done using a stationery knife. In this case, the protective PVC layer with part of the polystyrene foam located inside is cut through on both sides. The resulting cut ends can be trimmed with sandpaper on a grater.
- First, the upper sandwich panels for the slopes are installed, followed by the side elements. At the same time, insulation is placed in the resulting space (if the slope is “warm”). Installation without insulation occurs with the application of liquid nails to the surface of the workpiece and additional gluing to the wall.
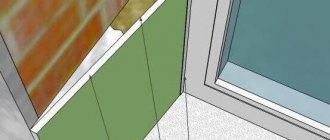
- The corners of the window opening are completed by mounting the corners in the form of an “F” profile. To do this, measure and cut individual profile elements with a length greater than 50 millimeters on each side. They secure the free ends of the panels, and the edges are overlapped. Using a linear line, the joints are marked diagonally from the corner to the opening. Both ends are cut along the mark. The result should be a beautiful joint with an angle of 45 degrees.
- All joints must be carefully sealed with sealant.
Before installing the “F” profile, you need to fill the space between the panels and the wall well. The corner near the window is carefully foamed, the main cavity is filled with insulation. Or, as an option, completely fill all the voids with foam.
The construction of slopes from sandwich panels is a good alternative to the more labor-intensive plastering option. Their installation does not require a whole list of “dirty” work on applying plaster with further leveling and finishing painting.
To some extent, sandwich panels for window slopes and plasterboard are inferior, structures made of which are more sensitive to moisture and also require finishing plaster.
The only competitor for quick and easy installation may be plastic panels, but they do not have their own insulation. If you choose between sandwich panels and ordinary plastic, then the former win in terms of heat and sound insulation.
How to cut the right size
When starting renovation work, every builder is faced with the main task - correct measuring measures. After all, the integrity of the structure and its attractive appearance will depend on the quality of the selected dimensions and finished cut sheets. Therefore, SIP plates should be prepared as follows:
- First you need to prepare the surface for installing slopes, level the walls, cut off excess installation materials after installing the window or doors;
- Then the stage of measurements and transfer of data to layers of construction products is carried out.
- Measuring work must be carried out in stages, first at the top, from corner to corner and depth, then using devices for cutting SIP panels (a jigsaw is quite suitable), cut off the required size of the plate.
- Using a building level, you need to attach the finished sandwich panel to the future slope and see whether the product fits tightly to the wall, at the right angle or not.
- If everything is done correctly, the same manipulations are performed with the side walls and the bottom (if necessary) of the opening.
- When transferring slope width data to a multi-layer building sheet, 10 mm must be added to this indicator. This is necessary for high-quality pairing of the product with the window frame.
Important to remember! In order for the slope structure to have a beautiful, holistic appearance, sandwich panel plates should be cut to strictly measured widths so that the plates do not protrude beyond the edges of the walls. In this case, after finishing, the wall will smoothly transition into the constructed slope
Also, when carrying out measuring activities, the possible unevenness of the walls should be taken into account, so measurements should be taken from the top, middle and bottom of the wall (or, respectively, in several sections of the upper and lower strips of the window and door opening).
Let's start installation
Finishing window slopes with sandwich panels
It will be quite easy to make slopes with sandwich panels if you follow the rules and sequence of actions. Even if you don’t have experience finishing slopes with your own hands, you don’t need to be afraid of this work. Before starting installation, you need to prepare tools and materials, you will need:
- Sandwich panel – you choose what material to buy from yourself
- Start profile
- F profile
- Liquid plastic – used as desired
- Tape measure and knife
- A screwdriver with self-tapping screws, a screwdriver and a drill - probably every home has the latter.
Slopes made of sandwich panels in a panel house
I have already said that installation should be done at least 24 hours after installing new windows. Using a tape measure, you need to take measurements and cut out panels for the side and top slopes. Use a knife to remove unnecessary pieces of polyurethane foam and begin installing the starting U profile using self-tapping screws for fastening. They need to be screwed in with a gap of 10-15 cm. Do not forget that the top profile is attached first, and only then the side ones should fit tightly with the top one. Next, we proceed to install the slopes using a sandwich panel; it is inserted into the grooves of the profile. Using the same scheme, we start from the upper slope.
Finishing of plastic slopes
Then there are two options:
- The first is to insert pieces of the starting profile into the vertical bar from above and below, and then the side panels fit into these grooves.
- The second is to simply attach the panel end-to-end with the window sill and the upper slope, after which the gaps are closed using liquid plastic.
When this stage is completed, all that remains is to give the slopes a finished look. To do this, use the f profile; it needs to be secured to the edges of the sandwich fabric. For additional thermal insulation, the voids between the sandwich sheet and the wall are filled with polyurethane foam - this process does not bring any inconvenience, since it is very easy to dismantle the profile. After filling the voids, the bar is returned to its place.
Plastic slopes made of sandwich panels for a balcony block
One more tip! It is better to trim the f profile after installation - to do this, it is attached with an overlap and then a cutting line is outlined using a pencil. In this way, maximum joining of the planks can be achieved.
We also recommend reading:
Convenient finishing of slopes with a PVC profile Beautiful and convenient do-it-yourself slopes made of PVC panels, wood or simply plastered Practical and easy installation of plastic slopes on windows Features of using plastic corners on slopes Arrangement and installation of metal slopes for windows
Do-it-yourself plastering of slopes: doorway putty technology
This type of work, such as plastering slopes, is one of the important stages of finishing a doorway. Not only the appearance of the door, but also its important operational characteristics depend on the quality of work performed. Let's take a closer look at the technology and features of doorway putty.
Why plaster slopes
Plastering the slopes of a door or window opening is of great importance, so a lot depends on the quality of the work. We can identify the main reasons why such surface treatment is performed:
- Crevices. Using putty, you can eliminate all cracks, gaps and cracks around the perimeter of the opening. This will have a positive effect on sound insulation and heat retention.
- Finished look. The slopes take on a neater appearance, the door is ready for use, and dirt and construction dust are eliminated.
- Decor. Plaster gives the opening an aesthetic appearance and can act as the main design.
- The basis for a different decor. In addition to plaster, you can use paint, wallpaper, tiles, MDF panels and other similar materials. However, in any case, you need to first level the slopes and create a suitable surface for finishing.
- Protection. Thanks to putty, it is possible to hide the mounting foam from ultraviolet radiation, which is a prerequisite for preventing its destruction.
Plastering of door slopes is carried out to protect and decorate the opening
Plastering slopes with your own hands is a very real task. To facilitate the process, you need to prepare all the necessary tools and select suitable materials.
Selection of putty
Which putty to choose for finishing slopes with your own hands? The modern construction market is famous for its huge assortment, so depending on the specific conditions, you can choose exactly the mixture that suits you best. The entire range can be divided into the following categories:
- Cement. Durable and quite moisture resistant, but after drying they shrink.
- Plaster. Homogeneous, easy to apply, provide a smooth surface, but do not like a humid environment.
- Polymer. Waterproof, easy to use, durable, but expensive.
In addition, plastering slopes with your own hands is often done in several stages. For the base coat you will need a starting, stronger but coarser mixture. It must be leveled with a plastic and uniform finishing putty. Some manufacturers offer universal formulations, but their cost is much higher.
Types of putty used for finishing door slopes
If you are planning further surface finishing of the opening after plastering the slopes, you can use a standard cement-sand mortar for basic sealing of cracks and elimination of unevenness.
Required Tools
Do-it-yourself plastering of door slopes is impossible without certain tools. First of all you will need:
- rule;
- set of spatulas;
- container for diluting the mixture;
- construction mixer;
- construction float;
- level;
- corners;
- serpyanka;
- primer;
- stationery knife;
- brush.
List of tools required for plastering door slopes
Since slopes can be plastered using different methods, you may additionally need a metal mesh, as well as drywall and a profile for its fastening. Be sure to stock up on a set of screws for different surfaces. To fix them you will need a drill and a screwdriver.
Since it is recommended to insulate the doorway, select suitable materials in advance. They will need to be placed around the perimeter in such a way as to prevent drafts and gaps in the finish.
In order not to smear the box and adjacent surfaces with plaster, cover them with masking tape before starting rough work. It is recommended to lay a film on the floor. If possible, remove the fabric from its hinges for a while. As for the new door, it is recommended not to remove the protective film from it until the repair is completed.
Preparing the opening
In order to facilitate plastering of door slopes, the work area must be prepared in advance. This includes a whole list of works. Since such design of slopes is almost always associated with updating the door itself, first you need to eliminate all the defects and irregularities that remained after replacing the frame.
First of all, cut off the excess polyurethane foam with a sharp utility knife. If the unevenness is too significant, it is best to use a plasterboard sheet as a base for plaster. Choose moisture-resistant samples to extend their service life. There are two ways to attach this material to the opening:
- On glue . This is the simplest option to save space. To begin with, a layer of plaster is applied to the slopes. You can use leftover tile adhesive or regular homemade mortar. Then drywall is applied to the wet viscous mass and pressed. Thus, you need to drive an even level around the entire perimeter of the opening.
- On the frame . If the curvature is too significant or you simply don’t want to waste putty once again, then use the traditional approach and screw sheets of the desired shape and size to the aluminum frame. These elements are screwed to the slopes using self-tapping screws and dowels. Using this method, you can create an unusual shape for the opening, for example, create a rounding at the corners, like an arched vault.
Drywall is often used to level door slopes.
If there are gaps and cracks in the opening, they need to be closed using insulation. Usually mineral wool is used for this. In order for the plaster on doorways to set better, it is recommended to cover the slopes with a special mesh. Serpyanka is glued to the deepening places of the self-tapping screws on the plasterboard and in the corners. A larger metal mesh can be nailed directly to the wall.
Finally, you need to treat the surfaces with an antiseptic and carefully prime them to improve adhesion. The next stage is directly plastering the slopes with your own hands.
Plaster application technology
Let's look at how to plaster the slopes of a doorway. The whole process can be divided into several stages:
- First you need to repair the largest irregularities. If you are laying the mass directly on concrete with a mesh, you must use a starting putty. First, a small amount of the mixture is thrown onto the slopes in the direction from bottom to top, and then leveled with a large spatula. Excess is transferred to the upper level. For drywall, everything is simpler: you need to seal the deepening holes of the screws with a finishing mixture.
- It is important to get straight corners. To do this, secure an aluminum profile and mesh around the perimeter. Apply the mixture on top of them with a small spatula and check the thickness of the layer with a large tool.
- After initial plastering of the slopes, wait until the surface is completely dry. If there are significant irregularities, it is recommended to remove them using a construction trowel.
- Since the slopes need to be plastered to a perfectly flat surface, the finishing compound must be applied on top. With its help, all irregularities are eliminated.
- After drying, float the surface and remove dust before further finishing.
An important step in applying plaster is creating even corners
Since it is not easy to putty slopes in several layers, you can improve the adhesion of the mixtures by applying shallow notches to the starting layer before it dries.
If you plan to paint or wallpaper, you need to try to create perfectly even slopes. For textured plaster, tiling and panels, starting treatment will be sufficient. However, if you plan to replace the coating in the future, it is better to initially bring the surface to perfection.
Installation of sandwich panels for windows
The installation of such products has a number of specific and technical features, without taking into account which you may not get a positive result:
In areas with a hot climate, ordering window sandwich panels with renolit film is mandatory, since in the sun such a panel can heat up to 70°C - a temperature at which deformation of the plastic is quite likely. When installing panels, it is necessary to take into account the high value of the coefficient of linear expansion of sandwich panels, which reaches 7 * 10 -50 C. When cutting the panel to the required size, it is necessary to use a circular saw with a fine pitch of teeth, since otherwise the plastic may chip and delaminate . In this case, cutting cannot be performed at temperatures below +5°C, since in these cases the sandwich panel material becomes very brittle.
During installation, use only the starting profile recommended by the manufacturer. Profile replacement is not allowed. Immediately after installation, the protective film must be removed.
Installation of window sandwich panels is much faster and more convenient than plasterboard slopes, as evidenced by the video presented.
Performance characteristics of window sandwich panels
Despite their lightness, as well as a rich color finish (products are available with a matte and glossy plastic surface, as well as laminated), the considered window panels differ:
- high resistance to solar radiation;
- low moisture absorption;
- sufficient surface resistance against abrasive external influences;
- resistance against possible cyclic loads;
- significant operating temperature range (from –50 to + 60°C).
The appearance of the installed window sandwich panels can be seen in the photo.
Window slope options
The traditional way of finishing is, of course, plaster. If such work is carried out by a qualified specialist, then you can forget about repairing slopes for many years. An important point when choosing this method is that there is no need to install a plastic corner at the border of the slopes and the wall.
The choice of this method is justified primarily if the wall in which the window is located is also leveled with plaster. But, given that when removing slopes, the layer of plaster reaches 5-7 cm or more, it is necessary to install a reinforcing mesh. Only a master can do this kind of work efficiently.
This option did not suit me because the wall framing the window was made of plasterboard and, in addition, a table top was already installed, which served as a window sill.
Three alternatives were considered. Finishing window slopes with plasterboard, followed by painting, plasterboard slopes with plastic glued to its surface and the use of sandwich panels.
Nowadays, the option of painting plasterboard slopes is used perhaps only for budget repairs of non-residential premises. Plastic glued to a plasterboard base is a variation of the same economical option.
Temperature changes, as well as high humidity, quickly destroy drywall. Carrying out restoration repairs every 2-3 years is not our method. Therefore, we chose PVC sandwich panels.
The sandwich panel is 10 mm. a sandwich consisting of two PVC sheets between which there is polystyrene foam insulation. The only inconvenience when purchasing is the need to purchase a whole sheet measuring 3000x1500 mm.
There are no difficulties in working with it - it can be easily cut with a grinder and even with an ordinary knife (if rough cutting into pieces is necessary for lifting into the apartment).
www.OknaInf.ru
Portal about plastic windows
- home
- Manufacturers
- Double-glazed window
- Slope finishing
- Articles
- Question answer
- Dictionary
- Site Map
- Feedback
- Skip to content
Profile
- REHAU
- KBE
- DECEUNINCK
- GOODWIN
- VEKA
- GRAIN
- EXPROF
- GEALAN
Accessories
- G.U.
- ELEMENTIS
- FORNAX
- SIEGENIA-AUBI
- WINKHAUS
- ROTO
- MACO
- VORNE
About windows
- Why do plastic windows sweat?
- We save when ordering windows
- Ordering plastic windows
- History of the invention of plastic windows (PVC)
- Energy saving glass
Instructions
- Instructions for installing plastic windows
- Instructions for measuring windows
- Instructions for adjusting window fittings MACO MULTI TREND
- Instructions for the manufacture and installation of a casing (casing)
Accessories
- Mosquito nets for windows and doors. Mosquito nets
- Window ventilation (supply) valves
- Window tinting
- Electrochromic glass (smart glass)
Slopes
Sandwich panels for windows price and quality
When choosing sandwich panels, pay attention to their quality and finish. The cost varies depending on the type, color, structure and thickness of the cladding board
The modern market of installation materials offers a different range of structures: both embossed and smooth. In addition, a wide range of colors allows you to choose a sandwich panel individually suited to the interior of the room. The use of denser materials will significantly raise the bar in price. Also, when purchasing imported sandwich panels, you will have to pay even more. However, the quality of the domestic coating produced is no longer inferior to a foreign product. Therefore, think twice about the need to purchase imported sandwich panels.
Features of the material
Unlike wooden window structures, modern plastic frames have ventilation equipment. It is for this purpose that the upper part of the sash is tilted, resulting in a narrow opening through which air masses flow. Because of this, air turbulences with sharp temperature changes are formed. To increase the service life of the window system, you need to responsibly approach the finishing of window slopes.
Drywall is often used for these purposes, but in winter this material can freeze. In addition, it needs to be carefully looked after. If the building is made of reinforced concrete blocks or bricks, a sandwich should be used for maximum thermal insulation of the slope panels. Main advantages of the material:
- does not require special care, any contamination can be removed with a soap solution;
- low weight of structures;
- resistance to sunlight;
- resistance to fungus;
- the material does not require additional decoration, the outer surface resembles window plastic;
- high rates of thermal and sound insulation; construction foam can be used to improve thermal insulation and adhesion of the panel to the slope;
- good vapor permeability, the panels do not get wet or deform under the influence of moisture;
- resistance to mechanical damage;
- stylish design;
- acceptable price;
- The material is environmentally friendly and does not emit substances harmful to humans during operation.
Despite a number of obvious advantages, sandwich, like any other building material, has a number of disadvantages. Some of them:
- improper installation of panels can cause gaps and cracks;
- under the influence of high temperatures, structures turn yellow and become deformed;
- Products cannot be installed if there is a small distance between the hinge and the wall (otherwise the panels will “walk” around the entire perimeter).