Thanks to the invention of new building materials and work methods, house designs with a fireplace have found a new lease of life. Heating systems for private houses have been improving every year for a long time. Today, one of the most optimal solutions aimed at fully heating a building is the use of centralized gas supply. At the same time, outdated heating structures are used only as auxiliary elements.
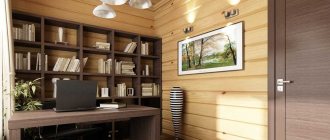
Project and layout of a private house with a fireplace
One such device that was used to heat human homes in the past is the fireplace. However, even despite their relatively low efficiency, similar devices are now quite often used in the construction of their own housing.
Using fireplaces to heat a room
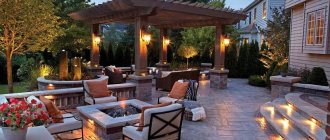
The use of fireplace heating has long faded into the background, and today such designs are used only to impart a certain style to the room. In addition, the presence of an open flame in it provides certain conditions of comfort. Each of us loves to watch the tongues of fire, which sway monotonously depending on the air currents. This process allows you to isolate yourself from everyday worries and relax, rest mentally and emotionally.
Project and interior design of a cottage with a fireplace
That is why in modern construction, similar systems are increasingly found, the purpose of which is not to heat the home, but to give it a more comfortable and soft atmosphere. At the same time, installing a fireplace in houses equipped with gas heating has the following advantages:
- special comfort and coziness of the room is achieved;
- the atmosphere in the house becomes more aesthetic;
- the efficiency of the main heating system increases due to the presence of an additional heating source;
- the selected interior becomes more detailed and homely.
The above factors once again emphasize the fact that the use of a fireplace in a private home is still relevant and carries many advantages. However, the layouts of houses and cottages equipped with fireplace systems require much more careful and detailed study, since the creation of similar buildings is a rather responsible process.
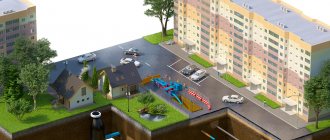
House layout with fireplace and two-car garage
It is no secret that the source of open fire that is present in the fireplace requires special care and some additional operations aimed at preventing it from penetrating deep into the living room. Based on fire safety requirements, the layout of country houses with a fireplace is carried out with special care in such a way as to avoid the slightest possibility of flame spreading into the building.
Assembly stages
If you decide to assemble a fireplace with your own rivers, you will need to acquire: standard and fireclay bricks, a grate, a door with a glass window, and dampers.
To assemble the main structure we will need solid bricks, while to assemble the chimney and firebox opening we will only need fireclay bricks. The solution must also contain a certain percentage of clay.
A minimum distance of 200-300 millimeters must be maintained from the wall to the heating unit. For assembly, a pre-prepared order is used.
The chimney system can be installed on the roof of the house through the façade or interior. If the pipes will pass indoors, they must be multi-layered, insulated and placed in a special box, which will be located with a small gap of 150-200 millimeters. External installation implies the presence of fasteners, indentation, followed by sealing.
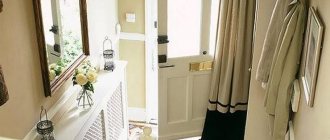
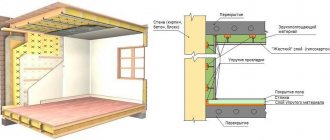
The floor surface in the room with the fireplace is also insulated and sealed with heat-resistant materials
Furniture and textiles are located at a safe distance from the fireplace
When passing a chimney through ceilings or the roof of a wooden house, it is important to follow fire safety rules
At the final stage, we isolate the space in front of the combustion chamber. You can lay out the indentation with porcelain stoneware, ceramic tiles, or stone.
Fireplace systems
Creating a fireplace in your own home is a rather complex and time-consuming process, since, in addition to fire safety, such devices and their construction have a number of features that need to be paid attention to.
Diagram of a house heating system with a fireplace
In general, the construction of similar devices and all associated communications that support their full operation is based on the following principles:
- The use of only strong fireproof materials that can withstand abnormally high temperatures arising during fuel combustion.
- Creation of a complete system for removing fuel combustion products based on natural draft.
- Construction of a fireplace requires the allocation of a significant part of the zoned space of the room, which will be occupied by the device itself.
Diagram of a fireplace for self-build
- The construction of an object involves strengthening the foundation, since its mass can reach several tons.
- To ensure full operation of the device, it is necessary to use special valves and grilles that limit the air flow inside the fireplace and ensure its safe operation.
The construction of a fireplace system is a rather labor-intensive and long-term process, containing a lot of nuances and features. The use of such structures, which are only decorative, is an unreasonable luxury that only wealthy segments of the population can afford.
How to properly finish
The fireplace is called decorative, so due attention should be paid to the decoration, it should become a decoration of your home and this is within your power. Its texture can be made very varied using putty; using a foam sponge, the putty is applied in jerks and a kind of rough surface is obtained. If you want something more, use acrylic paint of a dark color, the surface is painted with paint and immediately wiped with a dampened rag, then, lightly touching it, walk over it with silver or gold paint, thereby creating a speckled plane. For decoration, you can take drywall and cut out rectangles in the shape of bricks, but make the shape incorrect, and the laying of foam blocks will seem old. Fill the sides and top with a spatula, deliberately making the surface uneven, and after drying, paint it in the color you like. There is a special beech-colored putty on sale, intended for wood. Make an imitation of a stone surface by performing chaotic, disorderly movements, apply putty to the side parts of the fireplace using a spatula, imitate stonework with a small stick and leave until dry. The result will be a stone texture; for a natural look, you can paint the masonry with black or dark brown acrylic.
Stove heating in wooden houses
Projects of wooden houses made of timber, which are based on the use of fireplace structures or stoves, require a much more in-depth analysis and elaboration of all the details than objects built using other materials. Similar features of the system are due to the fact that wood is a highly flammable material. Based on this, we can conclude that not only the functionality of the system and its practicality, but most importantly its safety, depend on the elaboration of all the nuances. At the same time, almost every criterion that determines the full operation of the structure is subject to changes.
Houses made of timber are equipped with a special foundation, laid out of brick or poured with concrete, which can fully support the weight of the fireplace system.
In some cases, it is possible to strengthen only the load-bearing beams, but this solution is hardly optimal.
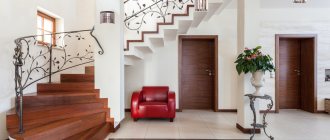
Project of a wooden house with a fireplace
To ensure the protection of the wooden surface from the high temperatures generated inside the oven, special films and primers are used, which completely cover all problem areas.
Today, projects of houses made of timber, equipped with a stove or fireplace, are quite rare due to the fact that such buildings, even despite more careful design, still pose a significant fire hazard. Another factor that plays an important role when creating a stove in a house made of timber is its placement.
In order to more accurately understand the principle of installing a similar device, it is necessary to first consider all possible options for the location of products that exist in modern construction. Today, the most practical and functional are the following variations of such designs:
- frontal;
- corner;
- free-standing.
Moreover, in wooden houses with a stove, its location is selected based on several criteria, the dominant role among which is the availability of free space and the possibility of additional processing of wooden surfaces.
Video description
Kolpakova stove on two floors.
Pouring the foundation
The stove turns out to be very heavy, so very serious reinforcement will be required Source kamin-expert.ru
To mark the foundation, you need to know what the perimeter of the stove base will be and add 5 cm on each side. In addition, the foundation must fall below the freezing point of the soil by at least 20-30 cm, so that when the soil thaws it does not sag or twist. A possible difficulty here may arise for residents of the northern regions - the filling will turn out to be too deep, but here you can get out of the situation by making a pile-slab foundation. To do this, in the corners and in the center you need to drill holes deeper than the freezing point of the soil by 30-40 cm and install chrysotile (asbestos-cement) pipes Ø150-200 mm there along the upper level of the proposed slab.
To fill the slab, you need to dig a hole at least 30-40 cm deep and up to the top level of the intended finished floor or 5-7 cm higher. A crushed stone cushion 5-6 cm thick should be poured there - you will lay reinforcement on it. Now you need to tie a frame from reinforcement Ø8 mm, a height 10 cm less than the thickness of the slab, and insert at least one rod into the pipes. Place gaskets under the reinforcement frame in several places so that the concrete can completely envelop the metal structure - this is a prerequisite. The frame is connected using a knitting wire with a cell of 200x200 mm, but in no case use welding for this - the frame must be pliable in the event of thermal expansion of concrete.
In order for the foundation to achieve the required density, you need to give the concrete three weeks to harden Source kamin-expert.ru
To prepare concrete for a slab foundation, it is best to focus on M300 (B12.5) - this is the brand and class, respectively. To compose the mixture, you need to use the following proportions: cement/crushed stone/sand/water - 1/2.8/1.9/0.8, only the ratio of water here is very relative - it depends on the moisture content of the sand and crushed stone. When making concrete, you should use the order in which components are added - this way the solution will correspond to the declared brand and strength class. Just add them in the order they are listed in the description - cement/sand/crushed stone, but not water. That is, first you need to make cement laitance, pour not all the water, but half, and while mixing sand and crushed stone, gradually add the rest.
To raise the foundation to the required height, you need to assemble formwork from boards, plywood, OSB or even chipboard. If you do not want to pull out the stands from under the reinforcement frame, then place it directly on a crushed stone cushion, fill half of it with concrete and lift it by about 5 cm so that the solution envelops the metal in all places. The time for complete hardening of concrete is 21 days and if you have this time, then wait, but if you are in a hurry, then laying the stove can begin in one and a half to two weeks.
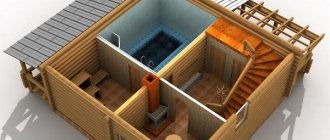
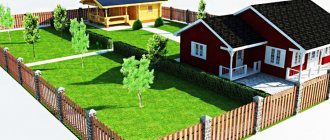
Designing a private house with a bathhouse
A striking example of a wooden building equipped with a stove is the layout of an ordinary bathhouse. As a rule, this particular object must meet all the necessary criteria, not least of which is the quality of the device’s reliability and its safety. Houses equipped with a sauna, in most cases, have two main heating systems. One of them is the main one and heats the entire living area of the house. In turn, the second provides heating only to the bathhouse room, which is where its work is directed.
As a rule, in projects of houses with a sauna, a frontal or corner method of placing the heating element is used. Moreover, it is located on the wall that is in direct contact with the street and is exposed to the external temperature. This arrangement ensures uniform heating of the entire room in the shortest possible time.
One of the most important design features inherent in similar buildings is ventilation, since without its proper design it is unlikely to be able to achieve the very atmosphere that is necessary in houses with a sauna. Constant access of oxygen is a necessary factor underlying the combustion process. With the correct location of all inlet and outlet openings, achieving maximum conditions in a house with a sauna will not be difficult.
Protecting wood from overheating
As already noted, it is extremely important to protect the wooden parts of the house that are in close proximity to the fireplace from overheating. Otherwise, fire cannot be avoided. In addition to the load-bearing floor beams, the wall behind the outer layer of facing material also needs protection. To do this, a so-called fire wall is constructed from brick. Its height should correspond to the height of the fireplace.
Such a wall can also be built from foam concrete blocks or gypsum . A protective gasket is also needed between the firebox and the facing slabs. Heat-resistant basalt wool is suitable for this. We also make a 30-centimeter collar on the floor around the fireplace from heat-resistant materials.
Designing a fireplace in houses with an attic
In turn, houses with an attic have a similar structure and layout. However, unlike a bathhouse, they are based on the use of a fireplace, and not an ordinary stove. This decision is due to the fact that the extension or attic is a place where people come to relax, sitting comfortably with a cup of hot coffee.
Attic project with fireplace
Based on this, the use of an open fire, which the fireplace system has, is much more preferable than a stove. Moreover, in this situation, the fireplace plays a decorative role rather than acting as the main heating element of the room.
At the same time, designs of houses with an attic generally imply frontal placement of the fireplace, and its arrangement is carried out right in the middle of the wall, adjacent directly to the living sector, from where it will be visible from anywhere in the room.
The design of a two-story house has its own characteristics, especially if the heating structure itself is installed on the first level of the building. Under such conditions, the design of the chimney undergoes significant changes, becoming more massive and extended. This has its advantages, since increasing the length of the exhaust pipes allows for improved draft inside the chimney.
Heating system for a private house with a fireplace
In turn, this factor contributes to achieving optimal characteristics of the heating device, regardless of its location. Two-story houses with a fireplace or stove located on the ground floor can imply absolutely any installation of the device: either front or corner, or a free-standing type of system.
At the same time, the optimal area of the room that 1 stove can fully heat is 20-25 m², which is a fairly good indicator. However, it should also be taken into account that it is almost impossible to heat the entire house, especially several floors, using an ordinary fireplace. Therefore, such systems are used in the modern world only to complete the interior and create a more comfortable atmosphere in the house.
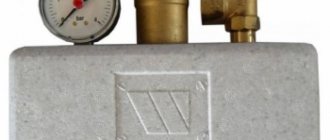
How to protect an aerated concrete chimney from external influences
A chimney inside an aerated concrete wall does not need insulation.
Only if the chimney runs next to fire-hazardous structures - cabinet furniture, wooden finishing elements or rafter system - then non-flammable insulation materials are used as fire-proof insulation: mineral or stone wool, basalt fiber. Synthetic insulation based on polystyrene foam, polystyrene, or polyurethane cannot be used for thermal insulation of the chimney.
To protect the chimney duct on the roof from precipitation and birds, caps of various shapes are used, for example, in the form of a Napoleon's cap or in the form of a small hipped roof. The space between the chimney outlet and the cap must be protected with a mesh. If this is not done, birds may build a nest in this place and the next time the fireplace is turned on, a fire will occur due to burnt scrambled eggs or tobacco chickens. We use a modern solution for hoods - hoods-blinds, which look aesthetically pleasing and already have protection against birds.
Determination of basic dimensions
The ratio of the size of the fireplace and the room
Perform the necessary preliminary calculations. Determine the volume of the room allocated for the construction of the fireplace. The firebox opening should be 1/50 of the room volume you calculated.
The height of the portal should be 2 times the depth of the firebox.
Set of tools
It is best to prepare the tools in advance and arrange them so that the most necessary and most frequently used ones are at hand. The toolkit will include:
- bayonet and shovel shovels;
- mechanic's hammer;
- stove maker's hammer;
- hacksaw for metal and wood;
- a sieve with a cell of 1.0 by 1.0 mm for cement and a sieve of 2.0 by 2.0 mm for sand;
- containers for preparing mortar and kneading clay;
- drill with a “mixer” type attachment;
- a washbrush for grouting the seams of the firebox;
- trowel;
- plumb line;
- construction level;
- red brick lining;
- tape measure and pencil.
Carefully carried out preparatory work will allow even a novice stove maker to build a real fireplace quickly and efficiently.
How to build a fireplace with your own hands video:
Fireplaces simultaneously heat and decorate the surrounding space. You can handle laying a brick fireplace on your own. You just need to read the manual and do everything in accordance with the instructions.
How to build a fireplace with your own hands
Preparation of materials
Prepare the required amount of ceramic bricks (determine in accordance with the planned dimensions and design of the fireplace). Also prepare fireclay bricks for arranging the firebox.
Additionally, prepare the following:
- mixture for bricklaying;
- 12mm glass-magnesium sheet;
- chimney;
- oven tape for mounting accessories;
- metal corners;
- chimney view.
Before starting work, cover everything that needs to be protected from contamination with polyethylene.
Prices for fireproof mortar for stoves and fireplaces
Materials
The main material when constructing a fireplace structure is brick. A special oven material is used here, available in two types:
Red brick stove elements can withstand temperatures of a thousand degrees. The marking of such material is not selected less than M200, and the dimensions cannot differ from the standard by more than 2 mm. Hitting it with a hammer will make a ringing sound.
Preparatory activities
Before starting work, it is necessary to carry out preparatory measures, the first of which will be to calculate the amount of future costs for the construction of the fireplace. When drawing up an estimate of possible and planned costs, as well as a project for a future structure, it is necessary to take into account all the nuances, namely:
- the proposed type of fireplace design and its location in the layout of the house;
- purpose of the fireplace (decorative only or also for heating);
- the material from which the house itself is built;
- method and type of finishing;
- type of flooring at the installation site;
- the floor of the house where the fireplace will be installed;
- distance from the fireplace to the roof;
- additional insulating materials;
- additional load on the main foundation of the house;
- strengthening the floor covering and interfloor openings;
- climatic zone in which the residential building is located;
- the amount of cash reserves to solve problems that arise during the construction process and were previously unaccounted for.
Due to the lack of price stability, it is difficult to indicate even an approximate amount. You can only indicate the boundaries of the cost range in which you need to invest. For example, a classic fireplace with brickwork, natural stone cladding, with a grate and a chimney, installed in a two-story house with an area of up to 150 m2, will cost between 60 thousand rubles and 100 thousand rubles. The exact amount of materials needed to build a fireplace yourself can only be announced after the work is completed.
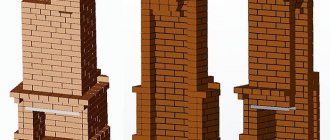
Project preparation
For a better understanding of the volume of construction and its stages, it is necessary to make a drawing of the fireplace and order it to scale. You can make a drawing in any form, the main thing is that it shows three or four views - front, sides, top, and, if necessary, back. Such a drawing will provide invaluable assistance in compiling a list of necessary materials - their quantity and volume.
The order marks the location of each brick. This scheme is made by both novice stove makers and experienced craftsmen. There are no identical fireplaces; each will have its own design feature, which must be taken into account and worked out in advance.
Typical design elements
There are two key elements in the design of a fireplace - the firebox and the chimney.
All other elements only complement them and help them function properly. Since the fireplace has a thousand-year history of development, all its details and their shape have long been thought out to the smallest detail. Fireplaces may differ in slight changes in design, but the main difference is the size of the firebox and external decoration. Additional elements include:
- smoke collector;
- ash pan damper;
- ash pan;
- grate;
- lining;
- valve for forced ventilation;
- chimney cleaning inspection;
- protective and decorative door or grille;
- portal;
- cladding
The last two elements are purely decorative. The portal is necessary in order to hide the fireplace insert and design the external contours of the fireplace in terms of architecture, and the cladding gives the portal an attractive appearance.