What will be needed for production?
The working body of a factory trimmer (motor, body, cutting disk) is similar to a conventional manual circular saw. Therefore, the hand saw can easily be adapted for miter cutting. The first thing you need is the handsaw itself. All that remains is to add a frame for attaching the electric saw and placing workpieces.
A variety of design options are possible, from the simplest platforms for straight sawing to complex devices: sawing at angles, with broaching for large-sized workpieces. Therefore, different materials and parts can be used.
For the frame, plywood with a thickness of 10-20 mm is best suited. Its advantages over other materials:
- Not brittle like chipboard, doesn't bend like fiberboard.
- Doesn't warp like wood.
- It is easy to process and attach in any home workshop, unlike metal.
- Under the roof, without moisture, it lasts quite a long time.
In addition to plywood, you will need:
- Fasteners for connecting frame parts (screws, studs, bolts, nuts).
- Wooden blocks or metal corners for joints and hinges.
- Hinge axis (pin, long bolt, washers, nuts).
The following tools are required and may be required:
- Sawing tool (hacksaw, jigsaw, circular saw).
- Drill or screwdriver (we also recommend reading how to make a circular saw from a drill).
- Drills of the required diameter.
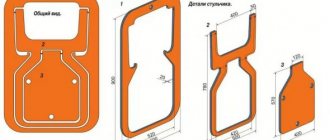
The dimensions of the blanks for the bed will depend on what design the master chooses and on the dimensions of the circular saw itself, on the basis of which the trimming is done. For example, to trim a fence picket, you will need a bed length along the workpiece (1.2-2 m). For small parts, a more compact bed is suitable.
The photo shows an example of the so-called monkey - a cutting circular saw with an abrasive disc for metal, but it serves as an example of what a small frame can be used in such a design.
The cost of materials and parts cannot be calculated, since they will be different in each individual case. Someone may simply already have everything they need to make it, and the parts won't cost anything. If purchased, the cost will depend on what design the master chooses.
Design elements of a self-made wood sawing machine
To make a stationary machine for sawing materials at home, you first need to know what structural elements it consists of. Whether it’s a homemade machine made from a manual circular saw, a grinder, or a tool assembled from disparate elements, the set of basic parts is the same.
The surface of the table must be made smooth for a higher quality product at the output.
The main elements of stationary circular installations are:
- Table for connecting and securing mechanisms. If the circular saw is powerful and massive, it is better to use a metal table. Options made from chipboard, wood, plywood are suitable, the main thing is that the surface is smooth.
- Shaft. The most important detail. When making it, a lathe is used separately. The dimensions should be calculated accurately to avoid runouts.
- Casing. This element ensures safe use of the circular saw.
- Engine. When using a grinder or circular saw, it is part of the power tool.
Helpful advice! If the design is supposed to be prefabricated, then when creating a circular machine with your own hands, the engine from a washing machine will be the most successful option.
The design of the circular must necessarily have moving parts of the drives, and a button must be built into the power supply circuit to stop the engine in emergency situations.
Circulars of any fixed type consist of main parts
Which tool should you choose?
Manual circulars are used, which the owner already has. The peculiarity of homemade miter saws is that on most designs they can be easily removed and used for their intended purpose, like a hand saw. Therefore, the need to buy a second circular does not always arise. But in the following cases it is better to buy a new or second circular:
- The saw is old, its service life is expiring, there is no point in making a stand for it, because a new saw may not fit.
- The design is such that it takes a long time to remove and install the saw.
- The operations are constantly alternating, and you have to take turns working either with a miter saw or with a hand saw. Frequent installation/disassembly is inconvenient.
- Two people work, one on a cross-cut saw, the other with a hand saw.
The selection criteria are the same as for a manual circular saw. When cutting, the circular saw engine experiences almost the same, and even less, loads as when working with a hand saw. Therefore, increased power is not required for simple trimming. The power will not be superfluous when cutting with a broach, since it cuts dimensional workpieces.
Any circular saw is suitable for trimming. Optimally – average power and price, from a brand with a good reputation for quality.
For example, Makita HS7601, its technical characteristics:
- Power 1200 W
- Cutting depth 66 mm, at an angle of 46 mm.
- Disc speed 5,200 rpm.
- Disc diameter 190 mm, seat diameter 30 mm.
- Price about 10 thousand rubles. 2022
Or Interskol DP-190/1600M with technical characteristics:
- Power 1600 W.
- Cutting depth 63 mm at right angles.
- Disc speed 4800 rpm.
- Disc diameter 190 mm, seat diameter 20 mm.
- Price from 6,000 rubles, 2022.
We also recommend reading interesting articles about choosing a circular saw for the home and about the rating of the 10 best circular saws; it contains all the most necessary information that will definitely come in handy when choosing a tool.
Interskol DP 190 is an excellent option for homemade trimming
Kinds
According to the type of food they are divided into:
- Network . They are powered by a 220 V network. The disadvantage of this power supply is the need for an electrical network at the place of work, as well as a certain inconvenience in operating the tool due to the cable.
- Rechargeable. They operate using a battery, so their range of operation is unlimited. A 220 V power supply is also required, but to charge the battery. Depending on the capacity of the power source, they can operate on a single charge for no more than 50 minutes.
It is advisable to buy cordless models in cases where it is impossible to use a corded saw.
How to make a crosscut from a manual pendulum-type circular saw?
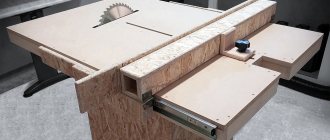
The simplest trim using a manual circular saw can be done in a few minutes. To do this, you will need a door hinge, preferably with one long side (strip). One side is attached to the circular platform, the other to the bed. The entire step-by-step manufacturing process is shown very clearly in this video:
It didn’t even require plywood and fasteners to make the frame. An ordinary wooden pallet was used as it. You can also use any suitable ready-made platform.
In some cases, if there are no slots in the wooden frame for the disc to pass through, they are cut through with the disc itself. Before this, the fastenings of the circular saw are loosened in order to make a cut with slight shifts to the left and right. This way the slot will be slightly wider than the disk, and during operation the disk will not rub against the sides of the slot.
The advantages of this solution:
- extreme ease of manufacture,
- a minimum of parts (a hinge and two bolts with nuts and washers).
- minimum tools for manufacturing (drill, drill bit, wrench).
- speed and ease of transfer from a hand saw to the miter mode and back.
Minuses:
- limited ability to cut at angles in length and height.
- there is play in the hinge axis; when sawing, you need to select one side and press the saw against it. In another case, due to backlash, the cut may be inaccurate (plus or minus 2-5 mm).
- changes to the safety device – the disk cover is always fully open.
An example of another homemade trim with a specially made frame instead of a pallet is here:
The method is a little more complicated, since you have to make a frame out of plywood. But the advantages of this design are compactness and mobility. It can be put away on a shelf, placed on a workbench, etc.
Device
A plunge-cut circular saw is slightly different in structure from a conventional circular saw and is equipped with a specialized unit. Thus, the accuracy of the cut and the absence of play are ensured by a complex precision mechanism, which significantly increases the cost of the tool. Otherwise, the design of the saw is similar to the basic models. The device consists of a durable housing, where an electric motor is located, during which the torque is transmitted to a special shaft. There is a locking device on this shaft that reliably holds the working disk and does not allow it to move relative to the shaft axis.
The saw blade, when in the non-working position, is located under a protective casing and is located in the same plane with the mounting base. This design allows for more precise positioning of the tool on the work surface compared to conventional circular models. All controls are located on one panel, which makes working with the device very convenient and understandable.
Some models of plunge-cut saws are equipped with two discs at once, which allows you to cut a board of any width, making two cuts at once in one pass.
Without exception, all devices are equipped with a spring-loaded lower base, thanks to which, if the cutting disc hits a nail or other third-party element, the operation of the device will be stopped in time. Features of the design of plunge-cut saws include the function of tilting the disk, which is especially convenient when it is necessary to manufacture products of complex configurations.
In addition to the standard design and traditional set of functions, many modern devices often have additional options. They do not have a fundamental effect on the operation of the saw, however, they make its use more convenient and safe. Among them, we can highlight a backlight, a speed controller, rulers of different sizes, and a chip sucker that forcibly removes the cutting products.
How to do it with a broach?
If a conventional crosscut saw only has a pendulum stroke (in a semicircle), then on a crosscut with a broach the saw can also move horizontally. This type of trim can cut to size along the length of workpieces of greater width.
If for a simple trim the width of the workpiece is limited by the width of the disk at maximum immersion in the material, then for the version with broaching the width of the saw stroke along the guides is added.
Factory miter saws with a broach design have both a pendulum stroke in a semicircle and a horizontal stroke of the saw along the guides.
Most homemade crosscuts with broaching are simpler in the very principle of their design. They do not have a pendulum motion in a semicircle, but only horizontal movement along the horizontal.
An example of making a homemade crosscut with broaching in this video:
This design cannot be called a crosscut in its pure form; it is rather an analogue capable of performing certain operations. Its plus:
- availability of materials,
- comparative ease of manufacture,
- ability to cut to the width of the workpiece.
Minuses:
- limited functionality, you cannot cut at angles in different planes,
- it is inconvenient to insert long workpieces under the saw blade,
- for long workpieces that are placed perpendicular to the homemade bed and saw, you will have to additionally make a support workbench.
Do-it-yourself parallel fence for a circular saw
The parallel stop is a mandatory device on a circular table; without it, it is almost impossible to make an even cut. You can make it yourself as follows:
- A U-shaped profile should be made from three strips of laminated chipboard; inserts should be placed and fixed inside, which will add rigidity. The result will be a square section.
- A guide channel is made from two parallel slats, which is bolted to the end of the table in a position perpendicular to the saw blade.
- An inverted T-shaped structure is then made from MDF, which is screwed to the stop and inserted into the channel.
You can make a parallel stop for a circular saw yourself
Important! The width of the channel should be such that the side of the T-shaped element fits tightly into it.
To fix the stop of a homemade circular saw made by yourself, it is convenient to use the original slots. Threaded bolts, nuts and wooden washers are suitable as a locking mechanism; you will need a hole in the bottom plane of the stop. Tightening the bolt helps to securely press the stop to the table top. This design allows you to quickly and easily set the required cut sizes.
Safety during work
Safety precautions when using homemade and factory trimmers are no different. Basic Rules:
- The hand should not approach the cutting disc closer than 20-30 cm. When cutting small parts, clamps are used.
- Care must be taken to ensure that the electrical wire does not get caught in the cutting blade.
- Do not work outdoors during rain to avoid water entering the electric motor through the ventilation grille and socket.
- You cannot work tired, intoxicated, or with reduced reaction.
A circular saw is a very noisy type of instrument; long-term use of it has a negative impact on the hearing organs, so you must use headphones. Also with safety glasses, because... During the sawing process, a large amount of small sawdust is formed, which fly into the eyes.
Additional functions of circular saws
The choice of circular saw depends on additional features that make cutting easier. Among them:
- Laser pointer - marks the cutting line with a beam. Provides high accuracy because the pencil line is constantly covered with shavings and becomes invisible.
- Speed adjustment - convenient for selecting engine speed for working with hard and soft wood.
- Connecting a vacuum cleaner makes cleaning the workplace easier. All sawdust flies into a construction vacuum cleaner or garbage disposal.
What is the meaning and benefit of homemade products?
Homemade trims are one-piece, even unique products. Each master makes a tool to solve his specific problems. To cut long workpieces, you can attach the trimmer to a flat beam (up to 6 m). The beam itself will work as a support (workbench) for long workpieces.
Factory trims do not make it possible to cut long workpieces unless an additional extension of the bed is built.
Sometimes there is a manual circular saw, but there is no trimmer and no money, no time to purchase it, and so on. The material for making such devices is cheap or costs nothing and is already at hand. Therefore, the question of whether to do the trim yourself or buy a factory one is decided by each master, based on the conditions.
The prices for factory trims are also taken into account:
- Miter saw Makita LS1040FN 196176, power 1650 W – about 22 thousand rubles.
- Makita LS1219L with broach. Power 1600 W – about 67 thousand rubles.
- Budget options: Encore Corvette-8M 90080. Power 1200 W, - about 7 thousand rubles.
Related Posts
Top 8 miter saws for wood equipped with a broach mechanism. Which miter saw is best for installing doors?
Contents: Miter saw: device, purpose and abilities Electronic miter saw: aspects and aspects of selection Miter saw blades: what is the difference between them
Cutting finishing materials at an angle is, frankly speaking, a difficult task, and virtually all people have problems solving it. But by and large, most finishing materials require this approach to their own installation, for example, lining, skirting boards, baguettes and, in addition, metal structures assembled from profile pipes. Well, there are a lot of such materials, and cutting them diagonally has to be done, even with very high precision. Next, together with the website stroisovety.org, we will study a tool such as a miter saw, which allows you to cope with the task of diagonal trimming. We will get acquainted with the design of this tool, evaluation aspects, which will allow you to purchase a model that is suitable for the job, and we will understand the saw blades used at the same time as equipment.
Electronic miter saw photo
A hand-held miter saw has a narrow purpose, and you are unlikely to be able to cut boards with it. Her tasks are little different - she can only make short cuts. With its help, you can cut a board in half, straighten its end, or cut the end of the board at a certain angle. About the principle, and everything else that it can do, however, believe me, this is a lot - other sawing equipment copes with such tasks much worse. Oh, sell, I completely forgot that, in addition to the type of wood, depending on the equipment used, the miter saw works with soft metals, plastic and, as needed, with thin-sheet iron, or rather with a profile made using it.
Read also: Concrete files for jigsaws
Miter Saw Abilities
The universal miter saw has a rather complex design - it consists of two main units, which are in no way distinguished by their simplicity of design. This is a bed with a rotary table and a movable cutting head with a massive electronic engine attached here.
- Stand with rotary table. You, these two parts have no basis for doing without each other. On the bed itself there is a guide that ensures a fixed position of the workpiece. The entire miter saw table can be rotated relative to the guide by 90˚ (45˚ one way and 45˚ the other way), thus providing a simple trim of the workpiece in each direction without reinstalling the part.
- Cutting head. It is installed specifically on a turntable - it changes its professional position together with the child. For convenience when working, a graduated scale is applied to the side of the rotary table on the bed - by combining the table mark with a certain degree value, cuts are made at any angle. This is not all - the head itself, or rather its cutting part, can tilt to the left and to the right, thereby providing an oblique cut. In most cases, the tilt is performed in one or two fixed positions (30˚ and 45˚ in either direction). Also, some models are equipped with a special broaching mechanism. A miter saw with a broach allows you to cut workpieces much wider than its regular counterpart.
What design does a miter saw have?
The question of how to choose a miter saw is best done by adhering to 5 small rules.
- First you need to decide on its purpose and operating criteria. Why do you need it? What kind of work, in what quantity, do you intend to create with its help? If you are purchasing a miter saw for use at home and do not even plan to do complex operations, you can get by with ordinary equipment with a basic set of additional functions. In this case, we are talking about the professional use of a miter saw and its everyday use, then you need to choose an expanded version of this tool with a full set of additional capabilities. You will be able to consider the option of purchasing a so-called combined miter saw, which is equipped with an additional work table at the top of the cutting head, allowing it to be used as a stationary circular saw.
Miter saw for wood photo
- The second thing you need to find out is the size of the disks used. What is important is not so much the diameter of the equipment being installed, on which the depth of cut depends in all respects, but also its thickness, which affects the type of material processed by the miter saw. A good option for household use is a machine designed for a disk with a diameter of 200 mm. For professional use, it is better to get a machine with disks with a diameter of 250 mm.
- Work safety. This popular rumor, a tool without appropriate protection becomes a very unsafe assistant - be sure to carefully examine the presence of protective covers that are designed to completely cover the disk even during cutting and protection devices against accidental activation.
- Weight and dimensions of the tool. Essentially, a miter saw is a portable device - you don't want it to be very heavy. Today, since we are talking about ease of work, carefully examine the ease of movement of all its parts - pay special attention to the cutting head. A very tight motion of this part of the tool will quickly tire the miter saw operator.
- And the last thing is ergonomics; the tool is expected to be comfortable to use.
- It is necessary to find out the size of the tooth - the larger it is, the rougher the cut will be. It is unlikely that a disk with a large tooth will be able to cleanly cut laminated, varnished or painted workpieces - for this purpose it is necessary to obtain a disk with a small tooth. Also, the small tooth showed excellent performance when working with the duralumin profile. In general, saw blades for miter saws are divided into three types: for longitudinal cuts, for transverse cuts, and also for finishing cuts, which, you know, are universal.
- If we are talking about mass production or working with thick workpieces, it is necessary to study the presence of thin slots on the disk - by and large, these are temperature compensators whose task is to maintain the measured size of the disk when it is heated. Today, such discs are the least noisy.
How to choose a miter saw
When choosing a miter saw, it will be useful to take into account both the power of this tool and, of course, the rotation speed of the disc. For the most part, these values are calculated by the manufacturer and are good. A household tool will have lower power than a professional one, but the rotation speed of the disc is almost always the same, which is determined by the need to make a clean and even cut.
Universal miter saw photo
There are not so many differences between the discs used on a miter saw, and the main ones are the seat and outer diameter, as well as the geometry of the cutting tooth. If what remains to be done with the size of the disks is to a certain extent clear to our client (you will prefer either a 25mm or 30mm mounting hole, and their outer diameter is 210, 250 and 305mm), then the geometry of the tooth should be understood in more detail.
Miter saw blade photo
And in conclusion, a few words about enterprises that create miter saws for wood. The favorites in the production of virtually all electronic tools are Bosch and Makita, and their miter saws are no exception. Practical tools from Metabo, Hitachi, and DeWalt also performed well. If we talk about Russian miter saws, then we’ll mention Corvette tools. So, there is plenty to choose from - the main thing is not to miscalculate your abilities.
Bosch hand miter saw photo
About the principle, and everything else that you should know about a tool such as a miter saw. Buy it, use it, don’t forget that this tool is quite scary - don’t forget about safety precautions and always be as collected and sober as possible while working!
Read also: Photo relay abb t1 connection diagram
Author of the article Alexander Kulikov
A brand new door is sold without fittings. It is not difficult to install the sash into the frame, install hinges, handles, and a lock if you have the tools. Additionally, devices that help wedge the canvas in the frame, as well as additional consumables for finishing, will be useful. It is better to get a branded tool for installing an interior door, because the quality of the work performed depends on it.
First, before installation, they inspect the household tools that are available. Check its performance. A power tool lying around idle could become unusable due to exposure to dampness and dust. After checking the functionality, a list of suitable purchases is made.
Preference is given to high-quality power tools. You shouldn’t overpay for professional-class units, and it’s better to avoid cheap Chinese counterfeits. It’s normal to purchase a semi-professional branded tool. In the future, you will need it more than once at home.
When performing complex work related to dismantling an old door frame, widening an opening, cutting grooves for fittings, you need a power tool. It will not only speed up the process, but will help to get the job done perfectly. Based on your intended goals, you need the following tool to install the door:
- A miter saw will be needed during the installation of a homemade sash. With its help, you can simply make longitudinal cuts, cut elements of the door frame, reduce the size of the sash, and adjust trims and trims. A miter saw can partially replace a jigsaw.
- A hammer drill is needed when dismantling an old door frame. The introduction of different sizes of chisels and drills helps to quickly make holes for anchors and break off part of the wall when expanding the opening.
- Use an electric drill to drill holes for screws, a door handle, and select a groove for the lock if there is no router nearby. It’s important to immediately think about what drills are needed to install an interior door.
- A screwdriver with a set of attachments is not an essential power tool if you intend to install only one door. Of course, tighten a dozen screws with a screwdriver.
- A jigsaw is indispensable in the process of installing extensions and platbands. Using a set of nail files, you can quickly make even cuts when fitting planks made of wood, aluminum, plastic, and MDF.
After installing the doors, the owner will not have the power tool lying around idle. You will need it when hanging shelves, cutting wooden pieces and other household work.
You can't do it without hand tools to install doors. Even if there are electronic units nearby, it is impossible to dismantle the box without a mount or hammer in a nail without a hammer. For installing doors you will need:
- Marking pencil. It is better to use a soft rod so that when pressed it does not leave dents on the varnished surface. Of course, take a marker, unfortunately it is difficult to erase after incorrect markings.
- A chisel is one of the main tools for installing doors between rooms, helping to select recesses for fittings.
- A hammer is needed to drive nails, dowels, cut out indentations with a chisel, and destroy the wall when expanding the opening.
- A plumb line and level will help ensure that the door is installed smoothly. If the box is skewed, the sash will sag. A laser level, or bubble level, 50 cm long is suitable.
- A hand hacksaw for wood replaces a jigsaw or a circular saw. But you won’t be able to saw a piece of wood lengthwise. A hacksaw will help to shorten the elements of the box, adjust the length of the trims and extensions.
- A crowbar will make it easier to dismantle the old boat. It is more convenient to use a pry bar from a car mechanic's kit.
- A mounting gun is needed when filling the gaps between the ends of the walls and the door frame with foam. You can benefit from using a tool if you take cylinders with a tube attachment for manually squeezing out foam.
- A set of screwdrivers replaces a screwdriver. It is comfortable to use the handle with interchangeable attachments of various shapes.
- The miter box helps to make the correct cut at the required angle of the parts of the box and platbands.
A good miter saw is designed for straight or cross-cutting of various materials at a specific angle. Among the main criteria characterizing the model are the absence of error and stable operation of the electric motor.
To choose the right miter saw, it is not enough to determine the range of tasks ahead; it is important to purchase a high-quality model that will ensure maximum accuracy. The rating of the best miter saws in terms of quality and reliability will introduce you to a selection of modern models that meet all the basic requirements of carpentry and carpentry.
Pros and cons of homemade products
The homemade product makes it possible to fully use a manual circular saw, for its intended purpose and for trimming. This saves space in the workshop and money on purchasing a factory trimmer.
Disadvantages of homemade products: limited functionality, rough cutting. They are good for rough carpentry work, and less so for fine carpentry. The factory trim has degrees of adjustment for sawing at different angles in two planes. As well as other options - laser pointers, clamps, backlight. Some models are broached. There are no such opportunities on homemade products.
Makita LS1216
When purchasing a powerful, durable and multifunctional miter saw, you can safely opt for this model from the Japanese manufacturer Makita. A professional miter cutter perfectly cuts metal, plastic and wood, when installing the appropriate saw blade. The cutting height/width is 107/363 mm, which significantly expands the range of available work. Users call this saw “a tool without flaws” and there are many reasons for this: with impeccable build quality and all working elements, the miter has the highest precision in setting angles. The model is also equipped with a soft start system, which is very appropriate for a powerful 1.65 kW engine. This is undoubtedly the best miter saw model in its class; the tool will cope not only with carpentry, but also with precision carpentry work - with the production of stairs, the production of decorative trim for doors.
Advantages:
- easy setting of arbitrary sawing angle
- long draw
- high power
- starting current limitation
- long service life
- the presence of double guides increases accuracy and rigidity
- small dimensions
Flaws:
- The only downside is the weight (26 kg), but given its characteristics this is justified
Our brief review shows the features of popular models for amateurs and professionals, and will help you choose the best miter saw. A decent quality tool is easy to maintain and operate, and even an inexperienced beginner can master the principle of its operation. Saws from the best miter manufacturers combine high quality assembly and a wide range of available jobs. When choosing a reliable miter saw for home or work, we recommend paying attention to the products of the following miter saw manufacturers: Makita, Metabo, Interskol, Zubr, Jet. All models considered in the rating showed high quality in work and functionality.
Milling
Discs
Such nozzles are available in various designs. The main difference between the devices is the size of the abrasive grains.
Sanding wood
If you decipher the abbreviation angle grinder, it is clear that finishing is the main purpose of the “grinder”.
Cord brushes
They are used primarily for primary (rough) sanding of wood, when it is necessary to smooth out the unevenness of the sample.
End discs
The name speaks for itself. These attachments are used to process the end parts of wooden blanks (cuts). They are especially effective if you have to deal with corner (oblique) cuts.