A house made of OSB panels is an excellent, modern solution. To better understand the features of houses made of this material, let's consider its main characteristics, advantages, disadvantages, main varieties and figure out how to work with it - install and finish. Read to the end and you will know what questions to ask specialists if you order work on the construction and finishing of a house from OSB panels.
OSB board is a functional building material Source wikimedia.org
Advantages and disadvantages of the material
You should start by learning what it is. OSB boards are made from tightly compressed pine chips. The best way to tell about the need to use the material is its advantages:
- Low construction costs . To build a house from OSB, you do not need an expensive lift. Many people even manage the construction themselves.
- Light weight of slabs . If we compare OSB with the traditional building material - brick, then it is 5 times lighter. This greatly simplifies the design; a reinforced foundation is not required. This will also make it possible to build housing on types of soil where it is not recommended to build brick houses.
- Fire resistance . Of course, any wood material can burn, but thanks to the dense pressed structure and fire-resistant impregnation, OSB boards burn very slowly.
- Heat conservation . Slabs made of coniferous chips do not allow heat or cold from the street to pass through, but retain the temperature inside the building as much as possible. For particularly harsh operating conditions, manufacturers offer insulated boards with an insulating layer.
Excellent material properties for private houses Source domnanowo.pl
- Resistance to moisture . Protective impregnation, proper putty and a reliable roof will allow you not to worry about rain or snow.
- Ease of finishing . The answer to the question whether it is possible to putty an OSB board is definitely yes. And this will not be difficult due to the ideal flatness of the surface.
This material really has many advantages, but there are also some points in which the slabs are inferior to their “competitors”:
- Soundproofing properties . The thickness of OSB for the walls of a frame house is from 9 to 15 mm, so it cannot completely protect against noise penetration. If this is a very important characteristic in a particular case of construction, then the problem is solved by an additional insulating layer.
- Flammability . Yes, the material is protected from fire, but when the slabs have already caught fire, it will be more difficult to extinguish them than brick structures.
- Requirements for accuracy when performing work . Construction like a designer requires strict adherence to all dimensions, otherwise even a small mistake can create several problems at once.
You need to work strictly according to the scheme Source tekna.no
There are definitely more positive aspects than negative ones, so the slabs can be considered as a material for the home.
House construction technology
When the construction of the foundation is completed, it is time to construct the main volume of the building. As noted earlier, it will not be very difficult to do this with your own hands due to the fact that there is no need for lifting machines and other mechanisms, which are indispensable in traditional construction.
The foundation must be well waterproofed. Once this is done, the assembly of the house begins. The first stage will be the laying of support boards along the perimeter of the base of the building, which should accurately repeat its configuration, as it is presented in the project.
Scheme for calculating the distance between logs for OSB sheathing
You need to choose boards so that their thickness matches the width of the grooves of the OSB board. They need to be connected using sealant inside, and also self-tapping screws for grooves and corners.
Further, strong beams are used as vertical guides. When their thickness is selected, the same principle is used as with boards - it is equal to the width of the OSB grooves. This will allow the latter to fit flush. The beams are connected in pairs with self-tapping screws, which need to be used to fasten both the inner and outer sides. The recommended pitch is 15 cm.
A special feature of a frame house is that during assembly, the corners of the house are formed by panels. One corner slab fits into the groove of the adjacent one. No more manipulations are needed. When the main volume is ready, all that remains is to install the OSB for the roof and floor.
Comparative table of types and features of OSB boards
The latter are narrower and designed for heavy loads, their thickness is greater. Roofing material is already placed on top of them. And finishing is done, for example, cladding.
Strong wooden beams must be used as vertical guides.
Types of slabs
The slabs presented on the market may differ in size, color, composition, and the presence of additional impregnations, but the main characteristics for classification are moisture resistance and strength. Based on these parameters, 4 types are determined:
- OSB-1 . The simplest option with low water resistance and strength. Such slabs are the cheapest in price, but are not suitable for buildings; they are used in furniture production.
- OSB-2 . Compared to the previous version, it is a little better, but is still afraid of water and stress. It is also used in furniture designs and for elements of houses that are not under load (partitions, wall decor).
- OSB-3 . Excellent moisture resistance and strength, affordable price. Used for construction.
- OSB-4 . The most durable version of the slabs, it is not afraid of either moisture or load. But there is also a drawback - the high price.
OSB-4 is the most durable and durable option.
Source greensoft.mn The third option will be ideal for a house made of OSB in terms of operating characteristics and price range. You can also use 4, but save money, and it’s not worth building the entire house from 1 and 2, such a structure will not be reliable.
See also: Catalog of companies that specialize in the construction of houses from SIP panels
Characteristics of building materials
A wide range of sizes of OSB panels allows you to choose them for any application. Standard sheet dimensions are 2500 x 1250. In this case, the consumer chooses this material, guided by:
- An affordable price, which determines a fairly high demand for this building material.
Design and arrangement of OSB panels - Ease of processing with various types of sawing manual or electric tools to form an even cut without cracks or chips.
- The rigidity of the panels is sufficient to firmly hold all types of fasteners: self-tapping screws, screws, nails.
- An absolutely flat surface that does not require additional processing, so after installing the panel you can immediately begin tiling or painting it.
- Light weight, which does not cause transportation problems, as well as ease of installation of walls and ceilings. Therefore, building a house is completely doable with your own hands.
- High resistance of slabs to fungi, bacteria, insects. This is ensured by the addition of antiseptic additives to the material.
Video description
In this video, look at what designs of houses made from OSB panels can look like:
Choosing a foundation
For slab houses, one of two types of foundations can be built:
- pile;
- tape
Pile foundation
For its construction, it is necessary to take into account the requirements. Piles should be installed at the corners of the future house and at the joints of partitions and load-bearing walls. The remaining supports must be mounted maintaining a distance of 1.4-1.5 m from each other. The immersion depth of the piles is selected taking into account the level of freezing of the ground.
Pile foundation for a small house Source fundament-pro.com
Another important point is that the piles must protrude from the ground at least 50 cm, this will protect the building from dampness.
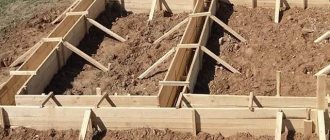
Strip foundation
This design is suitable for harsh climatic conditions and will allow you to spend less resources on heating the house. For a strip foundation, you need to dig a trench around the perimeter of the house and its internal partitions.
Before pouring concrete, you need to pour out and compact a 10 cm layer of sand at the bottom of the trench, then use crushed stone or gravel, and only after that concrete. If the soils are loose, then formwork will also be needed.
Construction of the frame
The foundation, before connecting to wooden elements, is covered with a layer of roofing felt, which will provide waterproofing. The lower frame of the beams is mounted on it. Anchor bolts are used for fastening.
It is important that the surface is exactly horizontal; the stability of the structure depends on this. The next stage will be the installation of frame supports and the top trim of the beams. After this, all that remains is to secure the vertical boards, which will become the support for the OSB boards.
All that remains is to sheathe such a box Source sakh.com
Roof installation
The construction of the roof of a frame house is done in a certain sequence
The construction of the roof of a frame house is done in the following sequence:
- Installation of rafter legs is carried out. They are mounted in pairs, fastened to the top trim beam of the last floor and to each other.
- Steel brackets are used to secure the rafters to the floor beams. These elements are attached to the ridge with self-tapping screws.
- To form very long slopes, the rafter legs are spliced. To do this, use two short beams of the same cross-section as the rafters, which are attached on both sides at the junction of the ends of the two rafters being spliced. All elements are tightened with bolts.
- After installing the rafters, you can proceed to the manufacture of the gable frame.
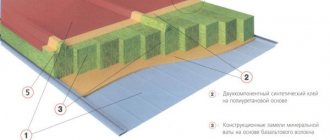
- After this, the roof is sheathed with oriented strand boards. At the same time, you should not forget about all the layers of the roofing pie: insulation, vapor and waterproofing.
- Then the gables are sheathed and insulated.
Plastering OSB walls
You also need to figure out how to putty OSB. To do this, you should familiarize yourself with the compositions that are suitable for coating this material, and study the application technology.
Types of putty compositions
You need to look for an answer to the question of how to putty an OSB board, taking into account the composition of the material. The boards are based on pine shavings, so special mixtures for wood are suitable, namely:
- Oil-adhesive mixtures . They are made from special varnishes and may also contain drying oil.
- Adhesive mixtures . They are based on oils, glue and plasticizers.
- Nitro putties . Made from cellulose ethers, resins and plasticizers. They have an important advantage - they dry quickly.
- Gypsum compositions . The presence of polymer particles makes the material very durable.
- Latex compounds . Very high quality, they provide not only a decorative, but also a protective function, and are characterized by long-term operation.
Latex putty has excellent properties, but is also more expensive Source stroitesnami96.ru
But you should not use traditional dry putty for bricks for OSB panels. They will fall off very quickly.
Additional types of foundation
If the soil is stable, a columnar foundation will be an excellent solution; a columnar-strip type is also possible. In the first option, the main advantage will be ease of construction and cost-effectiveness. In the second, dressings with a grillage between the supports will be used. The construction is based on the same principles. The pillars can be made at a factory or at home using asbestos-cement pipes.
It is possible to achieve high strength during foundation installation by using screw piles. Each support is installed below the ground freezing level, this helps to increase reliability. The best solution would be piles measuring 89 mm in diameter and 2-2.5 m in length. Installation of supports is not complete without a hydraulic drill based on an excavator. This fact should be taken into account and the area for the operation of this equipment should be provided in a timely manner. To save money, manual installation technology is used, but it is much more difficult and is not always possible.
Video description
This video shows the nuances of plastering wood panels:
Step-by-step instructions:
- Surface primer . Experts advise applying 2 layers using a regular brush. Drying time can range from a couple of hours to a whole day; more details are indicated on the container of the specific mixture.
Primer is an important stage of work Source fasad-exp.ru
- Applying putty . A spatula is used for work. Conditions are also important; high humidity and low temperatures are unacceptable. For putty for OSB boards to be effective, you need to apply at least 2-3 layers.
- Grinding . The surface can be thoroughly leveled and made smooth only after the putty has dried. In addition, you should clean the wall of dust.
- Reinforcement . Installation of overlapping reinforced mesh. Both plastic and steel can be used.
- Alignment . Using adhesives, you can level the wall, and then glue wallpaper or install another covering on it.
Floor installation
Procedure for laying flooring in a small country house:
- Mount the bottom trim. It is made from timber with a cross-section of 15x15 cm. The strapping beams are connected using a tongue-and-groove fastening. Additionally reinforced with bolts and glue. Assemble a platform from a 15x5 m board and lay it on top of the bottom trim. Cover the platform with plywood. Turn the resulting box over and place the insulation. Sew up the insulation with a double layer of plywood. Lay plywood 1.2 cm thick along the box, and 0.9 cm thick across the box. As a result, the floor will have a thickness of 2.1 cm. To fasten the plywood layers, you need PVA glue. Cover the sides of the platform with roofing felt.
The floor is ready. If desired, you can lay linoleum or laminate on it.
Briefly about the main thing
A house made of OSB panels is an excellent solution both for permanent residence and for building a summer house. First, you need to select a material based on its moisture resistance and strength characteristics. It is better to use OSB-3 or OSB-4 boards.
After selecting and purchasing materials, you can begin construction: foundation, base, walls, floor, roof. It is important at each stage to strictly adhere to the previously certified scheme.
In the end, all that remains is to putty the walls. The procedure itself is simple and will not be difficult, but the choice of materials must be approached responsibly, because not all compositions are “friendly” with OSB panels.
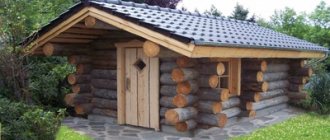
Do-it-yourself country houses (projects, photos): you can do it
A simple and comfortable country house in the forest
The dream of many city dwellers is a beautiful small house outside the city, where you can escape from the hustle and bustle of the city, hide from the heat, and feel the pleasant freshness of the earth under your feet instead of hot asphalt. But not everyone’s dreams come true; it seems that a country house is complicated, expensive, and time-consuming. In fact, building a country house with your own hands is quite simple.
Project plan
The first thing you should begin with in preparing and building your home is a project plan. You can draw the drawing yourself, or you can order it from special companies, of which there are quite a lot today. To save money, you can buy a ready-made project, or use free standard projects that can be downloaded on the Internet.
Frame house project
If you decide to draw the project yourself, think about whether you have enough knowledge and skills. As a rule, after sketching a sketch and a room plan, problems begin. If you know that you can draw the layout of pipes, electricity in the project, indicate the locations of sockets, etc., then you will be able to cope with independent drawings. If you have vague ideas about all this, it is better to turn to specialists with the sketches that you sketch at home. They will also help you select materials and even calculate the approximate cost of future construction.
Project with sketch
The house diagram is available on the Internet for free, use it for inspiration.
Independent projects can be drawn for country houses that do not have complex communications and electrical wiring systems.
Another project with a sketch
The cost of the project ranges from 500 rubles to 150,000 rubles. An average project will cost you around 5,000 rubles.
What is OSB
OSB or oriented strand boards consist of 90% wood chips. The remaining components are binder waterproof resins. Construction panels are produced by pressing large fragments of coniferous, aspen and larch wood. The size of the chips is up to 15 cm. Inside the future product, it is laid in three rows. The outer layers are placed parallel to the long side of the slab. The middle layer is perpendicular. The pressure in the press is so strong that the fibers interpenetrate. This guarantees high strength to the final product.
The resulting material is sometimes called improved wood. It is lightweight and easy to handle. Unlike natural solid wood, OSB does not burn or rot; there are no knots or voids in their structure that reduce its stability. In terms of its characteristics, it is superior to sheets of chipboard, MDF or plywood. These panels hold fasteners well: bolts, nails, dowels.
The use of phenol in binder mixtures raised the most questions among consumers. But now many manufacturers have begun to switch to polymer resins, which are completely safe for health. Such a product is marked with the words “ECO” or “Green” on the packaging.
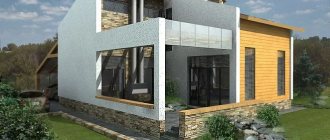
Interior lining of the house
The interior cladding of the house is done using lining. Since the frame garden house was originally planned to be used only in the summer, the walls were not insulated; the frame was simply sheathed with OSB sheets and a block house.
Finishing of internal walls with clapboard.
To improve the performance characteristics of the structure, insulation is performed. At the previous stage, we already wrote about how to properly lay waterproofing film after installing insulation. Most often, such structures use either mineral wool or ordinary polystyrene foam.
You can build frame-panel houses on your summer cottage; they are made from special panels, the design of which already includes both insulation and waterproofing. The lining is attached on top of the insulation.
Windows and doors
When fixing windows, be sure to leave openings that will be filled with polyurethane foam. If the profile does not have a protective transport film, it is better to paste it around the perimeter with mounting tape; this procedure will protect the structure from expansion of the mounting foam.
Installation of single-leaf windows.
Our inexpensive frame house used windows that open to the sides like on a balcony. If you encounter difficulties during installation, it is better to involve specialists in the work. The protection of the room from cold and moisture will depend on the correct installation of window and door profiles.
On a note
The polyurethane foam is carefully trimmed only after it has completely hardened; at the same stage, all protective films are removed.
Laminate flooring
You can begin installing the finished floor only after completing the installation of windows and doors, otherwise air entering the room from the street can cause damage to the floor covering.
Laminate flooring in the house.
In our frame garden house, we decided to use high-quality laminate. Laying is carried out on a subfloor made of plywood, on top of which a special sealing material is laid.
Execution of work
The step-by-step instructions in any case instruct you to first clear the site and level it to the ideal hydraulic level readings. It is categorically unacceptable to leave bushes and even grass or single roots. The easiest way to make your own foundation is to use ready-made blocks. They are laid out around the perimeter. An alternative is a pillar foundation, here you will have to dig holes and, after filling the sand cushion, place the same structures vertically inside.
Another method is to pour concrete mortar, which, when hardened, turns into an excellent base.
The next steps during construction will be:
- assembly of the bottom trim;
- treating it with an antiseptic;
- flooring made of boards that are protected from rot;
- installation of the original frame post and securing it to a metal corner;
- attaching a temporary spacer for greater rigidity;
- fixing the OSB sheet;
- repeating the same manipulation with other racks.
When all this is completed, all you need to do is paint the walls and make a threshold. It is recommended to fasten the sheets to the bottom line of the frame with a margin of 50 mm. It is achieved by adding the required height to the original timber frame. After the sheet resting on this part is fixed, it can be moved to another place and the procedure repeated. The most rational dimensions for a shed are 3x6 m; less is impractical, and not everyone needs to increase the area additionally.