To prevent doors from remaining open, they used to use a banal spring, but today they install a door closer. Its design is also based on a spring, but it is more powerful, hidden in a metal case and filled with oil - for “braking” when closing. Installing a door closer is not a difficult task. Self-installation will take 20-30 minutes. Hardly any more. So we take a drill and install it ourselves.
Most popular model
How it works
All regular door closers are based on a regular door lock.
, which, in addition to the electric drive for unlocking and locking, uses another one that is in charge of fine-tuning the door. The lock has a built-in Hall sensor, which determines that the door is closed “at the first click.” The electronic unit issues a command to the electric drive to tighten the door.
Locks with closers, installed on many VW Group vehicles, have the same structural diagram: a lock and an electric drive module connected to it by a cable.
Locks with closers, installed on many VW Group vehicles, have the same structural diagram: a lock and an electric drive module connected to it by a cable.
BMW closer operation diagram: when the door is closed, the rotating latch (2) engages the bracket (1). In this position, the Hall sensor (3) sends a signal to the control unit that the door is not closed tightly. An electric drive (6), consisting of a motor and a two-stage gearbox, tensions the cable (5) and moves the lever (4). The lever presses the rotating latch, which pulls the door “on the second click.” The latch is fixed, the electric drive is turned off.
BMW closer operation diagram: when the door is closed, the rotating latch (2) engages the bracket (1). In this position, the Hall sensor (3) sends a signal to the control unit that the door is not closed tightly. An electric drive (6), consisting of a motor and a two-stage gearbox, tensions the cable (5) and moves the lever (4). The lever presses the rotating latch, which pulls the door “on the second click.” The latch is fixed, the electric drive is turned off.
To close the trunk lid, in some cases, closers with a “reverse” circuit are used. The lid is tightened due to the fact that the bracket to which the lock clings crawls “deeper” into the threshold of the luggage compartment.
Luggage compartment lid closer.
Luggage compartment lid closer.
Choosing a frost-resistant outdoor door closer
In order for the sash to open and close easily in any weather, you need to pay attention to the seals. They must be made of frost-resistant rubber, otherwise the oil will leak in winter. The hydraulic oil used must remain fluid in the cold. It is important to have a system for adjusting the channel capacity, which will allow you to change the damping rate taking into account the average daily temperature.
The selected door closer must meet the operating conditions and have sufficient power, because the entrance doors are quite massive.
How does it work
In appearance, the electric drive resembles a gas-filled tailgate stop - only thicker and longer (according to the laws of mechanics, greater movement requires less force). In addition, numerous devices must fit inside. The main element is a screw-nut pair that passes through almost the entire drive. An electric motor is installed at the end, which rotates the lead screw through a reduction planetary two-stage gearbox. A coil spring that works in compression helps lift a heavy door.
Luggage compartment door drive: 1 — Hall sensor; 2 - electric motor; 3 - gearbox; 4 — lead screw nut; 5 - spring; 6 - lead screw.
Luggage compartment door drive: 1 — Hall sensor; 2 - electric motor; 3 - gearbox; 4 — lead screw nut; 5 - spring; 6 - lead screw.
A device with feedback is required
, indicating that the device has reached one of two extreme positions.
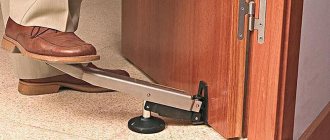
This role is played by the Hall sensor, which controls the rotation of the motor armature. The operation of the two drives is controlled by an electronic unit. The tailgate can be opened by command from the remote control, or by pressing the button on the door when the car is disarmed, or, finally, in the most effective way - by running your foot under the bumper.
You can close the opening from the remote control by pressing a button on the door trim or a button from the interior.
Upper
Another name is hinged or overhead. Installed on the top of the door frame. One part of the structure is attached to the frame, the other part is attached to the door leaf.
There are varieties in this class that differ in the method of transmitting force:
- Lever mechanism. The force of the compressed spring is transmitted to a system of two iron levers. This design is reliable. It has two drawbacks: it looks unattractive when closed due to protruding levers; the entire structure is not resistant to intentional breakdown.
- Parallel traction. The device is similar to the lever type, but the lever layout contains an additional bracket. In the closed position, the levers are parallel to the door leaf. The result is a design that is hardly noticeable.
- Sliding channel. The force is transmitted to a sliding rod, one end of which is rigidly fixed, and the other moves in a closed channel. This option has no protruding parts, which makes it unnoticeable and resistant to damage.
Floor-standing
They are attached to the floor and partially recessed into it. There are options that differ little from the upper models, only fixed at the bottom. But the most widespread are leverless designs with a lower loop attached to the axis of the closer. Floor-type mechanisms are usually installed for glass sashes that open in both directions. In rooms with increased aesthetic requirements, the floor option is indispensable.
Hidden
These are lever-type mechanisms with a body completely recessed inside the door leaf. Only the lever attached to the frame protrudes outward. Doors with a thickness of at least the size of the body being installed and having a cavity inside are suitable for their installation. They are low-power, therefore they are not able to cover heavy structures.
Safety
The working stroke of the side door closers is so small (6–7 mm) that only a finger can be pinched. On the interior side, the manufacturer does not leave any places where, for example, a child could find a gap in which a finger would be pinched. But the outer edges of the door still form gaps. However, you can only put a pencil in there.
This is how the Audi Q8 door closer bites through a pencil.
This is how the Audi Q8 door closer bites through a pencil.
Children should not operate the tailgate drives. Well, for an adult, the maximum force developed by the drive and not exceeding 10 kg at the edge of the door is not dangerous. If this force is exceeded, the door stops and even - on some cars - begins to open.
Preventive measures
It is necessary to periodically check the door structure for various damages and malfunctions:
- The door is examined for defects that could lead to misalignment. Also check the fastening of the hinges.
- Inspect the body of the mechanism - its integrity, absence of cracks and leaks.
- Check the places where the door closer is fixed to the box and the canvas. Loose fasteners should be tightened.
- The lever mechanism must operate without failure.
- If necessary, adjust the speed, angle of opening and closing of the blade.
If serious damage to the closer is detected, the mechanism is removed from the door and repaired or replaced.
Rear doorman
For ease of use of the trunk, we came up with a hands-free access system
. We have already discussed the principle of its operation. And here is how the power drive of the luggage compartment lid works.
An electric motor with a gear reducer that turns the lid by its hinges.
An electric motor with a gear reducer that turns the lid by its hinges.
Moreover, such devices are used both on heavy fifth doors of station wagons and on the lids of sedans.
There are also cars with a hydraulically driven trunk lid.
, but
the drive in the form of a sliding rod with a built-in electric drive
.
Hydraulic drive of the trunk lid of the Volkswagen Phaeton sedan: 1 - hydraulic cylinder; 2 - hydraulic unit; 3 - electric motor; 4 — trunk loop.
Hydraulic drive of the trunk lid of the Volkswagen Phaeton sedan: 1 - hydraulic cylinder; 2 - hydraulic unit; 3 - electric motor; 4 — trunk loop.
Installing a door closer: instructions with photos
To install the closer on the door, you only need a drill, a ruler, a pencil and a screwdriver. A drill is usually required “3” (three), but you need to look at the diameter of the fastener, which usually comes with the kit.
What is needed to install a door closer
Most manufacturers, to facilitate self-installation of the closer on the door, complete the products with installation templates. These templates schematically depict the parts of the closer in full size. They also have mounting holes for each element. In models that can create opening forces of different classes, the holes are drawn in different colors; in addition, they are labeled - the class of the closer is placed next to it.
Example template for installing a door closer
The template is printed on both sides of the sheet. On one side - for opening the doors "towards you" - from the side of the hinges (pictured above), on the other - "from you".
Installing a template
The template has two perpendicular red stripes. We align the horizontal one with the top edge of the door leaf, the vertical one with the axis line of the hinges.
Installing a template
Everything is clear with the upper edge of the door leaf, but to avoid mistakes during installation, you need to draw the axis line of the hinges. If the door closer is installed from the hinge side, there are no problems - use a long ruler and pencil to move the line of the middle of the hinges upward. If installation will be carried out on the other side, measure the distance from the edge of the canvas to the middle of the loop. Mark this distance on the other side and draw a line.
Holes for door closer
On the template we find marks for holes according to the selected class. Using a drill or awl, we transfer them to the door leaf and frame.
Transfer the marks for the holes to the canvas and frame
Typically, the kit includes two types of fasteners: for metal (metal-plastic) and wood. We select a drill of a suitable size and use a drill to drill holes in the designated places.
Door closers are equipped with two types of fasteners - for metal and wooden doors
Drill holes according to the marks
Next, the actual installation of the door closer begins. Please note that for installation it is necessary that the housing and arms are disconnected. If they are assembled, they are separated (the washer is unscrewed, the screw connecting the levers and the body is removed).
Installation
We attach the parts to the holes made and install the fasteners. In the diagram we find the class of opening force that we need (in this case EN2) and install the parts as shown in the figure.
Door closer installation diagram
To open “towards you,” we place the body on the door leaf and install a rod on the frame.
Installing the case
We fasten the rod
Now you need to connect the traction lever to the body. There is a special protrusion at the bottom of the case. We put a lever on it and tighten it with a screw.
Installing the traction lever
Now all that remains is to connect the lever to the rod. There are two options.
Self-installation of the front door is described here.
Connect the lever to the rod
The connection of the lever with the rod itself is very simple: the two parts are combined and slightly pressed with your fingers. They lock into place with a slight click. The trick is how to position them relative to the door. The rate of movement of the door leaf at the final stage of closing depends on this. The position can change due to the fact that the rod consists of two parts and can be adjusted in length - one of the parts of the rod is a long threaded pin. Rotate the pin to shorten or lengthen it.
If you just need a smooth finishing, the rod is placed so that it is perpendicular to the door leaf. To do this, reduce its size slightly (pictured on the left).
Lever and rod placement for setting finishing force
If the door has a latch, a significant force is required to overcome its resistance. For this option, a shoulder is placed perpendicular to the door (the rod is untwisted, making it longer).
Having arranged the parts accordingly, they are combined and connected. That's all, the installation of the door closer is complete. And you can handle it with your own hands, and without much difficulty. The final stage remains - setting the closing speed. To do this, you need to understand the adjustments of door closers.
How to put on a gate
Frost-resistant models that can be used outside are suitable for installation on a gate. But not all gates have a top crossbar. But everyone has side racks. In this case, the rod is attached to the side post by unfolding the mounting plate along the post.
Installing a door closer on a gate without a top crossbar
But hydraulic devices (discussed in this article) do not do well in the cold. The oil that is poured into the body and serves to “brake” the door leaf becomes more viscous, and the gate closes more slowly. From this point of view, it is better to choose a pneumatic model for the gate (read about selection and installation here).
How to install on a metal door
Installation of a closer on metal doors differs only in the type of fasteners used and the size of the drill. Since the canvas is usually heavier, powerful models of at least class 5 are selected (check the table). Accordingly, on the installation template you will need markings for another class.
The door closer is installed on a metal entrance door in the same way.
You may also need a more powerful drill, but these are all details. Otherwise, you need to install a closer on metal doors in the same way as wooden or metal-plastic ones.
Did you know that...
Some actuators begin to close the door when a person pulls the tailgate down slightly, indicating a desire to close it. Remember a computer CD-ROM: give it a little push and the tray slides away on its own.
The device allows you to implement an interesting function - the door is raised not to its full height, but by an amount programmed by the driver. This may be required in a garage with a low ceiling. The Hall sensor allows the “electronic intelligence” to count the number of revolutions of the electric motor that are necessary to lift the door to a given height. You can set the door lift height by pressing a button on the remote control or on the door itself.
Ways to control the door drive: 1 - button on the instrument panel; 2 — button on the door outside; 3 — button on the end of the door; 4 — button on the key fob.
Ways to control the door drive: 1 - button on the instrument panel; 2 — button on the door outside; 3 — button on the end of the door; 4 — button on the key fob.
When adjustment is required
Adjusting the door closer is a fairly simple matter; you can easily do it yourself. Let's look at in which cases it may be necessary to adjust the parameters of this device.
First of all, it should be remembered that the duration of proper operation of any device depends on its high-quality maintenance throughout its entire service life. Therefore, once or twice a year it is necessary to inspect the closer and correct minor problems. This is especially true when the seasons change.
It is recommended to inspect the closer at least 1-2 times a year
In winter and summer, the climatic conditions are strikingly different. Most closers are oil-filled, and as you know, any liquid changes its state depending on the ambient temperature. So, in winter the oil becomes more viscous and the door movement slows down, in summer everything happens exactly the opposite, so it is advisable to tighten the door closer to the required level.
When changing seasons, it is necessary to adjust the closer
Adjustment of devices is also necessary if you notice any problems or you are simply not satisfied with the settings of its operation. If the closer starts to slow down or the door closes too quickly and abruptly, jerkily, and doesn’t close for a long time, you can try to fix all this.
The closer is subject to mandatory adjustment in case of malfunctions
Things are a little more complicated if the door closer fails. Then simple adjustment may be ineffective and additional repair measures will be required.
In addition, knowledge about the possibility of setting the functions of the closer will be useful during initial installation, when it needs to be adjusted in accordance with the conditions of use. Less commonly, temporary adjustments to the effort and function of the product may be necessary while it is being used.
Portal about construction
01/18/2019 admin Comments No comments
To protect the door from premature failure, closers are often used. These devices are designed to smoothly and accurately slam the door leaf. A specific model is selected based on many factors:
- temperature changes;
- expected load;
- the weight of the canvas itself;
- required level of reliability.
Often such mechanisms cost a lot, and if for external doors this is justified by the reliable service of purchased devices, then for internal doors or a summer house it is more economical to make a homemade closer.
Model overview
Today, the market for devices for soft closing of doors is represented by domestic and foreign door closers. The most popular today are German (Dorma, Boda), Italian (Cobra, Cisa), Finnish (Abloy) devices. Presents domestic closers.
Today you can purchase a high-quality door closer, the price of which is 1000-1200 rubles. However, the cost of devices from foreign companies that are equipped with additional functions can reach 3500-4000 rubles.
Models from the Finnish company Abloy and the German GEZE and Dorma performed especially well in harsh winter conditions. Domestic door closers are not inferior in quality to European models, and their cost is significantly lower. You should not purchase cheap devices from unknown manufacturers that do not have the appropriate quality certificates. Such mechanisms quickly fail and reduce the service life of the door.
Ventilation grates
Fire doors can be equipped with ventilation grilles. Grilles are made of stainless steel and are installed, as a rule, to ensure free circulation of air inside.
Grids can be of the following types:
- Regular or “Through-through” - when installing such a grille, the fire door loses its smoke and gas tightness and loses its soundproofing properties;
- Special “Self-closing” grilles – these ventilation grilles consist of several parts. One of them is stationary; it is the one that provides the necessary air circulation inside the room. The other part is movable with a thermosetting seal.
The mechanism of operation of the “Self-Closing” ventilation grille is simple - in the open position it works just like a regular “through” grille.
However, when the air in the room is heated to a certain critical level (for example, 75 degrees Celsius), the moving part with the seal in the grille closes on its own, and the grille becomes smoke-tight.
This happens because there are special springs in the grille that hold the open part of the grille. They, in turn, are restrained by a special fusible element - it melts at the moment when the temperature rises to a critical level and releases the springs, which close the hole.
Such ventilation grilles do not have soundproofing properties, but they contain hot smoke in the event of a fire.
At the same time, they can let cold smoke through, so doors with such grilles cannot be called smoke-gas-tight, because this term implies protection from both hot and cold smoke, as well as protection from harmful gases generated when materials burn.