How to make a metal frame for a balcony
Having decided on the type of finishing material, you need to calculate how many profiles and components for it need to be purchased.
The metal profile will form the basis of the frame for the balcony or loggia and will bear the main load when installing the frame for glazing the balcony. It consists of two horizontal and four vertical reinforced parts. When carrying out work, you need to understand that you cannot load this part of the apartment indefinitely. The design feature of any balcony is that two-thirds of the slab protrude outward, and only a third is supporting. A large load on such a lever is simply unacceptable. Therefore, an advisable solution would be to cut off the heavy fence and make a lighter one with your own hands. Regardless of which area of the loggia or balcony the dismantling work is being carried out, place a warning fence at the bottom of the house.
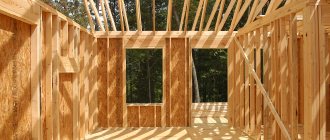
Having dismantled the old fence, you will have to resort to the services of a welder or weld a new, lighter frame with your own hands. When performing welding work, please note that the corners of the frame must have an exact size of ninety degrees. To do this, it is advisable to use a square. For a loggia frame, this condition is not necessary; however, aesthetically, even the smallest area with a clear geometry looks more neat and beautiful.
Frame installation work
Welding of the balcony frame can be done directly on the balcony slab.
To do this, when dismantling the old fence, metal protrusions are left, to which the frame parts are subsequently welded. The lower part is attached first, then the vertical support parts are welded, then the upper part is attached. The side elements are made in the same order and welded together. The metal profile components are fastened together with self-tapping screws, fitting into specially made grooves. The profile frame for the balcony exactly follows the contour of the main fence and is attached with self-tapping screws to the fence. If a decision is made to make a similar structure from a wooden beam, then the technology of execution is completely no different from a frame made of a metal profile. However, it is worth noting that such a design requires more reinforced fastening of the elements to each other. When preparing the frame on the loggia, you should also securely attach it to the wall.
To do the work yourself you need:
- Screwdriver;
- Hammer;
- Bulgarian;
- Hacksaw blade;
- Hammer;
- Pliers.
Useful tips
Installation with assistants
All described operations for the manufacture of the frame, installation of insulation and cladding are performed without installation to the base of the balcony. To fasten the corrugated sheeting, we use metal screws, which we screw into the lower wave. We expose the finished panels, weld them or nail them with dowels. We fasten them together by welding. To avoid damaging the corrugated sheeting during the work, we cover the sheets with cardboard and secure it with double-sided tape. When welding, we cover the cardboard with a metal sheet.
A minimum of 2 people are required for installation. One performs installation connections (welding, dowels, etc.). The second one exposes the finished panels, holds protective metal sheets during welding work and insures the structure.
Sheathing without dismantling
Sheathing without removing old structures is more difficult to carry out from a quality point of view. The old frame needs to be hidden and used as a load-bearing part. If there are any racks of metal corner left, we use them to fasten the profile pipe. Further operations are similar.
If the old frame is made of reinforcement, we fasten the frame from profile pipes using welding or clamps. We use reinforcement in the corners of the floor perimeter as racks.
Cladding on a wooden frame
All elements made from profiled pipes can be replaced with wooden blocks. This design is less reliable, but costs less. The bars are treated with a special compound that prevents rotting and damage by microorganisms. They are attached to each other using wood screws. For each connection point, use 2 self-tapping screws.
First, the front and side frames are made. Using self-tapping screws, the corrugated sheet is attached to the wood on one side. Insert the insulation and screw the corrugated sheet onto the other side. This design is called a sandwich. The finished frames are installed on the balcony slab using a mounting angle, which is screwed to the floor with dowels and to the frame with self-tapping screws. Sandwiches are attached to the balcony wall in the same way.
To decorate the upper edge of the cladding, a metal U-shaped profile 60 mm wide is used. The size is suitable for 40x40 timber and C8 or C10 corrugated sheets. The junction of the side and front sandwiches is covered with a corner. The element can be made independently. For this you need a profiled sheet with a round wave.
We cut a strip 100 mm wide from the sheet, in which the axis is the wave. Bend along the wave at an angle of 90°. We install on self-tapping screws.
Cladding and glazing
After welding the frame, you can begin cladding the balcony. Vinyl siding is best suited for such purposes. For cladding you will need to make a frame from a metal profile. It is not recommended to make a frame for a balcony from wooden beams. Although some strongly recommend this particular material, citing its relative low price. The metal profile is more reliable, as it is made of galvanized steel and is therefore not susceptible to corrosion.
When covering the siding panel with your own hands, gaps should be left at the joints of the elements for thermal expansion, and all unevenness and minor errors should be covered with special corners included in the package.
Before starting the interior finishing of the frame, it is necessary to glaze the upper part of the balcony or loggia. To do this, it is necessary to make the upper ebb from galvanized steel. You should not make such elements yourself; it is better to purchase a finished product. The lower ebb, as a rule, is included in the package for the glazing frame made of metal-plastic.
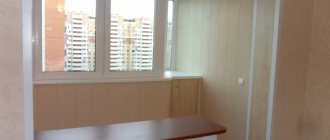
The interior decoration of the frame directly depends on the design of the walls and ceilings of the entire balcony, and is carried out as part of the wall arrangement.
General information
First of all, let’s figure out whether a balcony is really necessary, because its construction is associated with additional financial costs, and besides, the work will take some time.
So, as for the advantages of such a solution, they consist in the following points:
- The balcony offers views of possible attractions or just green spaces.
- Allows you to arrange an additional resting place.
- Can serve as a place for drying clothes.
- Allows you to create additional storage space for small items.
Balcony increases the useful space of the house
In addition, there are more original options for using it, for example, you can do:
- Bar;
- Hookah bar;
- Personal account, etc.
Thus, the benefits of balconies and loggias are truly obvious.
Beam 150x150 mm
How to make a remote balcony
Have you ever wondered what affects the cost of housing? You can name a dozen factors, but the main one is the square meters of the apartment. Their remote balcony adds a nice touch.
After all, in the cramped conditions of a multi-storey building, the only way to expand an apartment without harassing neighbors is to go outside. In our market times, the cost of square meters is rising. Therefore, money spent on expanding balconies can safely be considered a profitable investment.
In principle, everything can be done with your own hands. You just need to carefully study the issue, look at photos and videos, and consult with an experienced builder. In this article we will give you useful tips.
Useful theory
Removing balconies or loggias is a complex of construction and installation measures, as a result of which we not only increase the space of the apartment, but also strengthen the structure of the slab. The process involves moving the enclosing structures both forward and to the sides.
We definitely install balcony glazing to ensure warmth, silence and comfort in the new room. But if we install glazing with a distance from the original edge of the slab, then in any case the top of the glazing “looks” into the sky. We solve the problem of fastening the window frame together with the installation of the roof.
There are two ways to remove a balcony.
- Take out on the windowsill.
- Removal along the base of the slab.
Using the first method, you can expand the balcony by 10-35 cm. But when expanding, only the glazing is removed. The lower part - the parapet remains at the same level. As a result, the parapet and glazing are not located in the same plane.
This way we increase the volume of the balcony. Another positive side of this extension is the ability to install a window sill across the entire width of the extension. Paired with sliding windows, you can use it as a shelf, table or rack.
Removal along the window sill is simpler and cheaper than removal along the base of the slab , but this method of expansion has one significant drawback - the floor area does not increase. This imposes a limitation on the use of the extended balcony as a new room.
Related article: Finishing an open balcony in a Khrushchev building without glazing
How to extend the balcony to a greater distance? The second method allows extension up to 0.5 meters. Please note that this is the maximum safe extension size. Removal over a greater distance leads to a heavier expansion structure, increased load on the balcony slab and problems with fastening to the wall.
A distinctive property of the extension along the base of the slab (or extension along the floor) is the displacement of the parapet along with the glazing by the amount of expansion. The window frame rests on the parapet and is located in the same plane with it.
The main positive property of extending along the base of the slab is that it increases the area of the balcony. Thus, we turn it into a full-fledged room.
Is it possible to enlarge the balcony in another way?
Our people are resourceful and inventive. He quickly combined both methods to achieve the greatest expansion results.
Let’s consider this combined version of a balcony with a take-out in more detail.
Two possible ways
To increase the size of the balcony, you can use one of two possible methods:
- Removal of glazing along the parapet. When using this method, the actual size of the room is increased, while the nominal area of the balcony remains unchanged, so there is no need to obtain a permit or redo documents for housing.
- Extension of the slab around the perimeter. This is a complex and responsible work, which requires drawing up a project and obtaining a permit. But by choosing this method, you can increase the area by about a third, which will make the balcony in the Khrushchev-era building much more spacious.
Preparatory work
Before you begin work on removing the balcony, you should thoroughly prepare, think through and calculate everything. Thus, we will save time, money and nerves during the restructuring process.
Before starting expansion work, you need to answer two questions:
In other words, plan the end result and figure out which balcony extension design will be able to implement our expansion plans. After this, we select materials, tools, devices, and an assistant for practical work on removal.
Before you begin, you should draw a drawing or a detailed diagram of the installation of a balcony with an extension. It would be even better to order an expansion project. This way we can accurately calculate the type and quantity of materials needed to remove the balcony.
Tools and equipment:
- welding machine;
- mount;
- hammer;
- hammer drill (drill) and set of drills;
- angle grinder (grinder);
- building level and tape measure.
As a material for the manufacture of the expansion frame, we use a rectangular pipe of 100×50 mm.
Installation work
First of all, we empty the balcony of all things and disassemble the floor covering to the base. Using a grinder, we cut off the old fence and begin to strengthen the edge of the slab. Regardless of its condition, the edge must be closed with a metal corner 50x50 mm. It will serve as the basis for the lower mounting of the stem frame.
We cut two profiles from the pipe, the same length as the new width of the balcony along the facade. We place one profile on the floor and wall slab and attach it to it.
Along the side edges of the slab we install two profiles for the width of the external balcony, weld them to the wall profile and the corner.
We weld a second element to the ends, similar in size to the wall extension profile.
We prepare two side profiles. Their size is the width of the balcony plus 2/3 of the wall thickness. We make holes along the edges of the wall profile in the wall in such a way as to insert and weld the side elements of the frame. The result is a rectangle - the floor of the future balcony with an extension. We weld the logs in its inner part. The basis of the first part of the balcony extension along the base of the slab is ready.
Next we install gussets - vertical elements of the parapet structure. With their help, we solve the problem of how to make an extension along the windowsill, thereby combining both methods of expansion. To reduce the weight of the structure, we make the elements of the window sill extension from aluminum profiles.
We install horizontal connections, fencing and ceiling elements. The latter, being the rafters of the balcony roof with an extension, serve as fastening elements for the entire spatial frame of the expansion.
The frame is attached to the wall with anchors.
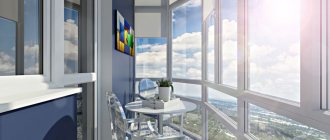
Glazing installation
For balconies, it is best to use PVC glazing or sliding systems. Extending the balcony with PVC glazing has better thermal insulation, but the inward opening doors block the window sill. This prevents it from being used to its full potential.
Sliding systems do not cover the window sill, since the sashes move along the plane of the window. But these windows have less thermal insulation compared to PVC windows.
Having installed the glazing frames, we install an external ebb and an internal window sill according to the extension design. Then we install double-glazed windows or sliding sashes, depending on the type of glazing.
Siding
The wide range of colors, ease of installation and durability of the siding have done their job. And now siding is a popular and convenient material for exterior cladding of balconies.
The fact is that siding installation proceeds from the bottom up, the boards engage with each other. But if the flashing is installed, it will be impossible to install the top siding board.
It is impossible to consider all the nuances of expanding a balcony in one article. But remember the main principles: measure seven times, cut once, be logical and do not violate safety precautions.
Balcony renovation - where to start?
The work begins with the dismantling of the old railings and the gypsum boards attached to them. Next, the screed is removed and all foreign objects are removed, since the metal frame must rest on a solid base, namely a reinforced concrete slab.
After preliminary preparation, the condition of the load-bearing foundation is assessed. Due to time and lingering moisture, usually the edge of the slab is partially destroyed and needs to be framed with a metal corner with a 63 mm shelf, on which the entire metal frame of the balcony will subsequently rest. Extension elements made of a metal strip 40*20*5 are welded to the corner, which are attached with anchors to the slab at a distance of 15 cm from the edge and securely fix it around the perimeter.
Concrete
The advantages of concrete balconies - their durability, fire resistance and appearance - make them an attractive addition to any private cottage. Many people take advantage of the flexibility and durability of these balconies and often decorate them with carpets, tiles, furniture, and plants.
However, all external concrete balconies are susceptible to deterioration, although this may not be obvious to the owner. Cracks, peeling of concrete, corrosion of reinforcement are signs of deformation. Small cracks in a concrete surface may look harmless, but the gaps provide a place for moisture to enter.
Throughout its life, a concrete floor is subject to numerous freeze-thaw cycles that affect both the surface of the concrete and the potential structure. Scaling (also known as spalling) is localized spalling of surface mortar caused primarily by hydraulic pressure from freeze-thaw cycles affecting the concrete at the surface. As a rule, it begins with localized small cracks, which can later merge and expand. Remember that concrete balconies can be severely damaged by frost. Regular frozen water expands by about 8%, but water with salts can expand up to 16%.
We are preparing new railings
New railings are placed on the already prepared base. To do this, you can use either a 40-mm corner or a profile pipe, which has a number of advantages, such as rigidity and an almost perfectly even shape.
The 40*20 pipe is cut into pieces equal to the distance from the floor to the planned level of the window sill (taking into account that the floor will rise by 5 - 15 cm during finishing, depending on the chosen material and design), usually this is about a meter and welded vertically using a level along the edge of the frame corner. The outer casing is attached to these pipes, so they are placed in increments of 40-60 cm.
Next, we carry out the upper trim of the railings, using the same profile pipe, which lies on top of the installed racks.
Unwelding the stem under the window sill
Since the balcony is not large, you can increase its usable area by moving the window sill forward. The stem size is usually 300 mm. In this option, the windows will be installed not along the edge of the slab, but along the edge of the external frame, that is, 30 cm further, thereby increasing the size of the balcony in the upper part.
The extension of the balcony under the window sill is made from the same 40*20 pipe and represents the upper contour of the frame around the perimeter on which the windows are placed. The “removal” is supported by inclined posts that transfer the load from the frames to the edge of the slab.
The operating procedure is as follows:
- We cut the pipe into 300 mm pieces.
- We weld them horizontally along the already standing railing posts, using a stretched thread between the pre-released pipes along the edges.
- We butt weld the front pipe. It is set according to level.
- We install support bevels, checking the horizontality of the front pipe.
At the corners, inclined elements can be made of galvanized wall profiles. It is smoother, has a larger flange width and is easier to attach the corners of the outer skin to. The bottom of the frame with the extension under the window sill is ready.
The base is an important part of the greenhouse
The base of the plinth will be the MZFL shallow-depth strip concrete foundation (since the greenhouse is light). In principle, a columnar foundation with a grillage made of timber, or even a foundation made of cinder blocks, would be quite suitable, but as usual.
It should be cast directly into the trench (with formwork installed above it), correctly laid in it and tied with reinforcement wire.
The ratio of cement and sand in the solution is 3 to 1 or 4 to 1 by volume. The formwork above the ground does not have to be made high - 20-30 cm is quite enough, and the rest of the base can be made from a block (but again ask yourself the question - do you need a high base?).
Pouring the greenhouse foundation into formwork and trench (directly into the ground)
After the mortar has completely hardened, we lay out the first row of blocks (piping) along the perimeter of the foundation. Starting the next row, in one of any walls of the greenhouse, leave an opening for the door. During laying, it is necessary to constantly check the correctness and verticality of the corners.
To securely fasten the corners of the trim into the base, we embed pins or plates. We level the surface of the base with a layer of mortar, creating a slope to the outside to drain the water.
Side racks
For blank walls, welding of the frame is also required. Vertical posts welded to the railing are connected at the top by a jumper, on which the visor will then rest.
In order to avoid overheating of the metal and distortion of the entire structure, welding work is carried out in two stages - first, the structure is assembled using tacks, then it is finally scalded.
To avoid rapid corrosion, the metal is primed.
In the photo, the frame of the balcony with extension under the window sill and glazing on both sides is ready for exterior finishing.
Related articles:
Many houses have an unheated room such as a balcony or loggia. How to insulate it and make it suitable for normal use in winter will help.
Residents of Khrushchevkas are familiar with the situation of disorder on the scanty balconies that these legendary buildings of the USSR are equipped with. In order to somehow organize it.
The article talks about the technology of covering the ceiling on a balcony with plastic panels, including preparatory work and installation of the ceiling.
Methods for restoring balcony slabs, their characteristics, and possible options for strengthening are considered using the example of repairing a balcony slab in a Khrushchev-era building.
We will show you how to arrange cabinets under the parapet on a balcony with a carry-out, mark and attach frame profiles under the sheathing, and sheathe the balcony parapet.
What is a balcony frame and why is it needed?
The frame is a special prefabricated structure. For its manufacture, pre-prepared individual elements are used. This structure is necessary to ensure the stability of the balcony room; in addition, it must withstand external loads.
The metal frame will give the balcony the necessary strength and the ability to withstand increased loads
If the owner of the apartment is planning to carry out renovation work on insulation, or it is necessary to install glazing, to achieve a high-quality result it is impossible to do without the use of a good frame.
Most people turn to professionals for help with such work. However, there is a small percentage of owners who make the frame themselves. Thanks to the clear use of specific instructions, the design is quite simple to install. But in addition to the frame, it is important to choose the right material for covering the balcony.
Related article: How to make a table on the balcony with your own hands
How to sheathe a balcony with your own hands, frame under corrugated sheeting
To cover a balcony, it is customary to use PVC siding, PVC lining or corrugated sheeting. Moreover, a metal frame is often used for outdoor work. And wooden ones are suitable for insulating walls from the inside.
Many craftsmen prefer corrugated sheets. This surface finishing option is the most rational.
After all, the material is made from light but durable sheet metal. Due to its positive characteristics, corrugated sheeting managed to achieve good resistance to external influences.
Corrugated sheeting is extremely popular due to its practicality and durability
When using profiled sheets, installation work is carried out quickly and easily. But to achieve this, it is important to correctly install the metal frame. To create it, profile pipes are used.
There are two types of design:
- Straight frame . It is placed parallel to the walls of the house. After this, the structure is insulated with mineral wool. Then it is necessary to sheathe the structure with corrugated sheets.
- Oblique frame . For its manufacture, special oblique extensions are used, which go in several directions. Some are located on the sides of the room, others in front. This design allows you to significantly expand the balcony.
There are two main types of frame: straight and oblique
A correctly installed frame will ensure quick and high-quality installation work on cladding and insulation of the balcony.
Bay windows
They are multi-section windows that typically extend outward from the exterior wall of the home. Although they can be used and are commonly found in all styles of home, they are most often found in Victorian or other traditionally decorated homes. Bay windows are popular for many reasons, but mainly because their large size and unique shape have the ability to fill a room with natural light and create a slight expansion of space.
Bay windows are usually three-sided, consisting of three or more windows. One window is parallel to the wall of the house, while the other two face outwards towards the interior wall, forming a trapezoidal shape. Typically, bay windows will add length and width of two to three meters, but this depends on the size of the structure installed.
Bay windows are very popular due to their aesthetic appeal. For this reason, adding a bay window to your home tends to be a very good investment if you ever sell your home in the future. Buyers often pay extra for improved natural light, and panoramic windows only increase this amount. In addition to providing better lighting, bay windows will help improve air flow in your home. They also add extra storage and furniture space, making them a popular choice for small bedrooms, living rooms or reading areas.
Enlargement of the room with a frame on the balcony made of profile pipes
How to make the size of the balcony room larger? Not many people know that thanks to the use of special designs, it is quite possible to enlarge a balcony on your own.
To ensure a high-quality result, it is important to carry out installation work consistently:
- Preparation . You need to completely vacate the premises and ensure that you have the necessary materials in advance. In addition, the area located under the balcony should be blocked to avoid injury to passers-by.
- Welding work . To make the frame of the room you will need special profile pipes. First you need to take care of the base to which the frame will subsequently be attached. To do this, weld the base along the balcony perimeter and make sure that the horizontal parts of the structure are the same size. If the frame is higher than 50 cm, you need to add additional pipes to it. The profile pipes that will serve as fencing should be welded to the bottom of the frame. Experienced craftsmen recommend pre-assembling the fence, and only after that welding it in sections. After completing work with the lower part, you can begin to install the upper part of the structure, which should correspond in size to the lower one.
- Finishing work . This stage is considered the most labor-intensive. First you need to attach special wooden posts to the corners of the frame. After this, the same materials are attached to the balcony (along the entire perimeter of the room). Then the longitudinal logs should be fixed at the bottom and top. These installation works make the structure more durable and stable.
When increasing the area of the balcony, a durable metal frame is simply necessary
To achieve a good result, you need to take care to carefully carry out all stages of installation work to increase the room. Moreover, it is worth paying special attention to the creation of the frame. After all, the strength of the balcony depends on this design. And for covering the room, it is recommended to choose high-quality materials that are highly wear-resistant and will serve for many years.
Slab expansion
You can more significantly increase the size of a balcony in a Khrushchev-era building by increasing the area of the balcony slab. This work is classified as complex; it requires the development of a detailed project and its approval by the relevant regulatory organizations. You can start work only after obtaining a permit.
It is difficult to say how long it will take to obtain permits. As a rule, this takes several months, so it is worth collecting documents in advance.
Advice! The work of expanding the balcony slab is usually entrusted to specialists, since it requires not only professional skills, but also knowledge of safety precautions for working at height.
The work is done like this:
- the parapet is dismantled;
- a corner measuring 50 by 50 mm is welded along the length and width of the concrete slab;
- then a frame is welded to the completed harness, which is made of profile pipes measuring 100 by 50 mm;
- if the planned width of the extension is more than half a meter, it is necessary to install metal spacers resting on the main wall;
- the welded frame must be secured to the wall using dowels;
- a new fence is welded along the edge of the manufactured frame, which is assembled from rectangular pipes measuring 40 by 20 mm;
- the new parapet must be fixed to the main wall with spacer dowels;
- Next, you will need to assemble a canopy of the same size as the welded lower frame. A beam should be installed in the upper part of the external structure; it is necessary for fastening the upper part of the window frames.
Please note: How to decorate a balcony with vinyl siding yourself?
The base of the extended balcony has been assembled, now finishing work can begin. You should start with the outer cladding. To do this, racks made of metal profiles or wooden blocks are installed in the corners of the welded frame, and the same racks are installed along the entire perimeter in increments of 0.5 m.
Horizontal beams should be secured at the top and bottom. Sheathing material can be attached to the assembled sheathing. Then you should begin installing frames and double-glazed windows, as well as insulation and interior finishing.
So, if you wish, you can increase the size of the balcony. Increasing the size of the slab is a difficult job, but it will be possible to significantly expand the size of the room. If you do not want to undertake a large-scale reconstruction, you can choose a simpler expansion option - moving the glazing beyond the parapet.
Manufacturing a frame for a balcony roof and glazing system
When the balcony is on the top floor of the house, the owners have to build a roof for the balcony themselves. Special canopies provide protection from rain and sun. The most popular option for finishing work on a structure is metal corrugated sheeting.
If the balcony is on the top floor, you will have to take care of installing a frame under the roof
To make the roof base, professionals recommend using profiles (50-60 mm).
They are installed in the form of 2 triangles on both sides of the frame. It is better to use zinc-alumina material for coating. It is also important to ensure that the sheet protrudes 5 cm on the sides.
Preparing the room for glazing
Before carrying out work on glazing the balcony, you need to take care of making the frame. But before you begin installing it, you should decide on the choice of material for the structure. Wooden or metal materials are suitable for such work. Experienced craftsmen prefer metal frames. This choice can easily be explained by their high reliability and durability.
To carry out welding work, you can purchase special inverter machines. There is no specific order for welding parts of the structure, because the entire installation depends on the characteristics of the balcony railing.
For high-quality glazing you will also need a strong frame
But what to do if the fence protrudes noticeably beyond the concrete slab?
It is necessary to align the vertical fence at the same level with the surface of the slab and find the metal strips (balcony embeds) at the base of the room.
In cases where a slab protrudes beyond the balcony fencing, you need to remove the old structure and free access to the embeds. After strengthening them further, it is important to ensure that the slab does not protrude and then install a new frame. Before welding the horizontal, excess vertical protruding parts should be trimmed.
Workflow Description
Now let's look specifically at the individual parts of the structure. I will tell you how to organize the work correctly, what materials need to be used and what to pay special attention to in order to achieve the best result.
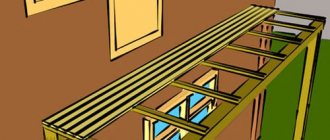
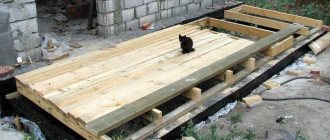
Element No. 1 – wooden floor
First of all, we will figure out how to make a wooden floor on the balcony. Wood is the best choice for these purposes, since the material is highly durable, pleasant to walk on and easy to maintain in an attractive condition.
To carry out the work we will need the following:
| Floor board | It is better to buy a ready-made version with a tongue-and-groove fastening, then you can perfectly combine the elements and get a smooth surface without gaps. A thickness of 32 mm is enough for us, although if you are going to place heavy furniture on the balcony, you can buy a thicker option, but there is little point in this |
| Beam for logs | Our flooring will be placed on special timber supports called logs. Elements of different sections are used for the logs, the main thing is that they ensure the reliability of the structure and withstand all loads without deformation. The height of the supporting structure must be no less than the thickness of the insulation being installed; do not lose sight of this nuance |
| Insulation | It is necessary to insulate the floor to ensure maximum thermal insulation of the balcony. For work, you can use polystyrene foam or mineral wool; the second option is preferable, but also more expensive. Additionally, you can cover the surface with heat-reflecting material Penofol, it has a small thickness, but significantly improves the thermal insulation of the surface |
| Compositions for processing and protecting wood | To ensure that the floor lasts as long as possible, all wooden elements must be treated with an antiseptic compound before installation, which protects the material from pests and mold. After installation, you must decide how to cover the wooden floor; it can be either paint or a special wear-resistant varnish that does not hide the structure of the material. |
If you have gaps and cracks where the floor meets the walls or railings, then it is easiest and most reliable to fill them with polyurethane foam; it will reliably close all the voids and insulate all problem areas.
Floor board allows you to make flooring quickly and efficiently
We also need a certain set of tools:
- To cut wooden elements, use either a power tool (saw or jigsaw) or an ordinary hand saw. If you choose a high-quality manual version with fine teeth, then you will cope with the job without any problems, and the cutting quality will be very, very high;
The floor board can be easily cut with a hacksaw
- It is better to fix the logs, and the easiest way to do this is with quick-installation dowels of the required length, holes for which are made using a hammer drill. Don't forget to purchase a drill of the appropriate diameter and length;
- The floorboard will be fixed using finishing nails, which are driven in with a regular small hammer.
The wooden floor on the balcony is made with your own hands as follows:
- Surface preparation consists of removing remnants of the old coating, if any, and cleaning the base. If there are unevenness and cracks on the surface, they need to be sealed with cement-sand mortar to level the floor. The easiest way to seal all cracks at junctions is with polyurethane foam, the excess of which is cut off after hardening;
The surface must be cleaned
- For the best thermal insulation, it is best to cover the base with polyethylene-based insulation with a heat-reflecting layer called Penofol . It is simply laid on the floor with an overlap of 10-15 cm on the walls; if there are connections, they are glued with metallized tape. If you have an insulated balcony under you, then you can skip this step;
Penofol is simply laid on the floor
Before using all wooden elements, they must be treated with an antiseptic composition and only then laid.
- Next, logs are laid on the surface. This process depends on how you are going to position the floorboard; if it lies lengthwise, then the logs are located across and vice versa. Fastening is done using quick-installation dowels, but if you did not install Penofol, then you can do without drilling and simply glue the elements onto liquid nails; this solution is in no way inferior to the usual option;
To simplify alignment, you can put the crossbars and level them, then the logs will lie flat
- Now it’s worth insulating the surface; if you use mineral wool, then it must be cut so that the pieces fit tightly between the frame elements. If you have polystyrene foam or extruded polystyrene foam, then after laying the elements, it is advisable to seal all the cracks with polyurethane foam . This will greatly improve the thermal insulation properties of the surface;
All cracks are filled with foam
- Next, you can start attaching the floor board; to do this, it needs to be cut into pieces of the required size; there should be a gap of 7-10 mm between the wall and the flooring. The end board is fastened with nails or self-tapping screws through the top, so that the fixation points are subsequently covered with a plinth. Subsequent elements are secured through the groove using screws or nails; all these actions are shown in great detail in the diagram below;
This is what the floorboard fastening technology looks like
- Before treating the wooden floor on the apartment balcony, the surface must be thoroughly cleaned of dust and debris. Next, apply the composition of your choice; if it is recommended to use primer under it, then this is done in advance to strengthen the surface. The best result is achieved if the protective coating is applied in at least 2 layers.
Before painting your wood floor, make sure it is free of dust and debris.
Element No. 2 – wooden ceiling
This part of the structure is no more difficult to finish than the floor, the only caveat is that the work is not very convenient, because you will have to sheathe the plane above your head. To work you need the following set of materials:
- Lining for surface finishing, there are many options, and you should choose the one that best suits your balcony. There are no special requirements, the main thing is that the lining is dry and intact;
Here are the main options for finishing materials
- The frame is made of timber, the thickness of which must be no less than the thickness of the insulation that will be used . If there is an insulated balcony above you, then I advise using only Penofol, it will be enough for good thermal insulation of the ceiling;
- The insulation may be different. Most often, foam plastic or rolled mineral wool is used; another option is described in the paragraph above, which is suitable for balconies in which the ceiling does not need to be particularly insulated.
The set of tools used is the same as in the section above. In general, the same tools are used for all wood trim work, so you can do the job without using any special equipment.
The work technology looks like this:
- First, you need to clean the surface; if any decorative elements such as plastic or ceiling tiles were attached to it, then they must be removed. As for whitewash or a layer of paint, it is not necessary to remove them, except perhaps go through with a brush to remove peeling areas, if any;
- If cracks have formed at the joints with the walls, which is not uncommon in panel houses, then they need to be repaired in a way familiar to us - using polyurethane foam . It will reliably close the cracks and even when the structures move, the foam will not burst and will maintain its integrity, which is very important;
All gaps at the joints are filled with foam, after which the excess is cut off
- Do not forget to stretch the wires under the lighting elements in advance if they will be present on the ceiling. This is very important, because then you will have to conduct wiring along the top, and this is not the most attractive option;
- If Penofol is used, the easiest way is to glue it to a concrete surface; for this you can use liquid nails. The material is lightweight, so there will be no problems with its fastening;
- Fastening the frame will require drilling holes in the concrete and fastening the bars using quick-installation dowels . The length of the fasteners should be 5 cm greater than the thickness of the bars used. Do not forget to align the elements evenly; to do this, you can place pieces of wood or other available materials under the frame;
- When insulating the ceiling on a loggia, it is best to use extruded polystyrene foam, which is simply glued to the surface with polyurethane foam or a special compound. All cracks are also filled with foam, and in the end we get an excellent result. This option is used when there is a cold balcony above you or you live on the top floor of the house;
Fill all voids and cracks with foam, it’s simple and reliable.
- The lining is fastened starting from one of the sides, the outermost element can be nailed or screwed through the top from the edge, anyway this part will be covered with a plinth . All subsequent parts are fixed through the groove after the new part is carefully tapped to fit as tightly as possible to the already installed one. This method of carrying out work ensures the most attractive appearance of the surface;
Fastening into a groove - an ideal solution for lining
- When the surface covering is completed, you can begin to apply a decorative protective coating. This can be paint, or it can be a composition that does not hide the texture of the wood; it can be either transparent or give a tint to the surface, for example, whiten or, conversely, darken it, giving a more attractive look. As an option, you can use stain, and then apply a clear varnish to the surface.
Element No. 3 – walls
If your ceiling is decorated with clapboard, then the walls are easier and best decorated in the same way. For this part of the work the following materials are required:
- Lining, it is best to use the same option as on the ceiling, although sometimes people combine different types, and in some situations it looks quite interesting;
- A block is used for the frame, and this time we need elements of different sections; for external walls that will be insulated, the thickness of the products should be no less than the thickness of the insulation, and for the wall adjacent to the house, the 20x40 option is enough. You can use the same timber everywhere, but this will take up extra space, of which there is already little on the balcony;
- As for insulation, it is needed only for external walls; on a loggia there is most often only one such wall, but on a balcony there can be three . Based on this, the required amount of material is calculated. For work, mineral wool, extruded polystyrene foam or polystyrene are most often used; the first two options are more effective in terms of performance.
If the wall on the side of the house is very smooth, then you don’t even have to attach the frame to it, but glue it with liquid nails
The workflow consists of the following steps:
- To begin with, as in all the cases described above, it is necessary to clean the surface of dirt, and if there are old finishing elements on them, then they need to be removed. By analogy with the ceiling, it’s easy to guess that cracks and voids are filled with polyurethane foam;
- It is advisable to cover the external surfaces with a waterproofing, vapor-permeable membrane to prevent moisture from penetrating into the insulation during temperature changes. Fastening is done in any convenient way; some do not fix the film in any way, but press it with frame elements afterwards;
- As I noted above, on the walls adjacent to the house, a frame 20 mm thick is sufficient, while on the external surfaces a sheathing equal in thickness to the insulation is installed. It is especially worth focusing on semicircular surfaces in order to make a frame on them; the bars are cut into small pieces and attached to the plane; this is the only way to cover such areas with clapboard;
Semicircular surfaces are made from short elements
- It is easiest to use solid insulation, since it can be tightly placed in the sheathing . But no matter how carefully you cut out the elements, there will still be gaps in some places; they need to be filled with polyurethane foam;
All joints must be reinforced with foam
- Don't forget to lay the wires if there are switches and sockets on the balcony. It is better to do this in special corrugated hoses; this will ensure the safety of the system and simplify the work process. Holes for boxes are pre-cut in the lining elements, and a block is attached to the wall at the installation sites;
It is important to take care of wiring elements in advance
- Fastening the lining can be done either in the manner described above or using special clamps called clamps . The main thing is to choose the optimal size of the elements so that they coincide with the thickness of the grooves on the lining. The kit includes nails of the required size;
- The surface is covered with the decorative and protective coating of your choice; if necessary, the wood is cleaned and sanded using fine-grained sandpaper.
Element No. 4 – wooden window blocks
If you have lined your balcony with wood, then wooden windows are best suited to this situation. Do not think that such designs are a relic of the past and are not used in our time.
Natural materials will always be in price, so let’s look at what criteria should be used to select a specific option:
- Material of manufacture, there are three main options: windows made of pine, larch and oak. The first solution is distinguished by an affordable price, accessibility and good reliability, provided that you update the protective coating in a timely manner; larch is more expensive, but it resists moisture and pests many times better than pine and lasts for decades. Oak is the most reliable, but also the most expensive option, which is why connoisseurs use it;
These options are used most often
- It is better to choose products made from laminated veneer lumber; they are noticeably cheaper than solid wood, but thanks to a special gluing technology, the structures withstand changes in temperature and humidity much better. Such windows do not lead, and they crack much less over time, while the appearance is almost as good as solid wood;
- Choose modern options in which the window profile ensures the tightest possible fit of the sashes . Ideally, if the design includes seals, it is better to completely abandon the old primitive options that were used in Soviet times; they initially do not provide good thermal insulation, and over time the performance deteriorates even more;
The seal significantly reduces heat loss through the junctions
- Of course, the design should have double-glazed windows rather than single glass; it is better if they are energy-saving structures in order to reduce heat loss to a minimum.
Now let’s look at the installation process; wooden glazing is produced according to the following algorithm:
- First of all, you need to prepare the opening; if there are no strong elements from below, then it is better to weld a corner to the balcony railing or screw a larch beam. It is important that you have an even and secure frame on all sides;
- Before installation, it is better to remove all removable sashes to make the structure as light as possible. Special plates are attached to the side and top of the frame; they should be directed inside the room, since that is where we will attach them;
The plates allow us to fix the window in the position we need
- The frame is placed in the opening and adjusted using a level; if necessary, wooden blocks or special plastic wedges are placed under it, with the help of which you can quickly adjust the position of the structure . It is better to work with an assistant, since you need someone to hold the frame while you set it up and subsequently fasten it;
- Fastening is done as follows: first, holes are made in the wall and ceiling using a hammer drill; you can drill directly through the eyes in the plate, so as not to remove the window and then expose it again. After this, quick installation dowels are first inserted and impact screws are driven in; this fastening option is the simplest and most reliable and even an inexperienced craftsman can handle this technology;
Plates allow you to fasten the window quickly and securely
- When the frame is securely fastened, you can begin to fill all joints with polyurethane foam . It is important to fill the entire space, but do not apply too much foam, it expands when it hardens;
- Lastly, excess foam is trimmed and all joints are covered with casing or decorative strips to improve the appearance of the opening.
The window sill is attached to the inside of the required width
Element No. 5 – wooden door on the balcony
For a complete set, you can also install wooden doors; they are ideal for closed balconies, because the material will not be affected by air humidity and temperature changes. Therefore, when choosing, you can be guided by several recommendations:
The door faces both the balcony and the inside of the room, so it should also be combined with the interior
- The main attention should be paid to the design; the door should be attractive, because you will constantly see it from the room;
- Quality is also of great importance, it is best to buy a coated design, but the regular option is also suitable, it will be cheaper, and its advantage is that you can choose the color yourself;
- The balcony block should not be insulated, choose simpler options, this way you will save money, and there is no point in having a warm block if you have followed all the recommendations from the sections above.
The door block must be equipped with high-quality fittings so that it does not warp after a year
There is no point in going into detail about the installation, since the work is carried out in exactly the same way as with window blocks. It is important to remove the door leaf and window sashes so that the frame is as light as possible and can be positioned as needed.
A balcony in a wooden house or any other individual building is finished in a similar way, unless of course you have a closed structure. If you have an open one, then it will contain wooden railings and wooden surfaces of the walls, floor and ceiling.
They must be covered with two layers of weather-resistant paint or varnish, and this protective layer must be renewed at least once every two years, this is the only way to maintain the reliability of the material for many years.
Wooden balconies on country houses are exposed to all adverse influences and require special protection