A barn is a necessary building on a private farmstead in the city and village. You can’t do without it even at the dacha. Gradually, more and more tools, equipment, and building materials accumulate that need to be stored somewhere. A reliable shelter for all these things is a metal shed. If you know how to weld metal, it won’t be difficult for you to make it yourself. It turns out to be approximately equal in cost to wood, and much cheaper than brick.
Advantages and disadvantages of metal sheds
A shed made of corrugated sheets is compact, inexpensive and durable.
The metal building is assembled from profiled pipes and sheet iron. Corrugated sheets are used more often because, thanks to their textured surface, they are stronger and better able to withstand wind loads.
Advantages of a utility unit made of metal profiles:
- Galvanized sheet iron is used for construction, so the shed does not need to be painted, primed or protected in any other way.
- The building is durable and can withstand high snow and wind loads.
- The barn will last for several decades.
- The utility unit comes in the form of a box; it does not have a bottom, so it can be moved to another place at any time.
- No foundation is needed for construction.
- Prefabricated metal structures cost even less than plastic cottages.
The disadvantages are the following:
- Metal does not retain heat, so the shed must be insulated if it is used in winter.
- The lack of gender can be a disadvantage.
The appearance of the barn is inferior to that of wood. However, the strict utilitarian design of modern structures fits well into the landscape of a summer cottage.
Types of outbuildings with woodsheds for the dacha
Modern summer cottages, which are offered by various companies, are designed in most cases according to the model principle. This allows this design to be adapted to any type of need.
Basically, outbuildings for a dacha can be divided into:
- purpose;
- size;
- the material used.
Change houses with a woodshed can be used for their intended purpose as commercial or residential premises.
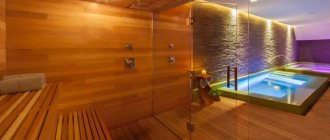
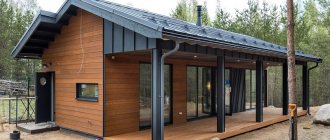
A utility unit with a woodshed is designed to store work equipment, and can also be designed as a small bathhouse, bathroom or shower. Typically, such a building is erected on a summer cottage if there is already a room for recreation or temporary residence on it.
In the case where the dacha plot is small, and it is not possible to build a dacha house, the owner gives preference to the option of a residential utility block with a woodshed. The room in it has sufficient area to take a break while working in the country and caring for plantings. In this case, such a room is equipped with a small stove, which is used for heating in early spring and late autumn, as well as for preparing food and drying things.
Advice! In a residential shed at the dacha, it is not recommended to make a large brick hearth for heating; it is enough to install a compact Canadian stove.
As for the size, there are many options for this building, it all depends on the area of the dacha plot itself. Typically, the length of a utility block with a woodshed varies from 3 to 7 m, and the width is 2-3.5 m.
Depending on the material used for the construction of the utility block, such a building can be:
- wooden;
- metal;
- brick.
Technologies for constructing sheds from profiles
Capital construction with a concrete floor.
A utility block made of corrugated sheets is constructed using 2 main technologies.
- Capital - with floor. They make a platform under the barn and fill it with concrete, which serves as the floor. Vertical posts are deepened into the ground and welded to the lower frame. If you wish, you can make a wooden floor in such a building. To do this, angles or thick-walled pipes are used as the bottom trim. Metal or wooden slats are attached to the frame and sheathed with boards.
- In a mobile structure there is no floor. The lower frame only serves as a base for the frame. Most often, the frame is divided into several sections, which are bolted together. Then the walls of the box are sheathed with corrugated sheets. This option can be disassembled and moved to another place or stored in a disassembled state.
Ready-made utility units of various sizes are classified as prefabricated structures.
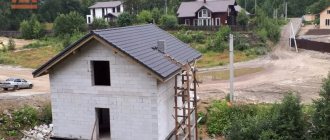
What are they building for?
After purchasing a plot of land and at the initial stages of its improvement, the owners need somewhere to store construction and finishing materials, all kinds of tools, hide from the rain themselves, and even live. To do this, they build a small building from the simplest materials, but this, of course, depends on the time of year during which construction is taking place. During construction work, this is necessary to ensure that all the required tools are always at hand.
In the future, this or a new structure can serve as a good shed, where various kinds of gardening equipment are usually stored. The room is also suitable for organizing a woodshed, toilet or shower.
Choosing a site for construction and marking the territory
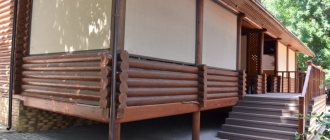
A shed can be attached to a house.
A shed made of corrugated sheets does not have a foundation, which means it does not belong to permanent buildings. SNiP norms are not applicable to it. And since metal is not flammable, the fire safety rules for it are extremely simple.
Requirements for choosing a location are limited to the convenience of the inhabitants of the dacha and common sense.
- You can install a metal block close to the house. But if the box serves as a car repair shop, the noise will disturb the residents. Therefore, it is better to move the building 4 m.
- The distance from the fence is regulated - 1 m. A shed can be built close to the fence by reaching an agreement with the neighbor.
- The area for the shed must be level. The metal structure does not compensate for uneven ground in any way.
- Elevated areas are preferable to avoid flooding.
- The metal box gets very hot in the sun. It is better to install it in the shade of trees.
The barn should not interfere with the free movement of people and vehicles.
Base
A temporary shed without a foundation is placed on a crushed stone cushion 25-40 cm thick. It is poured flush with the soil surface, removing the humus. However, a durable shed still needs a foundation that is reliable enough for this type of structure, inexpensive and not very labor-intensive.
Sheds are rarely built on slab foundations: for a conventional foundation they are too labor-intensive and expensive, and in a cowshed or pigsty it is difficult to arrange stalls and a manure pit on a slab. Large livestock barns made of brick are built on a strip or columnar-strip foundation, but for small private farms this is probably unnecessary.
Pillar foundation of a barn
The optimal foundation for a barn is columnar, see fig. The technology for laying it (the so-called process of building a foundation) was described earlier; We will analyze here, make this work easier and simpler for the shed. The step-by-step arrangement of a columnar foundation for a barn looks like this:
- For concrete, we purchase sand and gravel mixture (SGM) from road workers (not builders), it is much cheaper than construction sand and gravel separately. Concrete on the PGS is not suitable for a residential building, but it will be suitable for a barn;
- We also purchase M400 cement at the rate of 1 bag per 9 bags of ASG. The concrete will be M150, enough for a shed;
- On the site we make cast-offs from 1 (yes, exactly one) cord on pegs;
- We check it as usual, by comparing the diagonals and measuring the sides;
- Using the hydraulic hose level, we find the highest angle and set the distance of the cord from the ground surface to 10 cm;
- Using the same level, set the cast-off horizontally;
- In the lowest corner we drill a hole with a 200-mm hand drill to the calculated depth plus 15-25 cm for a sand-crushed stone cushion;
- We make a mark on the drill rod;
- We drill the remaining holes until the mark on the drill matches the cord;
- We fill the wells with equal layers of sand and crushed stone, compacting each layer. ASG cannot be used here, because the solution being poured should penetrate slightly into the crushed stone;
- We roll up pile sleeves with a diameter of 150 mm from 2 layers of roofing felt. We fasten them with 2 mm soft wire. To prevent the sleeves from bursting when pouring, you need 3-4 strapping belts per 1 m of their length;
- We put the sleeves in the wells. Place the stones vertically;
- We cut the sleeves, using metal scissors or large tailor's scissors, flush with the cord;
- We prepare reinforcement cages: 3 (10-12) mm corrugated rods per post, tied with the same 2 mm wire. The vertical pitch of the bundle is 200-250 mm. The distance from the inner edge of the sleeves and their top is usual, 30-50 mm;
- We place the frames in sleeves and position them so that they do not touch the walls;
- Mix the concrete using an ASG until it becomes creamy thick;
- Fill the pillars layer by layer, in layers of 15-20 cm, with a break of 10-25 minutes. between layers. This is called a hydraulic seal fill. In practice, the layers are poured in order, starting from the same column;
- Before pouring the last (penultimate) layer, we place anchors in the pillars;
- On the 3rd day we backfill the soil with a tamper. Be careful not to knock the posts off the vertical!
- On the 7th day (the concrete has gained 50% strength), construction can continue. On the 20th day, at a temperature of 15-25 degrees, the concrete will gain 75% strength and the structure on it is considered suitable for use.
Required tools and materials
To build a shed with your own hands, you will need a welding machine.
To make a country shed from a profile pipe with your own hands, you will need the following materials and tools:
- profile pipe with a cross section of 60*60 or 60*40 mm;
- corner 4–5 mm;
- profiled sheet - universal, 0.4–0.8 mm thick;
- crushed stone, sand, cement and sand for concrete;
- boards for finishing the floor, if any;
- welding machine;
- hacksaw, grinder;
- screwdriver and drill;
- shovel and trough;
- plumb line, square, tape measure, building level.
If the shed needs to be insulated, the list includes polystyrene foam or penoplex, waterproofing, as well as finishing material, such as lining.
Comparison of prices for various construction options, taking into account their quality
The cheapest segment of utility rooms, where prices vary from 11,000 to 30,000 rubles, is represented by frame buildings of a small area. So, economy class usually assumes a bare box measuring 1x1 m (2x1.5 or 2x2 m). Lining is used as cladding; the roof is covered with ondulin or roofing felt.
Frame sheds costing from 30,000 to 70,000 are in the middle price category. They differ from inexpensive buildings in size (for example, 3 × 3 or 6 × 2 m) and cladding material.
The price of expensive frame-type utility rooms can reach 160,000 rubles. For example, a barn measuring 5x4 m costs on average about 85,000–95,000 rubles, 4x7 m – 133,000 rubles, with partitions – 155,000 rubles.
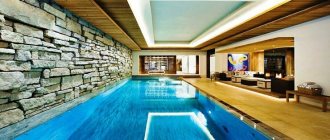
For example, the price for a utility block 3x4 m based on a metal frame in the basic configuration, including frame, walls, roof with waterproofing, door, is 113,000 rubles. The cost with installation is about 156,000 rubles. Here we must add the cost of the window with installation - 16,700 rubles, insulation - 16,500 rubles, interior finishing with corrugated sheets - 32,400 rubles, drainage - 7,800 rubles.
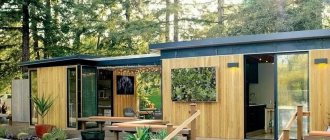
Such a building can serve as both a utility room and a house for children. Source houzz.de
There is also a “Luxury” category, which includes designer models made to order. Their cost can start from 600,000 rubles.
Container blocks cost between 40,000 and 65,000 rubles, depending on the size and configuration. Typical dimensions: 2.4 × 2.4 × 2.4 m, as well as 2.4 × 2.4 × 4.0 m and 2.4 × 2.4 × 5.8 m. Basic equipment includes hardboard interior trim, floors Chipboard, thermal insulation and wooden windows.
Prices for buildings made of foam blocks start from approximately 100,000 rubles (4 × 2 m), 150,000 (3 × 4 m), 340,000 (6 × 4 m).
About the choice of materials and design of the shed, watch the video:
Technology for self-construction of a metal shed
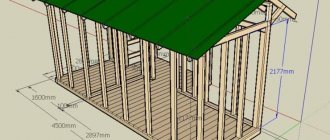
Drawing of a shed with a pitched roof
Assembling a shed from corrugated sheets and metal profiles with your own hands is not so difficult, especially if you have a drawing. However, if the block is completed independently, the ability to work with a welding machine is required.
- Mark the area using wooden pegs. The earth on the site is compacted.
- Recesses are made along the perimeter of the site in the corners and along future walls in increments of 1.5 m. The stands for the future entrance are placed closer - at a distance of 1.2 m, respectively, and the holes are dug at this distance. Depth – up to 60 cm.
- Vertical posts are installed in the recesses and concreted. After the concrete has set, the bottom trim is welded.
- If the structure is not permanent, the lower frame is first assembled, and vertical posts are welded to it. In this case, the main load falls on the lower trim.
- The upper ends of the racks are tied together with the upper strapping. Weld the cross members in pre-marked places.
- If a floor is provided, transverse joists are placed on the lower frame: iron ones are welded, wooden ones are bolted.
- Usually the barn is equipped with a pitched roof. To achieve this, walls are built at different heights. Then the logs are welded from the highest wall to the lowest. If they make a gable roof, it is assembled on the ground. First, the trusses are welded. Then they are placed on horizontal crossbars, and then the entire structure is lifted and installed on the top frame.
- After welding work, the metal structure is primed.
The walls are sheathed with corrugated sheets. Install the sheet so that the relief strips are placed vertically - this facilitates water drainage. Screw the sheets with self-tapping screws to the vertical and horizontal crossbars. The flooring is laid out according to the wave.
The roof is laid in the same way.
If you want to insulate a barn for your dacha using metal profiles, do it from the inside. Insulation is attached between the joints of the frame, waterproofed, and then sheathed with clapboard, boards, and plywood.
Household block with woodshed
Before you start designing a shed (shed, outbuilding) with a woodshed, you need to figure out what it is. In short, it is a small structure used for various purposes. Most often, cabins are installed in areas near a country house.
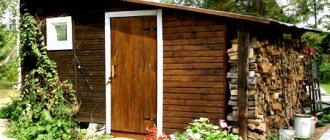
A change house with a woodshed is a room combined with an open space for fuel. Firewood will always be close to you. Since the change house is combined with a place for storing firewood, fuel will always remain dry thanks to the presence of a roof
It is important that due to the free circulation of air in the open structure, firewood is stored in ideal conditions
A utility unit with a firewood shed is a great idea for saving space, as well as combining the convenience of a shed with the functionality of an open space for firewood under a canopy.
A utility block with a woodshed for a summer residence is used for very different purposes and therefore has different construction options. The owner himself chooses the dimensions and layout of the cabin individually.
What is important to remember when building or creating a project for a utility block with a woodshed? Following:
- Since at the dacha the issue of hygiene very often comes up, it would be a good idea to build a utility block with a toilet and a firewood shed. A toilet and shower under one roof will help you combine both work in the country and keeping your body clean;
- You also need to remember about tools that can be stored in a separate room.
It is important to approach it responsibly when building a shed with a woodshed for your summer cottage with your own hands. If you have additional space, it can be used to spend quality time with friends
If you visit your dacha at different times of the year, it is important to think about heating. A potbelly stove can handle this task perfectly.
A dacha cabin with a woodshed can serve as temporary housing during the construction of a dacha and its furnishings.
If you have a potbelly stove, you can survive even the most severe frosts, since firewood is always at hand thanks to the presence of an indoor woodshed.
After completion of the work, this room can be used for various purposes, for example, for storing tools, barbecue, or for a change of work clothes. Here you can also place a bicycle and other things that you will need for a holiday in the country.
Useful tips and tricks
Roofing corrugated sheeting
In order for the utility unit to last a long time, you need to take into account the recommendations of specialists:
- For the roof, special roofing sheeting is purchased. It's a little thinner so it's easier to install.
- To fasten the profiled sheet, special fasteners are used: self-tapping screws with a rubber gasket that prevent leakage.
- The first sheet is fixed by placing self-tapping screws into the protrusion of the wave.
- If a gable roof is being made, the joint of the sheets is covered with a ridge.
- When joining, cracks often appear at the corners of the building. They are covered with a metal corner. It can serve as a decorative frame.
A metal shed is easy to assemble, durable and does not require special care. Its main disadvantage - high thermal conductivity - can be easily compensated for by insulating the structure.
Final stage
When the main construction work has been completed, and a new resident has settled on your site in the form of a utility block with a firewood shed, you should move on to its internal arrangement. First of all, this is a supply of communications, because now you definitely cannot do without electricity and water. Installation of various devices, pipes and taps in the shower, sockets, lamps is carried out.
If the cabin is made of wood, then the procedure for applying paint and antiseptic is mandatory. And if we are talking about a garage or woodshed, do not forget about the mandatory presence of ventilation.
The utility block is considered a truly necessary structure on any site. At the beginning of construction, it serves as an excellent “shelter”, and upon completion it serves as a storage room for garden tools, a firewood shed, a toilet, and anything else the owners of the site may want.
Next you will find an overview of the finished project of a utility block with a woodshed.