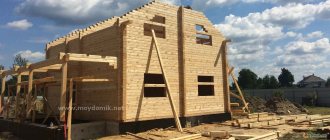
A home steam room is convenient, and for sauna lovers it will be much cheaper than a paid option. It can be equipped in a separate building or a room in a private house. We'll figure out how to make a sauna in your home with your own hands - how to choose materials for walls and floors, calculate and carry out ventilation, install the stove correctly and decorate the premises.
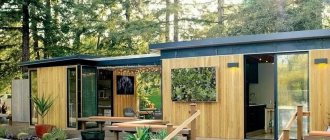
Sauna with a swimming pool under one roof Source yandex.net
Preparatory work
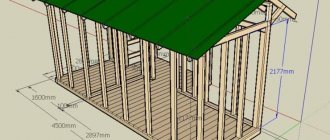
First of all, you need to make a drawing.
The presence of a stable air flow in the building makes it possible to choose sizes based on the number of users and convenience. The possible ceiling height is 1.9–2.1 m. It is not worth increasing this parameter, since this may lead to the appearance of a “tube effect”, due to which the draft increases and a draft occurs.
In addition, the air near the ceiling will be the hottest. Accordingly, the top shelf should be made at the maximum height. It is important to consider that a person should be able to sit on it without resting his head on the ceiling. The recommended distance is 1–1.1 m from it.
An example of the arrangement of shelves and their sizes
The optimal height of the shelf is 45 cm. If necessary, this parameter can be increased to 65 cm, but sitting on it may be uncomfortable. To fix this, you can build a step 25 cm high.
The rest bench is two-tiered. The height of the lower tier is 65 cm, the upper tier is 105 cm. The width is 35 and 70 cm, respectively.
The sauna is smaller in size when compared to a Russian bath. For 3–4 people, a room of 3.3 m2 will be enough. Shelves should be installed in several tiers along the walls. In this case, the optimal ceiling height is 2.1 m.
The length of the wall opposite the entrance is at least 2 m. In order for air to circulate properly, it is important to maintain the ratio of sizes. If you make the correct calculation, then the shelves with places to lie on the upper tier will be exposed to heat from the stove with acceptable air humidity.
What should be the size of the steam room: drawing up a project
The main task of the steam room is to provide high temperature. In the sauna it reaches 120°C. This requires a certain heating of the stove. However, heat in the steam room will be transferred not only from it, but also from the surrounding air. Therefore, metal stoves should not be placed near benches. They can heat up the air very much, which can cause burns.
It is also not recommended to equip a small steam room with a metal stove, as this is dangerous to health. The height of the ceilings in this case will not solve the problem.
The size of the steam room depends on the number of people who will be in it at the same time
Arranging a large steam room with an electric stove is a pointless undertaking, since the cost of electricity will not be offset by any comfort.
To determine the optimal dimensions of a room, the following fact must be taken into account: heat radiation in space diverges in such a way that its intensity after some time weakens in inverse proportion to a value equal to the square of the distance from the radiation device. Accordingly, people located at a distance of 3 m from the stove will be able to receive 4 times less heat than if they were located 1.5 m from the device. Create
This is the disadvantage of large pairs - in order for the heat to reach in the required quantity, you will need to make the stove too hot or overheat the air. Both options are harmful to human health. It is also worth remembering that the main condition for the high effectiveness of sauna procedures is heat dissipation. The larger the steam room, the better this process will occur. Therefore, it is recommended to choose average values for the area of a given room.
To optimize the space inside the steam room, you will need to minimize the base of the floor and increase the area of the shelves. It is recommended to muffle the space under them to reduce the heated volume. This will make it possible to save fuel for the stove and reduce the heating time of the sauna.
It is recommended to indicate all the necessary dimensions in a special technological map.
Video: is it possible to build a sauna/bathhouse in the basement of a private house
Selecting sauna materials
At the next stage, you need to decide on the materials that will be used in the process of building the sauna. You need to prepare:
- brick;
- pipes;
- bars;
- logs;
- sand;
- cement;
- roofing materials;
- glass;
- clay;
- gravel;
- materials for thermal insulation.
You can build a sauna, which consists of one steam room with a locker room, or you can also prepare a washing room or a relaxation room. The set of materials will depend on this.
It is recommended to allocate space for a corridor, which will help prevent the penetration of cooled air into the room.
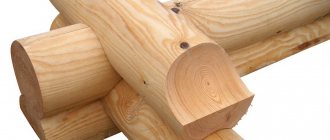
The main material for a sauna is wood. These can be logs, bars or boards. You can choose exclusively wood to construct the entire structure, including the base and roof. Another option is to use blocks or bricks.
A log house is most often used to build a bathhouse.
Additionally, the log house can be lined with brick to make it more wear-resistant and reduce thermal conductivity.
Log house - logs with specially prepared grooves. They are used for longitudinal fixation. For perpendicular fastening, notches are required. A row of stacked logs is called a crown. To connect the crowns, grooves (have a round shape) and notches are required. If everything is done correctly, then heat loss is excluded.
Pine and larch logs are suitable for making the structure. There should be no resin bags on their inner parts. It is recommended to make the lower crown from dried oak logs, the upper ones from linden or white spruce logs. The fibers should be straight, not slanted.
Straight fiber arrangement is optimal for a bath
If the fibers are inclined, this can lead to significant deformation of the material during the drying process. As a result, the wood will crack.
Nowadays you can find saunas made of glued profiled timber.
The construction made of laminated veneer lumber is quite reliable
Advantages of this design:
- strength of the building;
- flat and smooth surface of the walls, therefore there is no need for finishing;
- there is no shrinkage or deformation;
- resistance to rotting and damage by fungi and pests.
The disadvantage is the high cost.
It is easy to make a sauna from such material with your own hands, and the process takes much less time. There is no heat loss at all, since there are no gaps or cracks.
Which stove to choose for a wooden bath
The heater is most often used because it can provide optimal temperature and humidity.
The optimal stove for a sauna is a heater
You need to select the location of the brick structure at the stage of drawing up the drawing. In the process of laying the base, it is necessary to prepare a place for the stove. A special place for storing firewood is also recommended.
To lay the structure you will need M75 or M150 brick. The amount of material depends on the thermal conductivity of the walls and the layout of the room. On average, 35–40 bricks are needed per 1 m2. For good draft, the chimney device must protrude at least 0.5 m above the roof.
Continuous and temporary stoves are installed in saunas. The latter are able to heat the building more efficiently by heating the stones with hot smoke. The steam from a continuous stove is cleaner.
Heaters can be with a closed or open backfill chamber. This affects the quality of the steam.
An oven with a closed chamber is more environmentally friendly
Next you need to decide on the material for the roof. This is influenced by the climate of the area.
Video: how to equip an infrared sauna in an apartment
Types of structures
The types of designs widely available on the market will help you make a choice and answer the question - how to make a sauna in your home. Among the offers:
- infrared steam room;
- transformable model, very convenient, but characterized by high cost;
- frame - ready-made projects of any size. A set of elements allows you to assemble it in a limited space and in mobile conditions. Any corner where there is a tiled floor will do.
Samples can be presented without external cladding, with finishing, or a mixed type.
Calculation of materials for construction
First of all, you need to calculate how many floor boards you will need. For example, we will consider a sauna measuring 3.7x3.7 m. To make a floor in it, you need to prepare 25 edged boards.
Edged floor board
Standard board dimensions: thickness - 0.5 cm, width - 15 cm, length - 4 m.
Accordingly, 4 x 0.15 x 0.5 = 0.03 m3 is the area of one board.
The width and length of the sauna is 3.7 m, so to install the floor base you need to prepare 25 boards 15 cm wide and 4 m long.
To arrange the ceiling in a bathhouse, you need 38 boards of lining. The calculation of the material is carried out according to the same scheme. The thickness of one board is 22 mm, width is 100 mm.
In order to complete the interior decoration of the sauna and install partitions, you need 22 mm thick lining.
Linden lining is suitable for a sauna
If you plan to place the boards vertically, you will need approximately 153 boards.
Standard dimensions: board length - 3 m, width - 10 cm, thickness - 2.2 cm.
3 x 0.01 x 0.22 = 0.01 m3 - the area of one board.
Next, you need to calculate the area of the sauna walls: the height is 2.1 m, and the length, taking into account the partitions, is 24 m.
2.1 x 24 = 51 m2
There are 3 boards in 1 m2, respectively 51 x 3 = 153 lining boards for the entire steam room.
To perform a vapor barrier on the internal walls and ceiling structure, you can use various materials, among which vapor barrier film and breathable membrane are especially popular.
Vapor barrier of sauna walls is required
For a sauna 3.7x3.7 m, 44 m2 of material will be required.
To perform the calculation, you need to find out the total area of the ceiling structure and walls, while partitions do not need to be taken into account.
Length excluding partitions - 14.1 m.
2.1x14.1=29.61 m2.
The width and length of the ceiling structure is 3.7 m. The area is 3.7x3.7 = 13.69 m2.
Next you need to add up the area of the walls and ceiling: 29.61 + 13.69 = 43.3 m2.
At the next stage, the materials for the foundation are calculated. The need for cement, crushed stone, sand and other elements will depend on what type of base is planned to be made.
If it is a columnar foundation, then you will need asbestos-cement pipes with a diameter of 20 cm and a length of 150 cm. In the center of each of them, 2 reinforcement rods with a diameter of 5 mm must be mounted.
Selecting a location
Where to place - the answer to this question depends on several factors in the layout of the sauna in the house:
- If there is a gym or a massage area, it should be located next to these rooms.
- Friendly meetings imply space and a place to relax.
- If the purpose is to relax after a working day or relieve stress, it is usually located near the bedroom.
- If there is free space, a swimming pool is installed, and outside there is a vat or barrel of water for swimming.
Required Tools
To build a sauna base you need:
- carpentry tools;
- shovel;
- trowel;
- building level;
- concrete mixer;
- wheelbarrow;
- container for preparing the solution.
Concrete mixer can be rented
If you plan to mix the solution manually, then you need to prepare a metal container and a shovel. You can also use a construction mixer or a high-power electric drill with a special attachment.
A mixer attachment will help facilitate the process of mixing cement.
During the construction of a sauna, it is impossible to do without an electric jigsaw. With this tool you can make cuts and cuts to achieve unusual shapes in different materials.
An electric jigsaw will allow you to cut a piece of wood into any shape.
Briefly about the main thing
Setting up a good sauna is difficult, but it is possible. The result will justify the effort spent on it. Natural materials should be used in your work - they retain heat better. The ideal option is a log house on an earthen foundation. In finishing, you should also give preference to wood.
It is imperative to put insulation between the walls and the finishing. To quickly ventilate the room, you need windows in every room.
It is better to install a metal or electric stove, but you can choose other options.
If the sauna is a separate building, then there should be more rooms in it than if it occupies a room in the house.
Useful tips for finishing
The final stage of construction is interior and exterior finishing. It is best to cover a sauna with clapboard. Each type of wood has its own advantages:
- Linden has an excellent appearance and smells good.
- Alder is able to retain heat well, while it practically does not heat up. It has a varied palette of colors and beautiful designs.
- Pine is used most often. Releases healthy elements when heated.
The disadvantage of alder is that it is soft. Consequently, impacts may cause dents.
The finishing instructions are as follows:
- The first step is to cut the material to the height of the room.
- Next, do the sheathing. You need to start from the corner, and then move smoothly around the perimeter.
- It is recommended to cover them with wax or natural oils intended for saunas.
Treating the lining with wax will extend the life of the sauna
There is no need to treat the lining inside the sauna.
Which trees are better as raw materials?
Pay attention to the following factors:
- Linden - this wood is the most popular. Durable texture with a pleasant creamy shade. A rich aroma is added to the performance properties.
- Karelian birch is rarely used as a raw material in Finnish traditional buildings. It is not practical in terms of interior decoration due to deformation (warping). It is difficult to make adjustments to products.
- Black alder is the main quality: slow heating, due to this the shelves do not warm up for a long time. Used for the manufacture of related bath accessories. Alder has an amazing property - in extreme heat it turns red, when the temperature drops - the color changes to natural. It has a unique and unobtrusive aroma. Resistant to deformation and rotting, has high consumer properties.
- Cedar - opinions on its use vary. Skeptics deny the use of conifers. It contains phytoncides that create a healing aroma in the steam room. The species is praised for its high strength and resistance to fungal diseases of wood. The finished version made of cedar looks decent. The persistence of the aroma decreases after a year of use. Expensive pleasure.
- Spruce is what is most often preferred for manufacturing. Not used for finishing ceilings. Disadvantage: resin is released during sheathing. To decorate the walls, they use “simmered” wood, aged for many years, from which the resin no longer leaks.
- Pine is the least popular. Loses in terms of performance. Used only for the construction of rough structures.
- Abashi is the African equivalent of domestic oak. Lightweight and durable. Contacting open areas of the body does not cause discomfort and minimally overheats. It has no knots and does not emit resins. A significant disadvantage is the high cost.
- Aspen is a soft lining, easy to process. Over time it darkens and is susceptible to fungus.
- Larch is a tree with a reddish texture, its properties are not inferior to oak. It has been in use for decades, which compensates for its high cost.
All wood is protected from moisture. Paintwork is not a substitute for prevention. The difference is in the frequency of treatment - for moisture-resistant ones, this procedure is carried out less frequently.
The choice of method is a responsible decision that will determine the practicality and durability of use in the future.
Electrical wiring and ventilation system
The safety of operating an apartment sauna depends on the reliability of the electrical wiring.
The main heating equipment is an electric heater with a power of up to 3.5 kW. To connect it to the electrical network, it is necessary to install a waterproof socket, and run the current-carrying cable through the floor surface, placing it in a protective box.
The cable inside the cabin is placed in a thermostatic frame that can withstand high heating temperatures.
For an electric stove, it is also worth providing a special insulating base, located at a safe distance from the bathtub or sink.
The next important stage in organizing a home sauna is arranging a reliable ventilation system. In multi-storey buildings there is a standard ventilation shaft with apartment-by-apartment ducts. It would be a good idea to provide additional holes in the cabin design for mounting fans that are resistant to elevated temperatures.
Main types of saunas
All saunas differ from a traditional bath in the level of humidity and the absence of water vapor (for the model with infrared radiation). The following types of steam rooms are distinguished:
- With electric oven. In the center of the room is a homemade or factory-made stove, inside of which there are specialized stones.
- Sauna with infrared emitter. Only production lamps from trusted supplier companies are used. Installations are located around the perimeter of the room in the recommended order. An infrared sauna can be done very successfully with your own hands.
There are many advantages of each of the presented models. Infrared radiation has a number of pronounced medical and biological effects that are successfully used in medicine and rehabilitation.
Preparation of the drawing
A well-designed plan provides absolutely all parameters:
- Room dimensions.
- Location of communications, including electrical wiring, location of sockets, lighting fixtures.
- Design of shelves and their location.
The drawing indicates the finishing features of the floor and walls, the fasteners used and niches for infrared installations. If you do not have the proper artistic skills, you can use the services of a specialist, and find out the required safety parameters from the regulatory literature.
Foundation
This is the support without which your building cannot exist, and if you make a mistake at the initial stages, the entire construction will go downhill.
Varieties
There are two completely different types of saunas - wet and dry. The first option combines a very high percentage of humidity (from 95 to 100%) and a relatively low temperature (60-75°C).
This option is very good when it comes to ordinary get-togethers; these parameters create a very comfortable atmosphere that allows you to warm up, but without the extremes of enormous temperatures.
A dry sauna, also known as traditional or Finnish, has completely opposite characteristics - low humidity (5-20 percent) and high temperature (from 90 to 120°C)
Furnace installation
In modern saunas, electric stoves are most often installed. You can buy them in a specialized store or assemble them yourself. But in fact, it must be installed and connected correctly.
The oven is selected based on the parameters of the steam room, that is, its volume. Calculations carried out by specialists from sauna equipment manufacturing companies show that for high-quality heating of one cubic meter it is necessary to spend 1.4 kW of energy. A simple arithmetic calculation shows that, for a steam room with a volume of 5 - 9 cubic meters. m, it is enough to install a stove with a power of 6 kW. Such a stove can operate on a 220 V network. Furnaces with higher power must be connected to a 380 V network.
In addition, there are certain restrictions on installing a stove in a steam room. So a 6 kW oven must have safety zones - at least 70 mm on the sides, 100 mm in front. To connect it, you will need to install a 35 A fuse.
Building a sauna with your own hands
To work independently, you need to choose a sauna model, prepare equipment, and select a room for arrangement. The entire construction process consists of several successive stages:
- Preparation of the drawing.
- Preparation of materials and tools.
- Floor finishing.
- Wall decoration and shelf making.
- Installation of central equipment.
There are a number of parameters for which there are certain requirements:
- Safety rules must be strictly observed.
- All materials used are either fire-resistant or coated with antipyretics.
- There should be no slippery floors or walls in the sauna.
- For wiring, wires of sufficient cross-section with the ability to withstand voltage are used.
- Control panels and distribution panels must be placed outside the steam room itself.
- Lighting fixtures are covered with lamps made of fire-resistant material.
- The owner must be able to easily carry out wet cleaning with disinfectants. For this reason, it is necessary to provide coatings that are resistant to chemical agents.
- Heating devices (electric stove or wood boiler) must be covered with protective nets, gratings or wickerwork.
Special requirements must be placed on the premises: the condition of the walls, floors, coverings, communications, and wiring is assessed. If necessary, all repair work is carried out in advance before the interior decoration of the future sauna begins.
Prerequisites
- First, consider the height of your original room. It should exceed 210 centimeters, but be below 230. Indicators higher than this will make heating the building much more difficult; you will have to spend several hours to achieve a comfortable temperature.
- The shelf on top should have a distance from the floor of about 1.2 meters.
- The distance between shelves should be forty centimeters
- To calculate the room size you need, take 3 square meters for each user.
Walls
Although traditionally only natural materials were used for them - wood of different varieties and types, now the choice is simply huge. All possible varieties of bricks and other blocks are at your disposal.
But still, the frame method is recognized as the best because of its low cost, ease of construction and, most importantly, convenience. You won't have to wait long for the room to warm up to a comfortable temperature. Owners of other species will need a lot of patience.
Installation of central equipment
The final and most important stage of the work.
Infrared emitters are located around the perimeter (two on the back wall, two on the front corners, one along the bottom contour of the shelves). The electric oven is placed in the center of the steam room, enclosing the installation with a protective casing.
There are special requirements for the installation of a wood-burning boiler. An old metal container (for example, a frame from an old washing machine) is used as a boiler. The opening for storing firewood can be located either in the steam room itself or brought outside (to the next room).
Dimensions
In general, in any case, it is recommended to stick to the minimum, because... Each square meter very significantly increases the heating time of the room.
But if you have many friends who are close to you in their love for the sauna, calculate the required size, allocating five square meters of the total area for each person.
Benefits of a homemade sauna
Building a sauna with your own hands in your home or at your summer cottage is a great way to save money on going to a private company. In addition, the advantages of choosing include:
- The ability to independently choose the type of sauna and heating device (electric model or installation with infrared radiation).
- Ease of installation work, especially when using detailed instructions and manuals from experienced craftsmen.
- Useful properties of a sauna. Regardless of the type of radiation used in the sauna, the owner receives a lot of beneficial effects (relaxing, bactericidal, immunostimulating effect).
- The ability to use a variety of available materials for construction.
No special skills or abilities are required from the master. It is enough to have experience working with tools, and the electrical wiring can be entrusted to a specialist of the appropriate profile. If necessary, you can watch video lessons on construction work.