Relaxing in the fresh air surrounded by picturesque nature gives people a boost of energy, vigor and positive emotions. Therefore, with the onset of warm days, all owners of private houses and summer cottages are engaged in arranging a recreation area in the yard.
There are many interesting options for creating a comfortable relaxation area. But the simplest and most inexpensive is a gazebo attached to the house. In this article we will look at the advantages and disadvantages of such a structure, the best options for its construction and the step-by-step creation process.
General description of the design of the gazebo attached to the house
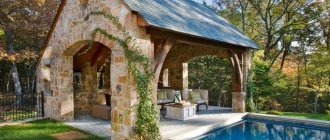
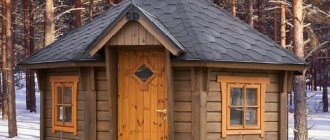
This gazebo is more reminiscent of a separate room, such as a living room. Especially if it is closed and fully furnished. In such a building it is pleasant to spend evenings with your family drinking tea and talking. And if the gazebo is equipped with a barbecue or stove, it will be possible to create the most functional recreation area for a large company.
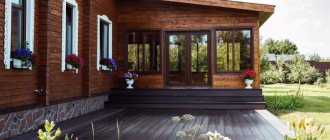
An open gazebo adjacent to the house looks like a terrace or veranda. It also allows you to organize a comfortable seating area, but you can only use it in the warm season.
Pergola made of wood: environmental friendliness and ease of processing of the material
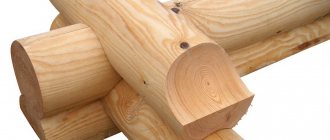
Wooden pergolas are the most widely used. The material is available, you can purchase it in almost any building materials store, in base stores, order it in workshops, and even make the blanks yourself if you have the necessary tools. Wooden structures are quite simply assembled; they are connected with self-tapping screws, which can easily be replaced with new ones if repairs are necessary.
The material is environmentally friendly and always looks organic among nature. The main advantages of wooden pergolas are:
- preservation of the natural structure, which gives the product a certain charm;
- the ability to decorate structural elements using carvings and other types of wood processing;
- During restoration, the coating layer can be completely removed and, using shades, the product can be given a completely new look.
Pergolas and arches made of wood will remain aesthetically pleasing and retain the features of landscape design only if they are correctly installed and provided with proper care. The lower parts of the supports, immersed in the ground, must be waterproofed. This will protect them from groundwater, precipitation and the moisture that inevitably seeps in when watering the plants.
Wooden pergolas look beautiful and harmonious on any site
Helpful advice! When choosing wooden pergolas and arches for your summer house, it is better to focus on hardwood deciduous trees. The costs of their acquisition are compensated by the durability of the design and savings on protective equipment.
Advantages and disadvantages
The main advantages of a gazebo attached to one of the walls of the house include:
- compactness . Such a structure does not take up as much space on the site as a free-standing gazebo or pergola. It is easy and simple to build with your own hands, and it is ideal for small summer cottages;
- functionality . Closed gazebos can be used as a separate recreation area, guest room, or summer kitchen. You can also place a gym or workshop here;
- ease of use. Since the gazebo attached to the house is located close to the living space, it is very convenient to use at any time of the day. Here you can breathe fresh air, drink tea or coffee, and chat with friends. If you additionally connect communications to it (water, gas, electricity), then this structure will turn into a full-fledged room;
- saving money on construction . Since one of the walls for the gazebo is already ready (the wall of the house acts as it), this significantly reduces the cost of purchasing building materials and simplifies the construction process itself;
- prompt installation times . A gazebo attached to a house is built much faster than a free-standing structure.
As for the disadvantages of such a structure, it is worth adding to them:
- when building an attached gazebo with a barbecue or stove, you will need to carefully consider the ventilation so that smoke does not enter the house;
- when constructing a wooden building, it will need to be treated once a year with antiseptics and fire-fighting impregnations, which extend the life of the wood and increase its technical characteristics;
- if metal is chosen as a support, it will need to be periodically treated with anti-corrosion compounds and painted;
- When building a gazebo made of stone or brick, you should prepare for a long and rather complex work process. But the result will be a permanent building that will serve the owners for many years.
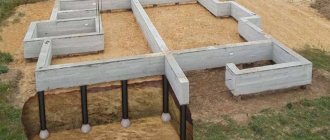
Monolithic foundation
The corresponding substrate in its finished form is a single piece that extends under every square meter of the extension. A monolithic foundation is used to contain heavy loads and is erected as follows:
- First you need to prepare the area for the extension - clear and level the soil;
- Next, a 1.5-meter recess is dug, which should protrude 1-1.5 meters beyond the future structure;
- The next step is laying a drainage layer at the bottom of the pit and formwork (covering the soil walls with wooden boards);
- Next comes the installation of the reinforcing frame and its filling with cement mortar.
A monolithic foundation is especially relevant for stationary brick kilns. However, it is enough to erect only a small monolithic slab under the fire source.
Design Features
A gazebo can be built from different materials, made of any shape, size, type of construction. With its help, you can create either an additional room for guests or a functional recreation area.
The most common and popular forms of gazebos are:
- rectangular;
- square;
- round;
- octagonal;
- non-standard forms.
It is not at all necessary to attach it only to the wall where there is a door to the street. Of course, the presence of a door or an opening window greatly simplifies the process of its operation (especially when it comes to creating a recreation area where a table, chairs and barbecue are located). However, quite often there are original buildings adjacent to solid walls (such a gazebo can even be attached to two walls of the house at once).
Laying the foundation
The reliability and longevity of a home depends on the foundation. In the place where the extension is planned, the foundation of the dwelling is opened. At the same level, a new foundation is laid.
The optimal foundation option for a 1-story wooden house is a monolithic strip foundation. Its depth is 0.5 m. The width is 300 mm.
Interior decoration of the bath
For a brick and block house, a full-fledged foundation is created that can withstand heavy loads.
The base parameters depend on:
- wall structures;
- bearing load;
- type of building materials.
The stages of foundation construction look like this:
- Determine the location of the bathhouse.
- Drive pegs around the perimeter.
- Using the pegs as a guide, stretch the construction twine.
- Set aside the width of the foundation.
- Install cast-off.
- Stretch 2 lines of twine.
- Check the diagonals and the accuracy of right angles (it is advisable to use a range finder and laser level).
- Dig a trench in accordance with the markings. If the house will have a central sewer system, then the trench needs to be drawn to the closest connection to the pipe. Otherwise, it is carried out to a drainage pit, which is arranged separately from the home.
- If the soil is sandy, install temporary formwork. It helps prevent the walls from falling to the bottom. The internal walls of the formwork are laid with roofing felt or film.
- Install a pipe into the trench under the communications and fill it with sand and soil. The trench under the base is filled with sand (coarse-grained) and crushed stone (2/3). Then you need to moisten the backfill with water and compact it well.
- Place tied rods of reinforcement into the trenches, secure the frame with clamps made of plastic.
- Pour concrete, level, dry. Waterproof with roofing felt or bitumen mastic.
It is advisable to lay the foundation in summer or early autumn. It should dry well and stand for 3 weeks.
In winter, screw piles are used to construct the foundation.
Types of adjacent gazebos
Gazebos are divided into:
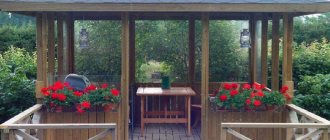
- open. Their construction requires little time, effort and finance. But this design only protects vacationers from the scorching sun and precipitation, but in case of strong winds, the holiday on it can be ruined. In addition, the open type of construction allows the gazebo to be used only in the warm season;
- closed. Such structures require large investments, effort and time. But they will delight you with functionality, practicality and ease of use at any time of the year. Quite often, people build closed gazebos, which are no different in practicality and ease of use from living rooms;
- with barbecue, oven, barbecue. For those who like to spend their leisure time in a noisy and cheerful company of friends, this option is the most optimal. And if you connect all communications to the gazebo, preparing aromatic and appetizing kebab will turn into pure pleasure.
Important: when building a gazebo with a barbecue or stove, it is worth additionally strengthening the foundation. Since such a structure in itself is quite heavy.
By location they are:
- located in front of or behind the house;
- built on the side;
- corner;
- covering two sides of the cottage.
Important : an open gazebo can be protected from the wind by thick curtains or a well-chosen wall of the house to which the building will adjoin.
Decorative design
Upon completion of all construction work, the finished gazebo is decorated. First of all, the structure is painted with special UV- and moisture-resistant paints, or varnished to ensure the durability of the wood.
Pay attention to the information about landscape design for the recreation area.
Additionally, the gazebo is decorated with slats along which climbing flower crops grow, artistic figurines or sculptures. Summer residents quite often tend to cover the extension with veneer or clapboard. Such decorative materials, in addition to giving the structure an aesthetic appearance, protect it from wind and rain. It would be ideal to provide for the transformation of an open gazebo into a closed one, and vice versa, through various removable structures.
It’s easy to give your gazebo a more original and cozy look with the help of Roman blinds. Experts also advise taking care of the comfortable interior of the extension: placing benches, a table and chairs, a small sofa or soft chairs that best match the style and design of the building itself.
Here you can learn how to make a 3x4 gazebo out of wood.
To illuminate the building in the evening, it is advisable to use various sconces, chandeliers, and wooden floor lamps. It’s a good idea to place decorative lanterns near the gazebo. Flower beds, front gardens, and an artificial pond will look harmonious around the gazebo.
Drawing with dimensions
Having decided to attach a gazebo to the house with your own hands, you need to draw up a competent plan - a drawing. It indicates: materials of manufacture, exact dimensions, design, internal filling, type of roofing and other nuances. Having such a project at hand, even beginners in the construction industry can easily cope with the construction process, avoiding primitive mistakes.
We are building a veranda
Building a veranda from polycarbonate with your own hands is much easier, cheaper and faster than from any other material. But first, you should have a clear idea of what you will use this room for. So, from a veranda you can make not only a place for rest and leisure, but also a functional dressing room. Attach it to the entrance to the house, and it will be much warmer even in the harshest winter. If you love plants, you can turn your veranda into a greenhouse or even a winter garden. Then, of course, an additional ventilation system will be required, which must be taken into account in the project.
Important: The area of the room must be more than 12 m². If you make it smaller, the veranda will be too tiny and uncomfortable; it will be difficult to clean it and accommodate the necessary furniture.
Polycarbonate is mounted on a pre-prepared frame. For its construction, you can use wooden beams with a large cross-section or rolled metal (steel or aluminum). It is very important to organize the correct roof slope - it should be at least 30°. The slope is calculated individually for each climate zone and depends on the amount of seasonal precipitation, wind load and other factors. This information is presented in more detail in the relevant SNiP.
Foundation for a greenhouse
As we said earlier, polycarbonate is lightweight, so it is not at all necessary to lay a powerful, expensive foundation to build from it. In this case, a lightweight (shallow-depth) strip, column or pile option is suitable. When choosing a foundation, consider not only the weight and dimensions of the future veranda, but also its purpose. For example, if you plan to place heavy furniture or many potted plants inside, this will put additional stress on the base.
What types of foundations are suitable for a veranda:
- Slab - for large and heavy verandas. The most expensive option, however, it provides a level base and guarantees the durability of the structure.
- Shallow tape is the most common solution. Even an inexperienced builder can make such a foundation. The only materials you will need are crushed stone, cement, sand and formwork boards.
- A columnar foundation is more suitable for open or small closed verandas.
- Pile is the most common type of foundation in recent times. Installation of piles by professional workers takes only a few hours, after which you can immediately begin installing the frame and covering it with polycarbonate. Thus, the veranda can be made in just 1-2 days.
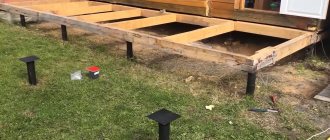
Let's look at how to arrange a columnar foundation for a small veranda. Support posts can be made of concrete, brick, wood or pipes. The main advantage of this type is that the base is completely autonomous and does not come into contact with the foundation of the house; it can be attached to any side and expanded if necessary, just by adding the required number of pillars.
Progress:
- If you are making poles from pipes, coat them with an anti-corrosion agent before installation; if made of wood, use an antiseptic, plus coat every centimeter with liquid bitumen or mastic.
- Mark the site where the veranda will be built and dig holes around the perimeter. The depth of the pits should correspond to the depth of the main foundation, and the diameter should be slightly larger than the diameter of the pillars.
- Pour 15-20 cm of river sand into the bottom of each hole and compact it thoroughly. Such simple drainage will not allow underground and sedimentary waters to destroy the pillars.
- Install the posts in the holes strictly vertically, checking the position using a building level. If you are making concrete supports, then wooden formwork is first installed in the pits, after which concrete is poured into it. To increase strength, a thick reinforcing rod is placed in the center of each concrete column.
Screw piles are convenient because, depending on the specifics of the landscape, you can adjust their height without additional difficulties, leveling the soil, etc. If your site is on a slope or has hilly terrain, it is better to make a pile foundation than to waste time creating a level area.
Installation of polycarbonate
Glazing of the veranda with polycarbonate can be done both vertically and horizontally on wooden beams or metal profiles. If you are making an open extension, then you only need to install the roof sheathing on the support posts. If you want to cover the veranda with polycarbonate, you will need a sheathing (frame) not only for the roof, but also for the walls. Polycarbonate is a very durable material, but in order for the veranda to last for a long time, it must be properly secured. To do this, the sheathing beams should be installed in increments of 60 to 80 cm, and the support pillars should be located from each other at a distance of 1 to 3 m (depending on the thickness of the sheet and the dimensions of the veranda).
There are two ways to attach polycarbonate to the frame - dry or wet. In the first case, only self-tapping screws and other fasteners are used; in the second, silicone sealant is added to this.
Important: Before installing the polycarbonate sheet, you need to make markings for the fasteners, drill holes with a diameter slightly larger than the self-tapping screw, and only then screw them to the sheathing. Be sure to use protective spacers (thermal washers) to avoid damaging the polycarbonate surface with metal fasteners. Do not overtighten the screw, otherwise a crack will appear in the material, or it will bend and begin to collect moisture in this place. Maintain a distance between fasteners of 30-40 cm. The image below shows how to correctly screw a self-tapping screw into polycarbonate:
How to make a polycarbonate veranda:
- Start installing panels from the left edge of the wall. Leave a small gap of 3-5 mm between adjacent panels - then the sealant will fill it. If you are working with honeycomb panels, lay them vertically and do not overlap the bottom so that condensation can flow freely through the gutters inside the sheet and out. To insulate the bottom end of the panel, use a special perforated tape. It will not allow dust and debris to penetrate inside and will not retain water.
- Before installation, each panel must be glued with a special continuous tape, covering the upper end part so that water, dust or small debris does not get there. Protective strips are also used for this.
- Do not remove the protective film from the polycarbonate until installation work is completed! Position the panels so that the film is located outside the room.
- Make markings for fastening points on the frame and panels. Use self-tapping screws only made of stainless steel, otherwise they will begin to rust after the first rain. To attach monolithic slabs to the frame, use a metal profile or weather-resistant durable adhesive.
- After installing the walls and roof, fill the joints between the sheets with transparent silicone sealant or cover them with decorative strips.
As you can see, the work is not at all difficult and for a successful outcome you just need to understand the features of fastening the sheets. Finally, we invite you to watch an interesting video about assembling a polycarbonate veranda:
Tools and materials required for work
As for manufacturing materials, the following are suitable:
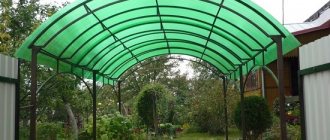
- polycarbonate _ This material is durable, flexible, and has good light transmittance. Polycarbonate is a budget material that is easy to work with. It is also durable and attractive. Both the walls of the canopy and the roof are constructed from it;
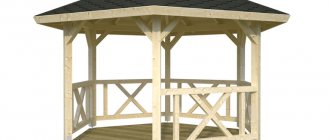
- tree. Its advantages can be described endlessly. These include: naturalness and environmental friendliness, beautiful texture, durability, light weight, ease of use, affordable cost. The most inexpensive wood is pine. More elite materials are oak, beech, teak;
- brick. This material is characterized by high cost and a rather complex and painstaking work process. But from it you can build a closed gazebo, characterized by functionality, excellent heat and sound insulation qualities, and aesthetics.
Tools (provided that the gazebo will be built from wood) in the work process will need:
- a circular saw;
- hammer and nails;
- plane;
- chisel;
- jigsaw;
- drill with drills;
- building level and tape measure.
Types of verandas
Any construction should begin on paper. First of all, you will need to make a polycarbonate veranda project, and you have the power to give the structure any shape. It is not at all necessary to limit yourself to the usual geometry - make the extension oval, round, wave-like or any other shape - polycarbonate opens up new horizons for DIY construction. With it, anyone can become an architect and designer.
There are built-in and attached verandas. The former are often built simultaneously with the house on the same foundation and often under the same roof. In the second case, a separate foundation will be required for the veranda. Among attached verandas, terraces are very popular. Often these are open-type structures that visually increase the area of the house and perform useful functions. Thus, the terrace is at the same time a place for relaxation, a porch, and protection of the walls and foundations of the house from precipitation. Polycarbonate is ideal for constructing an open veranda. It makes the space even lighter and airier. For the roof, more durable cellular polycarbonate is used - this is a sheet inside of which there are ventilation gutters that give strength and prevent condensation from forming.
If you live in a cold climate zone, it is better to give preference to a closed veranda, making the walls from the same cellular polycarbonate. In addition to protection from rain and wind, it will help keep the room warm thanks to its air layer inside.
Advantages and disadvantages of the material
To summarize all the information presented above, we propose to outline the advantages and disadvantages of an attached polycarbonate veranda. First and most importantly, construction from this material is much cheaper than from any other. This results not only in the price of polycarbonate, but also in the installation method and the low load on the foundation. For very small and light verandas, some do not even build a “real” foundation at all, but simply place a regular fence or concrete road slab on a drainage pad in the ground, on which I mount the frame.
Even if you choose almost transparent light polycarbonate, in summer it will not be very hot on such a veranda, because the material scatters most of the rays. And to ensure the flow of fresh air into a closed room, several ventilation hatches can be made in the polycarbonate ceiling. Use blinds to create dense, cool shade. In the case of polycarbonate, even the most ordinary plastic models will look harmonious.
To heat such a veranda in winter, it is enough to use infrared films. During the daytime, they will help you save a lot on heating costs. In other words, making the microclimate in a polycarbonate veranda comfortable is not so difficult or expensive.
One of the disadvantages of such buildings is the fact that in winter, the polycarbonate for the veranda roof needs to be regularly cleared of snow, and this must be done very carefully. Do not use iron scoops, brushes or shovels to avoid scratching the surface. Otherwise, the material will lose its previous light transmittance and protective characteristics. You can wash the walls of the veranda only with delicate products that do not contain alkalis or caustic acids.
Polycarbonate verandas have many more advantages than disadvantages, so cast aside all doubts and start construction.
DIY construction
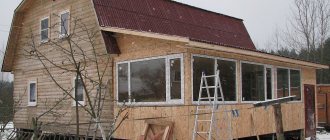
The construction of a wooden extension, for example, to a country house, begins with work on creating the foundation.
Base
You can pour a common foundation with the house in advance, and if the idea of building a gazebo came after the construction of the main building, then there remains the opportunity to build a pile or columnar foundation, although no one is stopping you from doing it in the form of a solid concrete screed.
For a small gazebo, you can make a columnar foundation.
Different materials are used for it:
The process of performing work to create a foundation may be as follows.
First, the site for the extension needs to be cleared of debris and grass, then leveled. Mark the installation locations for the supports - this is usually done using pegs and rope.
In the corners of the future structure, holes are dug for the pillars. A layer of crushed stone is poured onto the bottom, followed by sand to a height of 20 cm. A piece of roofing material is placed on top and 10 cm of concrete is poured. After this, you need to wait two days until the mixture hardens, and then begin laying the bricks in two rows. The bricks are held together with cement mortar, each new layer is laid perpendicular to the previous one.
To make a base for a gazebo measuring 3x3 m or 4x5, 4-6 pillars are enough. After all the pillars are installed, the first crown of the building is created.
Frame
The lower trim is made of timber. To further form the floor, logs are laid, which can rest on posts. Corner and intermediate posts are made from timber. Those of them that are adjacent to the wall should be half a meter higher than the others, so that the roof subsequently has a slope.
The top trim is made. Then railings are installed at a height of 1 m. Rafter beams are mounted on the beam at the top.
When creating the floor, it is recommended to use the same material as on the porch. You can also make a wooden deck or a cement surface.
Roof
The shed roof of the gazebo in the form of an extension should rest on the wall support beam. Slate, ondulin or similar material is mounted on the clad truss structure. It is good if the roofing matches the flooring of the house itself.
Where is the best location?
There are two ways to choose the ideal place for a pergola in landscape design: based on the location or the type of structure. In the first case, the type, size and other parameters are dictated by the space itself: for example, you need to zone the space, provide shade in a certain area, tie up plants. In the second, you choose a pergola and look for a place in the garden where to place it.
Options may vary:
- Pergola for flowers or grapes. If the plants are already planted, place the structure next to them and let the vines fall onto the mesh. Over time, the vines will take up space and give a decorative appearance.
- Pergola with swing. Here you will relax in the shade, so the view before your eyes comes to the fore - the landscape should please you. Ideally placed overlooking a flower garden or other beautiful area.
- Pergola by the pool. You don't want to completely shade the area around the water, but a corner in the shade is necessary. Throw lush greenery around the canopy, place a couple of sunbeds with a table and other furniture separately below. After swimming, you will be pleased to sit in the shade with a book and a refreshing cocktail.
- Pergolas near the house. The installed canopy takes almost no part in landscape design, but it perfectly shades the windows and creates space for relaxing on the street near the building.
An original structure for majestic climbing roses
What could be more beautiful than a “living blanket” consisting of many bright colors. Red or yellow buds exude a unique aroma when entering private territory. It’s even better to enjoy their beauty while sitting in a rose pergola, the photo of which evokes pleasant feelings.
But before you build it, you need to consider the following principles:
- The design must be reliable, since climbing roses are very heavy due to the huge number of buds. Therefore, load-bearing supports are buried in the ground.
- A rose is a majestic flower and it should fit harmoniously into the garden landscape.
- When choosing the size of the structure, you should take into account the area of your personal plot.
- If it is not possible to build a pergola for roses, you can make trellises that can be easily placed near any building.
It is interesting that such a pergola, strewn with many bright flowers, can perform various functions on the territory of a country house:
- an original transition from one area of the garden to another;
- “live” connection between buildings;
- unique landscaping of the veranda;
- flowering alleys of garden design.
To build such a pergola, wood, metal, and sometimes stone buildings are used. Forged structures installed on a stone base look wonderful against the backdrop of the garden. In such a pergola you can spend hours thinking about the meaning of life, reading interesting novels and simply enjoying the surrounding nature.
We do it ourselves
You can actually make a pergola gazebo yourself. Here are some installation tips:
- First, markings and installation of support pillars are done.
- Then a lattice is installed on the sides of the pergola, between the pillars (there may be wooden slats or galvanized screws).
- Next, we mount the support beams and cut off the ends of the crossbars.
- If you have strong winds, it is worth strengthening the frame with brackets.
- Finally, the cross beams are installed. The distances between the rafters must be the same.
We showed you an example very concisely, but easily understandable. If you are interested in the pergola topic, then on the Internet you can find step-by-step instructions and videos with a detailed description of what is done and how.
Arched pergola created on a small summer cottage
Arches are a popular support for flowers in small dachas. More often they are used to shade paths, passages, or simply to support climbing plants in flower beds. In a wooden structure, it is the arched part that is relatively small, this is explained by certain limitations in manufacturing - the size of the workpieces. The ability to carve this material, use the burning technique, and decorate it with various shades of varnish and other coatings make the pergola a real work of art.
Arched type pergolas look good not only metal, but also wooden
Helpful advice! When determining methods for artistic processing of an arched wooden structure, it is necessary to carefully select the means for protective and decorative coatings. They must be intended for external work.
When installing a structure, a mistake is often made: massive supports are chosen. Then the composition as a whole looks heavy and rough. And delicate flowers with graceful carved leaves climbing along it are lost among the large amount of “wood”. The diameter or (if it is timber) thickness of the supports should not be allowed to significantly exceed the width of the arch. The distance between the arches connected by transverse beams should not be less than 50 cm. Otherwise, it will not be possible to decorate the structure with abundant green mass, and it will look like an unnecessary element of the garden plot.
A small arched pergola can be used to shade paths or passages
Metal pergola arches are also installed in small areas. They are much more elegant than wooden ones. If the design is intended for grapes, then the main aesthetic requirements are straight lines, proportionality, and high-quality material. A metal arch for flowers can be decorated with decorative elements. Advantages of arched structures:
- possibility of placement in a small area;
- increasing the length of the support for plant development due to its rounded shape;
- visual perception of upward direction, which creates a vertical level of landscaping on the site.
To make a pergola-arch made of wood look elegant, you need to avoid massive structures
Arched structures, even not decorated with additional design elements, are decorative structures in themselves.
Photo gallery of beautiful pergolas
Below is a gallery of photographs of finished pergolas, decorated in different styles. They differ in materials, sizes, and purposes. Any of them will decorate the estate.
Even on a small estate there is a place for a beautiful pergola: in the front garden for the growth of climbing plants, near the house, a swimming pool as a summer gazebo, or a canopy. It is also an excellent decorative support for crops in the garden. This multi-tasking element of landscape design does not require any special investment; you can do it yourself, even without experience.