The bathroom is not a residential area. But this is where special coziness and comfort are needed. After all, the mood of the apartment owners and, as a result, their performance and health depend on how convenient it is to use the bathroom.
Traditionally, laying tiles in the bathroom solves the problem. It has a long service life, beautiful appearance, and easy maintenance. However, the desired result can be achieved only with proper installation of tiles - the slightest violation of technology leads to chips and cracks that cannot be restored.
Below we will tell you how to prepare the surface of the floor and walls for laying ceramics, how to choose tile adhesive, and how to properly finish.
What mistakes are made when laying
Incorrectly selected tiles
When shopping for tiles, people are often guided by two factors that influence the final choice - design and pricing policy. But having decided on a purchase, they do not check the tiles for identity. This is a serious mistake that can result in uneven joints between tiles, tiles of different sizes and shades. Before purchasing, you need to check the dimensions of the tiles. It is better to take several tiles of the same batch from different boxes and compare them with each other. The ceramic material must be the same around the perimeter and height of the product.
Buying glazed ceramics
The bathroom is a place where there should be increased safety. When coming out after a shower, a person should not slide on the floor, like on an ice skating rink. Therefore, glazed tiles will not work; you should buy unglazed material. Safety must be paramount, as falling onto a ceramic floor can result in serious injury to a person.
Choosing the wrong mixture for laying tiles
Laying tiles on the bathroom floor requires the correct selection of mixtures to fix the tiles. With the current choice of materials, the need for cement mortar for laying has disappeared; manufacturers offer good mixtures that will facilitate the process of laying tiles on the floor. For the bathroom and toilet, they buy primer, glue and grout exclusively for floor coverings. The base of the bathroom and toilet is constantly subjected to heavy loads, therefore it is necessary to lay the tiles with an adhesive of increased fixation.
Particular attention is paid to preparing the mixture. You must not deviate from the instructions on the packaging of the mixture; the proportions must be strictly observed when preparing the adhesive emulsion
To do this, you need to carefully study all the recommendations of the manufacturers. The glue should be uniform, without lumps.
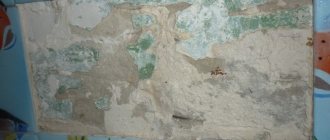
Poorly prepared base.
How to lay tiles if the original base is uneven? Many people try to solve the problem with more glue. This is a fatal mistake that guarantees a crooked floor with height differences. The fact is that leveling the surface by laying tiles with a large amount of glue will entail landslides of the adhesive base and the probability that the tile will simply “float” reaches almost 100%.
Therefore, before installation, you need to pay attention to leveling the surface. Correctly laying tiles on the bathroom floor can only be done on a well-prepared surface.
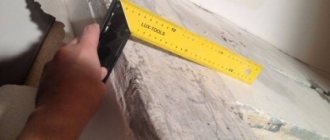
There was an error in measurements
Trying to lay tiles without careful measurements means setting the whole job up for failure. It is impossible to lay a tile floor evenly without a corner, a rubber hammer and a water level, or better yet a laser level.
The laid row of tiles must be checked using a level; defects are leveled using a rubber hammer. Why a rubber mallet and not an ordinary one? The ceramic coating can simply burst or chip when using an ordinary hammer, so a rubber hammer should always be at hand.
Leveling tiles with a rubber hammer
Required Tools
To work with mosaics prepare:
building level;
- spatula (toothed with a comb profile height of 3 mm, as well as rubber);
- roulette;
- pencil;
- plumb line;
- rule;
- grater (preference is given to a polyurethane product);
- rubber mallet;
- container for preparing the solution;
- knife;
- construction mixer.
In areas of complex configuration, you need to divide the mosaic tiles into parts. A standard tool, a tile cutter, is not suitable for this. You need to use an angle grinder, and with a diamond blade. There is a risk of injury when handling the material.
Bathroom tiling basics
In order for the tiles to last as long as possible, it is necessary to follow a certain order of laying the tiles in the bathroom.
It is easier to lay tiles on the floor. Therefore, if you have little experience, it is better to start with the floor. If you plan to lay it parallel to the walls, then it is better to start from a visible corner for more decorative qualities of the finished surface. Laying diagonally is usually done from the middle of the room.
Particular attention should be paid to the seams between tiles, since the decorative properties of the surface depend on their size.
The size of the seams is adjusted using plastic crosses. It is necessary to ensure that air does not form under the tiles, which can lead to destruction of the material. The level must be checked. Tile cutting is done using a tile cutter or grinder.
Let's look at the sequence of laying tiles on the walls in the bathroom. Here the situation is more complicated, since you have to work on a vertical surface. In this case, there are also certain rules for laying tiles in the bathroom.
Firstly, you need to start laying from a visible corner. Secondly, installation is carried out from a profile nailed to the wall and aligned horizontally. It is fastened at such a height from the floor that only whole tiles are laid under the ceiling.
After the glue has dried, the bottom row is laid out. To apply the glue here, you can use a notched spatula, which will allow you to adjust the layer. Too much adhesive may cause the tiles to slip or fall off.
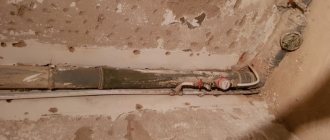
Sometimes you have to make slopes from tiles in the bathroom, for example, for niches for sewer pipes. In this case, you should come up with spacers, since when gluing the tiles to the upper slope, they may fall off. To decorate the joints, external and internal corners for tiles in the bathroom are used.
The final step is to grout the joints with a mixture of the appropriate color. The excess mixture is removed with a sponge, and then the entire tile is wiped clean.
Thus, it is clear that the technology for laying tiles in the bathroom is quite complex. But with a certain amount of diligence, it is quite feasible on your own.
It is very important to strictly follow the installation rules and use only high-quality building materials
Additional Information:
Reasons for deformation of bathroom tiles on walls and floors
Putting tile joints in order when laying tiles on the floor
How to veneer aerated concrete with clinker tiles
Preparatory work
The stages of surface preparation vary depending on what room is planned to be finished, the state of the work front and how long-lasting and high-quality the result is required. Main stages:
- checking the surface condition. To do this, you need to find out the type and condition of the old coating (if any) or the quality of the wall surface. Hardness and strength are checked by light blows with a hammer or chisel (the handle of any tool). If this level of exposure damages the surface, it needs to be stripped down to a more durable base. If the entire wall (floor, ceiling) does not have sufficient hardness and resistance to external influences, it is better to replace the partition or use plasterboard structures;
- stripping. It is required for any option of laying tiles in the bathtub, even if the renovation is carried out in a new building. When cleaning, the surface is freed from all fragile parts, dust, dirt, rust/dampness/mold stains, cracks and lacunae are sealed. If a humid atmosphere has led to the formation of mold or mildew, treatment with fungicidal and antibacterial agents is required before further work;
- alignment. For truly high-quality installation, a perfectly smooth, strictly flat surface is required. Any curvatures, irregularities, or protrusions will disrupt the installation pattern and complicate installation work. For leveling, you can use moisture-resistant drywall or beacon plaster (in case of significant unevenness). For mild unevenness and/or defects, ordinary plaster and subsequent putty are sufficient;
- putty and primer of the leveled surface. This operation is necessary to ensure high-quality adhesion of the tile adhesive (mortar) to the wall (floor);
- installation of tiles;
- grouting joints.
It should be noted that in old buildings with sufficient room size, leveling is faster and better done using plasterboard. This is due to the insufficient strength of old walls and the difficulty of dismantling and/or leveling them. The same applies to new buildings with uneven walls made of brick, foam or aerated concrete. If the space of the bathroom or kitchen is not enough and does not allow you to “steal” up to 15...30% of the area with plasterboard structures, the best option is with a relatively thin layer of plaster.
Interesting: both for insufficiently strong walls and for partitions (floors, walls, ceilings) made of plasterboard or wood, it is advisable to strengthen the surface under the tiles. To do this, a reinforcing mesh is placed under the layer of plaster (putty). Drywall works best with the polypropylene version of the mesh, brick and wood, old plaster partitions with metal.
How to choose the optimal layout
Before choosing a tile, it is worth drawing a sketch by hand to decide on the type of cladding. To do this, you need to draw a detailed plan of the room with all dimensions and furnishings:
- carefully take measurements of the floor and walls, openings, and indicate the parameters on paper;
- draw up a drawing of the bathroom and be sure to show the location of the doorway, window (if any), all niches and ledges;
- indicate the location of plumbing fixtures, sockets, switches, and pipeline outlets.
Now that the plan is ready, you can choose the optimal layout scheme using sketches with colored pencils. Such a sketch will help determine the best location of decorative elements, places to cut tiles, and problem areas. Be sure to consider the degree of complexity of the work if you plan to do the cladding yourself.
Corner technology
Internal corners are formed at the joints of the walls. It is necessary to try to lay out the trim as accurately as possible. Many novice craftsmen leave gaps of 1-2 cm in the hope of sealing them later with tiled grout. This is not true, because first of all, it violates the aesthetics, and secondly, the grout is not intended for such tasks, and after a short period of time it will weather and begin to deteriorate.
External corners, as a rule, are formed to hide the installation of niches and projections for communications. You can form a corner joint with uncut, factory edges of the tiles, making an undercut near the wall. The easiest way is to lay it “overlapping” on the corner, leaving a gap of 3-4 mm between the tiles for grouting. The verticality of the corner is checked after laying 1-2 rows using a plumb line.
When forming an end-to-end corner, after drying, you can glue a special rubber corner. It will hide possible defects in the joint and make the protruding corner itself softer, which will subsequently protect the owners from possible household injuries.
Corners can be sealed with a corner
Diagonal method
- the most complex and time-consuming.
This method has a number of advantages:
- visually expands the area;
- if there are mistakes in the layout and the walls are not perpendicular or parallel, it hides this flaw;
- gives a beautiful and original drawing.
And also the disadvantages:
- Even minor deviations in the size of the tiles are not allowed;
- more waste.
With the “diagonal” method, the first row begins to be laid with cut tiles diagonally, which increases the percentage of waste.
The tile joints are located perpendicular to each other and at an angle of 45 degrees to the walls. Checking the accuracy of laying tiles in the bathroom is carried out with a level and a square.
The following options for laying tiles in the bathroom are a two-color combination of already known methods.
Primer
Having made sure that enough time has passed to begin the next stage of work, the technology instructs to prime the wall. The primer additionally cleans the surface, destroys potential sources of fungus and increases the adhesion of tile adhesive to the wall material. This adds up to longer tile life and improved sanitary performance in the bathroom. Primer compositions are most often sold in ready-made liquid form. It should be applied to the entire surface of the wall using a brush, roller or spray, and then wait until it dries completely.
The time intervals after which the next stage of work can begin are indicated by the manufacturer in the instructions on the packaging of building mixtures
Methods for laying ceramic tiles: advantages and disadvantages
Laying tiles in the bathroom is carried out according to various schemes, each of which can emphasize the advantages of a ceramic coating and will allow you to use the geometry of the room with maximum benefit. Below are the most popular styling models with an assessment of their practicality.
Direct method
The easiest to implement and cost-effective. The tiles are laid in even strips parallel to the plane of the floor and walls. Both square and rectangular tiles are suitable. The second option, depending on the location, can help to visually increase the space.
This procedure for laying tiles in the bathroom is often used among beginners in this field.
Running
This laying scheme is similar to the installation of brickwork, when the tiles are laid in a checkerboard pattern with subsequent rows shifted in relation to the previous ones by 1/2 of the length. This option looks especially advantageous when laying tiles in the shape of a rectangle, the sides of which are in a ratio of 2 to 1. The advantages are similar to the direct laying method, with the difference that there will be more waste.
Staggered laying is ideal for rectangular tiles called "hogs" because the result is a surface that imitates real brickwork.
Diagonally
This installation method is characterized by the location of the fragments at an angle of 45 degrees relative to the line where the floor and walls meet. This technique looks very impressive, especially on large-scale surfaces, but is more difficult to work with. An expanded panorama with lines intersecting diagonally appears before your eyes. For limited space, this method is not suitable, as it will optically reduce the area of the room. Disadvantages include the increased complexity of the work and significant labor costs associated with the need to trim tiles. Diagonal laying is associated with a large level of waste, and therefore is quite expensive.
Carrying out diagonal laying work will require a sufficient level of skill from the worker. For novice finishers, such a scheme may be too complicated.
Modular
The modular design was invented to create unusual styling. Drawings that are distinguished by originality and modern design can be achieved by using tiles of different sizes, but with multiple edges. The main difficulty lies in correctly calculating the required amount of finishing material. For this purpose, a schematic layout plan to scale is created. It is imperative to take into account the level of thickness of the seams.
The modular scheme is in many ways similar to the staggered laying method, but the calculations for its creation must be as accurate as possible.
Adhesive compositions, classification, preparation
Depending on the conditions of use, tile adhesive materials are divided into 5 main categories:
- Adhesive for internal use, contains a minimum amount of special ingredients. For this reason, it is the cheapest representative of such materials.
- Universal adhesive compositions used for finishing objects with ceramic tiles both indoors and outdoors.
- Compositions intended for laying floor tiles. Due to the use of a significant amount of plasticizing additives, it has increased fluidity, which makes it unsuitable for use on vertical planes.
- Mixtures with increased adhesive properties are used for working with large-sized tiles, including for finishing non-standard surfaces.
- Adhesives with increased moisture resistance. The presence of hydrophobic plasticizers in the composition makes it indispensable for finishing fountains or swimming pools.
When purchasing tile adhesive mixtures, you should carefully read the package directions, including the list of ingredients, to make the right choice.
To prepare glue from ready-made mixtures, it is enough to thoroughly mix it with water in a strictly specified proportion. Having achieved a uniform composition, you need to let it sit for 10 - 15 minutes so that the chemical reactions of specific additives start. It should be borne in mind that the finished composition has a limited period of use, after which it begins to harden. It is impossible to “revive” such a mixture by adding water. Therefore, glue must be prepared in a limited volume per 1.0 - 1.5 square meters.
Stirring the adhesive composition with water is usually done in a plastic container using a special attachment on a drill.
Ceramic or porcelain stoneware products with increased load-bearing capacity and a rough surface are used for laying flooring. The walls are decorated with ceramic tiles.
Tile adhesive calculator by area
How to lay tiles in the bathroom
To properly lay the tiles, you will need to follow a number of recommendations:
- It is necessary to start laying tiles on the wall from the second row, counting from the floor. The first row of tiles remains empty at the initial stage; during installation you should focus on the markings.
- The glue is applied to the base, not to the tiles. For convenience, use a notched spatula; it will create the desired texture.
- Do not press too hard on the tiles during installation; if you overdo it, the ceramics may not hold up and crack or break.
- Excess glue is removed using a foam sponge.
- To ensure that the seams between the tiles in the bathroom are the same width, use special crosses. The optimal width is a few millimeters.
- Check each new row for horizontalness. Even the slightest deviation can later lead to distortions in the masonry. This may happen due to slightly different sizes of tiles, which periodically happens with domestic ceramics.
- When tiling corners and ledges in the bathroom, you will need to cut the tiles using a grinder or tile cutter.
- If you need to make recesses, you can simply carefully break them out with pliers until you get a hole of the required size.
You can see more details on how to lay tiles on bathroom walls with your own hands in the training video.
Possible problems and ways to solve them
Careful study of instructions, manuals and tutorials on how to properly lay tiles in a bathroom does not guarantee high-quality work. When laying tiles yourself, mistakes almost always occur. Some have more, some have less. In this situation, you need not to get hung up on the problems that have arisen, but to quickly eliminate them before the glue has completely set.
The tiles lie in steps
The origins of such a defect were laid during the preparatory work - the problems of the wall plane were not completely eliminated. More precisely, the line where the wall meets the floor has a slope or curvature. As a result, the vertical joints will slowly move to the side, creating steps of tiles. In such cases, you initially need to either trim the tiles or place various underlays under them to maintain a perfectly even top line.
If the problem is discovered later, after laying several rows of tiles, you need to find the row where it all started and wedge the seams. The lower seam is corrected using matches and wedges, the upper seams are corrected with plastic crosses of different thicknesses.
Steps.
The tiles look crooked in a row
This situation occurs when there is no cross in the seam - it fell out or the craftsman forgot to insert it. The defect can be easily eliminated: the tiles are leveled, new crosses are placed in the seams, and the displaced tiles are secured on all sides to adjacent tiles with masking tape.
The tile looks crooked.
The tile falls inside
When the tiles are embedded in the adhesive and this is clearly visible visually, the fault lies entirely with the finisher - he applied the adhesive mixture incorrectly: either unevenly or only in dots. By the way, the most common mistake of novice finishers is to apply glue pointwise in order to save it. In this case, the tile either sinks in or cracks, becoming covered with cobwebs.
Defects in work are eliminated by re-gluing the entire row of tiles, which is easier and faster than re-gluing only sunken tiles. This recommendation seems illogical, but it is a fact.
Restoring sunken tiles.
The sealed seams have failed
Such defects occur as a result of poorly cleaned seams or too liquid grout. The defect can be eliminated by repeating the jointing operation after the old grout has been removed and the seams have been cleaned.
Different tile sizes
Even the world's leading brands producing ceramic tiles may have different lengths and widths of tiles. The difference may be minimal, but on the wall it is noticeable. Therefore, experienced finishers lay one row of tiles from one package, which increases the likelihood of hiding sizing errors.
If a tile of a different size has already been laid, then it is replaced with another one, more suitable in geometry to the adjacent tiles, or the size of the seams is adjusted to hide the defect as much as possible.
Seam processing
Having figured out how to properly lay tiles in the bathroom, you can move on to the next most important step - grouting the tile joints. How to process ceramic products yourself? The grouting process should begin one day after laying the last tile.
Use a sponge to remove any remaining adhesive from the tiles. The grout solution is prepared in accordance with the instructions. Apply it inside the seams with a rubber spatula. The mortar between the tiles hardens within half an hour. Next, wipe it with a damp sponge.
Processing seams on tiles
To avoid the formation of mold and mildew in the future, finished seams are treated with a special mixture. Wide seams are rubbed with a mixture of sand, to which it is recommended to add latex. Latex will protect the seams from cracking, eliminating the need to replace tiles. It also performs a decorative function in the bathroom, the design of which will become unique.
The use of latex does not require diluting the dry mixture with water. Just mix them and leave for a while. The finished grout is applied with a brush or cloth. After drying, the seams are washed again with a dampened sponge.
How to prepare the wall surface
Preliminary work consists of cleaning the surface of old tiles or paint, leveling it and priming it.
Removing old tiles
The old tiles are removed with a spatula, picking up the edge with a spatula. With the same tool you need to clean off traces of glue on the wall. Remains of the old fastener are unacceptable; they must be cleaned off until large scratches form, and if this does not work, they must be cleaned with coarse emery cloth. It is best to use it in a waterproof version, since old plaster quickly clogs the pores, and it is best to remove dirt with a jet of water.
After removing the tiles, the walls need to be sanded and large potholes and cracks filled with putty. If there are large protrusions, they are removed with a spatula or chisel and then sealed. The putty should be given time for final hardening during the day, and smoothed with sandpaper.
Cleaning old paint from walls
It is rarely possible to effectively remove paint from walls mechanically with your own hands. For this it is better to use a special liquid. It is applied to the walls with a brush and left for a day. During this time, the paint peels off the walls and is easily removed with a spatula. If difficulties arise, you can additionally use a hair dryer; the temperature of the air flow up to 600 degrees helps to separate the old paint from the walls.
Alignment of walls
Checking the horizontal straightness of the walls can be done with a stretched cord and measuring the distance between it and the wall. To clarify the amount of vertical curvature, a plumb line is used.
The amount of curvature up to 12 - 15 mm can be corrected with plaster , but this work can only be trusted by an experienced craftsman.
The second, radical way to correct curvature is to install a sheet of drywall on the wall.
Before starting work on finishing the walls with tiles, they need to be treated with a primer. The composition is selected depending on the material of the wall surface, in accordance with the recommendations on the packaging of the product.
Calculator for the required number of tiles
Preparing the walls
Preparing the walls comes down to plastering and leveling them. The tiles must be laid absolutely level with the wall. If the seams between the bricks are deep, they are sealed with mortar. First you need to decide on the verticality of the walls. If the wall has a deviation from the vertical of more than four centimeters, there is no point in leveling it with plaster. Such walls are sheathed with plasterboard sheets.
Plaster leveling
First you need to remove the plaster that has fallen off the wall and plaster all the cracks. The only tool that can cope with this job and smooth out all the flaws is a rule that is at least two meters long. It is the rule that all excess solution is cut off. If there is no rule, then you can use a flat metal corner or a square pipe of suitable length instead. The applied solution must be removed without sparing.
Proper preparation of the base
The success of the event depends not only on the quality of the purchased materials, but also on how thoroughly the preparatory work was carried out. Installation should be done on a wall that has been cleared of old coating. Walls and floors must have a perfectly clean and smooth surface. Otherwise, over time, the tile will swell, crack, and then completely fall off.
Old tiles are knocked out using a chisel and hammer. You can use a hammer drill, but it makes a lot of noise. The paint is removed with a spatula or drill.
The floor is leveled in two ways:
- concrete mixture;
- leveling mixture.
Leveling the floor under tiles in the bathroom
The latter option is more expensive, easier to implement and allows you to get a perfectly flat surface.
If there are significant unevenness on the walls, they are eliminated with concrete mixture or putty. However, it is easier to cover them with moisture-resistant plasterboard
When using it, you will have to pay special attention to sealing the seams. To prevent moisture from penetrating inside, they are additionally coated with varnish.
A primer helps improve the moisture-resistant qualities of the material and increase adhesion. It is recommended to cover not only drywall, but also concrete or brick bases.
How to choose the right glue
You can make adhesive for bathroom tiles yourself, or you can buy it. It all depends on the type of base, the amount of work and the skill of the finisher.
So, if you need to level out significant differences in height on the surface of the walls with glue, it is cheaper to do it at home. You will need: Portland cement, river sand (quarry sand must be sifted to remove small pebbles), PVA glue (can be replaced with dishwashing detergent, liquid soap or washing powder) and water.
The quality of such glue depends entirely on compliance with the proportions of the ingredients in the composition: 4 parts of sand are added to Portland cement grade 300, 400 - 5, 500 - 6 and 5-10% PVA glue diluted with water (1 part water, 2 parts glue) for every 10 kg mixtures.
For information: to improve the frost, heat and moisture resistance of homemade glue, resistance to chemicals, plasticity and adhesion, special additives are added to the solution: MasterTherm, superplasticizer - C3, liquid glass, dibutyl phthalate, resin additive DEG1, superplasticizer D5, etc. .
The method of use of each additive is described in the instructions for its use.
Ready-made types of tile adhesive come in the form of:
- dry mixtures - the composition contains all the necessary components. All that remains is to stir according to the instructions;
Dry tile adhesive.
- mastic - ready-to-use paste;
Mastic.
- adhesive solution (another name is “liquid nails”) - used only for repairing (replacing) tiles.
How to choose adhesive for bathroom tiles if you have to buy it?
Here the choice of glue is determined by the base on which the ceramics will be glued. Thus, universal cement and two-component epoxy adhesives adhere best to gypsum and cement plaster. For a plasterboard wall, you need a dispersion adhesive that has good adhesion, but does not penetrate deeply into the base.
The best brands to buy: Litokol, Knauf, Vetonit Ultra fix, Ceresit and Unis Plus.
Joining materials
Technological joining of laminate and ceramics can be done using the following products:
- the use of a flexible PVC profile allows you to connect curved bends;
- a flexible metal profile is used to connect curved zones and straight seams;
- an aluminum threshold is used to process the joining surfaces under the door leaf;
- the use of a box threshold increases sound insulation and seals joints;
- using a transitional PVC profile, coatings with a large difference in height are finished;
- when using a cork expansion joint, a smooth joining surface is obtained between the laminate and the tile;
- Using a T-shaped profile from solid wood, straight seams are made.
T-profile
Types of layouts
There are many types of laying tiles on the floor and walls of the bathroom, from the simplest to the incredibly complex. Each option has its own advantages and features. Let's look at the most popular types of tile laying.
Straight
The simplest and most popular option for laying tiles in the bathroom. The tiles are located strictly parallel to the floor and walls, side by side. For such a layout, a simple rectangular or square shape is suitable.
Running
Otherwise, such a design is called brick or stone masonry. In order for such decor to look harmonious, it is worth choosing the right proportions of the tiles. The ideal ratio of width to length is 1 to 2. How beautifully you can lay out tiles in the bathroom, imitating brickwork, is shown in the photo below.
Diagonal
One of the most difficult methods of laying tiles in the bathroom, requiring experience. When choosing such masonry, it is necessary to take into account that due to the constant cutting of tiles, the material consumption will be much greater compared to other options. However, the effort and money spent will be worth it, since diagonal laying of tiles is also one of the most impressive.
Despite its effectiveness, diagonal design is not suitable for every bathroom. If the area is small, it is better to use simpler options, since the diagonal will only make all the shortcomings of the room visible. It is better to choose a similar layout for a spacious room, but you should pay attention to the curvature of the walls - they should be perfectly smooth without deviations from the perpendicular axis. You can see in the photo how to use tiles laid diagonally in bathroom design.
Modular
An eye-catching choice for bathroom design. In this case, tiles of different sizes are used; they can be laid out in any combination, which gives room for imagination. There are a lot of options for combining different tiles in the bathroom; the most interesting ones can be found in the photo.
Horizontal
Clear lines can significantly change the proportions of a room. The horizontal layout of the tiles most often consists of a dark bottom combined with a light top. There may also be an option with several horizontal stripes of different colors. With this design, plain tiles are most often used.
If you choose a finish with patterns, it is better to separate parts of the masonry with a plain border. To make the design more harmonious, the border is used not only at the bottom of the walls, but also under the ceiling. You can see what the horizontal tile layout in the bathroom will look like in the photo below.
Vertical
With a vertical tile layout in the bathroom, brighter stripes clearly stand out against a plain background. The width of the stripes can be different, the same or alternate. However, it is worth considering that too many stripes look too bright and are not suitable for decorating all the walls of the bathroom. In this way, it is better to highlight only one wall, a separate area or niche.
Vertical stripes visually stretch the room upward, while at the same time narrowing it slightly. This looks good on long longitudinal walls, but not on the ends in narrow rooms. Using stripes, you can highlight different areas of the bathroom, if it is combined with a toilet, as well as the most significant design elements.
Mosaic layout
The combination of regular tiles and mosaics in the bathroom looks very impressive. A real mosaic is more difficult to install, since it requires laying out hundreds of small elements exactly according to the diagram, without ever making a mistake.
However, there are simpler options - ready-made mosaics on a grid or imitation. Mosaics can be used in different ways:
- Wall decor. The mosaic pattern can be made in one color or with a full pattern. The choice of ornaments, colors or subject of images depends on the style of the interior and the personal wishes of the household.
- Flooring. If the bathroom is small, colorful mosaics on the walls may look too bright, but similar decor on the floor will look good even in a small area.
- Zoning of space. Using mosaics, you can divide the bathroom into zones. This type of finish is especially popular in the shower area or on the wall along the bathtub.
- To attract attention. Mosaics can be used to highlight specific details, such as a sink or bath towel hooks.
- Decoration. Mosaic does not have to occupy the entire bathroom; it can be a border, individual stripes or patterns.
- Hard to reach places. The tiny details of the mosaic allow it to be used for finishing the most complex surfaces.
How beautifully to combine tiles with mosaics in the bathroom can be seen in the photo.
Tile grouting and treatment
Grouting of the tiles is done after the entire room has been lined with this material. If, when laying tiles on the walls, gaps were left for subsequent grouting, then grouting without sand in the composition will be required. Sanded grout is used for floor tiles, which are also laid at wide intervals. To increase the beneficial properties of grout, some craftsmen add latex to it, a solution of which is sold in specialized stores. You should not try to save money on this solution, since its beneficial properties noticeably decrease along with a decrease in its concentration. The latex solution increases the elasticity of the grout and the quality of its adhesion.
Grouting seams in the bathroom
DIY bathroom tiling
It is convenient to distribute the solution over the surface using a rubber trowel, which must be carefully moved diagonally across the laid tiles, holding it at a slight angle. Proper grouting allows you to fill every single seam with grout, but it is better to check this after the process is completed
It is recommended to start grouting from the wall near which the bathtub is located, and when it is finished, you can clean the place from which the repair began. After grouting, the ceramic tiles are treated with a sealant to protect them from harmful influences, which is applied using a paint roller, but if only the seams will be treated, you can also use a regular brush. To ensure that the tiles last as long as possible, they are treated with sealant at least once a year.
A little about the choice of material
As we have already said, ceramic tiles for the bathroom are the most popular type of finishing material. There are certain requirements for this room; accordingly, the materials for its finishing should be chosen correctly, namely, taking into account their technical characteristics:
- minimal moisture absorption;
- increased resistance to cleaning chemicals;
- resistance to mechanical stress;
- resistance to high temperatures and steam;
- bathroom floor tiles must be abrasion resistant; resist bending and abrasive substances.
When choosing a material, you should proceed from the quality of the ceramics. Tile that meets European standards can be of three grades, each of which is marked with a specific color. The first grade is a tile with a red marking, characterized by high quality and durability. The second grade is a material that may have approximately 5% defects; this series is marked with blue or light blue markings. The lowest grade is marked in green.
Ceramic tiles are distinguished by their resistance class, of which there are five, they are marked with Roman numerals. In a residential area, it is advisable to use a material no higher than wear resistance class III, but for a bathroom, class I is sufficient. Since laying tiles in the bathroom is not easy, you should correctly calculate the amount of tiles - ideally, you should take the material with a margin of about 15% to take into account the fit. Well, the design of the material plays an important role in the choice - after all, everyone wants the bathroom to be not only functional and comfortable, but also beautiful. And the variety of tiles is a guarantee that you can easily find your own finishing method.
Technology for laying mosaics on standard surfaces
If you follow all the steps in the recommended order, you can get coverage for a long service life.
This is interesting: Consumption per 1m2 of adhesive on tiles, how to calculate
Instructions:
- Waterproofing material is applied to the prepared base. Bitumen is not suitable for this. The best composition options: coating, painting insulation.
- Choose an installation technique: start tiling on the floor from the front door; on load-bearing walls, partitions - from the far corner of the most important part of the room.
- After preparing the solution, begin laying the finishing material. First, apply the substance to the walls/floor with a spatula with a smooth edge, then apply it again to remove excess mixture. The glue layer becomes textured thanks to the use of a spatula with teeth (3 mm).
- Start installing the mosaic at any wall height. Full-size tiles are heavier, so install the bottom tiles (above the floor) first. This allows you to make the masonry more even.
- When the glue dries, the joints between the tiles are rubbed. The composition for the mosaic is chosen taking into account the speed of hardening. In most cases, the drying period is 4-24 hours. When choosing the shade of such material, the colors of the interior are taken into account, since the grout imparts a shade to the seams.
If mosaic tiles are used, the paper backing is removed 20 minutes after installation.
Where to start
The first thing you need to think about is not how to arrange the decor of the tiles in the bathroom; first you need a floor plan with the location of the main interior details - plumbing fixtures and furniture
What you need to pay attention to when creating a diagram:
- When thinking over the drawing, observe all the proportions and scales of the bathroom, but do not make the drawing too small. The diagram should be large enough to place all the elements on it and clearly indicate the dimensions.
- To correctly lay out the tiles in the bathroom, you need to know the exact dimensions, so measure all the walls of the room, taking into account the doorway, ledges and niches. Label the obtained values on the diagram.
- Mark the location of plumbing fixtures and furniture on the drawing.
- Be sure to indicate the location of the ventilation shaft, sockets, switches, etc.
- Interior details that are attached on top of the trim do not need to be indicated on the diagram - they do not affect the layout in any way.
- Do a control check - compare the real bathroom with the resulting diagram, make sure everything is correct.
This is what a bathroom should look like with the correct tile layout
An accurate diagram is needed to correctly calculate the amount of material, the size of the tiles and the ornament itself. If you make even a small miscalculation, it may turn out that the most beautiful elements of the layout end up behind the plumbing fixtures or in the corners, otherwise the effect that was intended for such decor will be completely lost. Design examples that you can see for laying tiles in the bathroom are presented in the photo below.
Sketch of tile layout in the bathroom
Tile laying process
Having carefully examined the various options for finishing bathroom tiles, let’s move on to studying the installation process itself using the example of tiling a bathroom floor.
To do this, let’s imagine that the tiles have already been selected, all materials have been purchased, and the necessary measurements have been made.
- We clean the surface: we remove the old covering from the floors: linoleum, parquet, tiles along with glue or mortar. After tapping the surface and hearing a dull sound, we also remove the old screed (this means that there are cavities under it and the base is not strong).
- Next, we prepare the surface for laying the tiles.
- If there are large differences relative to the horizon, it is necessary to level the surface. We do this with cement-sand mortar.
- After the screed has dried, prime the surface and dry it.
- We arrange waterproofing using bitumen pastes or a special mixture for plaster waterproofing.
- We prime again to increase the adhesion of the base to the future coating.
- If the differences in the horizontal floor level are small, you can use a special self-leveling mixture (leveling mass), which can remove the difference from 3 to 15 mm. When using leveling compound, surface priming is not necessary.
The base of the floor is now ready.
The bathroom options for decorating with tiles were discussed above and you have already chosen the appropriate installation method.
- We begin laying the tiles in the direction from the far wall to the doors. We also determine which wall will have a bathtub, shower stall, washing machine or furniture under which the cut edges of the tiles will be hidden. We carry out the work from the direction of the open corner (whole tile) to the wall with plumbing (cut tiles).
For this:
- We place two tiles in the corners at the required height and attach them to alabaster (it dries quickly and can be easily removed in the future);
- Wet the underside of the tile well with water (you can dip it in a container of water);
- Using a special (notched) spatula, apply diluted glue to the entire surface of the tile;
- we lay it in place, joining it with the lighthouse tiles, and leaving a gap between them using special identical crosses;
- we put the laid tiles in place, tapping them with the handle of a trowel;
- we check the correctness of the draft using a rule, a lath or a nylon thread, placing it on top of the lighthouse tiles, or we check the horizon with a short level;
- remove excess glue that appears after settling with a trowel;
- use a spatula to clean the seam between the tiles;
- we check the horizon again;
- We repeat the entire cycle until the end of the row, then remove the beacons and install them with glue.
- After all the tiles have been laid and the glue has dried, we begin grouting the joints:
- Use a dry cloth to remove any remaining adhesive from the surface of the tiles;
- Using a rubber spatula, fill the seams with diluted grout;
- let dry and remove excess.
As you already understood, the installation process is not complicated, but it requires care and attention. A well-chosen technology will ensure a long service life of the tile covering. Good luck!
Gallery
Preparing surfaces for installation
When doing the work yourself, first level the surfaces. If this is not done, all the shortcomings of the supporting structure or partition will appear.
The installation process is simplified when mosaic tiles or mosaics on mesh/paper are used.
The first of the types of cladding, which is a solid base with small items on it, imitates a mosaic.
Mosaic on a grid is an economical option. In both cases, it is necessary to level the walls, since a curved surface can shorten the service life of the cladding.
Recommendations for preparing the site for installation:
- The old coating (if any) is dismantled. It is removed using moderate force, otherwise areas of the load-bearing wall may be partially removed (for example, when using a hammer drill, sledgehammer).
- If it is necessary to finish a room that has not been used before (for example, in a new building), the rough surfaces are leveled. For this purpose plaster is used.
- The walls are cleaned of dust. As a result, the adhesion of materials is enhanced.
- If there are defects on the cladding (dents, holes, cracks, chips), putty is used. This composition helps to increase the service life of the coating.
- After applying the putty or plaster, the surface is sanded with medium or fine-grit sandpaper, being careful not to leave too large grooves. Due to this, the strength of the coating increases.
- When the walls are leveled, they are re-cleaned of dirt. This measure also increases the adhesion of the rough finishing layer and the adhesive composition.
To make the work easier, it is recommended to mark the surface. The accuracy of drawing lines, their position relative to the vertical and horizontal are determined by the building level.
The recommendations that are taken as a basis when performing work are the following:
- In corner areas, tiles are laid from the outer corner.
- If mirrors or other interior items hang on the wall, take into account their position during cladding. It is important that they fit organically into the pattern created on the wall by the mosaic.
Alignment methods:
- grinding using an angle grinder (a diamond disc with a comb height of at least 3 mm);
- puttying level differences in different areas within 3-5 mm;
- plastering using a beacon system;
- installation of drywall.
Choosing tiles and laying them
In order to correctly calculate the amount of facing material, it is necessary to measure the surface area on which it will lie, and also determine the size of the tile itself. Tile sizes range from 100x100 mm to 600x600 mm and are sold per square meter. You need to buy it with a reserve, since when laying about 5% can go to waste. Also, the quantity of tiles purchased is influenced by the method of their installation. There are several such methods:
- Direct laying. This is the simplest and most common method.
- Diagonal laying. It looks more impressive, is suitable for square rooms, and will help hide slanting walls.
- Laying in a checkerboard pattern. The best way to lay tiles of two or more colors.
- Offset installation. In this case, the tiles of the next row are placed offset to the tiles of the previous row. This option is more suitable for rectangular rooms.
- Mosaic. This method is made from facing materials of different sizes and colors, thereby creating a specific pattern or design.
Once the choice and installation method have been made, you can begin preparing the walls.
Tips from the experts
Recommendations revealing the features of mosaic installation:
- constantly use a grater and a building level, since products can move;
- to fix translucent mosaics, use white glue; for bright ones, choose materials in accordance with the shade of the cladding;
- do not put excessive pressure on the products;
- When laying mosaic tiles, place the paper or film side on top, and the plastic mesh side on the bottom.
When you plan to use mosaic as the main finishing material, you need to understand how to lay it in order to reduce the time it takes to complete the work.
Before starting repairs
Before laying tiles in the bathroom with your own hands, you will need to check whether there is a slope on the walls. This is easily done using a level; the walls should be strictly at an angle of 90 degrees. If there is a deviation upward or downward, you will need to first level the surface with plaster. You can see how this is done in the video; without leveling it will not be possible to properly lay tiles in the bathroom - such repairs run the risk of not lasting long.
If the angle between the wall and the floor deviates from the norm of 90 degrees, unsightly gaps in the masonry between the tiles may appear, difficulties with installing a bathtub or shower tray (the appearance of large gaps that will have to be sealed with sealant), etc.
Laying around the tabletop
When gluing tiles around a countertop or a sink attached to a wall, the most important thing is to cut the ceramic correctly. Cracks, chips and other visible flaws are unacceptable here. If errors are made during cutting, the cut part should be replaced. And don't rush to glue it. It’s better to try everything on several times and first, without glue, lay out the cut tiles in the intended place.
Covering the countertop starts from the corner