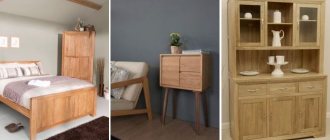
Wood is a favorite material among furniture makers.
After all, each piece of furniture made from natural solid wood is unique and inimitable in its own way. You don’t have to be a professional furniture maker to make a beautiful and practical chair for your home. The main thing is to choose the right materials and tools, show your imagination and stock up on free time and patience. By deciding to make chairs for your home from wood, you will fill the interior with a special atmosphere of warmth and comfort. This material combines harmoniously with glass, stone, textiles and even metal .
Current wood species
Wood is easy to machine. In particular, we are talking about sawing, drilling, planing, etc. But before you make a chair with a wooden back with your own hands, you need to decide on the type of wood from which each lumber will be made. For furniture it is recommended to use:
- Pine;
- Larch;
- Cedar;
- Oak;
- Hornbeam;
- Cedar;
- Maple;
- Ash;
- Nut;
- Pear;
- Apple tree.
Moreover, it is not necessary to choose expensive and durable oak, hornbeam, and walnut. They are luxurious for making something as humble as a chair. In addition, in addition to them, there are coniferous species that are resistant to moisture and convey a wonderful aroma. If only this breed did not have a tree with many knots. Birch and poplar should also be avoided - the first one turns black over time, and the second one quickly rots and turns into dust.
Types of chairs
There are many types of chairs. We will look at two of them: a kitchen chair for dining and a living room option. They both have a similar shape, but the dining chair has a narrower seat.
The following materials are used to produce chairs:
- Metal blanks;
- Wood;
- Polyamides;
- Composite materials.
There are special versions of chairs made of glass or rare stone. Such designs have, first of all, decorative value.
Of the above materials, the most practical is wood - it is easy to process, has high strength characteristics and looks aesthetically pleasing.
Emphasis on quality lumber
It is convenient to assemble chairs from ready-made parts. But if the latter are not available, then they have to be made from lumber in the form of bars and boards. The corresponding workpieces can be called high-quality if they lack:
- Knots;
- spots;
- Dents and holes;
- Roughness.
If unevenness can be smoothed out and dents can be repaired, then with knots things are more complicated. The fact is that they contribute to a break in the structure of the array. Therefore, when choosing furniture, the target audience should take a closer look at the legs and the supporting frame as a whole. The same applies to the choice of lumber for making thematic elements.
Manufacturing
As mentioned above, there is nothing particularly difficult about making your own inexpensive but attractive chipboard stool. The main thing is to first draw up detailed drawings and indicate on them all the dimensions of the future structure. Having such an “action plan” in hand will make your work much easier and more convenient, because at any moment you will be able to check whether you are doing everything correctly.
Preparation and cutting of material
The first stage of making a stool from chipboard yourself will be preparing and sawing the specified material that imitates wood. Different craftsmen use different tools for this, but an electric jigsaw is considered more convenient and practical - it’s easier to work with. It is advisable to use a tool with short teeth. The jigsaw should work at the highest speed - this is the only way all the cuts will be clean and even.
Having at hand a template (a detailed drawing with all the details) of the future stool, you can proceed to its creation. The paper or cardboard blank must be attached to the wood boards and outlined with a pencil. This way, it will be easier for you to cut out all the parts efficiently and accurately. All small irregularities remaining after cutting should be removed using sandpaper or sandpaper.
The cut bars must be carefully polished and tried on each other. Sanding is especially important if small households will use homemade furniture in the future. Having prepared all the necessary parts for the future structure, you can move on to the final stage before assembly - drilling all the necessary holes. Make sure that they are all at the same level.
Assembly
When all the parts are cut and prepared, you can begin to directly assemble the stool. Before you start assembling the furniture structure, you need to treat all cut edges with a special ribbon. It should be selected in accordance with the color of the material itself. Ribbons of contrasting colors are also appropriate.
The tape should be applied to the edges of the legs and seats, and then glued using a hot iron. The latter should be applied quickly, making short movements. The heated tape must be pressed down with a clean rag. The glue located on the back side of the applied coating sets almost immediately - it will not heat up or cool down for a long time.
All parts of the stool must be assembled using screws and confirmations. Some craftsmen first glue all the parts and then fasten them with self-tapping screws - it’s easier that way. The seat of the resulting stool can be made soft by installing foam rubber and upholstery.
Decoration
The stool will look more attractive if you equip it with padding and upholstery. The upholstery of such furniture can be oilcloth, woven or leatherette. Each master chooses the best option himself. Foam rubber is often used as filling.
Chair design: general idea
At first glance, a wooden chair seems like a simple piece of furniture. However, looking at the drawings of a wooden chair, a combination of different elements becomes clear:
- Seat – allows you to sit down;
- Backrest – allows you to lean back and fix your back in a comfortable position;
- Rear crossbar - strengthens the load-bearing parts of the backrest and prevents the back from falling back;
- Tsargi - strengthen the fastening of the supporting legs on the sides;
- Side crossbars – help secure the load-bearing legs from above;
- Legs – raise the product above the floor to a certain level.
For more comfortable sitting, the finished product can be upholstered and filled with filling. Moreover, the upholstery, depending on its composition, definitely contributes to the style of the chair. The upholstery is made of textile or leather. The filler is foam rubber, synthetic fluff, and fabric scraps.
The back may have one or more crossbars. In this case, the crossbars are arranged lengthwise or crosswise.
It is recommended to supplement the legs with soft liners at the bottom. The latter prevent the formation of dents on the flooring from the load of the legs and chair, respectively.
Note!
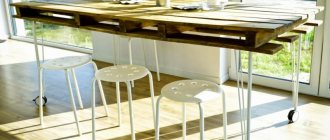
DIY furniture made from pallets (140 photos) - step-by-step master class with diagrams and drawings, design ideas
DIY coffee table - manufacturing guide with a full description of the steps, choice of materials (120 photo ideas)
Do-it-yourself laundry basket (130 photo ideas): step-by-step master class for making it yourself, choice of materials, design options
Decoration
If we talk about decorating stools, there are a lot of ideas that will allow you to turn them into something unique and interesting. Ideas for decorating such products can be divided into 3 large categories:
- woodworking;
- use of various types of pillows;
- the use of various types of capes.
If we talk about the first category, then a very popular type of decoration is the creation of antique stools. For this purpose, there is a special coating for wood, as well as its special processing. Carved models of this type, which are made by professionals, have a fairly high price. But it is not always possible to make such a stool yourself.
But the use of various kinds of pillows is one of the most commonly used methods of decorating such furniture. In addition to the fact that various original pillows make the stool truly unique and interesting, it is also soft and comfortable. After all, often the problem with any stool is that you can’t sit on it for a long time due to the hard surface. And so this problem is solved, and you can enjoy sitting on such a beautiful chair. Another decoration option is the use of various capes. Well, here everything is limited only by the imagination of the owner of such furniture and his financial capabilities. As you can see, today there are many options for decorating wooden stools made with your own hands.
Type of chair design
Chairs differ from chair to chair, even if thematic products are made from the same type of lumber. The variety of designs contributes to the corresponding assortment. The problem of how to make a chair out of wood with your own hands must be solved, guided by the characteristics of the future project, as well as the factors that allow the chair to be special:
- Strength - type of wood, number of crossbars, quality of fastening, thickness of lumber;
- Functionality – the form of the model and its ability to be transformed (specifically, folding products should be highlighted);
- Convenience – product dimensions, back height, upholstery;
- Style – breed, upholstery, painting, shape.
Low, high, soft, dark - a wooden chair can be made in different types. The main thing is that the corresponding event welcomes an independent approach (without the help of joiners and carpenters).
Chair requirements and options
Regardless of the material chosen for the construction of the structure, such furniture must have the following qualities:
- Sufficient stability so as not to be afraid of any terrain.
- High strength, otherwise the legs may give way “from fatigue” at the most crucial moment.
- Light weight and compact dimensions, because bulky chairs, even folding ones, are difficult to place in the trunk. If the activity involves long walks, the lightness of the design comes to the fore.
The most common folding seats are stools. They, without a back, are lightweight and easier to manufacture. However, sitting on such a structure is not very comfortable. Chairs with a back are already more like typical furniture that cannot be transformed. To ensure lighter weight, seats and backrests are often made of fabric. The hit material for homemade chairs, folding and regular, is wood, but these camping structures are often made of metal or plastic.
Optimal sizes
The normal height of a chair seat is 75-80 cm above floor level. The seat itself has an area of about 30x30 cm.
The height of the backrest is calculated depending on the height of the user. However, it should only support 1/2 or 2/3 of the back length.
If you need to make a children's chair with your own hands, then the height of the product is increased so that the child can freely hold his elbows above the table top. The exception is the youngest children. A transformable high chair with an integrated seat will suit them. The latter should be located above the floor at a height of 45-50 cm. Moreover, crossbars for the back and legs are required.
Antique effects
The number of layers of paint to be applied depends on the style that was decided to be used in the work. If you decide to prefer the standard look, which involves the classic rough effect, then one layer will be enough. Then it will be possible to ensure that the wood texture is visible through the paint. In order to obtain the aging effect with a smooth surface of the wooden elements of the chair, the first layer of paint must be treated with fine-grained sandpaper. Next, you need to rid the surface of dust using a brush, only after that you can begin applying the second layer of paint.
To give the chair a worn effect, you need to use sandpaper.
In order for the chair to acquire the effect of wear and tear, after applying the paint you need to use fine sandpaper. The paint should be somewhat worn in those places where it usually wears naturally during use: on the corners and edges of the object. Surface treatment in certain places must be carried out until the desired degree of aging is achieved, the intensity may not be too high, then it is worth reaching the primer layer and stopping, and for intensive aging you should get to the wood. At the next stage, you need to lightly sand the entire surface.
Required Tools
One copy of a real wooden chair, i.e. seats made from solid wood are relatively expensive - 6,000-20,000 rubles. The cost is affected by the brand and the complexity of manufacturing the structure.
Note!
- Do-it-yourself illuminated mirror - step-by-step master class on how to make it yourself, photos of types of lighting
DIY flower stand - TOP 100 photos of stand options, detailed instructions, diagrams and drawings from the masters
- Do-it-yourself furniture restoration: restoration methods, step-by-step master class, necessary tools and materials
It is easier for the target audience to make a wooden chair themselves than to pay an average salary for the entire furniture set. The question is whether the creator has the necessary tools:
- Measuring objects - ruler, square, meter, level;
- Fixation items – vices, clamps;
- Impact devices – hammer, mallet;
- Items for cutting – jigsaw, hand saw for wood;
- Smoothing accessories – electric planer, grinder, emery machine;
- Devices for drilling and fastening – drill, screwdriver;
- Painting accessories – brushes, roller, containers.
Additionally, you will need a workbench and consumables - sandpaper, screws, choppers, wood glue.
Assembly
Chair assembly procedure
A wooden chair is assembled without a seat twice: first dry and without wedges, and after adjusting the parts and checking the configuration by measuring the sides and pairs (oblique diagonals from the lower corner to the opposite upper one), finally with wedging and gluing. In both cases, the so-called. an apron made from the rear legs, back and longitudinal drawers, and the “apron” is already adjusted to it
Note: Note the way the tenons are inserted into the front legs here and below when we get to the seat posts. With equal spikes, like in a stool, the sides of the chair do not cut into the legs, and there will not be adequate strength.
About frame details
All parts of the chair are made from solid wood. The temptation to make the rear legs prefabricated to save material is great, but don’t: they will soon break. It’s better to take on the set right away, marking the contours on the surface of the board according to the template with a shift. If the chair is for dining, then in this case the longitudinal drawers should also be slanted/curved, and the question arises: how to make tenons with grooves? It is very difficult to mow at home, and it is not necessary. You will have to spend a little more material, but oblique/curved drawers with straight tenons can be obtained without much difficulty from a board as thick as the drawer height, see fig.:
How to make slanted/curved drawers with straight tenons
Only now you need to mill the tenons, using a mandrel with the required angle, and always in a bag: remove the fold from the long sides, transfer the bag and fold the short sides. The corners of the studs are rounded separately, this is no longer critical.
Back
The back of a chair, as you know, can be solid, hard, stacked, or soft. Solid rigid - just a curved bar. It is cut out, like curved drawers, as well as details of hard inlaid backs, pos. 1-3 in Fig.; We won’t talk about the backs of Viennese and other complex chairs for now. The back parts are assembled on spikes; We’ll leave chairs with backs with screws in museums of Soviet consumer goods.
For a simple soft back, pos. 4, you need a straight top bar and, possibly, an intermediate support (purlin, “backrest”). The base of the back is made of 4-6 mm plywood. They cover it in the same way as the seat, see below, but use foam rubber no thicker than 7 mm or use batting/felt. The soft padding is placed on glue, not reaching 15-20 mm to the edges. The decorative lining is sewn into a pocket, placed on a base with padding and stitched at the bottom. Place the backrest in the grooves selected in the top bar, rear drawer or purlin and rear legs; select the grooves by measuring the thickness of the back covered with fabric. The sequence of chair assembly changes:
- assemble the left (right) part of the apron with the back drawer, top bar and purlin for dry use;
- put the backrest, perhaps with adjustment;
- they complete the apron by installing the missing rear leg with its own longitudinal drawer;
- the front part is attached to the apron;
- after checking the configuration and final adjustment, they go through everything with glue (optionally with wedging) in the same sequence;
- The soft insert of the backrest is finally placed either dry, or with a minimum amount of glue added only to the grooves so that it does not squeeze out onto the fabric.
Seat
How the chair cushion is arranged is shown in Fig. with a drawing at the beginning. Unlike the seat of a stool, the upholstery in this case does not stretch as much when the sitter fidgets, so the inner upholstery of the base is not required. The base is made of plywood or a solid board with a thickness of 12-30 mm. But the seat of a chair is more difficult to clean than a stool, so the foam padding must be covered with felt or, worse, batting that absorbs sweat. Solid particles of dried sweat are subsequently squeezed out of the seat.
Correct upholstery of a chair seat
The upholstery of the chair seat also does not need to be fastened as carefully as that of a stool; you can get by with pinning it with a furniture stapler without gluing. Cover the pillow with decorative fabric in the usual way, trimming the scars that form at the corners. But the cladding made as shown in Fig. will last much longer. If the chair is covered with much more elastic and expensive leather than fabric, this is a must-have option.
Laths or jibs?
Chair brackets for seat installation
Drawings of chairs most often show the fastening of the seat to slats, embedded in the legs along with the longitudinal drawers and additionally attached to them with self-tapping screws. This highly technological and low-labor method is widely used in industry, but for yourself it would be much better to lay the seat on the jibs, see fig. on right. The chair will be much stronger, the seat will get dirty less and will be easier to remove for cleaning.
How to install the seat?
A seat simply laid on top of the support frame loses all the advantages compared to a stool, and the chair frame experiences increased loads. Therefore, it is better to place the seat of the chair in a tray formed by the drawers; To do this, if the seat is on jibs, they are placed lower by the thickness of the base of the seat without a cushion. So that the front drawer does not interfere with the legs, it is lowered to the same thickness, which will only make the entire frame stronger, and the seat itself is moved forward by the thickness of the drawer or a little more. Then the front jibs cut into the front frame flush with its top.
About curly legs
I really want to put a homemade chair on curly wooden legs. This is not at all as difficult as it might seem, you just have to spend money on thick beams: for the front legs, taking into account the margin for processing, a 150x150 beam will do, and for the rear legs - from 250x250.
How the figured legs on the bars are marked is clear from Fig. Basic conditions: you need 2 identical templates, with their heads and heels meeting on the inner (relative to the finished leg) edge of the beam. However, the convergence of the heels is not necessary, then they will turn out to be wide, like hooves, and the trace of their supporting surface will look like a horseshoe. The technology itself does not require art education: they simply remove the excess from the side of the inner edge and alternately from the outer edges.
Relevance of painting
Many people are in a hurry to paint a wooden chair, but this is not necessary. The fact is that the chemical composition only spoils the naturalness of the forest. The latter ceases to emit a pleasant aroma.
Another thing is a worn-out model. It can definitely be painted with quick-drying and hygienic water-based silicone paint marked “For wood”.
Preparatory work before starting the aging process
The appearance of furniture that still has a margin of safety, but cannot be used for its intended purpose due to the loss of its former luster, can be improved. If you have to work with chairs whose surface is coated with polish, you need to get rid of it by using a special compound purchased for this purpose at a hardware store. The surface can be covered with paint, which also needs to be removed using sandpaper; it needs to be worked until the base becomes smooth. The furniture may not be painted, then it is necessary to remove dirt from the surface using fine-grained sandpaper.
Before aging a chair, it is necessary to thoroughly clean its surface with sandpaper or a sanding machine.
It is important that the base is free of grease deposits. During the work process, it is recommended to use a respirator that will protect the respiratory tract, and the room in which the master works should be well ventilated. You should not begin further work after removing the top layer from the furniture until the room has been vacuumed and the surface of the product has been wiped with a damp cloth.
Due to the fact that you will be working with objects that have served for decades, their surface must be degreased by treating with a soap solution, after which the chairs must be left to dry. Puttying is not required, since a perfectly smooth surface is not needed, because the purpose of the work is aging, which involves slight wear; for this reason, defects in the base of the wood should be emphasized and not masked with the mixture.
Photo of a homemade wooden chair
Preparatory work
Before you paint old furniture with your own hands, you need to do the following preparatory work:
- We clean all the parts. If remnants of the previous coating are found on the tree, they must be removed. We dismantle small parts;
- Grinding. The paint will not lie flat on the surface unless it is first sanded, removing any bumps or swellings that have appeared over time. You can watch how to remove the remnants of past decor in the available videos on the Internet;
- We remove dirt and dust accumulations;
- Apply an antiseptic primer. It is necessary so that during operation the tree does not begin to rot;
- If the furniture is in good condition and no chipped parts are found, then putty is not needed. Otherwise, you need to fill the chips with a special mixture for wood;
- Dry the cleaned and primed parts for several hours.
| Consumables, equipment |
| Electric |
| Measuring |
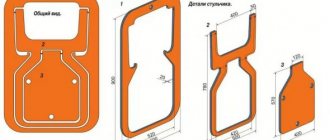
Cut out the blanks for the back parts
1. Saw out the bottom crossbar from the back (Fig. 4), but do not make bevels on its upper edge yet. Mark the positions of the four sockets.
2. Cut out the top crossbar D of the backrest (Fig. 5) with an allowance of 10 mm in length. Make two copies of the top rail template. Glue one copy to the bottom edge, but don't cut out the curved shape yet.
3. For the middle board E and the side bars F of the backrest, make a blank measuring 13 x 178 x 533 mm (Fig. 6). You will saw off the side pieces later after cutting the tenons.
What is a kneeling chair and how is it different from a regular chair?
Any orthopedic chair is designed to provide not only comfortable sitting, but also benefits for human health. For many decades, scientists have been trying to find a design that would fully meet these requirements.
At the end of the last century, Dr. Mendel found that the most useful chair is one whose seat is located at an angle of 15° relative to the horizon. However, such a slope caused the body to slide under the force of gravity. In order to eliminate this shortcoming, many studies were carried out, as a result of which a chair appeared with a footrest in a half-bent position, on which one stood with one's knees.
A feature of the kneeling chair is the redirection of the load from the lower part of the spine to the muscles of the legs, while maintaining a vertical position of the back, the shoulders remain straightened.
Since its inception, when the chair had only a seat and a knee rest, its design has acquired many innovations. Models with wheels and a back, with static support and in the form of a transformer, with an arched support that allows the sitter to swing, corset chairs appeared.
The most suitable model is selected taking into account the person’s weight, height, medical recommendations and individual preferences.
Now about the improvements
1. After upholstering the knee pads, the thought immediately came to me that making three rectangular pads would be much easier
2. I cut the planks into the support bars 20 mm, plus glue and confirmations. On the first pine chair we had to put corners, because my daughter somehow managed to loosen the glue.
3. I strengthened the part of the support bar that comes from the seat. That is, I have not 2 strips there, but 5. And they are also embedded into the beam by 20 mm.
4. I made the seat and knee pads composite. There is a supporting part, and there is the seat itself and knee pads already with foam rubber and covered. To connect the seat and knee pads, I inserted M8 bolts (M6 is also possible), the heads of which were filled with epoxy (you can use liquid nails or other reliable glue with filler).
5. Seat angle adjustment system. Already tried it and am satisfied. The chair became a little higher than before, and I had to change the height for my daughter using a bar. It was so easy to set a comfortable angle, which could not be done in the basic model. You can supplement the system with a series of holes along a different radius and thereby obtain an almost perfectly smooth adjustment of the seat tilt.
Well, I’ll just share where I found the beech. It’s easier for those who have such boards, but I couldn’t find them in my region. And I found beech steps in a large store and right there in the store they gave me one meter (1000*400*40, it seems) step on 40*22 slats and several 40*45 bars and I happily went home to make chair No. 2. And now I want to make chair No. 3, making the parts not prefabricated, but solid.
My daughter went to first grade and I see that the child’s seat in such a chair is really different than in a traditional one. The child has a straight back without any effort. For an adult, IMHO, you need to make a chair out of iron. I (100 kg) carefully sat down on the first pine chair, but there are still doubts that it would have supported me for a long time.
Drawing
The dimensions of the bars that will be needed when making a kneeling chair are indicated in the drawing (click on the picture to enlarge).
3D model of the future kneeling chair looks like this