Drywall is a universal building material with which you can quickly level the walls in the bathroom, erect partitions for zoning, and make the frame of an acrylic bathtub. The final finishing can be done with tiles. Even in conditions of high humidity, this material will retain its original appearance for more than 20 years. Before gluing tiles to drywall in the bathroom, you need to prepare the drywall base and make markings. Strict adherence to installation rules will allow you to quickly and reliably glue the tiles.
What to consider when choosing tiles
Bathroom renovations are rarely done, so you shouldn’t skimp on facing materials. When choosing ceramic tiles, pay attention to the following characteristics:
- Smooth tile surface, right angles. If it is difficult to visually assess the degree of unevenness of the products, then you need to take two tiles and align them with the front side inward. If the surface of the product is smooth, the fit will be tight;
- quality and clarity of the pattern - blurriness and unclear outline of the patterns indicate a violation of the production technology;
- hardness of the samples - if during the firing process the residence time of the tiles in the oven was exceeded, the product becomes brittle. When you tap on such elements, a ringing sound is produced. High-quality tiles are characterized by a dull sound;
- Ceramic tiles on the reverse side must have the manufacturer's markings. A shiny back surface indicates overheating of the tile.
Once the facing material has been selected, it is necessary to accurately calculate its quantity. It is better to do this in tile units rather than meters.
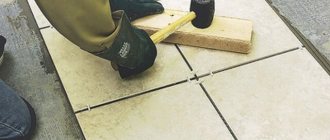
Tile installation
In order to correctly lay tiles on the tiles, it is advisable to apply the solution not to the tiles, but to the surface itself. That is, use a narrow spatula to scoop the solution onto a notched one, or immediately with a notched one, and distribute the glue evenly over the wall. However, cover an area of no more than one square meter.
Now take the tile in your hands and place it at the corner from which you will start laying. And be sure to press firmly to ensure a good grip. Pinned? Great! Then pick up a level and check how evenly the tiles are laid. If the edge is sticking out, immediately tap the top with a rubber mallet to force the tile into place.
But if the tile is recessed, there is nothing you can do about it - pry it up and remove it from the wall, you will need to reposition it.
And just like that, tile by tile, you lay the entire wall.
Important! After each tile, check how the tiles are now laid relative to the previously laid ones.
This is how you will be able to correctly lay the tiles on the gvl.
Requirements for plasterboard base
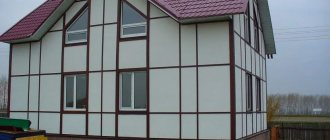
The bathroom is a room with high levels of humidity, even with good ventilation. All finishing materials used in the bathroom must be resistant to moisture. To make a plasterboard base on which the tiles are planned to be laid, a moisture-resistant type of material with a green surface color is used - gypsum board. If ordinary gypsum boards are used, then under the influence of moisture, the surface of the sheet is deformed and the tile may come off.
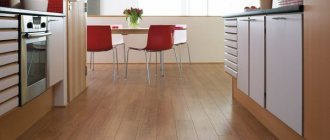
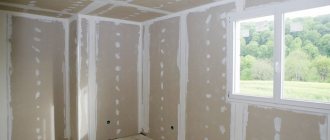
Drywall - material for quick “dry” leveling
For a bathroom or kitchen, moisture-resistant plasterboard under tiles is best suited
Additional recommendations from professionals
Many years of professional experience shared by specialists indicate that some manipulations should be done in a certain way, and not in any other way. After all, the secret to successfully creating a high-quality floor lies precisely in such nuances.
- Tying GVL sheets together will provide them with greater resistance to stress. Fixing with self-tapping screws will allow you to hold on better;
- Before laying the tiles, the gypsum fiber flooring is kept indoors for about 3 days, and only then covered with a primer;
- When buying tile adhesive in a store, be sure to find out its capabilities regarding gypsum fiber;
- Laying tiles begins only on a completely dry primer. This is done using a hammer, beacons and a spatula. In this case, all the rules described above are taken into account.
These are all the nuances that you will encounter in your work.
Required tools and materials
In order to glue tiles you will need the following set of tools and materials:
- building level - it is convenient to use a rack level;
- spatula with a coarse-toothed and straight edge. They apply and level plaster and glue;
- rubber spatula for grouting;
- tile cutter;
- construction mixer or drill with an attachment for mixing adhesive;
- corners, crosses to obtain equal spaces between tiles;
- rubber hammer for laying large tiles;
- metal profile or wooden plank;
- jointing;
- paint roller, brush.
Tools
How to choose glue
The adhesive ability of the selected composition will determine how firmly the tiles will be attached to the drywall in the bathroom. Before laying tiles on drywall in the bathroom, you need to select a composition with a high-quality adhesive base.
For gluing tiles to drywall, 3 types of glue are produced:
- universal adhesive “liquid nails for ceramic tiles”. To perform work in the bathroom, use moisture-resistant brands of glue. The cost of the material is high, so it is recommended to use “liquid nails” for gluing single tile elements;
- elastic adhesive - sold dry or fully prepared. The prepared elastic glue is packaged in buckets and costs more than dry glue. When choosing a dry composition, it must be diluted with water immediately before installation begins;
- cement-based composition - usually cement-based materials are not applied to the surface of gypsum products, but in this case the cement will come into contact with the paper.
Find out which adhesive to use for bathroom tiles in our article.
Liquid Nails
Cement-based composition
Elastic glue
The dry adhesive mixture is diluted with water in accordance with the manufacturer's instructions on the packaging. The glue should be mixed in stages, in the amount necessary to treat a wall surface with an area of no more than 1 m2.
Features of the gypsum fiber base
Gypsum fiber sheets are the same drywall, only in a more improved form. These coatings have a number of identical properties. However, there is a difference and it concerns the structure: GVL does not have a double-sided frame with cardboard. There are reasons for this. In this case, strength is imparted to gypsum through reinforcement with cellulose components, as well as through special additives with moisture resistance and fire resistance properties (these characteristics of gypsum fiber board are higher than those of gypsum board).
The strength of gypsum fiber board is an order of magnitude higher than that of gypsum plasterboard, and therefore gypsum fiber sheets are recommended for use when constructing a leveled dry screed base. When a dry screed needs to be done in a bathroom or toilet, then a special moisture-resistant GVLV is used.
To lay a high-quality floor with your own hands, it is important to follow the technology and have an idea of how to lay wall or floor tiles. Creating a new floor involves the following sequence of actions:
- dismantling the old coating, repairing the base;
- arrangement of dry screed made of gypsum fiber board;
- laying tiles;
- grouting joints.
It is possible to lay a sheet of gypsum fiber board on top of a wet screed. However, such work is difficult and is almost never used in modern home finishing practice.
Puttying plasterboard base
The plasterboard base for the tiles must first be prepared. First you need to clean the surface of the gypsum board from dust and other contaminants that arise during the installation process. Plaster for drywall can be prepared from a dry mixture or use a ready-made liquid composition.
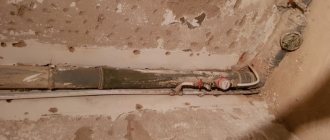
Installation of drywall to walls
The plaster is applied with a spatula with a smooth edge to the seams between the gypsum board sheets. Distribute the plaster carefully so that all cavities are tightly filled. It is necessary to avoid the formation of tubercles of the mixture on the seams when applying plaster. They definitely need to be aligned. The joints between sheets of material can be sealed with reinforced tape.
Preparing the plasterboard base for putty
It is recommended to choose high quality plaster for joints, for example, Knauf Fugenfuller. If it is necessary to eliminate surface damage to plasterboard sheets, then use plaster for surface finishing.
Plasterboard putty
After the first layer has dried, apply a second layer of plaster. The dried surface of the seams is treated with fine-grained sandpaper.
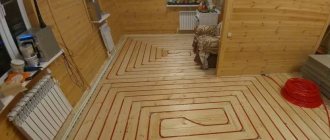
Technology for arranging a tiled floor on a dry GVL screed
The first step is to study the condition of the original floor. The old covering is dismantled. And the base is checked for defects. If the base is wooden, the boards are evaluated. They are either completely replaced or strengthened by additional fixation to the joists. Large gaps are sealed with polyurethane foam.
Next, the GVL slabs are laid.
Features of laying GVL:
- Laying sheets along the room with dressing will significantly reduce material consumption;
- The fastening elements for sheets to a wooden base are self-tapping screws, which are screwed in increments of 20 cm;
- Priming gypsum fiber board sheets after installation is a mandatory procedure. The primer will help retain the putty and provide better adhesion to the tile adhesive;
- The displacement (otherwise known as the spread) at the seams of the gypsum fiber sheets is clearly monitored when subsequent rows are formed. It should be within 20 cm when combining two rows;
- The use of specialized GVL sheets (the so-called floor covering elements), glued together during the production process, is very convenient when forming a two-layer floor. The thickness of such plates is 20 mm, and a special rebate at the ends allows you to significantly speed up and facilitate the installation process. Before laying tiles on sheets of this type, they are cut to the required size, the folds are glued and only then the sheets are laid on the floor surface.
Surface primer
The leveled plasterboard base must be primed. A special primer for drywall will prevent moisture exchange between the tile layer and the base. The composition is applied with a paint roller or brush. Professional builders use a notched trowel when priming.
Primer
To increase the strength of the surface, the composition can be applied in two layers, with an interval of 45 minutes. The primer for drywall should penetrate deeply into the base material and help strengthen the surface. Of the various brands, the most suitable mixture for GKLV is Mira 4120, Tifengrund Knauf primer or mixtures with a similar composition.
Material consumption and prices
In order not to encounter a shortage of materials during the work, you need to accurately calculate their quantity, taking into account the recommended consumption rate. A review of prices and consumption rates is based on a study of offers from online construction stores.
| Name of material | Material consumption | Price for 1 kg (m2) of material, rubles |
| per 1 m2 | ||
| Primer Knauf Tiefengrund | 0.07-0.1 kg | 64,5 |
| Moisture-resistant plasterboard Knauf | 1 m2 | 151 |
| Moisture-resistant plasterboard Gyproc Ergo | 1 m2 | 132 |
| Glue BOLARS KaminFix | 0,8-1 | 29 |
| Tile adhesive Knauf-Fliesen | 0,8-1 | 10 |
| Gypsum adhesive for filling joints and facing works SEMIN | 2-5 kg | 75,6 |
| Facing tiles | 1 m2 | 320-1890 |
| Gypsum putty KnaufFugenfuller | 0,3-0,5 | 22 |
| For 1 linear meter | ||
| Silicone grout CS 25 Ceresit | 20 | 821 |
| Adhesive-sealant Bison POLY MAX 300 g, colorless | 21 | 1837 |
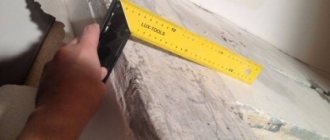
Choosing a tile fixation option
To make bathroom walls with tiles on plasterboard look aesthetically pleasing, you need to choose the right tile mounting scheme. To do this, calculate the number of samples for one row. The length of the wall must be divided by the width of one tile. The size of the gaps between the tiles also needs to be taken into account. As a result, we get an integer number of elements and a remainder. Depending on the width of the remainder, choose a laying scheme:
- if the width of the remainder is more than 0.5 of the width of the element, installation begins from the visible section of the wall. Then the cropped element will be located in a less noticeable corner;
- if the width of the remainder is less than 0.5 times the width of the tile, then begin gluing from the center of the wall. In this case, identical trimmed elements will be located along the edges of the row.
Laying away from the visible section of the wall
Laying tiles from the center of the wall
Laying from the edge of the wall
To lay the first row of tiles on the gypsum board, you need to fix the guide strip. You can use a metal profile or a wooden strip as a guide. If you start laying tiles from the second row, the work will be easier, especially if the floor surface is uneven. Using a building level, mark a horizontal line where the guide strip will be attached to the wall. Then the bar is fixed.
https://youtu.be/jYrmerUyYSo
Preparing the doorway
If, when laying new tiles on the floor, the floor level rises, you need to trim the toilet door frames. This is done so that the tiles go under the box when laying. This is aesthetically more beautiful and also avoids unnecessary trimming of tiles.
To trim the door frame, you need a hacksaw with a fine tooth. Place a sheet of gypsum fiber board next to the box, with the tile facing down on it. Give a small plus to the thickness of the tile adhesive and file the door frame according to the resulting level. Knock out the sawn-off parts or remove them from under the box.
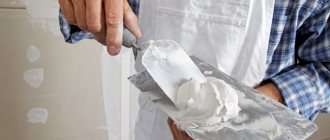
Preparation of the adhesive composition
If adhesive in the form of a dry powder is chosen to fix the tiles, then it should be properly prepared before starting work. To mix the glue, use a wide-necked container, bucket or basin.
The required amount of water is poured into the container, but not more than 1/3 of the total volume. Then pour in the dry mixture and mix with a drill or mixer. The mixer should operate at low speeds so that the glue does not begin to set quickly. You need to mix a small amount of glue at a time, enough to lay no more than 1 m2 of tiles, especially for novice craftsmen.
The consistency of the finished adhesive solution should resemble thick sour cream. We recommend that you first find out the consumption of tile adhesive so that there is no overspending.
Fixing tiles
The tiles are laid in accordance with the calculations made: from the central part or from the edge of the wall in the following order:
- Using a straight-edged spatula, apply glue to the plasterboard base. Use a coarse-toothed spatula to distribute it evenly. Fixing the tiles is possible as long as the adhesive composition sticks to your hands; if the adhesive remains only on the wall, you need to apply a new layer;
Apply glue to the wall
- The first element is placed above the guide profile. The tile is applied to the surface treated with glue and pressed lightly. To increase the strength of the attachment, you can tap with a rubber hammer;
- Adjacent tiles are laid horizontally and vertically in the same way. The distance between the samples is filled with glue;
- To get equal spaces between the tiles, plastic crosses are used. They are inserted into the tile joints and removed after the glue has dried;
- After all the rows above the guide strip are completed, it is removed and the bottom row of tiles is laid.
The process of laying tiles on drywall
You can lay no more than 5 rows of tiles in one approach. Then you need to pause for 45-60 minutes. During the pause, the tension in the plasterboard sheets will be relieved. After the cladding has completely dried, they begin to process the seams.
Cladding repair
If a tile laid on drywall cracks during use, it can be easily replaced. To do this, cut out the area with the damaged tile so that you get a small hole. After this, take a new profile, fix it on the wall with hangers, cut out a suitable piece of drywall, close the hole and stick a new tile in this place.
How to repair a plasterboard wall
Finishing between tile joints
After laying the tiles is completed, you need to wait a little time for the glue to set. Then, using a jointing tool, the gaps between the tiles are processed. As a result, the seams should resemble grooves that will be filled with a special grout for bathroom tiles.
The pre-prepared grout mixture is applied using a rubber spatula. Movements with a spatula should be performed from top to bottom, holding the tool at an angle of 45°C. Grout colors for tiles are produced in various shades; you can choose a tone close to the main color of the tile or a contrasting one.
Grouting joints
After the grout layer has dried, it is covered with protective varnish, liquid glass or silicone sealant. This will protect the material from moisture and the occurrence of fungus and mold.
Tile is laid on a plasterboard base in almost the same way as on a plastered wall. Installation on a flat gypsum board surface is even faster. Compliance with installation technology and recommendations for the selection of materials will allow you to perform high-quality ceramic tile cladding and understand how to glue tiles to plasterboard in the bathroom.
GKLV or GVLV – which is preferable in the bathroom
It makes almost no difference whether it’s gypsum board or gypsum fiber, the main thing is that it’s moisture resistant. What is more convenient for workers to work with? Let them choose. The main thing to remember is that moisture resistance is not water resistance)) Actually, it seemed that way to me. I touched 2 sheets, gypsum plasterboard - somehow flimsy, “plays”, gypsum board with the same thickness seemed much more durable and reliable. I read it on the internet and didn’t find any advantages of gypsum board either. But with all this, for some reason, gypsum plasterboard almost always appears in discussions of boxes in bathrooms. So I’m thinking – what don’t I understand? Maybe tile adhesive sticks to GVL worse (prime, of course, anyway), or maybe it is less moisture-resistant (I am, of course, only considering moisture-resistant sheets - GKLV and GVLV)? Foam blocks, I think, will eat up too much space due to their thickness.
Plus, they make it more difficult to make a door to access the filter and meter. So far I have understood this - gypsum board is easier to work with, a little cheaper and allows you to create convex-concave surfaces. Most people choose gypsum boards for these reasons. But personally, I don’t need the third one. I wouldn’t mind saving, but on the few squares I need, the savings (GKLV vs GVLV) will be 100-200 rubles - it’s not serious to worry about. What remains is simplicity of operation. If the difference is not cosmic, I think I can cope with a more complex GVL. But on the other hand, my back wall in the toilet and the frame in the bathroom will not sag when pressed with a finger. hoochie In addition, the gypsum plasterboard needs to be drilled, the self-tapping screw just won’t fit. In short, make a moisture-resistant gypsum board. The technology has been tested thousands of times (by me personally, dozens)