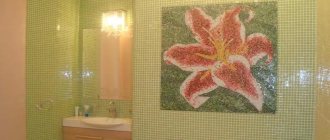
Before laying tiles in the bathroom, the wall surface must be carefully prepared. The strength and aesthetics of the coating will depend on proper preparation. But the preparatory stage is not exactly that easy; it is a whole job that requires a lot of effort and financial costs. To begin with, you need to calculate the area of future tile installation, what kind of tile it will be, what kind of tile will be used, and a huge number of other nuances. In order for everything to turn out beautifully and smoothly, you need to know certain rules on how to prepare the walls in the bathroom before laying tiles, which will be discussed below.
Primary requirements
There are basic requirements for the preparation of walls that must be taken into account.
- Good adhesion. If the adhesion is weak, then there is a high probability that the tile will not last long on the wall and will quickly fall off.
- Strength. A loose surface also causes tiles to fall off; the ideal surface is strong, without voids.
- Smooth corners. Clogged corners will directly affect the aesthetics of the tiles and the bathroom as a whole.
- Preparing cladding for communications. Modern design involves hidden communications (pipes, wires), which can be hidden under plaster or drywall.
- Waterproofing. The bathroom is a place with high humidity, which promotes the development of mold and mildew.
How long does it take to dry?
The drying speed depends on the composition of the primer, surface material, temperature and humidity in the room. The approximate drying speed is:
- Acrylic - 8-9 hours.
- Alkyd - at least 11 -13 hours.
- Concrete contact – over a day.
The drying speed of the primer mixture largely depends on the ability of the walls to absorb moisture. At the same time, it is impossible to determine externally whether the surface is ready for further work, so it is best to follow the instructions on the packaging.
Preparing the walls
First of all, it is necessary to assess the condition of the walls before preparation.
The preparation process includes the following steps:
- Condition assessment.
- Dismantling the old covering.
- Alignment of walls.
- Finishing.
- Ground covering.
- Waterproofing.
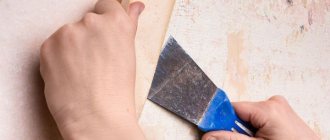
When dismantling the covering, the old tiles are removed. If there is plaster on the brickwork, it needs to be checked for strength and weak points knocked down.
The plaster is applied with a new layer, it is important to pay attention to leveling the wall; for this, a building level is used.
Conclusion
Choosing a primer is not as difficult as it seems at first glance; you need to decide on the type of base, after which you will know exactly what you need to purchase. The video in this article will help you understand the issue even better, and if you don’t understand anything, feel free to write in the comments under the review.
Did you like the article? Subscribe to our Yandex.Zen channel
August 26, 2016
Bathroom, Construction Chemicals, Construction and Repair
If you want to express gratitude, add a clarification or objection, or ask the author something, add a comment or say thank you!
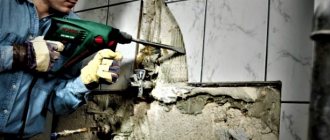
Dismantling
This kind of work is very easy to do on your own, even without special skills. To remove old tiles, use a hammer drill to remove the old layer of mortar.
- When working with a hammer drill, it is important to use safety glasses, as flying pieces of old materials can cause injury.
- It is also important not to forget about the presence of electrical wiring that cannot be touched with a tool.
- If necessary, the old wiring is replaced with new one.
After completing the dismantling process, there should be no unevenness or bulging areas on the surface. If the walls are covered with old paint, a grinder with a special attachment is used to remove it, which cuts off the paint from the old layer of plaster.
Severe deformation
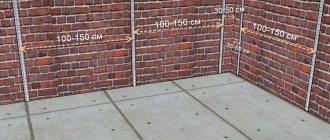
The frame method of installing plasterboard is used to level bathroom walls that have large surface deformations. Before installing the sheathing, the wall is covered with a waterproofing membrane. The profiles are installed in increments of 60 cm, since the standard sheet width is 1.2 m. The slats are secured with U-shaped hangers or corners. They are placed in increments of 50-60 cm. The drywall is fixed to the frame with self-tapping screws. The fasteners are screwed in increments no wider than 30 cm.
The base for laying tiles can be made smoother with plaster, but the wall will need to be reinforced in order to better secure the applied layers of mortar. After repair and priming of the base, it is covered with a reinforcing grid. It is fixed to the surface with dowel nails. Then the wall is sprayed with liquid cement-sand mortar. Several layers of plaster may be required to pre-level the surface. They are applied only after the previous ones have completely dried. The final alignment of the partition can be done after installing the beacons.
Alignment
After the dismantling process, you need to remove all construction debris from the bathroom and collect dust using a construction vacuum cleaner. Using a plumb line, the evenness of the walls is checked; if there are drops and depressions, they must be leveled with plaster.
- Plastering surfaces is a meticulous process that requires a professional approach. The smoother the wall, the less tile adhesive consumption and the better the result.
- The walls need to be plastered with a solution of cement and sand; in the first days after application, it must be constantly moistened, otherwise cracks may appear on the surface.
Plaster is not needed if there are no serious irregularities on the walls.
Installation of beacons
Beacons are guides along which the wedge or rule will follow. How to do them?
- Screw self-tapping screws into the wall at several points.
- Install the wedge and check the level.
- Apply a small layer of plaster along the screed line.
- When it hardens, you will get two parallel slats that will serve as guides in your work.
- Upon completion of the work, you can unscrew them and plaster the holes (but this is not necessary).
Beacons will allow you to get a perfectly flat surface without drops.
An alternative way is to screw in the screws at the same level (measure the insertion depth with a ruler), and then stretch brightly colored threads between them. The threads should intersect exactly in the center. This way, all the differences and gaps in the wall will be visible.
In order to obtain such an intersection, you need to screw in screws in different corners of the wall and pull the thread crosswise (with an envelope), then adjust the height of the screws until the threads touch.
Plaster
Before applying the plaster, it is necessary to treat the surface with a primer solution, which forms a protective film on the surface.
- The plaster mixture must be selected taking into account the high humidity in the room.
- If the difference in unevenness does not exceed one centimeter, the walls do not need to be leveled.
- Before laying tiles, the walls must be treated with an antiseptic solution.
- Beacons can be installed on special mounts, which are very convenient to use.
- When the wall is plastered, you need to clean it of dust to increase adhesion.
How to plaster correctly
Applying plaster to a relatively flat surface without the use of beacons is carried out using the following technology:
- Use a small spatula to scoop up a small amount of solution.
- Transfer to a large spatula.
- Applied at an angle to the wall.
- A second strip of material is applied.
During work, you must immediately remove excess material. Therefore, after applying several strips of putty, it is necessary to level them using a rule.
Experienced specialists do it differently - instead of spreading it, they throw the solution onto the wall. This turns out much faster, but this method is beyond the power of beginners, so it is better to follow the instructions described above.
If beacons are installed, then you need to fill the space between them with the prepared mixture. It is necessary to ensure that the tops of the beacons remain on the surface. After this, within an hour, until the solution has had time to dry completely, the beacons are removed, and the resulting grooves are filled with the remaining solution.
If it is necessary to apply several layers of putty to the surface, then each applied layer, until it dries, is treated with a notched trowel. The resulting irregularities provide better adhesion of one layer to another.
After the putty has completely dried, the surface is sanded. To do this, take a grater into which sandpaper is inserted. After this, the entire surface of the walls is processed with a grater in a circular motion. When using sandpaper, do not select a smooth material. Paper with an abrasiveness of about 60 grit is suitable. The adhesive composition will adhere better to such a rough wall. In addition, walls under tiles do not require perfect smoothness.
If you need to lay stone instead of tiles, read how to do this in the article Laying decorative stone on a wall.
High quality primer
When the walls are leveled and plastered, they need to be primed. This is a very important stage of preparation, which cannot be excluded from the list of works.
- The soil mixture significantly increases adhesion, so that the tiles will adhere firmly to the wall;
- The soil mixture fills all the pores of the surface, making it homogeneous;
- The soil mixture reduces the consumption of tile adhesive;
Special solutions are used as a primer; an aqueous solution of glue and latex can also be used. A good and high-quality primer is the most important step in preparing the wall for cladding.
Advice from professionals
- Think about where the tiles will go end-to-end and where they will overlap (meaning corner joints).
- Use a level to check the surface quality of the corners. The more isometric the walls are, the longer the tiles will last. This is due to the rules of strength of strength, theoretical mechanics and string theory. All angles must be equal to 0, 90, 180. You need to round exactly to these values.
- Do not rush to lay the tiles; if the primer layer has not dried, it will not fulfill its functions, but will only prevent the adhesive-cement from setting.
- When mixing adhesive cement, you can add primer to it to make it more sticky and viscous. If you overdo it, it will take a long time to dry and the tiles may “float”.
The main advice that only a true professional will understand is to be able to improvise. If you think that this or that operation is inappropriate, cross it off the list; if you think that, on the contrary, you need to perform the same procedure twice, feel free to do it.
Moreover, the instructions suggest a wide choice. After each step, the master chooses an intermediate action (wait until the layer dries, apply another one, check) and only the correct combination of steps and choices determines whether the reconstruction of the surface will be successful or unsuccessful.
ATTENTION! This is what distinguishes a master from a beginner. A professional always knows how to approach the process creatively and apply all the knowledge in the process. Beginner – knows the instructions, but does not apply creativity or deviate from it.
The initial conditions are different everywhere - walls are made of different materials, different degrees of processing, different surface quality, tiles can also have different weights, structures, and relief patterns. However, everyone needs the same result - a smooth and structured surface that will last a long time and will be pleasing to the eye.
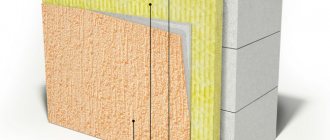
Waterproofing methods
Dampness and humidity in the bathroom provoke premature aging of communications, as well as any surfaces, from brick to plaster. To avoid fungi and the appearance of a musty smell, it is necessary to make high-quality waterproofing.
- Rolled, coating, painting and penetrating materials can be used as waterproofing.
- Each of them has its own advantages, forming a protective film on the wall surface.
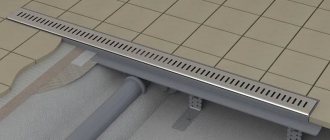
- To waterproof the floor, it is best to use rolls, which provide reliable protection for many years.
For walls, it is most convenient to use coating and penetrating substances; liquid waterproofing also lasts for a very long time, more than twenty years. This substance is convenient for treating areas near plumbing and communications.
Materials used
The labor-intensive alignment process, consisting of several stages, will take a lot of time, so experts recommend using gypsum plasterboard for repairing partitions. The use of plasterboard sheets is justified when differences exceed 6 cm. Taking into account the humidity of the room, you should purchase moisture-resistant plasterboards.
Drywall can be glued to the base or mounted on the sheathing. It is better to make it from a metal profile. You can also build a frame from wooden blocks, but they will need to be protected from moisture by impregnating them with an antiseptic and painting them in 2 layers. To build the sheathing, you need to purchase plastic dowels, self-tapping screws, U-shaped hangers and connectors.
Leveling the walls in the bathroom by plastering is carried out with a cement-sand mortar or a gypsum-based mixture. The use of cement mortar is more justified based on the increased level of humidity in the room. You can plaster an uneven base with a composition like Ceresit glue, but using such building material will cost more.
The rules for preparing walls provide for plastering them according to beacons. Without them, it will be impossible to create a smooth surface. It is more advisable to use metal and plastic beacons as guides. To secure them to the partition, plaster stamps or clamps are used, which are installed on the partitions using dowels and self-tapping screws.
To prepare the wall for laying tiles, you need to ensure reliable waterproofing of the base. Before installing drywall, it is recommended to cover the surface with a special film that has water-repellent properties. When plastering, a primer composition can be used as a waterproofing agent.
Required Tools
For dismantling, plastering and other preparatory work, you need to prepare tools that may be useful at a certain stage of the work.
- Hammer.
- Bulgarian.
- Building level.
- Tape measure and pencil.
- Spatula and trowel.
- Sandpaper.
- Container for mixing the solution.
- Chisel.
- Lighthouses.
- Protective clothing.
There are many types of spatulas and trowels that are used for plastering walls. It is important to remember that laying tiles is a fairly simple process, but preparing walls can be a lengthy and more labor-intensive process.
The durability and appearance of the cladding, which can last for decades, directly depends on proper preparation. Each stage of preparation is incredibly important, but it guarantees a positive result and is the key to successful and high-quality repairs.
How to plaster
The choice of plaster for interior decoration depends on the expected layer thickness.
The composition is selected based on the type of room in which the finishing is carried out. When working in rooms with high humidity, cement mortars are used, which prevent moisture from penetrating into the base material. Gypsum mixtures began to be used relatively recently, when additives were added to the composition to enhance the water-repellent properties.
- Weber cement-based plaster Vetonit" is distinguished by its high strength, ease of use and versatility. This plaster is good because it can be used for finishing both dry and wet rooms.
- Cement plaster Ceresit CT 24 Light is positioned as a “light” mixture suitable for working with cellular concrete and sand-lime brick. An important advantage of this composition is its economical consumption. Can be used for work in any type of room, as well as for external work.
- Volma Aquaslayer MN plaster is a moisture-resistant solution that contains various deliveries that provide additional moisture resistance. It is used for finishing bathrooms, saunas, swimming pools, etc.