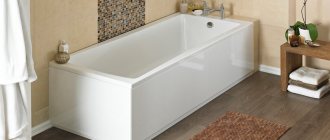
Acrylic bathtubs have rather thin walls and require reliable support. Installing an acrylic bathtub is possible in several ways: using the factory frame that comes with the kit, or using bricks. There is also a combined option - when they use a frame, supporting the bottom in some places with bricks. This method is needed if the bottom is too thin and “plays” under your feet.
The frame or legs for an acrylic bathtub are sometimes included in the kit, sometimes as an extended package. The difference between the legs and the frame is significant, and not only in price. Legs mounted on slats are attached only to the reinforced bottom, usually with two to four self-tapping screws. The sides remain without support (below photo on the left). The frame is most often more massive, made of thicker profiled pipe (square cross-section), and has more support points. Some of the supports come from the sides of the bathtub, the other part is attached to the bottom, supporting it (photo on the right).
Options for acrylic bathtubs - legs and frame
Regardless of the type of frame, it must be attached to the bottom. To do this, holes are drilled in the bottom in the right places, into which self-tapping screws are then screwed. There is no need to be afraid of this moment. This is the technology for installing an acrylic bathtub. There are reinforcement plates at the mounting points. But, in order not to damage the bathtub, before starting installation, carefully read the instructions; they indicate the dimensions of the fasteners that can be used.
Choosing the material and shape of the bathroom
You need to start any such actions with a clear choice of the type of future bath.
The owner of the apartment must understand that the material of this bathing container will depend on:
- Her price;
- Aesthetic qualities;
- Subtleties of installation manipulations.
The most common types of bathtubs today are:
- Made of cast iron;
- Of steel;
- Made from acrylic.
Depending on the chosen installation method, they are divided into:
- Angular;
- Direct.
Types of acrylic bathtubs
As for the comfort of an acrylic container, it will largely be determined by the technical competence of its installers.
Today, many varieties of such bathtubs are produced, including mounted
- On racks alone;
- On racks and frame frame;
- Using screens made of polymers or stone.
Bath installation methods
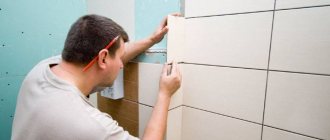
The bathtub is installed either in a completely tiled bathroom, or on the eve of tiling the walls, that is, under the tiles, as this method is usually called by home renovation specialists.
It’s natural to ask the question: why not do everything ingeniously and simply, that is, first tiling the entire floor and walls? This will significantly simplify the task of the tiler, and he will be able to realize any aesthetic ideas of the customer.
Springs
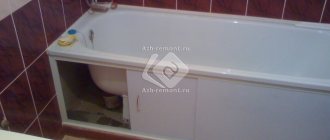
Let's look at how to attach the screen to an acrylic bathtub using springs. First, you need to experimentally find the place where the spring is attached to the bottom of the frame. To do this, the screen is placed over the side of the bath and pressed tightly to the top. The position of the bottom of the panel is marked on the frame.
Then each mark must be shifted upward by 3 cm. A spring is applied to the new line. And the top part will be the place where it is attached. And after attaching the springs to the frame, it is necessary to carry out a number of more operations in a clear sequence.
You need to do the following:
- On the back side of the decorative panel, a corner is glued into which a hole for the hook is drilled. They will cling to the lower part of the spring.
- The bars are glued to the side wall of the bathtub, which will prevent the panel from falling towards the bowl. The thickness of the parts must be selected so that the screen is strictly vertical.
- The panel is attached to the springs with hooks.
All that remains is to press the latter to the floor and place the screen under the side of the bath. When the springs push the screen upward, it will be fixed by the bathtub stiffener. And the glued bars will not allow it to fall over.
Source u-mama.ru
How to adjust all the gaps when installing a bathtub
The convenience of this approach also lies in the fact that the bathtub can be installed on ready-made tiles literally in one day. At the same time, there is practically no need to make noise, crumble and chop the decor, and then take out the resulting garbage. It is this method that is used by almost all new residents and those who carry out planned repairs.
- However, this method has one big drawback in the form of a clearly visible seam that remains between the bathtub and the tiles.
- It has to be filled with polyurethane foam, filled with rubber cords, and then hidden under plastic covers.
- However, water will definitely find a hole in such a seam, and it is at the joint that colonies of black fungus will begin to develop.
Siphon assembly and connection to the sewer system
We have moved this point to the end of the article to describe in detail the process and nuances of connecting siphon equipment to an acrylic bathtub. However, this work must be done immediately after installing the legs or frame, before installing the screen, and before finally attaching the bath to the wall and brickwork.
As a rule, the siphon is supplied disassembled. A large number of chaotically located parts can, at first glance, even frighten a person who is faced with connecting a bathtub for the first time. However, the attached instructions describe everything in detail and show how the siphon is assembled, so assembly does not cause any particular difficulties.
When disassembled, the siphon is a collection of various parts. The figure shows the general assembly diagram and the sequence of fastening the siphon elements (+)
Installation of the siphon begins with connecting the receiving pipe (4) and the protective grille (2) to the lower outlet of the bathtub. Before this, the joints must be treated with sealant and a rubber gasket (3) must be placed inside, on top of which a layer of sealant is also applied.
Then, without waiting for it to dry, the outlet pipe is inserted into the lower part of the bath.
Next, an already assembled flexible hose (16) is inserted into the overflow outlet (13), and its other end with a pre-installed gasket (18) is connected to the upper hole of the bath and secured with a protective overflow grill (19).
This is what a fully assembled siphon looks like. To avoid its leakage during operation, it is very important to correctly install the gaskets, which, even with a slight misalignment, can move out of place and become deformed.
Then the part of the siphon that is connected to the sewer pipe is assembled. All joints are treated with sealant. When assembling the siphon, try not to overtighten the threaded connections, as this can lead to deformation and breakage of the plastic parts.
At this stage of work, it is worth taking care of installing the mixer.
Installing a bathtub under tiles (instructions)
A much more aesthetically pleasing and hygienically safe option is to install a bathtub under the tiles. In this case, the floor under the bathroom can be either tiled or left without decoration.
But as for the walls, they are covered with tiles only after the installation of the bath is completed.
The undeniable advantages of this method are:
- There are no questions regarding the areas where the sides meet the walls;
- The immobility of the bath increases, because the lining becomes an auxiliary support that prevents the bathtub from tilting and turning over;
- The settlement of pathogenic microflora in the area where the container adjoins the wall is excluded, since water will no longer be able to accumulate in this area.
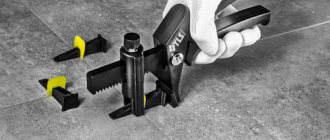
Clamps
Installing a screen under a bath using clamps is only suitable for asymmetrical bowls. Or for bathtubs with a rounded shape. Before work, you must check the completeness. In addition to the clamps, the kit should include top latches.
The procedure is as follows:
- It is necessary to draw a line along the floor that completely corresponds to the top edge of the bathroom. The easiest way to do this is with a plumb line.
- Clamps are installed along the intended line to mark the places where they are attached to the floor.
- Holes of the required depth are drilled in the latter.
- All clamps are fixed with dowels.
- Latches are attached to the side of the bathtub.
- On the inside of the panels, opposite the latch, screw the fastening tabs.
All that remains is to install the screen into the lower clamps and press the upper part tightly against the side of the bath. A click will indicate the tightness of the fixation in the latch.
Source sanplast.pl
Installing a screen under a bathtub with your own hands using screws requires making a wooden frame to fit the size of the bowl. Decorative panels will be glued onto it. And at the bottom of the frame two locking screws are attached, which will serve as legs.
The screws are completely screwed into the frame. And the frame fits under the side of the bathtub. Now you need to unscrew the spacer screws until the top of the frame rests against the stiffener on the inside. To avoid subsidence, the operation must be carried out with a full bath.
Source 78.ngsdo.ru
Ideas for decorating with tiles
This installation method also has a couple of weaknesses:
- The complexity of applying cladding is increasing, for this reason it will be necessary to invite a qualified tiler to carry out the work, and not a self-taught enthusiast;
- If you need to install a new bathtub, you will need to buy a model that is exactly the same in all dimensions.
Installing a corner bathtub under tiles
In the process of preparing walls for tiling, it is important to pay attention to the verticality of the corners. If they are tilted in one way or another, at the junction there will be a need to cut the tiles into a cone.
The consequences of such an operation are not always obvious, but in general this is far from ideal and is in fact considered a defect.
What types of screens are there?
Now you can buy bath screens of any design and made of any material. Manufacturers of decorative panels involve experienced designers in the design of models.
They develop original designs that can fit into even the most sophisticated interior.
For the manufacture of screens, plastic, metal, MDF, polystyrene, plasterboard, polyvinyl chloride, and acrylic are used. Patterns, subject pictures (photo printing), and decorative elements can be applied to the surface of the product.
Often there are models made from combined materials.
Glass and mirror screens look very original. They are used not only for their intended purpose, but also to model the space of bathrooms.
For such panels, they use not ordinary glass, but organic glass, because it better resists mechanical damage and shock.
When choosing a material, you should pay attention to its strength, resistance to moisture and high temperatures. A high-quality model can last for decades
Good performance characteristics imply a higher price for the structure, but this is the case when the investment is completely justified.
Installing a cast iron bathtub under tiles
Very often, new residents and people who have started renovations are interested in how exactly a cast-iron bathtub should be installed. These are the types of bathtubs found in most standard apartments today.
There is no doubt that such a bathtub must be installed before tiling work begins. Otherwise, you will inevitably have to face a wide range of rather difficult problems.
Pros of a cast iron bath
The advantages of installing a cast iron bathtub under tiles come down to the following two points.
- After installing the cast iron, there is a chance to draw the line where the tile meets the container. For this purpose, it is filled with water and physical shrinkage is monitored. Then you can mark the line from which to begin cladding.
- This ensures significant savings on tiles and adhesive solution for them. Accordingly, material costs for repairs are reduced. Having placed the cast iron on the cladding with which the floor is laid, you should connect the drain and water supply lines, after which you can begin gluing the ceramic tiles to the wall.
Installing an acrylic bathtub under tiles
Installation of an acrylic bathtub occurs somewhat differently. Such bathing containers, unlike cast iron ones, are not limited in outline and dimensions.
At the same time, it is much more likely that after filling an acrylic bath with water, it will shrink very noticeably.
If in the case of a cast-iron bathtub you can still look for some workaround technologies for installation on ready-made decor, then when using an acrylic container it will no longer be possible to make compromises.
You need to install acrylic only after tiling the floor and before gluing the tiles to the wall. Otherwise, you will have to put up with cracks spreading across the tiled decor.
We put it on bricks
Installation on bricks requires care and precision - you need to align the support evenly so that the sides of the bath are in a horizontal plane.
They are usually placed on two or three rows of bricks laid on a bed (on the wide part). The number of bricks depends on the location of the sewer outlet. A thin layer of mortar is laid between the bricks. The bathtub is placed on bricks, the horizontal sides are checked, if necessary, they are adjusted by changing the thickness of the mortar between the bricks (we do not put anything on the top ones yet).
We lay out the bricks, screw the corner
Having set it up, we mark on the wall at what level the sides are located. At this mark, a corner is attached that will support the sides of the bath. It is better to take an aluminum corner, the width of the shelf is 3 cm, the thickness is 2-3 mm.
To give the base an aesthetic appearance, you can wrap them with a plaster mesh and plaster them. In fact, plaster also reduces the hygroscopicity of red brick, extending the service life of the support. So it is not advisable to skip this stage.
Plastering a brick base for an acrylic bathtub
Having folded the painting mesh, a solid layer of cement-sand mortar is applied to the tops of the bricks. A solid layer of plumbing silicone is applied to the corner, after which the bath is installed. We move it towards the wall evenly so that the gaps between the side and the wall are even.
The support for installing the bathtub is ready
We select the squeezed out silicone, forming a beautiful seam. You can smooth it out with a teaspoon. If you carry it without lifting your hand from edge to edge, you get an even and smooth seam. Then remove the squeezed out solution. We remove the silicone earlier - it “sets” faster. The solution must be picked up no later than 20-30 minutes after installation, so don’t delay it either.
This is what an acrylic bathtub looks like from below, placed on bricks
If the silicone was not enough and it did not squeeze out, it’s not a big deal. We form a seam by filling the gap at the top with silicone. This completes the installation of the acrylic bathtub on bricks. Next is connecting the siphon and finishing, but this is not entirely related to this topic.
Installing a metal bathtub under tiles
The metal bathing container is very attractive due to its low cost. Oddly enough, this fact does not in any way affect its convenience, practicality and utilitarianism.
True, this option also has an undeniable disadvantage. The fact is that an iron bath takes heat away from the water much faster than containers made of other materials.
Installation of a metal bathtub is divided into the following stages.
- The container is being installed.
- It is being covered with tiles.
Trying to veneer the walls before installing an iron bathtub will not lead to anything good. As you might guess, water will inevitably penetrate into the gap between the bathtub and the wall.
Accordingly, you will either have to constantly fight the notorious black mold, or put up with its intrusive presence until the next repair.
Required Tools
At the first stage of installing the structure, you should prepare all the necessary fixtures and tools, namely:
- a hammer drill with a drill of the required cross-section and length - for making holes in the wall;
- screwdriver - for tightening fasteners when assembling the structure; in addition, it can be used to drill holes in the bathtub itself, if necessary;
- an open-end wrench of the appropriate size - to adjust the height of the legs of the bathroom frame;
- construction corner - inspect corners;
- roulette;
- building level - to level the structure horizontally;
- pencil or construction marker - for marking.
It is also worth taking care of additional consumables in advance: sealing tape or a plumbing corner - to seal the joints between the wall and the bathroom. But you can also use simple silicone sealant if the walls in the room are perfectly smooth.
Getting rid of bathtub shrinkage
If you glue the tiles only after installing the bathroom and its engineering, then the only unpleasant surprise may be shrinkage under the weight of water. But eliminating this problem will not cause any difficulties.
It will be enough to carefully hide the cracks that have arisen under the mastic. In general, there should be no complaints about the aesthetics of the space adjacent to the bathtub.
Bottom reinforcement
How to strengthen the bottom of the bathtub so that it does not sag? bricks as additional support . The use of such a base will strengthen the structure, but in case of dismantling difficulties will arise.
The method of arranging the support is called combined, since bricks are used together with the factory base.
- First, install the legs and adjust them in height;
- Measures the distance from the floor to the bathtub and determines the height of the brick support;
- Carry out masonry work;
- Check the length of the legs and the height of the brickwork (they must match exactly to evenly distribute the load on the supports).
- The masonry is covered with a dense layer of polyurethane foam and a bathtub with legs is placed on it;
- The font is filled with water for better “gluing” with the brick.