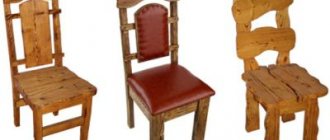
Staining wood is painting a treated wood surface with stain to give it color while preserving the natural wood texture. Often painting with stain is done to decorate the surface to resemble a more expensive type of wood.
Stains are chemical compounds that do not form a film on the surface of wood. Since the stain is absorbed into the surface, it creates a beautiful wood texture. However, often the composition does not have protective properties, so painting wood with stain and varnish is carried out simultaneously.
The coloring of a surface with stain does not occur due to pigment, but due to chemical reactions. Therefore, depending on the type of wood, the same composition can “appear” in different colors. Before starting work, be sure to test the stain on an inconspicuous area of the wood.
“I will show you paints and stains and even some varnishes...”
Good afternoon Natasha Udovina and the team of the TAIR Creative Studio are with you. I want to tell and show how you can paint wood in different ways. Paint in a broad sense. I will show you paints and stains and even some varnishes. All the techniques that I showed can be combined with each other and select any colors.
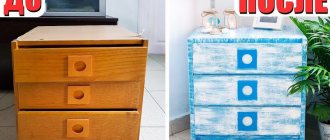
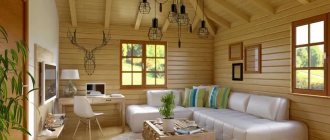
All these methods are applicable on small objects, such as a box, and on furniture. For the next master class, I was planning to decorate such a chest of drawers.
1. Full painting with paint For any type of painting without highlighting the texture of the wood, it is necessary to thoroughly prepare the surface for work. I specifically chose a piece of wood that had a crack in the knot and obvious unevenness. To make the surface smooth, it is necessary to seal the cracks. I use gesso primer; regular putty will also work.
Using a spatula, the composition is rubbed into the depths of the unevenness, and the excess is removed. note
that the aqueous composition may sag a little in deep cracks after drying and re-puttying will be required. After drying, I sand the gesso primer until it is perfectly smooth.
Next, to save paint consumption and facilitate its application, you need to cover the absorbent surface of the wood and gesso with primer, inexpensive paint or varnish. I apply white acrylic primer diluted with water. Next, paint of the selected color is applied with a wide flat brush.
As much as you might want to finish this process quickly, remember that it is better to apply several thin coats to dry rather than one thick coat. This will help avoid obvious brush marks and make the coloring even. In this method, I hide the wood texture as much as possible, but if you want to preserve it, then you need to do without putty and primer.
How to paint over wood stain?
ABOUT
Painting with wood stain is fundamentally different from painting with any type of paint or enamels in that wood treated with stain only changes color, preserving the natural pattern of the fibers. Painting with stain creates this effect, as a rule, due to chemical reactions.
Stains are often called compounds that give wood color due to the pigments they contain, which is not entirely accurate. But, if such compositions do not form a “dull”, opaque film that hides the natural texture of the wood, such an inaccuracy is insignificant.
1.
How to stain wood: methods and tools. 2.
Preparing the surface for applying stain.
3.
Some features of painting with stain.
4.
How to paint with stain in two colors.
5.
The final stage of processing with stain.
6.
About work safety.
-article version
Wood staining
DIY wood stain
Not everyone knows that stain is not just a liquid material, thanks to which wood acquires a brown tone and many of its shades.
Today, wood stains are rich in colors. In addition, it has antiseptic properties, which helps the wood last 2 times longer.
This article will help you get acquainted with modern stain. He will also answer questions about how to make wood stain with your own hands, what types of wood stain exist, and how to paint with wood stain correctly.
Return
Wood stain: varieties and their features
The basis for the production of liquid impregnation can be water, alcohol, or oil. And each variety has its own characteristics.
Water stain is available in the form of a water-soluble powder mixture and a ready-to-use mixture. This stain, the second name for stain, is in greatest demand. It can be used for both interior and exterior work.
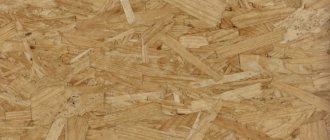
Powdered stain dissolves well in water. It is environmentally friendly and has elasticity and adhesion. The diverse palette of shades begins with the lightest tone and ends with dark red.
Various shades of stain colors
But there are several disadvantages. First, it is not advisable to use liquid impregnation for resinous rocks. Spots may appear on the surface of the wood. And secondly, by painting a wooden surface with a water-based stain, the wood fibers are raised. The positive thing is that the structure of the wood is more emphasized and at the same time it becomes more susceptible to the influence of moisture.
Choosing stain color
Alcohol based stain is an aniline dye dissolved in denatured alcohol. It also comes in ready-made and powder form.
The dyes are quickly absorbed into the wood fibers and after half an hour the paint is completely dry.
Uniform painting with stain by hand is unlikely to work, since the alcohol evaporates immediately after application. Thus, stains may appear, so it is better to use a spray gun.
Varieties of stains
Oil stain can color a wooden product in a color known to the human eye. Pigment stain gives wood a uniform color and hides the texture. The impregnating liquid colors the wood from the inside and emphasizes the structure.
Oil-based stain does not dry as quickly as alcohol-based stain, but it is very convenient to work with. It is applied in an even layer and does not lift the fibers, and does not form a film on the surface, which allows the wood to breathe.
Dilute the liquid with white spirit solvent.
Wax and acrylic stains have the same qualities as the tinting materials described above. In addition, wax stain is used to restore the old coating. It paints over small differences in surface color.
These wood stains cover the surface of the wood with a layer that protects it from moisture. It's easy to check. It is enough to pour a small amount of water on the floor, and it will scatter drop by drop. At the same time, the protective film of wax stain is vulnerable to mechanical stress and needs protection. To do this, it is coated with varnish.
Water-based stain in bleached oak color, topped with wax
Acrylic and wax liquids have a rich palette of colors and emphasize the wood texture, which is why they are also called rustic.
Return
DIY stain
You can make your own toning liquid at home without using expensive ingredients using plants, coffee and chemical ingredients.
Stain | gradient toning
Stain is the easiest way to tint wood while still keeping the wood grain showing through.
The first stage in staining
- wetting the wood with clean water. After drying, the wood fibers rise and must be sanded off with fine-grained sandpaper.
Second phase
- then the stain is applied either in one layer or in several, depending on how dark the tone you need. I decided to show gradient coloring with three stains, it turns out to be a smooth transition. You need to work quickly with the brush and not let the stain dry out so that a sharp border does not form at the transition point. I decided to deepen the color and applied another layer.
How to stain wood: methods and tools
Painting with stain is practically the final stage in the production of wooden products, so it can only be started after mechanical processing, incl. decorative (polishing, brushing, sharpening, etc.), completely completed.
The wood should not have any contaminants, even invisible ones (for example, grease stains); during processing they will instantly “appear.” It is not allowed to paint wood with a moisture content above 12-14%, especially those based on nitro compounds and oil.
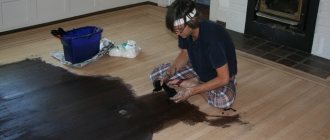
Painting with stain with a brush
Acrylic paint stain | gradient coloring
Classic store-bought stains most often match the colors of valuable tree species.
But sometimes you want to tint the wood in some non-standard color, and at the same time preserve its texture. In this case, you can make the stain yourself using acrylic paints. I'll do a gradient again just to show off a few colors at once. I take white, Turkish green and manganese blue. I dilute them with water until liquid.
If the paint is thick, like mine, then rub it well so that there are no lumps left. As in the case of ordinary stain, I first wet the board with clean water, and after drying, I sand the raised fibers. Then I wet the surface again with water and apply colors one by one, making smooth transitions between them. Can be applied in one or several layers.
Finally, after drying, I lightly sand the board, exposing the natural color of the wood in places, this also gives an interesting effect. You can create a stain of any color!
Varieties of stains.
If you are new to woodworking and just getting started with woodworking, choose an oil stain . It takes a long time to dry, so make sure that during the drying process that dust and small debris do not get on the product, this will ruin the work. But it is the oil-based stain that makes it easy to apply an even, beautiful layer. Moreover, such a stain allows for errors.
Water-based stains.
The most common type of stain.
They must be applied carefully and evenly. Since such stains can raise wood fluff. Before processing, the wood should be wetted, sanded and, after drying well, treated with stain. Alcohol stain is difficult to apply by hand; it is sprayed onto the surface using a spray gun.
Rustic acrylic and wax stains.
New developments. Moreover, this type of coating is only conventionally called stain, since they also preserve the natural structure of the wood. This stain can be of any shade. It is easy to apply and does not raise the lint. Forms a film on the surface and has protective properties. However, like other stains, rustic stain must be varnished.
- When painting wood with stain, do not repeatedly brush over drying wood fragments. Because then the brush strokes will be visible.
- Only dry wood with a moisture content of no more than 12% can be stained.
- For a beautiful result, the stain should be applied in two or three layers. Before applying the next layer, allow the previous layer to dry completely.
Ombre colors
Ombre is a type of gradient that does not imply a transition from color to color, but a transition from light to dark or vice versa. By the way, I have a detailed video. The ombre effect is often used in furniture decor, for example, to darken the edges of drawers, or to create a transition on the legs.
First, as in the first case, we do the usual staining. Then, after the paint has dried, we take a darker or, conversely, lighter in tone color and begin to paint the edge. It is very important not to leave a sharp border, so as you approach the center, the paint becomes more and more diluted, and the very bottom edge is simply washed away with clean water.
Depending on how much you want to lighten or darken the edge, you can apply several coats of paint or limit yourself to one or two. I decided to show what the ombre transition from all edges to the center would look like. I get a strictly rectangular gradient shape, but you can make it smoother, for example, round or oval.
Why apply stain to wood?
To better protect the wood flooring and extend its service life, it is recommended to treat it with stain. This impregnation penetrates deeply into the pores of the wood and enters into a chemical reaction with tannins located in the growth rings, giving the wood a light- and water-resistant color.
In addition, stain protects the wood from borers, mold fungi and other infections and pests. Modern liquid stains come in the following types:
- oil;
- alcohol;
- aquatic.
Let us consider their characteristic properties in more detail.
Water stain
This impregnation comes in two types: in the form of ready-made solutions that can be used immediately, and in powder form. A solution should be prepared from it. Water stain does not require drying oil , white spirit and other solvents.
However, it has one significant drawback: when the impregnation penetrates into the wood, it lifts its fibers , leaving the wood unprotected from excess moisture.
But, on the other hand, with the help of such wood processing, its structure is emphasized and highlighted. Therefore, today this type of stain is considered the most common.
Alcohol stain
This impregnation is a solution of aniline dye in ethyl alcohol. It is used for decorative and antiseptic painting of wood products. With the help of alcohol stain, pile lifting is reduced and wood swelling does not occur.
Using this type of stain, it is quite difficult to achieve uniform coloring, because the composition dries very quickly and stains can form . This impregnation is best suited for tinting small products, but it will not be suitable for painting parquet.
Oil stain
This impregnation is a dye dissolved in flax oil. It is the most convenient to work with and can be applied in different ways. Oil stain does not lift fibers and is evenly distributed over the entire wooden surface. Products processed in this way can always be easily repainted and restored .
Toning with varnishes
Another way to give wood a noble shade is to use varnishes.
It is important to sand the wood thoroughly before applying. Shellac varnishes are used in woodworking; they give the wood pleasant golden shades. TAIR has two types in its assortment: shellac alcohol and clarified alcohol. The alcohol varnish in the jar looks very dark, almost like bitumen, but in use it is slightly more golden than the lightened varnish. I show them on one board. I really like the result.
But since I started talking about bitumen, I’ll show that too. The use of bitumen varnish is already in the area of aging. I apply varnish along the edges and the wood immediately looks as if it has been burned. I apply bitumen varnish using a sponge. Bitumen varnish can be removed with white spirit, so if you accidentally drop more bitumen than necessary, it can be easily removed from a varnished or painted surface.
You can apply bitumen varnish directly to wood, but it is very actively absorbed into the wood and cannot be wiped off. Also note that bitumen varnish is very glossy and sticky, it is recommended to cover it with shellac varnish on top. Brushes after bitumen and shellac varnish should be washed in solvents.
How to stain wood?
There are four main ways to treat wood with stain. We will look at three of them, since painting with a spray gun is a more professional option. Not everyone has such equipment.
- Processing with stain by lowering small parts directly into a container with stain. Since this exotic method is more suitable for various wood crafts.
- Applying stain using a brush. The stain is applied with a soft natural brush.
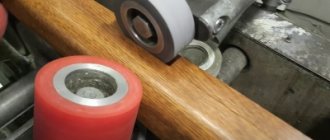
- Painting wood with stain using a roller or swab. The roller should be medium or narrow, with short or medium pile. A foam roller is suitable for water-based stains.
Multi-layer painting with a rubber spatula
I take the next primed board.
I paint it in a color that will show through from under the others. I have this purple-red one from the Acrylic-Art line. Pay attention when applied in one layer - it has such a delicate pink undertone, and when you apply subsequent layers it darkens to a noble brown! I love using this color in painting!
Then I put the following colors on a rubber spatula, maybe two at a time. I take light cold cobalt green, dark cobalt and manganese blue. It is better to wet the surface first, then the colors will float into each other more smoothly.
As a final chord I add a bright note of lemon color. Since the work is done in the raw, the colors float into each other quite interestingly.
How to use stain?
Items made from expensive types of wood are quite expensive, but there is a way out - you need to learn how to apply stain, choose the right variety, shade of tinting composition and change the world for the better. In addition, it is important to have an understanding of the rules of surface preparation, methods, and stages of application. Beitz preserves the structure and relief of the material, changing only its color. All properties remain the same, since the composition impregnates the material within the top layer.
Layer-by-layer application allows you to mix shades and create a unique color.
Multi-layer painting with holes. Using a metal scraper.
The next method is simple, but very effective for those who love aging techniques.
The first color is applied to the primed wood. I took gray linen. In this case, you can apply the color in one thick layer and use an old bristle brush, which leaves marks. I lightly dry the paint with a hairdryer, but not completely. I take a metal spatula and start peeling off the paint.
In those places where it has not dried out, it is very well removed in whole layers. The next color is sage. I apply it randomly, making strokes in different directions. I dry it again and peel it off with a spatula. In some places you can apply force and even scratch the soil right up to the wood.
One-step craquelure
I paint the primed wood gold. One-step crackle p
is an imitation of cracks in paint that appear over time due to changes in temperature and humidity. The first color is the one that will remain visible through the cracks; you can come up with many interesting options, make it darker or lighter than the main one, use metallics or mother-of-pearl. After the paint has dried, a thick layer of craquelure varnish is applied to the surface.
I leave it to dry until it is slightly sticky to the touch. I take the red color, because I really love the noble combination of red and gold, and with a wide flat brush I begin to paint the entire board.
Very important!
You can apply paint over craquelure varnish only once, so it is important that the paint immediately has sufficient coverage and a well-spreadable consistency. If you try to apply a second layer of paint, it will simply start to roll off unsightly. Let's paint joint to joint! As you can see, cracks appear immediately. After the paint has dried, the craquelure must be covered with shellac varnish.
Two-step craquelure
Two-step craquelure
imitates cracks that appear in the varnish over time. I will show how to create these cracks without covering the wood with paint or primer so that the texture of the wood remains visible. But, of course, such cracks can be created over a painted surface, or over decoupage, or painting, or even painting.
First I apply several layers of shellac varnish. I took the unbleached one because I really liked it in one of the previous methods. Wood is a very absorbent material, so you don’t even need to take into account the first layer of varnish; it will be completely absorbed. After it, it is better to apply another 3-4 layers of shellac varnish with intermediate drying.
Then, as in one-step craquelure, I distribute a thick layer of craquelure varnish over the surface. I leave it to dry for a day. In the morning, these gorgeous cracks appear in the light. If your room is humid or cool, there may be fewer cracks, then you need to warm the surface with warm air from a hairdryer. Craquelure loves dryness and warmth. To show the cracks, I rub oil paint into them. I cover the craquelure with shellac varnish.
How to remove water stain?
stain
water
-
based is absorbed quite deeply, especially across the fibers, so sanding is not a good option.
Some brands of stain You need to soak the bed in it for several hours, and the solvent will displace the dye from the wood.
Interesting materials:
How to connect a rhythmix gamepad? How to connect an xbox 360 gamepad to android? How to connect an Xbox 360 controller to a computer wirelessly? How to connect an Xbox One controller to Xbox One? How to connect a guitar to a Windows 10 computer? How to activate gold status on xbox 360? How to connect Google Fonts to HTML? How to connect Google Maps? How to connect Google Search Console? How to connect GoPro to laptop?
Boat board | multi-layer painting using a wax candle
I paint everything with thinly diluted brown paint.
After drying, in some places I rub the board with a wax candle. Keep in mind that the paint in these places will come off later! Then I paint one half with the color kraplak, and the other with dark green. The main thing is not to forget and not to start blow-drying, otherwise the wax will start to melt! After the paint has dried, I take a metal scraper and start removing the paint. In areas covered with wax, it can be removed very easily. Next, I take a candle and rub new areas with it.
I try to include both new colors and the color that we tore out from under the second layer. I cover one half with orange, and the other with light cobalt green. I dry it naturally in the same way, then remove the paint with a scraper. I cover some parts again with candle wax.
I paint everything with one color - Persian turquoise from the Acrylic De Luxe line. I dry it and scrape through the paint. This is another way of aging.
Using wet paper
This is also one of the methods of multi-layer painting.
I apply thinly diluted ocher as the first layer and dry it with a hairdryer. Next, I take a sheet of paper and tear it into pieces of different shapes and sizes. Try to have complex shapes and not just straight stripes. I wet the paper with water and place the pieces on my piece of wood. The next color is applied with a palette knife. I chose warm gray. You need to apply it so that pieces of paper do not move off during the process. You can safely leave a slight sloppiness in the application, uneven thickness of strokes. While the paint is still fresh, I carefully lift the paper with a palette knife and remove them. And I leave it to dry.
Then I tear up the next batch of pieces of paper, moisten them and place them on the board. I try to ensure that there are different areas under the paper - both gray and ocher. I apply the next color - dark ocher, and remove the paper without waiting for it to dry. Drying the paint. Then all stages are repeated as many times as you want to add colors to your work.
I apply red ocher, and the very last layer is burnt umber. This method differs from others in that each layer has its own small thickness, and it seems as if entire layers of paint were actually falling off the board after numerous stains.
Gold plating
Before gilding with gold leaf, you need to prepare a very flat and smooth surface.
I cover the board with gesso primer. I let it dry completely and then sand it with fine-grit sandpaper. After sanding, it is better to smooth the surface with a piece of natural fabric, such as linen. Levskas has an absorbent surface, so you need to cover it with the first layer. In icon painting techniques, where gilding also requires a smooth surface, shellac varnishes are used for this, and here I also use shellac. After this, if any brush marks remain, you can sand and smooth the surface again. Then I apply another coat of shellac varnish.
If you want to get perfect smoothness, reminiscent of an even gold bar, it is better to use alcohol-based gilding compounds. I use acrylic water-based, it won’t achieve perfect smoothness, but you can get another beautiful effect. After the glue has dried to transparency, you can apply gold leaf. I use the classic one.
Ideally, special wide brushes are used to transfer it to the surface. Then the gold leaf will lie more smoothly and evenly. But I think that the resulting cracks and creases have their own charm. Moreover, you can scratch the gold leaf on top with a metal brush (Although I’m sure many would condemn me for this!). According to technology, classic gold leaf is sealed with alcohol varnishes to avoid oxidation. I use shellac varnish.
Processing wood with stain: choosing the composition, color and tool. Surface preparation and staining
All photos from the article
In this article we will look at how to use wood stain. This substance is used, as a rule, to give cheap types of wood the aesthetics of expensive ones. In some cases, it additionally provides the wooden surface with protective functions. But let's talk about everything in more detail.
Painting wood with stain using a wide brush
General provisions
Stain for exterior woodwork in a jar
The main feature of stain is that, unlike paints and varnishes, it does not create a film layer on the wooden surface, but penetrates deep into its fibers.
This allows us to highlight the inherent advantages of such a solution:
- Emphasizing and ennobling the natural wood pattern.
- Lack of sealing. Wood impregnated with the solution in question continues to “breathe.”
- Preservation of the texture of the wooden surface with all its roughness.
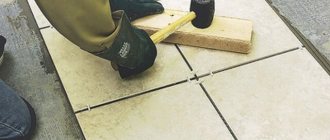
Brushed firing and gray wood
Firing with brushing requires a gas burner, metal brushes and compliance with fire safety regulations.
Don't be afraid to burn the wood thoroughly if you're doing it for the first time. Usually, beginners do a very weak firing, achieving a barely brown color. When firing, we burn soft wood fibers so that we can then easily comb them out and reveal the relief texture. To do this, after firing, we moisten the board with water so that dust does not fly in all directions, take metal brushes and comb our wood with pressure. This technique is often called “Barn Board” - this is the attempt to age a board to the state of a board left over from a dismantled old barn. Any means will work here: you can use a nail puller or a hammer to leave deep dents, or use a chisel to mark and widen cracks. An awl or nail is suitable for creating round holes. Using a drill and a drill bit, you can create paths for bark beetles. Use a saw to mark some old cuts.
You can hammer in a couple of nails and oxidize their heads with acid, but I didn’t. A new board will first of all be distinguished by a smooth cut, so for authenticity it’s worth adding some unevenness to it, you can even cut out some pieces..
After all these terrible abuses of the board, I take a torch and once again burn through the newly formed cracks and potholes. I comb out the burnt wood again with a wire brush. Next, I sweep away the remaining dust with a brush and take white paint. Over time, the tree loses its color, fades in the sun, and becomes clogged with dust. To imitate such gray wood, you need to patina it. I apply thinly diluted white paint and then immediately wipe it off with a wet cloth. I dry it. The paint melts right away. I apply the next layer.
It is important
not to overdo it with white!
Wash the paint thoroughly after application. The wood should appear slightly dusty. The final step is to lightly sand the wood with sandpaper.
Brushed firing and metallic patina (dry brush)
I have another board with firing and brushing. By combining firing, brushing and dry brushing, you can achieve different visual effects, lightening the texture of the wood or, conversely, darkening it. And I want to show the metallic patina in this example. I paint the board deep black, using velvet black from the Acrylic De Luxe line.
Metallic paints look best and shimmer on dark surfaces. Next, I take Decolor metallic paints and work using the dry brush technique: I put paint on a brush (it is better to use flat, coarse bristles), wipe off the excess on a napkin and begin painting in the direction of the wood grain.
It is important not to overdo it and stop in time. The result is an elegant metallized coating that emphasizes the wood grain.
How to stain wood?
To more clearly emphasize the texture of the wood (especially after brushing), to give it an unusual color or an “antique” look, the part is coated with two different stains.
They do it this way: first, the wood is covered with a light (often bleaching) water- or alcohol-based stain, creating a general background. Then, a darker stain on an oil or oil-wax basis is applied with a swab or roller. At the same time, the denser fibers that form the pattern remain light.
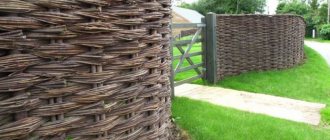
Brushing without firing + washing technique
Of course, you can brush wood without firing it, which is exactly what I did before I bought the burner.
This can be done with special drill attachments and hard metal brushes. Or brush by hand, which is what I do. This, of course, is a great way to keep warm when there is no heating) You definitely need to sand the board after brushing so as not to get splinters.
Next I start painting. I apply purple and immediately wash off the unabsorbed paint with a wet rag. I introduce an additional color in some places - ultramarine - and do the same with it.
This technique allows you to delicately highlight the texture of the board. Next, I take green Chameleon paint, apply it to the entire surface, and also wash away the residue, allowing it to remain only in the depths of the pores. After drying, a delicate pearlescent effect is obtained.
Impregnation for wood: how to stain a wooden surface
Stain, as a coating for wooden surfaces, not only preserves the wood, but also enhances its decorative properties. With the help of stain, inexpensive wood species can be transformed into valuable exotic wood. Let's talk about how to properly stain a wooden surface.