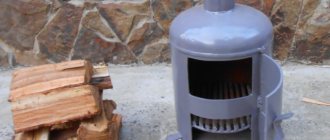
It's always nice to put waste materials to good use. And if it concerns fuel and heating, it is also very profitable. A striking example is waste oil heating furnaces. They can use any oil that can burn. Transmission, diesel, machine, confectionery, vegetable... Really any. There are no problems with fuel for such units. What they found, they filled it in. Moreover, a do-it-yourself furnace for mining is also made from waste materials: an old gas or oxygen cylinder, sections of pipes of different diameters or pieces of metal.
Furnace in production: options for making the device yourself
With the approach of cold weather, many craftsmen are coming up with various designs for heating the room and heating water. First of all, the question is about the type of fuel. In search of the most rational and cheapest option, many choose to work off, the average consumption of which is about 2 liters per hour. A waste oil furnace has a number of advantages. Knowing all the intricacies of its manufacture, you can create a budget-friendly and efficient source of heat in the house. Garage stove: photo examples, varieties, how to make it yourself (read more)
Creating a homemade stove for mining is not a labor-intensive process.
Nozzle
First you need to make a spherical nozzle; fuel will flow through it in the future. Make a hole in the sphere, the diameter should be approximately 0.25 mm
Please note that the power of a homemade burner depends on the diameter. The smaller the diameter, the lower the power and vice versa
All difficulties await you in the manufacture of the nozzle. The channel for air passage must be made perfectly smooth. It is necessary that the air hits forward and not against the walls of the nozzle. The best option is to make a hole on a special machine.
But if luck smiles on you and you find a jet with the desired diameter, then do not miss the opportunity and place it in the center of the spherical element. If you can’t find a hemisphere, you can use a small piece of sheet metal with a jet attached inside. As a result, you will receive an oil spray nozzle. Heated fuel will flow into it, and atomization occurs due to the incoming air. When installing such a device in a universal boiler, you get an effective and cheap heat source.
Advantages and disadvantages of a waste oil stove
A factory or homemade waste oil furnace is characterized by a number of advantages:
- ensuring fast and efficient heating of enclosed spaces in the form of greenhouses, domestic buildings, warehouses and technical rooms;
- independence of the device from electricity and gas;
When ensuring normal operation, the stove does not create a lot of soot and burning.
- unique design features of the device that allow you to carry out the cooking process;
- ease of operation;
- no open flame;
- reliability of the structure, which is made of metal products connected by welding;
- when ensuring normal operation, the stove does not create a lot of soot and burning;
- due to its light weight and dimensions, the device can be transported;
- the stove can be made from scrap metal;
- during operation of the device, combustion of oil and its vapor is ensured;
- The stove can be combined with a water heating system by installing a tank on top.
A closed type furnace is not without its drawbacks, among which are the following:
- the possibility of clogging the supply tube with waste oil;
- the need to install a chimney with a length of at least 4 m;
- presence of hot open surfaces;
The exhaust furnace provides fast and efficient heating of various types of enclosed spaces.
- weekly cleaning of the chimney and oil container from accumulated waste;
- high probability of contamination of clothing and premises during contact with fuel;
- the container with fuel should be located in a warm room;
- unpleasant smell of used oil;
- the flame in the apparatus can be extinguished only after the fuel has completely burned out;
- if used incorrectly, the fire hazard increases;
- characteristic humming noise during operation of the furnace;
- The fuel ignites only when it is heated to its flash point.
Note! Before pouring oil into the system, it should be filtered.
Conclusions and useful video on the topic
You can learn how to make a heating device for a garage and increase its efficiency in the following video:
If you don’t have the opportunity or desire to make a heat gun with your own hands, you can simply go to a specialized store, choose a suitable device and buy it without unnecessary fuss. The advantages are obvious: guarantees, operational safety, high efficiency with low consumption of combustible material.
Would you like to tell us about a heat gun you assembled yourself? Do you want to share technological nuances that will be useful to site visitors? Please write comments, post thematic photos, and ask questions in the block below.
Operating principle of a waste oil furnace
The prototype for oil furnaces operating on waste oil is kerogas, which was previously used in villages and dachas. It used kerosene as fuel, the vapors of which were burned in a separate chamber. To save on fuel, a waste oil burning option was developed. It can be purchased for free or at a reasonable cost at any service station.
Components of a waste oil stove.
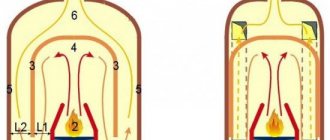
Creating a homemade stove during mining is not a difficult process. The main task is to properly organize the system for a productive oil combustion process. To ensure complete combustion of vapors, heavy components must first be split into light ones, which is carried out as a result of pyrolysis. The oil must be properly heated for efficient evaporation.
The operating principle of an oil furnace during mining is as follows. First of all, the mining is ignited in the lower chamber of the apparatus. The combustion intensity is regulated using a throttle valve in the device body, through which air enters the chamber. Oil vapor mixed with oxygen rises upward through a vertical pipe. The pipe is connected to the upper tank, which is the afterburner chamber.
The mixture is mixed under the influence of the Coriolis force (force of inertia). The intensity of the process is achieved by choosing the correct diameter and length of the combustion chamber. To ensure complete combustion, air must flow through the damper in sufficient quantity. To do this, it is additionally sucked through holes made in a vertical perforated pipe connecting the tanks.
The combustion intensity is regulated using a throttle valve in the device body.
The gas flow is directed to the final combustion chamber, in which the upper part is expanded. During its manufacture, a horizontal separation is made between the chimney inlet and the combustion chamber outlet, which is necessary to ensure a temperature jump between the nitrogen oxide and oxygen afterburning zones. At temperatures below 600 °C, nitrogen oxides are more active than oxygen. As they decompose, they oxidize fuel particles. With increasing temperature, oxygen acts as the main oxidizing agent. Harmful substances are released into the atmosphere through the chimney.
Note! To ensure efficient oil combustion in the upper tank, the temperature must be low.
Briefly about the main thing
An electric probe, a heated drain plug, a heating element and a heating plate - with these simple means you can safely heat the oil inside the engine in winter before starting. In fact, you don’t need to invent anything - each of the four options is available for purchase on many trading platforms.
In terms of power supply, there are no difficulties: a wire and a plug or a simple electrical circuit based on a relay and a toggle switch. Another question is whether it is necessary. The answer is short and advisory in nature: it is necessary, especially in cold weather worse than -10°C.
Many motorists are forced to think about how to heat the engine sump with their own hands due to the weather conditions in winter, which affect the normal starting of the engine. Some drivers mistakenly believe that in winter it is difficult to start the power unit due to weak battery power. In fact, the problem is caused by a change in the lubricant, which becomes very viscous, making it difficult to start the engine and the functionality of the crankshaft.
Ineffective lubrication in the initial minutes of engine start leads to excessive wear of the piston unit. These troubles can be avoided by heating the crankcase and eliminating excessive oil viscosity.
Waste oil furnace: types of designs
There are several types of oil furnaces that operate on waste oil. The classic model is the pyrolysis apparatus. It is made from ready-made containers in the form of barrels, pipes, cylinders or from alloy sheets. Oil is poured into the lower vessel, which splits when there is insufficient air. In the upper tank, intensive combustion of its vapor occurs, due to which a lot of heat is released.
Temperature regulation is carried out by air supply. Such a furnace requires constant cleaning of the chambers from accumulated fractions. It does not have mechanical temperature control.
Oil is poured into the lower vessel of the stove, which breaks down when there is insufficient air.
At the oil recovery stove, a guaranteed air supply to the second chamber is realized with the help of a fan. The combustion process is more efficient, so warm air evenly enters the room.
The operating principle of a stove with a drip supply of fuel is similar to the operating mechanism of diesel engines. It is economical. However, the independent process of manufacturing the device is very labor-intensive, so it is better to purchase a factory device of this type. In addition, it should be taken into account that homemade drip stoves are picky about the quality of the oil, which must be preheated before feeding into the stove.
The most efficient model is a supercharged waste oil furnace. It, in comparison with a potbelly stove, has a higher cost. Additional heat comes from blowing fans. Supercharging can be done using a car cooler motor, and the heater is blown by a 220 V home propeller.
Standard layout of a waste oil furnace.
Independent production
Anyone can make the simplest design. There are quite a lot of diagrams on how to do this; from them you can understand the entire production process.
It would be more interesting to consider a supercharged waste oil furnace. There are also enough drawings, but the design is more complex and therefore requires additional knowledge in this area.
Its main advantage is that it will not release energy into the street in large quantities, but will slowly extract heat. The second significant difference is the presence of a drawer for oil, which makes it easy to clean. In simpler (completely closed) containers this is extremely difficult to do.
Detailed drawing of a supercharged waste oil furnace
The diameter of the pipes and the volume of the oil container must be selected based on the square footage of the heated room.
For an average garage with dimensions of 3x6 m, you will need parts of the following sizes:
- profile pipe 75×75×4 cm;
- fuel box 55×55×4 cm.
You can also use a round container, but it is difficult to process. But it will look more aesthetically pleasing.
For independent production, you need to follow these step-by-step steps:
- Cut the drawer elements. Pipes for the afterburner must be cut at an angle of 45°.
- In a smaller profile, a hole for the box is cut out with a grinder, and the sides are welded on the sides. A handle is attached to the box.
- The structure is welded together, and a hole is drilled on top for the chimney pipe.
For more efficient operation and maximum heat extraction, it is recommended to attach an extension cord in the form of a 3-meter pipe to the stove. The fuel will burn out in it. But for a higher degree of safety, it is recommended to line the walls of the garage near the stove with metal sheets and remove all wooden shelves and flammable substances.
In this video you will learn about the design of a waste oil furnace:
At the last stage, you only need to light the fuel and adjust the operation of the stove. In this case, the main task is to minimize the emission of black smoke, since this indicates that there is not enough air in the system. To configure this parameter, you need to drill several holes and check the number of emissions. But a large number of holes can also cause harm. Smoke may escape into the room. Therefore, the number of holes must be adjusted correctly.
Making a dropper is also quite difficult, but such a task is quite doable. Often, to produce a drip furnace for mining, a cylinder with a diameter of 220 to 300 mm is used. They have fairly thick walls so as not to burn for a long time. A steel pipe with a diameter of 5 mm or more may also be suitable.
The ideal option for these purposes is to use a heat-resistant chrome-plated pipe with a diameter of 3 mm or more. But production will be cheap only if the pipe is already available. It’s not worth buying one specifically, as manufacturing will be expensive.
A good drawing will help you make a complex dropper stove with your own hands
All other parts can also be found at the farm or radio market. For example, a Zhiguli fan is well suited for supercharging. Metal pipes and other elements are available at scrap metal collection points.
The production technology of the drip furnace is as follows:
- The bowl for the flame is made from a pipe or a ready-made steel container. The tray should not be too large, since the pipe must be removed through the hatch.
- Openings for the chimney and cleaning hatch are cut out in the body using a grinder.
- An afterburner is being manufactured. You don't need to make all the holes at once. It’s better to make a third of the maximum quantity set in the drawing, and complete the rest during the setup process.
- A cover and an air duct are welded to the afterburner. A fan is mounted in the latter.
- The device is assembled, settings are made and its operation is checked.
In order for the device to be truly reliable, it is better to place it in a steel case. It must be welded from profiled pipes. To regulate the temperature, it is necessary to provide for the possibility of changing the amount of fuel supplied, as well as inflating the fan.
Operating principle of a drip furnace
Experienced users have learned to regulate the amount of fuel burned by eye. If the oil is supplied in drops, then less than 1 liter per hour burns out, and if there is a small stream, then more than 1 liter. To install easy adjustment of the air supply, you can purchase a cheap PWM on the Chinese market.
After assembling the entire structure, it is necessary to check its operation. The procedure is no different from previous recommendations. You want to achieve the purest possible smoke without overdoing the holes in the lighter.
If a person has some experience, then making even a complex potbelly stove using waste fuel is not difficult. If a novice master has never been interested in this area, then the simplest design made from scrap materials will do.
Requirements for installation and operation of an oil furnace
It is required that the stove be located in an empty room, near which there should be no flammable surfaces. Particular attention is paid to self-made devices. They should not be placed on a shelf or other support that could catch fire.
A homemade furnace for mining should be located on a flat base, which can be concrete or brick. It is necessary that the distance between the apparatus and the wall be at least 1 m. To create good draft, the chimney must have a length of more than 4 m. Insulation should be provided on its external side to prevent the formation of acid condensation.
The used oil should not contain any solvent or other flammable element, so such components should be kept away from the furnace. It is also unacceptable for moisture to get into the container with oil. This will cause a fire in the oven. In the event of an emergency, a fire extinguisher should be used to extinguish the fire.
Note! In the room where the stove is located, there must be a good system of natural supply and exhaust ventilation.
The operating principle of a stove with a drip supply of fuel is similar to the operating mechanism of diesel engines.
Before starting work, oil is poured into a container in an amount equal to half the volume of the tank, which will provide the necessary space for the formation of vapor. For the vapors to become enriched with oxygen, you need to wait some time. Then the fuel is ignited using long matches. As soon as the process of ignition of vapors begins, the damper is closed halfway.
To increase the performance of the mini-furnace during mining, you can install a sealed tank with liquid above its upper chamber. To supply and drain water, fittings are attached to it, which are located at different levels. Another option for increasing productivity is the necessary air convection, which is carried out using a fan located near the upper chamber. By taking warm air from the stove, it helps to cool it, which has a positive effect on the life of the device.
DIY options for increasing the efficiency of a mini-oven
Waste oil furnaces are often used to heat a garage or small workshop. It is not recommended to use such a device in a building where people are constantly present. This is due to the fact that the stove absorbs oxygen, which has a negative effect on the human respiratory organs. If the device is intended to heat a living space, it should be located in a separate room.
It is not recommended to use such a stove in a room where people are constantly present.
To improve the efficiency of the device, additional devices can be used. A waste oil furnace with a water circuit is organized by tying the coil body or installing a water jacket on the chimney. In the first case, the coil is made of copper pipe. It is built into the heating system of the house.
The water jacket is made of sheet metal in the form of a container, which is located in the upper part of the housing. It circulates a liquid coolant. For the stove to operate efficiently, the tank must contain up to 30 liters of water. Such a device will allow you to heat a large area.
An exhaust furnace with a water circuit must be equipped with an expansion tank with an emergency drain, necessary in case of boiling of the liquid. It is not recommended to install a membrane container here.
Another option for increasing the efficient operation of the furnace is to use an air heat exchanger, which is represented by a fan. No design changes are made to the device, and the heating of the room is improved. The fan is located near the upper chamber. When it cools, the heated air spreads across the area of the room. You can also pass air through a box located on top of the stove, or through a pipe that is installed in the afterburner chamber.
An exhaust furnace with a water circuit must be equipped with an expansion tank with an emergency drain.
Popular options for pre-fabricated furnaces, their characteristics
The Teplamos NT-612 stove is often chosen as a device used for heating a garage. The power of such a drip fanless heater can vary between 5-15 kW. Fuel consumption is 0.5-1.5 l/hour.
This furnace for use in a garage is a closed type device. It is equipped with a chimney, an air supply pipe and a built-in tank designed for 8 liters of fuel. Fuel combustion occurs in the inner chamber. The operation of the device begins with electrical heating of the plasma bowl. When the required temperature is reached, fuel is supplied and air is forced into the combustion chamber. The average cost of the device is 30 thousand rubles.
Note! For normal operation of the stove, it must be preheated with a small amount of diesel fuel, which is poured into a special bowl.
Another popular model is the Zhar-25 (MS-25) stove. This device can operate not only on waste oil, but also on diesel fuel. The device operates from the electrical network, which powers the internal fan. The thermal power of the furnace varies from 25 to 50 kW. It is designed to heat a room up to 500 square meters. m. Maximum fuel consumption is 4.5 l/hour. The device has large dimensions. Its weight reaches 130 kg. This stove needs to be equipped with a good chimney. You can buy it for 45 thousand rubles.
The exhaust furnace is equipped with a chimney, an air supply pipe and a built-in tank.
Basic principles for designing a heat gun
To construct a heat gun yourself, you need to find a large-diameter pipe. Then make two holes slightly at the two ends on opposite sides: one of large caliber, the other of small caliber. The final products of combustion will come out through the large one, and fuel will flow through the small one. Then it is necessary to install a combustion chamber with an automatic catalyst, which will bring the gas mixture into a burning state
It is very important to maintain a high degree of tightness throughout the entire structure to avoid leakage. Then you need to attach a fan to the end of the pipe, where the small-caliber hole is located, and the structure is ready
How to make an electric heat gun - this question is not difficult, the main thing is to properly follow the safety rules when using it
This position is especially important for a tank with a gas mixture; it must be at least a meter away from other objects in the room. If possible, it is advisable to temporarily remove highly flammable materials while using a homemade heating device
Because warm air can catalyze many chemical reactions.
An electric heat gun made with your own hands does not require specialized skills or professional knowledge, and what is especially important is that there are practically no material costs for construction. However, during construction it is very important to comply with the points indicated in the drawing
(See also: Do-it-yourself greenhouse heating)
A homemade electric heat gun allows you to provide adequate heat to large areas. Since from a practical point of view, double heating occurs. The first source of heat is simple warm air, the second source is a gas mixture, after combustion of which a fairly significant amount of heat is released.
This design is mainly used for heating rooms in which, due to circumstances, it is impossible to ensure proper tightness, for example, repairs in the winter. An electric-gas gun is mainly used for heating large premises or for quickly heating small living spaces.
To make a diesel heat gun you will need a number of components, namely:
- the combustion chamber;
- diesel fuel tank;
- large-caliber metal pipe;
- catalyst;
- fan.
First you need to make a hole at both ends of the metal pipe: one large and one small. Then it will be necessary to install the catalyst into the combustion chamber in the metal pipe itself. In no case should you begin construction without having a plan for the future design, since in this case either it will not be possible to assemble the unit, or its final operation will simply be energy inefficient. (See also: Do-it-yourself gas generator stove)
The smallest diesel heat gun is used mainly for heating a small room and its main advantage is efficiency. The main feature of its design is the use of a small metal pipe and the absence of a fuel tank. That is, such a unit functions solely by converting cold air into warm air. The main thing to remember is that the fan must always have a separate power source in order to avoid a short circuit in the electrical network.
To build a diesel heat gun, it is necessary to determine the footage of the future room, and also take into account the degree of air insulation of the room where the future heating unit is planned to be used. From a practical point of view, the degree of air insulation can be determined by only one parameter: air ventilation is noticeable or not. Depending on this, you need to plan the future design. If the room is sufficiently insulated, then the gas mixture can be dispensed with and, therefore, energy costs will be significantly lower.
Many people often ask the question, how to make a diesel heat gun yourself? The answer is very simple, the first thing you need to do is make your own plan, and then carefully implement it point by point. The most common practical mistake many people make is precisely failure to comply with all points of the plan or lack of due attention.
Do-it-yourself stove made of sheet metal and pipes
Depending on the type of device, the structure can be created from pipes of different diameters or from iron sheets. To work you will need the following tools:
- grinder with cutting and grinding wheel;
- sheet metal and pipes;
- welding machine and electrodes;
- metal corners;
- metal paint that can withstand high temperatures.
Before making a furnace for testing, a detailed drawing of the apparatus is made. You can create it yourself or use ready-made options that are easy to find on websites on the Internet.
The first step is to make the lower part of the chamber connecting to the fuel tank. It looks like a rounded or straight tank with a lid where two pipes are located. The first is used to supply oil, and the second is used to strengthen the pipe that goes into the middle part of the device. Elements for the tank are cut out with a grinder and connected according to the drawing.
Depending on the type of device, the structure can be created from pipes of different diameters or from iron sheets.
The bottom and metal corners are welded to the walls of the tank, which act as the legs of the structure. To create a lid, a sheet of metal is taken and holes are made in it. The first, with a diameter of 100 mm, is located in the center; the second, 60 mm in size, is located closer to the edge. The lid should be removable, which will make cleaning the stove easier.
A pipe about 37 cm long and 100 mm in diameter is used to supply oxygen. It has holes along the entire length of the element necessary for the supply of oxygen. The pipe is welded perpendicular to the cover at the bottom of the apparatus. An air damper is fixed on it, which will be secured with a rivet or bolts. The hole under the damper should be 6 cm in size. It is intended for supplying oil and igniting fuel.
The design of the upper tank is carried out by analogy with the design of the lower tank according to the drawing of a furnace using waste oil with your own hands. The walls of the product must have a thickness of at least 350 mm. A bottom with a diameter of 10 cm is cut out of the bottom of the tank, which should be placed closer to the edge. A small piece of pipe with a diameter of 11 cm is welded to the bottom of the hole. This is necessary to connect the element to the gas combustion tank.
Before making a furnace for testing, a detailed drawing of the apparatus is made.
Since the top cover of the supercharged exhaust furnace is exposed to high temperatures, a metal sheet with a thickness of at least 6 mm should be used for its manufacture. There is an opening in the lid for the chimney pipe, which should coincide with the opening at the bottom of the container. Between these elements, a partition made of dense metal sheet is mounted, located near the smoke hole. A pipe is attached to the top of the lid, connecting to the chimney part. The self-production process can be seen in detail in the video of the furnace being tested.
Note! To give the structure rigidity and stability, a metal spacer in the form of a piece of pipe with a diameter of 200-300 mm is welded between the chambers.
Making a drip heater
Most often, craftsmen use old oxygen and propane cylinders with a diameter of 220 and 300 mm, respectively, to assemble droppers. The former are preferable because of their powerful thick walls that can last a long time and not burn out. A pipe made of low-carbon steel (St 3-10) with a wall thickness of 5 mm or more is also suitable.
Advice. The ideal option for a durable housing is a pipe made of heat-resistant stainless steel alloyed with chromium, molybdenum or nickel (for example, 15X1MF or 12X18H12T) with a wall no more than 3 mm. Perhaps you or a neighbor has one in your garage. There is no need to buy it specially - it will be too expensive.
Select rolled metal for other parts according to the drawing of the furnace with top feed of waste into the combustion zone. The blower fan is a “snail” from a VAZ 2108 cabin heater or its Chinese equivalent, the fuel line is a stainless tube with a diameter of 8-10 mm.
The manufacturing technology is as follows:
- Make a fire bowl from a piece of pipe or take a ready-made steel container. It must be removed through the inspection hatch, so do not make the tray too large.
- Cut openings in the body for the chimney pipe and cleanout hatch. In the latter, make a frame and install the door (possibly bolted).
- Make an afterburner. Take your time to drill all the holes indicated on the drawing; do the bottom 2 rows first. You will complete the rest while setting up the oven.
- Weld a cover and an air duct with a flange for mounting the fan to the afterburner. Attach the fuel supply device as shown in the photo.
- Assemble the heating unit and connect it to the chimney.
Advice. For greater stability to the body, it would not hurt to weld a frame from a steel profile or angle according to the example shown in the photo.
The afterburner in the photo is a close-up - side and end views
. To regulate the heating power, you need to provide a fan speed control and a device for dosing the fuel supply (as a rule, an auto-drinker with a jet break is used). According to reviews from craftsmen on a popular forum where heat extraction issues are discussed, fuel consumption in the furnace can be monitored visually. The trend is this: if the oil flows in drops at the break in the stream, then less than 1 liter per hour burns, and when a thin stream flows, more than 1 liter per hour.
Recommendation. Control the fan performance using a cheap Chinese PWM controller (price is about 8 USD).
Different designs of drip bowls
After igniting and warming up the heater, it is necessary to set the optimal operating mode. The procedure is carried out according to the same scheme as with the miracle stove: you need to achieve the most transparent smoke from the chimney by drilling additional holes in the afterburner. The ideal flame color is blue, normal is yellow, and reddish is unsatisfactory. In the latter case, low heat transfer, high consumption and soot formation are observed. For details about the design and assembly of the furnace, see the video:
Step-by-step instructions for making a waste oil stove with your own hands from a cylinder
The device can be made from old items using the presented drawings of a waste oil furnace. For this process you will need a gas cylinder with a capacity of 50 liters. You should also prepare:
- pipe with a diameter of 80-100 mm and a length of 4 m;
- steel corner for making a stand and internal elements of the heat exchanger;
- sheet steel for making the bottom of the upper chamber and the plug;
For the manufacturing process of a waste oil furnace, you will need a gas cylinder with a capacity of 50 liters.
- brake disk;
- fuel supply hose;
- clamps;
- half-inch valve;
- loops;
- half-inch oil supply pipe.
An empty gas cylinder is used to make the body. You need to unscrew the valve on it, after which you should leave it outside overnight to ventilate the remaining gas. A hole is drilled in the bottom of the product. To prevent the formation of a spark, the drill must be moistened with oil. Through the hole, the cylinder is filled with water, which is then drained, washing away the remaining gas.
Two openings are cut in the cylinder. The top one will be used for the combustion chamber, where the heat exchanger will be installed. The lower one acts as a burner with a tray. The upper part of the chamber is specially made large. If necessary, it can be filled with other fuel options in the form of firewood or pressed briquettes.
A stove made from a gas cylinder will be more economical and efficient than one made from other materials.
Next, the bottom for the upper compartment of the device is made from sheet metal 4 mm thick. A burner is made from a piece of pipe 200 mm long, as shown in the drawing of a waste oil stove. There are many holes made around the circumference of the product, which are necessary for air to enter the fuel. Next, sand the inside of the burner. This will eliminate the possibility of soot accumulating on the ends and uneven surfaces.
Burner for testing: varieties, device, how to make it yourself (read more)
The furnace burner is exhausted from a gas cylinder and welded to the bottom of the upper chamber. If there are no mining reserves, wood can be laid on the formed shelf.
What is required for production
Diagram of a Babington burner. (Click to enlarge) Assembling the burner is not at all difficult, but there are certain components that must all function correctly in order to ensure trouble-free operation.
The burner consists of the following parts:
- Babington nozzles, which can be used as a door handle. Usually located in the burner.
- A 20 lb (9 liter) propane tank that will act as a source of compressed air.
- The liquid fuel pump is usually a gear oil pump. Connects via copper pipe.
- A cut-off 100 lb (45.36 liter) propane tank can be used as a burner guide. Mounted at the required height. You can also get by with a blowtorch.
- A settling tank to collect impurities that have not been burned. A cut off unnecessary cylinder will do.
- A splash catcher, because without it there will be splashes everywhere. A piece of beam is used for this.
Making a tray for working off and installing a chimney for an oil stove with your own hands
According to the drawing of the stove, a cast iron automobile brake disc, which has good heat-resistant characteristics, is used to make a waste oil pan. A steel circle is welded in its lower part, which forms the bottom. At the top there is a lid through which air enters the oven.
A cast iron automobile brake disc is used to make the pan.
On a note! It is better to make the opening wide. This will provide sufficient air draft so that the oil will flow into the pan.
The next stage in the manufacture of a stove using waste oil from a gas cylinder is to make a coupling from a 10 cm long pipe that connects the burner and the pan. Thanks to this element, servicing the stove will be much easier. You can remove the tray and clean the bottom of the burner. To ensure the supply of oil, a metal tube is inserted into the hole in the housing and secured by welding. An emergency valve is installed on the pipe.
The chimney structure is made of a pipe with a diameter of 100 mm. One end of it is welded to the hole in the central upper part of the body, and the other is brought out to the street.
On a note! The chimney pipe through the wall must pass through a special fireproof glass.
By watching the video “Furnace using a gas cylinder”, you can familiarize yourself with the sequence of actions in the manufacture of the device.
Tips for craftsmen
In order to make such a design for heating, carefully study the drawing of the supercharged furnace.
A similar oil device can be made from an old liquefied gas cylinder. In this case, it is worth cutting off the top of the container and constructing a lid with a seal, the role of which will be played by an asbestos cord.
The entire process of creating a structure consists of cutting out openings to provide access to the mining and arranging the chimney. The opening for ignition and monitoring of the firebox must be equipped with a door.
In addition, you need to take care of inserting the pipe through which air will be supplied. In this case, the diameter does not play a special role, so a 45 mm pipe will be just right. Small holes with a diameter of up to 9 mm must be made along the entire length of the metal object. There should be about 50 of them.
How to make a pyrolysis type stove
A potbelly stove during mining consists of three main elements:
- oil containers with lid and valve;
- closed combustion chamber;
- afterburning chambers.
The stove must have a chimney, the length of which is at least 4 m. The oil container, according to the do-it-yourself potbelly stove drawing, is made from a piece of pipe with a diameter of 345 mm and a length of 100 mm. A sheet metal cover is welded to its lower part. The removable top cover is made of a pipe with a diameter of 352 mm, to which sides with a height of 600 mm must be attached by welding. The lid has a central hole of 100 mm in size, intended for the combustion chamber, as well as a side hole (60 mm in diameter) for air injection, which is closed by a rotating lid.
Note! By adjusting the clearance of the blower, you select the combustion intensity of the stove, which affects the air temperature in the room.
According to the drawing of the stove during testing, a pipe with a diameter of 352 mm and a height of 100 mm is used to make the afterburner. Holes measuring 100 mm are made in its lower and upper parts. The first is for the combustion chamber pipe, and the second is for the chimney. Closer to the chimney opening, it is necessary to weld a partition 70 mm high and 330 mm wide.
Diagram of a pyrolysis-type furnace.
Using a drill, holes are made in the combustion chamber pipe along its entire height, leaving the lower zone 20 mm high and the upper zone (50 mm) unused. After completing all welding work, the tightness and reliability of the seams should be checked. Next, a furnace test is organized. The waste is poured into the oil container. Kerosene is added on top. Careful ignition is carried out with the ash pan open, with the help of which, after heating the oven, the heat intensity is adjusted.
Note! Testing the furnace during testing should be carried out outdoors, which will avoid a fire indoors or other accident.
To heat a garage, small workshop or living space, you can use a waste stove, which has a number of advantages. The device can be purchased ready-made or made independently using drawings from the Internet. Before making a stove, you should study the sequence of actions in order to subsequently obtain a practical and effective device.
How to use a homemade unit correctly?
The unit described above should not be placed near mixtures or objects that can easily ignite, or in a draft. It is also important that the stove chimney is completely sealed, and there is at least 50 centimeters of free space around in each direction. It is imperative to ensure that no water gets into the fuel used, otherwise it will splash out of the holes in the pipe.
The “working” will heat up very quickly. Fill the container to two-thirds of the height, then, adding 25 grams of gasoline or solvent, ignite the resulting mixture through the fuel filling hole. For ignition, it is preferable to use a burning wick screwed to a piece of wire.
Note! Check regularly how the unit works. Use the plate to adjust the burning intensity. Never leave a working oven unattended!