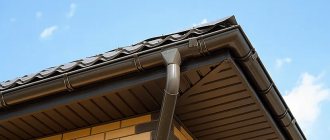
Rafters for residential buildings are most often made of wood. Such rafter systems are usually made in the shape of a triangle, although other designs are sometimes used.
If it is necessary to save living space, attic rafter systems are used, which make it possible to equip another living room in the attic.
How to draw a roof plan
General information about constructing drawings of roof plans for industrial and public buildings: to construct a drawing, the plan is divided into rectangles, according to the building plan. Inside the rectangles, lines are drawn that will indicate ridges and valleys - the external and internal junctions of the slopes. These lines are projections of the main elements of the walls, so the roof model will be better represented in volume. Some of the rectangles will be located outside the walls. This is a prerequisite for a correctly executed roof plan, since they must have an overhang.
The roof plan of a pitched roof is distinguished by the presence of a larger number of projection lines of ridges and valleys, since the slopes have a large slope, in addition, such roofs are often made of complex shapes. The roof plan of a flat roof is often limited to just a few lines.
The construction of front or side views is carried out taking into account the slopes of the roof slopes. The roof slope is set at the design stage of houses and is determined by the purpose of the building, its type, the selected roofing material, etc.
3 rules for drawing a pitched (flat) roof plan:
- the intersection of two slopes forms a ridge (endow). Its projection on the plan divides the corner of the rectangle into equal parts;
- if the eaves lines are parallel, then the ridge line will be parallel to them... its projection will be in the middle, unless otherwise determines the type of roof (for example, if the slopes are not equal);
- When two lines of intersection converge at a point, a third one will most likely pass through it.
Suggested procedure for working in drawing programs:
- draw a polyline around the existing house plan;
- copy it, as well as the outlines of the main walls, onto a drawing with a roof plan;
- mark with a line the projection of the upper ridge of the house;
- draw the remaining ridges and valleys using the three rules given above;
- place ventilation and smoke ducts on the roof plan;
- place skylights (if any);
- directions of drains, slopes of slopes, marks;
- indicate dimensions on the plan (along axes and contours).
After reading this lesson, you should not have any questions about how to draw a roof plan - a house plan; you must agree that the whole drawing is just a few lines! However, the question: how to draw a rafter plan has not yet been resolved.
Floor slab installation technology
To install prefabricated reinforced concrete slabs, it will be necessary to rent a crane and 4 workers: a driver, a slinger and 2 installers.
Load-bearing walls should be calculated taking into account the need for a 5 cm gap on the street side. Insulation is placed in the recess; it prevents drafts through the cracks in the ceiling. Wear of thermal insulation in such houses leads to cold, dampness and drafts.
Installation procedure:
- Concrete is laid in a layer of 15-20 mm on the prepared cement mortar cushion on the supporting walls.
- The panel is lifted with a crane and placed on top of the installation site.
- Installers rotate the slab to guide it to the desired position. Crowbars will help to accurately position the slab before removing the slings. The correct location implies a contact point between the wall and the slab of at least 15 cm on each side.
- The slings are released and a final check of the installation is made.
There are no temperature restrictions for reinforced concrete
How to draw a rafter plan
The rafter plan is a designation of pitched roof elements that is omitted from the roof drawing. The rafters are positioned taking into account the roofing material, since different materials require different foundations. In the case of metal tiles, it is necessary to leave a space of 450 cm between the rafters. Drawing procedure in AutoCAD:
- copying the roof plan or mirroring half of the roof, if these drawings must be combined;
- assigning roof lines a smaller thickness;
- parallel offset from the ridges and valleys of the lines by half from the rafters (if the rafters are 15 cm, then the offset in the program must be specified as 75 mm);
- after this, the main frame is ready (see more details: the rafter system of the house), then you need to move on to the rafters of the slopes, it is recommended to draw them from the middle of the roof, especially if the building is symmetrical (it is better to place two lines at once on opposite sides of the line of symmetry and move from them) .
- The distance for placing the rafters is selected individually, taking into account the characteristics of the roof of the house; in my work it was up to 800 mm; in places where chimneys pass, the distance was reduced to 600.
Source
Sequence of installation of floor slabs
Initially, you need to complete 2 steps:
- Preparation. It is important to create the correct level between all the supporting walls of the structure. The permissible difference is 1 cm, it is not necessary to eliminate it. To check the horizontal plane, use a building level. A beam is laid between opposite walls and the evenness is checked. If there are small irregularities, they can be eliminated with cement mortar.
- Next, a distribution belt is made to level the wall. The reinforcing belt is made of cement M500 1 to 3 with sand. It is important to ensure the cleanliness of the sand, rinse and sift if necessary. A solution of medium viscosity is prepared. The mixture is poured into the formwork and pierced or tamped to remove voids. The solution takes up to 3-4 weeks to dry.
The main qualities for which reinforced concrete is valued are always called strength and good resistance to bending moment.
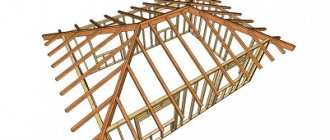
Algorithm for constructing a plan for layered rafters
1) Draw the coordination axes of the building.
2) Draw the outline of the walls.
3) Lay Mauerlat along the perimeter of the building on the outer walls.
4) Place a support beam in the corners of the building to support the diagonal rafter legs.
5) At an angle of 45°, draw diagonal rafter legs from the corners of the building.
6) Lay a plank along the inner wall of the building and show the upper purlin.
7) Lay the rafter legs, starting from the support unit, after a certain distance.
 Lay short rafter legs (springs) in a checkerboard pattern along the diagonal rafter legs.
9) Install the racks every 3000 - 6000 mm, starting from the support unit.
10) If the building width is more than 12 m, place a crossbar at the rafter legs.
11) To form a cornice, a filly is nailed to each rafter leg, and fillies, called shorties, are nailed to the diagonal rafter legs on both sides.
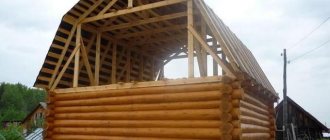
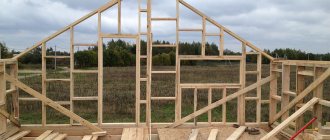
Roof assembly
No matter what the walls of the house are built from, the roof is always formed from wood. We have figured out its structure in the gable version, now we will pay attention to the stages of work.
We recommend reading: drawing up a drawing of a gable roof.
Stages of frame construction
We offer a small step-by-step photo report on the installation of layered rafters when installing a gable roof:
| No. | Steps, photo | A comment |
| 1. | Installation of Mauerlat around the perimeter of the walls | If this is the roof of a brick house (including walls made of foam blocks, aerated concrete, ceramic or expanded clay concrete blocks), rafter beams (mauerlat) are mounted on the edge of the masonry - on those sides where the roof slopes will hang. |
What you need to know to develop a rafter plan
In order to save living space, attic rafter systems are chosen , since it is with their help that it becomes possible to equip an additional living room in the attic.
In general, a process such as designing a rafter system can be considered quite complex, since it requires certain skills, knowledge and skills. Therefore, to carry out all the necessary calculations and competently draw up a drawing, it is best to use the services of a specialist who already has some experience in such work.
The most important parameters that must be taken into account, starting from the roof design stage, are:
- Roof slope angle
- Selection of rafter section
- Roof type
- Material to be used for roofing
- Calculation of the rafter system
The level of slope of the slopes must be taken into account when selecting materials and when calculating the strength of the supporting structure necessary for any roofing work.
Most of the materials that can be used for such purposes can have a very noticeable impact on the design of the rafter system as a whole. Therefore, it is necessary to choose the material that will be used to cover the roof very carefully, with all responsibility, and this must be done during the design process.
The drawing of the rafter system must be calculated with special care , since all possible errors and shortcomings that are made when assessing loads may well lead not only to damage and deformation of the rafters, but also to the complete destruction of the roof already during its operation, up to complete collapse roofs.
Rafter plan
Material selection
The basis of rafter structures is wood. There are strict standards for the quality and size of the material:
- wood moisture content should be less than 18%;
- There should be no more than 3 knots on each meter of the board, their diameter should not exceed 3 cm;
- through cracks are unacceptable;
- the depth of blind cracks should be less than half the length of the board.
The beam should have a cross-section from 4 to 15 to 10 by 25 cm. The indicator depends on the distance at which the legs will be located from each other, as well as on the number of loads from precipitation on a certain area of the roof.
It is important that the cross-section is no more than 5 cm. After all, the width is always directly proportional to the length. For example, if the length of the board is 5 m, the width should not be less than 13 cm.
When choosing a material, attention is paid to cracks, chips and other defects. It is impossible to find even wood. It is important that the maximum length of knots does not exceed a third of the thickness of the timber.
Development of a rafter plan
The process of developing a rafter plan includes procedures such as:
- Construction of modular axes linked to the thickness of the building’s load-bearing walls. In this case, on the plan itself, the projection of the crowning cornice is shown on the outer wall using a contour line.
- Ventilation and pipelines must also be indicated on the plan; their location must certainly be taken into account when arranging elements in the rafter system design.
- Based on the selected roof structure, a plan is developed. In this case, the walls and the fastening of the rafters in the ridge must be taken into account directly on the sketch.
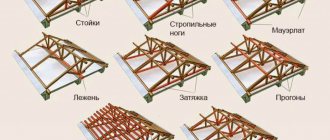
Using such a sketch allows you to draw a plan of the rafter system, with the mauerlats, longitudinal struts and racks, a rafter beam, and rafter legs indicated on it.
Rafter system
The selection of a suitable distance between adjacent rafters is carried out based on:
- from the weight of the material chosen for roofing,
- scaffolding that will be used in this case,
- The pitch of the rafters can be changed due to the need to pass ventilation pipes or a chimney through them.
Also, ventilation and pipes can be passed through by interrupting the legs of the rafters, for which their ends are supported on special wooden jumpers, which are located between the adjacent rafters, and secured using a special rafter cut.
Examples of our work
Roofing from scratch in the community center "Nightingale Grove"
Roof installation in EKP "Monolith"
Replacement of the roof of an office building in Dzerzhinsky
Reconstruction of the roof in the village of Pozdnyakovo
Rafter plan: making it easier to calculate the system
In the construction of cottages and country houses, rafter systems used in residential buildings are used.
This article will talk about how a rafter system is designed, what a rafter plan is and how it is drawn up to facilitate the calculation of the system. Rafters for residential buildings are most often made of wood. Such rafter systems are usually made in the shape of a triangle, although other designs are sometimes used.
If it is necessary to save living space, attic rafter systems are used, which make it possible to equip another living room in the attic.
Recommendations from the pros!
Accessories for a bath Do-it-yourself gazebo Concrete fence Do-it-yourself potbelly stove Do-it-yourself veranda Screw foundation Do-it-yourself country toilet Decorative brick Stone fence Pouring a foundation How to make a fence Wicket from corrugated sheets Do-it-yourself fireplace Brick fence Do-it-yourself flower beds Forged gates Do-it-yourself porch Pool for a bathhouse Chicken coop do it yourself DIY staircase Metal gates Installation of lining Installation of polycarbonate Pump for a summer house Arrangement of a garage Fences for flower beds Do-it-yourself blind area Steam room in a bathhouse Railings for stairs Do-it-yourself cellar Painting walls Press with your own hands Grilles on windows Rolling gates Do-it-yourself barn Alarm system for a summer residence Benches for a summer residence Fence posts Floor screed Solid fuel boilers DIY greenhouse Fence installation House insulation Attic insulation Foundation insulation
Design of rafter systems and rafters
Designing a rafter system is a rather complex task that requires special skills and knowledge. To do this, it is necessary to correctly calculate snow and wind, and the optimal weight of the system.
Therefore, the greatest efficiency and durability of a built house can be achieved if the calculations and drawings of the rafter system are performed by a competent, qualified specialist with experience in performing such work.
The most important points taken into account when designing a roof are:
- Type of roof being built;
- Angles of inclination of slopes;
- Material used for roofing;
- selection of rafter section;
- Calculation of rafter system structures.
Design of a rafter system
At the same time, the magnitude of the slope of the slopes also affects the calculation of the strength of the supporting structure and the choice of material with which the roof will be covered.
Most of these materials directly affect the design of the rafter system, therefore, the covering material must be selected at the design stage.
The rafter structure should be carefully calculated when designing the roof, since shortcomings made when assessing loads can cause both deformation of the rafter structure and damage to the roof covering during operation, as well as the collapse of the entire roof.
The load-bearing structures of the roof, which in the case of a pitched roof consist of sheathing and rafters, ensure its stability and strength.
The structural layout of the rafters depends on the following parameters:
- Roof shape;
- The presence of internal supports and their location;
- Length of the space to be covered.
When drawing rafters, it should be taken into account that rafters or rafter trusses can be hanging or layered (the most widespread type).
Most often, the rafter design is made in the shape of a triangle, providing maximum rigidity and efficiency.
Complex rafter trusses include a number of different additional elements, such as:
- Rafter beams, also called rafter legs;
- Puffs;
- Crossbars;
- Racks;
- Struts, etc.
Let's take a closer look at the two main types of rafters:
- Layered rafters are installed in houses where the load-bearing wall is the middle one. They consist of two rafter legs, the lower ends of which rest on the mauerlats - load-bearing beams, and the upper ends - on the ridge run, which is supported by racks. The racks are installed on a bench located on the load-bearing internal wall. The Mauerlat and the bench serve to distribute the load on the walls. In the absence of longitudinal internal walls, the rafters should be supported by transverse internal walls or pillars, the distance between which does not exceed 6.5 meters. With the help of one additional support, the width of the covered room can be increased to 12 meters, and with two supports - up to 15 or 16 meters. Increasing the span increases the complexity of the design, as it becomes necessary to introduce additional roof elements, such as posts and struts, to increase the stability and lateral rigidity of the rafter system, turning the rafter structure into a truss.
- Hanging rafters are used in the absence of internal supports and rest only on external walls. Hanging rafters include inclined rafter legs and a brace, which is a horizontal beam that receives thrust from the rafter legs. The lower ends of the rafter legs rest on the mauerlats using tightening, and for the upper ends the rafters are fastened to the ridge. The simplest version of hanging rafters is a triangular symmetrical truss, and the volume of the overlapped space can be from 7 to 12 meters. The structure can be strengthened using a special tie - a crossbar.
Important: it should be noted that the production of hanging rafters is a rather labor-intensive process, and their cost is significantly higher than the cost of suspended rafters. Therefore, quite often, in order to reduce the cost of construction, combined rafter systems are installed, which include both hanging and inclined rafters.
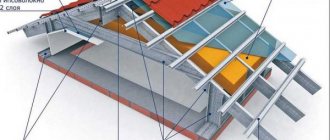
Formation of roofing layers
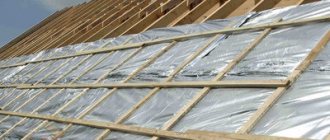
Further actions depend on what roofing material will be used for the coating. If it is rigid, such as slate, metal tiles, ceramic tiles or corrugated sheets, then sheathing is mounted on the upper planes of the rafter beams.
If the attic is not heated
But first, a hydro-windproof membrane. The roll is rolled out along the entire length of the roof, securing the canvas with antiseptic slats, as shown in the photo.
Installation of roof sheathing
The canvases are laid with an overlap of at least 10 cm, and first attached to the rafters with a stapler. Then the joints are taped with tape, after which the rail is used, due to the height of which a gap is provided for ventilation of the roof.
An edged board is placed across the counter-lattice, the size of which is selected depending on the pitch between the rafters. The larger it is, the thicker the sheathing board should be. The width is usually the same, 100 mm.
The distance between the boards is determined by calculation and depends on the parameters of the roofing material.
This is what the relationship between the rafter spacing and the thickness of the horizontal sheathing board looks like:
- 600 mm – 20 mm;
- 900 mm – 23 mm;
- 1200 mm – 30 mm;
- 1500 mm – 37 mm.
Structure of the sheathing of a cold roof with a hard covering
When using soft material (ondulin, flexible tiles) to cover the roof, the base under it must be solid, so the board is mounted not in increments, but end-to-end.
As an option, sheet material, mainly OSB boards, is used for flooring. They also hem the roof slopes from the inside.
Continuous gable decking for soft roofing material
If there is an attic under the roof
The rafter system of the gable roof of the attic has no structural differences from the cold version, but the pie is composed somewhat differently.
In the attic floor, the roof is the same as the external walls for a frame house (attic roof projects are presented in our article). It should not only protect the under-roof spaces from blowing and leaking, but also ensure proper temperature conditions, and preferably, access to light, for which windows are made in the slopes or gables.
Diagram of the installation of a mansard gable roof of a house
Mineral wool or foam plastic insulation (foam glass is not used here due to its high cost and greater weight) is laid not only in the attic floor, but also in the roof structure (the insulation of house floors is described in detail in the article). The thickness of the insulation is determined by calculation, but cannot be less than 200 mm.
At the same time, it is very important to ensure that steam penetrating into the structure through the wood and possible cracks, despite the presence of a vapor barrier membrane under the inner lining, does not settle on mineral wool or expanded polystyrene, but can freely exit through a small ventilation gap.
The principle of ventilating an attic roof
A free space of 3-4 cm is left between the insulation and the counter-lattice, which holds the rolled waterproofing without fail, otherwise the vapors will not have an outlet and will condense inside, reducing the thermal efficiency of the structure and leading to rotting of the wood.
How to add additional insulation
If additional insulation is necessary - in the case when the calculation determines the thickness of the insulation to be greater than 200 mm (this is the standard height of the rafter beam section), an additional layer is installed.
The choice of roofing material depending on the angle of inclination
This can be done both from the inside and outside, but the first option is easier to do, since insulation is usually installed during the interior finishing process.
And then, you need to cover the roof as quickly as possible with corrugated sheets or other roofing material, install gutters - so that until the installation is completed, rain cannot wet the insulation and rafters.
The roof needs to be covered as quickly as possible
When there is no dripping from the roof, everything can be done slowly from the inside and even several additional layers can be formed through spacer battens.
To prevent them from “eating” the under-roof space, it is very convenient to use rolled foil materials made of foamed polyethylene for this purpose.
Additional insulation with Penofol
In terms of heat retention, they are 4 times more effective than foam plastic or mineral wool, and to prevent the creation of cold bridges and steam from penetrating between the canvases, their joints are glued with metallized tape. Next, along the lathing, which is mounted on top of the canvases, cladding is made, the choice of which depends on the design of the premises.
Stages of drawing up diagrams
The preparation of design documentation for a gable roof is divided into several stages:
- Drawing up a sketch of the future complex - this part of the drawing is responsible for the appearance of the roof, the structure and appearance of the roof. The sketch reflects the color scheme and style of the entire structure.
- Development of main roofing elements - this part of the drawing is responsible for performing calculations, determining loads and the amount of material used.
- Roofing construction - direct execution of construction work in accordance with approved drawings.
The photo shows the types of pitched structures, each of which has its own distinctive features in the design and construction of the rafter system.
Wind load accounting
Due to the wind, the roof experiences a lateral load, and the wind flow is divided into two branches - upper and lower. All these nuances require mandatory consideration, otherwise the roof will not last long. It happens that the wind can even tear off the roof or seriously damage it. In this case, minor repairs will not help, so it is best to protect yourself from financial losses in advance.
Especially for these purposes, there is such a term in construction usage - the aerodynamic coefficient of the roof. This parameter is directly dependent on the degree of slope of the roof slopes. As the angle of inclination increases, the wind load also increases, which can lead to the structure tipping over. As the angle decreases, the lateral load on the roof also decreases, but in this case the wind begins to put pressure on the eaves from below. With significant lifting force, the roof can be torn off, similar to how a strong wind tears an umbrella out of the hands of a passerby. Taking these considerations into account, they try to make roofs in regions with strong winds flat, with a minimum eaves length. Hanging rafters are not used in such cases.
In addition to the direct influence of wind, such areas are also dangerous because the roof experiences frequent mechanical impacts from falling branches and other objects. Moreover, high roofs are more susceptible to such loads. When scratches appear on metal roofing material, the corrosion process is set in motion, so it is best not to use it in such regions. It should also be taken into account that when laying the Mauerlat, it is recommended to make a certain indentation from the edge of the outer wall, in order to avoid it being torn off by strong gusts of wind.