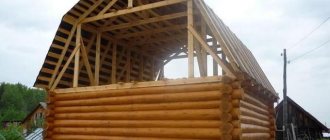
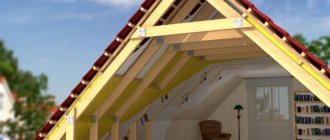
The classic hipped roof, even today, remains unusual for Russian latitudes and is reminiscent of the overseas way of life. That is why it is most often built in order to give the architecture of a residential building a special effect in terms of style and perception, it is advantageous to distinguish it from monotonous, familiar buildings.
In addition, a hipped roof - built with your own hands according to all the rules - in practice has a large number of advantages, especially for the harsh Russian latitudes. Let's take a closer look?
Varieties: hip and tent structures
The class of hipped roofs combines two types of structures that resemble a square and rectangular envelope in plan.
The first variety is called tent, the second - hip. Compared to their pitched counterparts, they are distinguished by the absence of pediments, called gables in the roofing industry. In the construction of both versions of hipped structures, layered and hanging rafters are used, the installation of which is carried out in accordance with standard technologies for the construction of pitched rafter systems.
Characteristic differences within the four-slope class:
In a hip roof, all four slopes have the shape of isosceles triangles, the vertices of which converge at one highest point.
There is no ridge as such in a hipped structure; its function is performed by the central support in layered systems or the top of a hanging truss. In a hip roof, a pair of main slopes has a trapezoidal configuration, and the second pair is triangular. The hip structure differs from its tent-type counterpart in the obligatory presence of a ridge, to which the trapezoids are adjacent at the upper bases. Triangular slopes, also known as hips, are adjacent to the ridge at the top, and their sides are connected to the inclined sides of the trapezoids.
Based on the configuration of the roofs in plan, it is clear that hip structures are usually erected over square buildings, and hip structures over rectangular houses. Both soft and hard roofing materials are suitable for covering. The characteristic square or rectangular shape is repeated in the drawings of the rafter system of a hipped roof with a clearly marked arrangement of elements in the plan and vertical projections of the slopes.
Often, hip and hip systems are used together in the construction of one building or effectively complement gable, lean-to, sloping and other roofs.
Structures with four slopes can rest directly on the upper crown of a wooden house or on the Mauerlat, which serves as the top frame of brick or concrete walls. If you can find upper and lower supports for each rafter, the roof frame is constructed using layered technology.
Installation of layered rafter legs is simpler and more accessible for an inexperienced home roofer, who needs to take into account that:
Issues of fastening the Mauerlat and the closely related method of installing rafter legs according to the rules are resolved at the stage of designing a house. If the building does not have an internal load-bearing wall or it is not possible to build reliable supports for the central part of the roof, nothing will work other than a hanging rafter system assembly scheme. True, in most cases the layered construction method is used, for the implementation of which it is necessary to provide in advance a load-bearing support inside the structure.
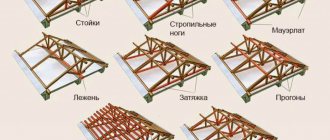
In the construction of rafter systems for hipped and hipped roofs, specific structural elements are used, these are:
Diagonal rafter legs forming the spinal connections of the slopes. In hip structures, diagonals, also known as slanted rafters, connect the ridge girder consoles to the corners of the roof.
In tent systems, sloping legs connect the top to the corners. Rafters, or rafter half-legs, are installed perpendicular to the eaves. They rest on diagonal rafters and are located parallel to each other, therefore they differ in different lengths. Narozhniki form the planes of tent and hip slopes.
Diagonal rafters and flanges are also used for the construction of valleys, only then concave corners of the roof are arranged, and not convex ones like hip ones.
The whole difficulty of constructing frames for roofs with four slopes lies in the installation of diagonal rafters, which determine the result of the formation of the structure. In addition, the slopes must withstand a load one and a half times greater than ordinary rafters of pitched roofs.
Because they also work as a skate, that is, as a support for the upper heel of the skaters.
If we briefly describe the procedure for constructing a layered frame for a hipped roof, then it can be done in several stages:
Installation of a mauerlat on brick or concrete walls.
The process of installing a mauerlat on walls made of logs or beams can be eliminated, since it can be successfully replaced by an upper crown. Installation of a central support for a hipped structure or a supporting frame for the main part of a hip roof. Installation of conventional layered rafters: a pair for a hipped roof and a specified design a row solution for a hip structure. Installation of diagonal rafter legs connecting the corners of the systems with the top of the support or the extreme points of the ridge. Manufacturing to size and fastening of the flanges.
In the case of using a hanging frame scheme, the start of the construction of the tent frame will be the installation of a triangular truss in the center. The installation of a four-slope hip rafter system will begin with the installation of a number of roof trusses.
Design of hip roofs
When developing a hip roof, all types of loads that will affect it are taken into account. To do this, you must first resolve several important issues:
- purpose of the attic space;
- roofing material;
- degree of atmospheric influence in the construction region.
Based on these factors, the degree of slope of the slopes and the roof area are determined, the loads are calculated and a decision is made on the design and parameters of the rafter system.
Geometric parameters of slopes
The angle of inclination of the slopes depends on the snow and wind load, therefore it varies within a very wide range - from 5 to 60 degrees. In areas with rainy weather and high snow cover, roofs with a slope of 45 to 60 degrees are erected. If the region is characterized by strong winds and minimal precipitation, then the slope can be reduced to the very minimum.
When determining the angular parameters of the roof, it is necessary to take into account what material it will be covered with:
- slate sheets, ondulin, roofing metal and rolled materials are laid on slopes with a slope of 14 to 60 degrees;
- the tiles are mounted on a surface with a degree of slope from 30 to 60 degrees;
- Roll coating is used on sloping slopes - from 5 to 18 degrees.
Having decided on the angle of the roof, it is not at all difficult to calculate at what height the ridge will be. To do this, use simple trigonometric formulas for a right triangle.
Roof area
Even the most complex hip roof consists of individual slopes that follow the contours of the simplest geometric shapes, so most often for calculations it is enough to know the linear dimensions of the base and the angles of inclination of the hips.
To determine the square footage of the roof, it is necessary to add up the areas of the slopes of which it consists
The total roof area is calculated by summing the square footage of the individual hips. Slopes of complex configuration are divided into several simple surfaces, after which separate calculations are carried out for each of them.
The principles for calculating the geometric parameters of hip roofs are based on calculations for simple surfaces
Load calculation
Loads acting on a hipped roof are divided into two types:
- permanent,
- periodic.
The first includes the weight of roofing materials, rafters, sheathing and other frame parts. The second is the forces exerted by precipitation and wind force. In addition, when calculating, one should take into account the payload in the form of various engineering systems and communications attached to the elements of the rafter system.
Based on SNiP, when designing a roof it is necessary to assume a snow load of 180 kg/sq.m. m. If there is a danger of snow accumulation on the roof, this parameter increases to 400–450 kg/sq. m. If the roof has a slope angle of more than 60 degrees, then the snow load can be ignored - precipitation does not linger on surfaces with such steep slopes.
The force of wind loads is much less - up to 35 kg/sq. m. If the roof slope is from 5 to 30 degrees, then the effect of the wind can be neglected.
The above parameters of atmospheric influences are average values accepted for the middle zone. When performing calculations, correction factors should be used depending on the region of construction.
Calculation of the rafter system
When calculating the rafter system, the pitch of the rafters and the maximum load they can carry are determined. Based on these data, a decision is made to install braces, which help redistribute the load, and tie-downs, which protect the frame from loosening.
The main load of the hip roof falls on the diagonal rafters
The presence of hips on hipped roofs, in addition to the usual rafters, also requires the installation of diagonal rafters (in other words, slanted ones) - those that are attached to the ridge and directed to the corners of the building. Their length is greater than the transverse node elements of the roof. In addition, shortened elements—springs—are attached to the diagonal ribs. Compared to conventional rafters, slanted legs experience a load increased by 1.5–2 times, so their cross-section is doubled, and to ensure multi-span they are supported by one or two racks.
Often, hip roofs have a complicated rafter system, which, in contrast to a simple hipped structure, places additional load where vertical supports are installed. This feature must be taken into account when calculating the strength of a wooden roof frame.
The distance for laying the rafters is called the pitch and is determined based on the length of the rafter leg and the cross-section of the lumber used. It is most convenient to determine this parameter using special tables, one of which is given below.
Table: dependence of the cross-section and pitch of rafters on their length
| Rafter leg length, m | Rafter section, m | Distance between rafters (step), m |
| Until 3 | 8x10 9x10 9x16 | 110–135 140–170 175–215 |
| Up to 4 | 8x16 8x18 9x18 | 110–135 140–170 175–215 |
| Up to 5 | 8x20 10x20 | 110–135 140–175 |
| Until 6 | 10x20 | 110–140 |
| Up to 6.5 | 12x22 | 110–140 |
Manual calculations are quite labor-intensive. To reduce design time, you can use one of the online calculators to determine the parameters of hip roofs. With its help, you can determine not only geometric parameters, but also a lot of other equally important factors:
- amount of moisture and heat insulation, taking into account overlaps;
- amount of roofing material, including waste generated during cutting;
- the volume of lumber required for arranging the rafter system;
- length of overhangs, etc.
Video: using a construction calculator to calculate a roof
https://youtube.com/watch?v=-6j7L6Kxxf4
What materials will be needed to assemble the rafter system?
For the construction of a hip roof, timber and boards made of larch, pine and other coniferous wood are best suited. When choosing material for construction, it is necessary to carefully reject defective boards. Fungal damage, knots and cracks reduce the strength of the boards and affect the durability of the roof. When the wood moisture content is more than 22%, the lumber is stacked in the open air and dried. It should be understood that under-dried boards can warp, and this, in turn, will lead to a violation of the geometry of the roof with possible damage to the finishing coating.
To assemble a wooden frame, a rectangular beam with a cross-section from 80x80 mm to 150x150 mm is used - the exact parameters are determined by calculation or using the table above. As an alternative, you can use a board with a section of 50x100 mm or 50x200 mm. If there is a need to strengthen the rafter leg, then paired boards are used.
For reliable fastening, as well as increasing the rigidity of the wooden frame, steel brackets and other metal elements are used. Often, steel supports, rather than wooden ones, are installed under particularly loaded ridge girders. Combined frames have increased strength and reliability.
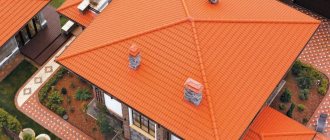
Dutch roof: classic four slopes
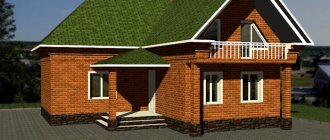
The Dutch or hip roof is considered a classic option, which is particularly resistant to wind and snow.
The surface of a standard hip roof forms two trapezoidal slopes on the long sides and the same number of triangular ones on the short sides. Unlike a hipped roof, this form, according to modern architects, is considered more aesthetically pleasing.
The hip roof rafter system involves the installation of four slanted rafters - diagonal support beams that run from the two tops of the slopes to the upper corners of the building.
But the half-hip roof, in turn, comes in two types: when the side slopes cut off only part of the end at the top, or already at the bottom, that is, the half-hip itself can be a triangle or a trapezoid, and is called Danish or half-hip Dutch.
Advantages of hip roofs over gable structures
One of the main tasks that appears even at the stage of designing your own home is choosing the type of roof. The presence of many options among gable and hipped structures requires an answer to the question of which roof to give preference to. And although the aesthetics of the structure plays an important role, the criteria of reliability and practicality still come to the fore.
A gable roof is a classic structure that is formed by two opposite slopes and a pair of vertical end parts called gables. The spacious under-roof space allows you to equip an attic, living space or use the attic for domestic purposes.
The classic gable roof is easily recognized by a pair of rectangular slopes that adjoin each other along the central axis of the building, and two triangular gables at its ends
Structures of this type, due to their simplicity and practicality, remained the most popular in individual construction for a long time. At the same time, the dependence of the roof geometry on the size of the building, as well as the complication and rise in cost of the structure when arranging the attic, forced the search for other, more practical and functional options. And they were found in the form of a variety of hipped roofs, which are based on a pair of triangular and two trapezoidal slopes. The latter are often called hips, and the roof itself is called hip. When erecting a structure of this type, there is no need for gables and it becomes possible to make the building more modern and original.
The slopes of the simplest hip roof define surfaces in the form of two trapezoids and a pair of triangles
There are several advantages of hip roofs over traditional gable structures:
- the possibility of installing attic windows directly on the slopes;
- increased strength, reliability and stability of the rafter system;
- increased resistance to weather factors;
- the possibility of increasing the area of the attic by simply reducing the width of the base of the hip;
- more uniform distribution of roof weight;
- improved temperature conditions when arranging the attic space.
Don’t be fooled by the many advantages of a more stylish hipped roof - it also has disadvantages. These include a more complex design, a slight reduction in the size of the attic space and wasteful use of roofing material. As for expenses, the budget required for the construction of one and the other roof differs slightly.
The hipped roof is not a know-how in architecture - its design has been known since ancient times
Half-hip Dutch roof: particularly stable
The half-hip Dutch roof is both a variant of both a gable structure and a hip roof. It differs from the classic version by the presence of truncated hips - triangular end slopes. According to the rules, the length of the hip of a Dutch roof should be 1.5-3 times less than the length of the side trapezoidal slopes.
The advantage of such a roof is that it is possible to install a vertical dormer window, and at the same time there is no sharp projection, like a gable roof, which, in turn, increases the roof’s ability to withstand extreme wind loads.
Advantages and disadvantages
The following advantages of a hipped roof are noted:
- The absence of a pediment makes it possible to increase the resistance of the structure to wind loads from all sides, which is important for regions with variable wind roses.
- Effective drainage of precipitation and melt water around the entire perimeter of the house.
- Possibility of arranging a comfortable attic of considerable size.
- Attractive appearance.
Disadvantages include more complex design and construction and increased costs. This design is more often used in luxury homes, where special attention is paid to design.
Half-hip Danish roof: European traditions
But the Danish half-hip roof is a type of purely hip roof. In this case, only the lower part of the end slope is mounted, and a small vertical pediment is left under the ridge.
The advantage of this design is that it allows you to abandon the attic windows in the roof that are problematic in terms of waterproofing and provide natural lighting to the attic by installing full vertical glazing, which is especially fashionable now.
Calculation of the volume of the attic space
Before starting construction of the attic floor, you should check the drawing for compliance with SNIP rules. According to the standards, 50% of the room under a hipped hip roof should have a ceiling height of 2.5 m.
The usable area includes parts of the attic with a floor height of at least 2.5 m. Areas of the room with a distance from floor to ceiling of 1.5 m with a roof slope of 30° are taken into account, 1.1 m - with 45°, 0.5 m - with 60°. The remaining areas of the room with a lower height are taken into account in the formula with a reduction factor of 0.7.
To determine the main part of the volume of the attic space yourself, you should divide the space into geometric shapes. Formulas for calculations can be found in school textbooks. The dimensions of imaginary figures are taken from the drawings of the plan, facade and sections. The classic hipped hip roof consists of two pyramids with an offset center and one truncated. The volume of a hipped hipped roof is much easier to calculate. The figure formed by the roof frame is a regular pyramid with a square base.
Hip roof: ideal proportions
A hip roof is usually installed on buildings that have the same length of walls, which form a square perimeter. In such a hipped roof, all the slopes are shaped like identical isosceles triangles, a roofer’s dream, in a word, and a builder’s nightmare.
The fact is that the construction of a classic hip roof is even more difficult than that of a hip roof, because here the rafters must all converge at one point:
Calculation of the angle of inclination of the slopes and the length of the rafters
The roof slope value is selected based on the climatic conditions of the construction region. It is advisable to install hipped hip roofs without an attic at an angle of 15–25° in areas with strong winds. The requirements of roofing material manufacturers should be taken into account. For each type there are acceptable minimum slope angles relative to the floor plane.
The height of the ridge is calculated using formulas applicable to right triangles in trigonometry. In some cases, first select a suitable mark for the top point of a hipped hip roof from the drawing, and then calculate the angle at which the slopes will be mounted. In the formula, a is the height of the ridge, b is half the width of the house from the plan. Based on the values of a and b, the angle of inclination or height of the ridge is calculated using the Bradis tables for tg and ctg.
You may be interested in: The most common types of roofs by design: frame and components
You can determine the length of the rafter leg L, having the value of the span, the mark of the top point of the roof or the angle of inclination using two formulas. If the height of the ridge is known: L=L1+L2.
A smaller angle of inclination is characterized by a long rafter length.
Stage I. Planning and design
Before making a hipped roof, be sure to think through all its details, down to the smallest detail. Be sure to build even the simplest hip roof structure according to a ready-made drawing. The fact is that the finished gable roof has almost noticeable defects and distortions, but if you make a mistake somewhere in the construction of the same hip or hip roof, then the diagonal rafters simply will not meet at the ridge and it will be extremely difficult to correct this.
Therefore, if you know special programs, create a 3D model of the future roof directly in them, and if not, then just prepare a detailed drawing and it’s good if a professional helps you with this. All the details of such a roof must be calculated - down to the smallest detail!
By the way, today it is quite fashionable to make not only the roof hipped, but also its individual functional elements:
Preparatory stage
After developing the project and drawing up drawings (models) of the hipped roof, preparations for the construction of the roof begin. At this stage, it is important to choose the right material, control its quality and prepare the necessary tools.
Before purchasing basic and consumable materials, it is necessary to calculate their need , because... they must be purchased immediately for the entire volume of construction, but without excessive reserves.
Particular attention is paid to wooden elements for the rafter system. A board, timber or log of coniferous species is most suitable for it. Larch stands out especially for its strength and resistance to decay. If you have financial resources, you can use oak.
The calculation of the need for rafters is made taking into account the installation pitch and the height of the roof (the angle of inclination of the slope). The length of each rafter is determined as L=h/sinA. The lumber of the ale rafter system must be of high quality and have a residual moisture content of no more than 20%.
Roofing material is selected based on financial capabilities, size of the house and overall design. It could be:
- rolled material (including ondulin),
- slate,
- tiles,
- corrugated sheets,
- metal tiles,
- asbestos-cement or metal sheets.
For waterproofing, bitumen mastic, roofing felt or polymer films are usually chosen . Mineral wool and expanded polystyrene (foam plastic) are most often used as insulation.
The need for these materials is selected based on the roof area, taking into account the overlap of elements or strips, as well as inevitable waste.
Required Tools
Before starting the main work, you need to prepare the following tool:
- Bulgarian,
- hacksaw,
- electric drill,
- screwdriver,
- plane,
- axe,
- hammer,
- pliers,
- screwdriver,
- chisel,
- construction knife,
- scissors,
- construction or furniture stapler,
- paint brush and roller,
- building level,
- plumb line,
- roulette,
- metal ruler,
- square
For large amounts of work, it is advisable to have a circular saw.
Stage II. Preparation of structural elements
So, if you have taken a ready-made roof drawing or sketched it yourself and are confident in the future quality, it’s time to prepare the necessary elements of the rafter system. And to do this, first let’s figure out how they are called correctly.
So, the first thing you will have to take care of before building a hipped roof is the Mauerlat.
This is a square or rectangular beam that you will lay on the top of the walls around the entire perimeter of the house. It will become a support for the rafters, which will transfer the load to it, and it is this board that will evenly distribute the weight of the entire roof onto the walls of the house and the foundation. The ideal option is to use a beam with a section of 15 by 10 cm as a mauerlat.
Next, you will build the rafter legs - this is the main element that will create the slope of the roof. Standard rafters are made from boards 50 by 150 mm, and diagonal ones - 100 by 150 mm.
You will also need ties, the main task of which is to prevent the rafter legs from moving to the sides. You will fix the puffs themselves and connect them with the lower ends, and for this, stock up on boards measuring 50 by 150 meters.
But from above, both the diagonal rafter legs and the standard rafters will converge and be secured to each other in the ridge. To do this, take a beam 150 by 100 mm.
Next, in the center of the two opposite sides there should be a transverse beam - a bench, which serves as a support for the racks, and they, in turn, support the ridge girder. A timber with a cross section of 100 by 100 mm or 100 by 150 mm is suitable for this purpose.
The slopes will become a support for the rafters, which prevents them from moving. You should install them at an angle to the stand; to do this, take the same material as for the bench.
Next, an important detail will be the rack - the vertical element of the roof frame. It will serve as a support for the skate. Make it from the same material as the Mauerlat.
Don't forget also about the wind board - this is a horizontal element that connects all the lower ends of the rafters together. You will need to nail it to the rafters along the inner perimeter of the roof and in this way emphasize the line of the slope. A 100 by 50 mm board is suitable for this purpose.
But for the outside you will need another board - a filly, made of the same material. This board received such a strange name from the times when it was carved in the form of horse faces.
But the most unusual and complex element of a hipped roof is the truss, which gives rigidity to the entire structure. Its main task is to connect all horizontal and vertical elements. It is also mounted at an angle, and is made of 100 by 100 mm timber:
And finally, if we are talking specifically about a hip roof, then the only element that is present exclusively in hip roofs is the flaps. They are shortened rafters that rest on a diagonal rafter leg. You can make them from a 50 by 150 mm board.
In life, all these elements look like this:
Also think about insulation, waterproofing film and additional roofing elements:
Plan for laying supports on the Mauerlat
Depending on the material used to construct the walls of the building, the mauerlat can be laid in various ways.
General recommendations are:
- In the upper part of the walls made of gas silicate or foam concrete blocks, you need to pour a reinforced concrete belt in which to place anchors for subsequent fixation of the Mauerlat.
- When constructing brick walls, a side of 1-2 bricks is made in their upper part so that a recess is formed in the center of the wall for a wooden frame. As the bricks are laid, wooden plugs are placed between the bricks, to which the Mauerlat will be fixed with brackets.
For the Mauerlat you will need a beam with a cross section of 100×150 or 150×150 mm. When planning the use of space under the roof, thicker beams should be used. The frame elements are joined with oblique notches, followed by reinforcement with nails, screws or screws, and in the corners with staples.
Next, you need to place the ceiling elements on the Mauerlat. They are made from bars with a cross section of 100×200 mm. The central beam is laid first. If the length of the lumber is not enough, it is made from two pieces of timber. Moreover, the connection point should be on a supporting element, for example, a load-bearing wall.
In this case, the beams are laid in 60 cm increments. As a rule, the box has non-ideal dimensions, so the spacing between the beams can be slightly adjusted to smooth out imperfections. The distance from the walls of the house to the outer beams located on both sides should be 90 cm. This is required for the installation of outriggers.
Extensions are attached to the end parts of the floor beams. For convenience, they are first placed only in those places where the rafters will be installed later. They are fastened to the surface of the outrigger mauerlat with nails, and to the beams with dowels, large-section nails, and self-tapping screws, after which the fastening is reinforced with corners.
Stage III. Installation of attic floor
Often the headstocks of hanging rafters or hangers, which work in tension in a hip roof, must be made of steel. To do this, special wooden purlins are suspended perpendicularly to the clamps of the wooden rafters.
And wooden beams are suspended perpendicular to the purlins, after which beamless lightweight fillings are laid between them. Therefore, if you want to reduce the roof load on the hanging rafters or roof truss, you need to choose suspended floor structures.
For steel trusses, the suspended ceiling must be made fireproof, using steel beams.
Prefabricated reinforced concrete slabs should be laid between such beams, and light insulation should be placed on them. To increase the fire resistance and durability of such load-bearing structures, they must be made of reinforced concrete. Moreover, it is better to make the most reinforced concrete load-bearing structures from large-sized prefabricated panels, so as not to take risks.
Typical hip roof design
When building a simple hip roof, you can use a standard project developed by specialists. Project documentation includes:
- technological map;
- roof plan;
- rafter system diagrams;
- drawings of sections and corner connections;
- statement and specification with a complete list of materials used.
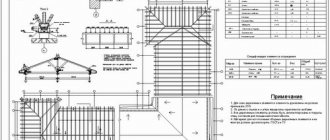
As a sample, below is documentation for a typical hip roof design for a house with an area of 155 square meters. m.
Gallery: drawings and diagrams of a hipped roof
The drawing indicates the exact dimensions of all roof elements. Triangles lie at the base of the roof truss
Rafters of trapezoidal slopes rest on the long load-bearing walls of the building
The ties are installed at the base of the rafters and act as floor beams
When creating a project, it is necessary to take into account the length of the rafters, their pitch, the recommended cross-section of timber or boards. Wooden and metal products are used to fasten the rafters
Fastenings allow you to transfer the load from one element of the system to another
Despite the apparent complexity of a hipped roof, building it with your own hands is not much more difficult than a gable structure. It is only important to carefully understand the purpose of the individual elements and the principles of constructing the rafter system. Otherwise, the reliability and durability of the roof will still depend on adherence to technology and careful installation. As for the additional difficulties and costs, they will be repaid with complete satisfaction from the work, which will make the building brighter and more attractive.
Stage IV. Installation of ridge girder
When calculating the ridge run, take into account the following nuances:
If the building has permanent longitudinal walls, or at least two rows of internal pillars, then two purlins are made.
At the same time, many rafter structures can be composite in length, and crossbars are used to increase rigidity. If the building does not have internal supports, then inclined rafters cannot be made here. Therefore, special construction trusses are used, to which the attic floor is simply suspended. In this case, the rods, which are located along the upper contour of the trusses, form the upper chord of the construction truss, and along the lower contour - the lower chord.
The truss lattice itself now forms vertical rods and braces - inclined rods that are located between the upper and lower chords. Moreover, such trusses are not necessarily made only of wood; on the contrary, steel reinforced concrete ones are quite popular today. During the construction process, the trusses are installed at a distance of 4-6 meters from each other.
The simplest version of such trusses are truss trusses, which consist of rafter legs, a vertical suspension, headstock and tie rods. If the width of the building is large enough, construction trusses or truss supports are used during installation. But then the attic floor cannot be covered with beams that will rest on the walls alone. Such a structure must be suspended on steel clamps to the lower chord of the truss, or to a tie, in order to thus form suspended ceilings.
This photo illustration clearly shows exactly how the rafters need to be attached to the ridge and ridges:
Installation of a hip roof
The assembly of the rafter system must be carried out in a strictly defined order. This is necessary in order to correctly install and secure all structural elements of the roof.
- To redistribute the load exerted on the walls by the roofing structure, wind and precipitation, a Mauerlat is laid on the external walls. In individual construction, timber with a cross-section of at least 100x150 mm is used for these purposes. Anchor pins are used to secure the longitudinal beams of the structure. They must be laid in the upper rows of the masonry at the stage of wall construction. Waterproofing of the Mauerlat is carried out using two layers of roofing material, which is laid on top of the load-bearing walls. The Mauerlat is attached to the load-bearing wall using bolts or anchors
- If it is necessary to install vertical supports, beds are laid on the load-bearing walls. Wooden pads are used to horizontally level the elements of the rafter system. In the future, this will greatly simplify the installation of racks and purlins. If capital partitions are not provided for in the building plan, then vertical supports are mounted on floor beams. To do this, they are strengthened by joining two 50x200 mm boards or using one 100x200 mm beam.
Support of vertical posts on beams is allowed only if the structure rests on a permanent pier - Set up support posts. To level them, use a plumb line or laser level, after which temporary supports are installed. Metal angles and plates are used to attach the vertical support to the beam or horizontal beam.
- Purlins are laid on top of the racks. A traditional hip roof requires the installation of one purlin, which, in fact, forms the ridge. Tent structures require the installation of four purlins. As with the installation of racks, fastening is carried out using metal corners and self-tapping screws.
The ridge purlin can be attached either directly to the rafter leg or using wooden plates - Preparing the rafters. The side rafters of simple hipped roofs are mounted in exactly the same way as the rafters on a gable roof. First you need to make a template. To do this, from the side of the outer support, apply a board of the same width as the rafters to the ridge. Its thickness should not exceed 25 mm - the template should be light. On this board, mark the notch necessary for reliable support and precise fit of the rafter leg to the ridge beam, as well as a cutout corresponding to the junction with the Mauerlat. The marked areas are cut out and then used for quick preparation of the rafter legs. Making a template can reduce the time it takes to prepare rafters for installation
- By applying the manufactured sample to the purlin, it is necessary to check whether precise adjustment of the rafters is necessary. If there are gaps, cuts in the rafters are made taking into account the amendments. After all the supporting legs are ready, they are set in increments of 50–150 cm and attached to the Mauerlat and the ridge. For installation, staples are best suited, but strong metal corners can also be used.
- As already mentioned, diagonal rafters are made from spliced boards or timber of increased cross-section. To install them, you will also need a template, which is prepared in full accordance with the method described above. Since the slanted rafters are adjacent to the corner of the mauerlat on one side, and rest on the racks on the other, the cut is made at an angle of 45° to the plane. The layout of rafters and soffits on a hip roof is carried out according to a template
- In the gaps between the sloped rafters, sprigs are attached. Their step corresponds to the distance between the rafters, and the diagonal legs and the mauerlat act as support points. The load experienced by the rafters cannot be compared with the weight that falls on the rafters, so the former can be constructed from boards 30–50 mm thick. To speed up installation, you will need a template with notches on the side of the diagonal rafters and the mauerlat, but the cutouts on half of the frames must be made in a mirror image.
The use of metal fasteners makes the rafter system more rigid and stable - If there is a need, fillies are attached to the rafters and frames. The ends of the rafter elements are cut along the cord.
Attaching the rafters to the Mauerlat can be done in several ways - Strengthen the slopes and side rafters. In the first case, vertical trusses are used, and in the second, struts installed at an angle of 45° are used. They are supported on beds or beams.
- After the rafter system is assembled, a roofing pie is installed on top of it.
The rafter system is prepared for installation of roofing materials
Stage V. Installation of standard and diagonal rafters
So, the diagonal rafter legs rest directly on the ridge, depending on the following conditions:
Additionally, for reliability, the slanted rafters are secured with metal wire twisted several times.
On the ribs, the installation of ridge elements must be done in the same sequence as on a regular roof ridge. Those. install the rib element with a closed end, place the ridge elements in the lock and secure them mechanically. But at the intersection of the ribs and the ridge of a hip roof, it is customary to install Y-shaped ridge elements, although starting and ending ridge elements can also be used instead.
But only cut them along the contour when they are secured to the edge, and mechanically secure the joints. Be sure to treat with primer and mineral coating from the standard repair kit. Also, when installing ridge elements, do not forget to leave a gap on the ribs or ridges of a hipped roof to allow air to escape from the under-roof space.
All the same principles must be observed when building a hipped roof of complex shape:
You can do it! Please ask your questions in the comments.
Installation of slanted rafters - drawings
The diameter of the diagonal rafters coincides with the dimensions of the ordinary elements. Since in our example the slope of the trapezoidal slopes and hips is different, one of the sloped legs is placed slightly higher than the other.
The process of creating and installing slopes is as follows:
- Using laces, we outline additional lines for marking the cut, pulling it to the corners and the center of the slope from the top point of the ridge beam.
- Determine the angle between the top of the corner stem and the lace. This will be the angle for the bottom cut (α). The upper cut (β) is calculated using the formula: β=90º-α.
- We take a piece of board and cut one edge of it at an angle β. Having attached the workpiece to the place where the upper parts are joined, we combine its edge with the lace. We mark the excess and saw off.
- In another blank for the lower heel, we saw off a section at an angle α.
- Using the templates obtained, the first diagonal rafter is cut out. If there is no whole board of the required length, the element is assembled from two pieces. They are spliced using an inch board, 1 m long, placing it on the outside of the rafters. The finished element can be installed.
- The second half of the diagonal rafters is made in the same way, not forgetting that it should be placed slightly lower than the first. The junction of the two halves of the slope should not coincide with the section where the boards are joined into one piece.
- The boards are joined with nails at a distance of 40-50 cm.
- Next, you need to draw a saw line along the lace on the rafter so that it can be joined to the adjacent diagonal element.
The manufacture of the remaining 3 parts is carried out in the same way. Supports are installed under each of these rafters in the places where the beams meet the corner extensions. Additional supports near the ridge are required if the span exceeds 7.5 m.
Construction of a hip rafter system
Let's look at one of the common examples of a hip roof with layered rafter legs. They will have to rely on floor beams laid on top of the mauerlat.
Rigid fastening with a notch will be used only to fix the top of the rafter legs on the ridge girder, so there is no need to strengthen the Mauerlat fasteners. The dimensions of the box of the house shown in the example are 8.4 × 10.8 m. The actual dimensions of the roof in plan will increase on each side by the amount of the eaves overhang, by 40-50 cm.
Roofing pie, sectional diagram
The requirements for the pie are standard - the materials laid in layers must provide good tightness and insulation with a service life that at least matches the durability of the lumber used in the frame and sheathing. The standard scheme includes sheathing and counter-lattice, a layer of waterproofing and roofing.
Differences for residential and non-residential buildings
In houses with residential attics or exploitable under-roof space, heat and vapor barrier layers are added to the design.
The layers of the cake are laid with mandatory ventilation gaps:
- 1-2 cm - from the vapor barrier to the inner lining;
- 2 to 4-5 cm – from the top layer of insulation to the waterproofing;
- 2-3 cm and above - from waterproofing to coating.
The cake is made breathable and blown, 4-5 cm before the junction with the ridge beam, the heat-insulating layer remains open.
The difference between permanent homes, periodically visited summer cottages and non-residential buildings is manifested in the vapor permeability of the materials used. In the first case, the emphasis is on proper ventilation of the cake itself and the possibility of removing condensate from the inside. In the rest - on providing maximum protection from external atmospheric influences.
In residential buildings with unused attics, it is recommended to insulate the ceiling rather than the roof, not least because of the complexity of its shape.
On our website there are publications on how to build a hip roof with your own hands, including for a house with an attic and a gazebo.
Construction of a 4 pitched hipped roof using the example of a gazebo
For a square gazebo 4.5 * 4.5 meters, we made a hip roof covered with soft tiles. The slope angle chosen was “floor material”, taking into account snow and wind loads - 30°. Since the structure is small, it was decided to make a simple system (in the figure below).
The distance between the rafter legs is 2.25 m. For rafter lengths up to 3.5 m, a board of 40 * 200 mm is needed. A 90*140 mm beam was used for the strapping.
Scheme of a hip roof rafter system for a gazebo
The rafter system was assembled on the ground, secured to support posts, then a solid OSB flooring was installed, and then covered with flexible tiles.
First, we assembled the harness that will be attached to the support posts. Next, we installed rafters that rest on the middle of the frame.
The procedure here is as follows: in the middle we place a stand, on top of which the rafter legs will be joined. In this version, this rack is temporary, we only need it for a while - until we connect the first four rafters in the center. In other cases - for larger houses - this rack can remain.
The procedure for assembling a hipped 4-pitched roof: assembled the frame, attached the middle rafter legs to it
We take a board of the required section and lean it against the stand in the place where they will connect (depending on the desired angle of inclination).
We mark how it should be cut (at the top, at the joint and where it joins the harness). We cut off everything unnecessary, try it on again, and adjust if necessary. Next, using this blank, we make three more of the same kind.
Now you can begin to assemble the rafter system of the hipped hipped roof. The most questions arise about the junction of the rafter legs in the center. The optimal way - reliable and not too complicated - is to take a piece of timber of a suitable cross-section, make an octagon out of it - for joining eight rafter legs (four corner and four central).
The size of the edges is according to the cross-section of the rafter legs
Having fixed all four central elements of the rafter system with nails, we perform the same operations with the corner rafters: we take one, try it on, cut it out, make three copies using the template we made, and mount it.
The rafter system of the 4 pitched hip roof has been assembled
Using the same principle, we make half-legs (shortened rafters). If desired, all connections can be further strengthened with corners or metal plates, then the rafter system of the hipped roof will be more reliable and you will not be afraid even in the heaviest snowfalls.
The tests were successful
We install the assembled system on the gazebo posts, fasten it with nails, corners, and secure it with slopes. After this, you can install the sheathing (in this case, solid) and lay the roofing material.
Assembling the ridge section of a hipped roof
The central section of the hip roof is nothing more than a traditional gable structure. Consequently, its assembly is carried out using technology for pitched roofs. Although such a design usually involves the presence of a beam on which supports for the ridge are placed, in this example the functions of such an element are assigned to the central floor beam.
The ridge section of the roof is done as follows:
- First, a supporting structure is assembled for the rafters, which will rest against the ridge beam with their upper heels. The ridge itself will be supported by three support pillars, of which the middle one is mounted directly on the central beam of the floor. To correctly install the two outer pillars, transverse bars are placed under them on top of the ceiling, spanning at least 5 beams in length. The struts provide additional stability to the structure. The supporting elements of the frame are made of timber with a cross-section of 100×150 mm, and the struts are made of boards 50×150 mm.
- To ensure that all rafters are the same, a template is made for cutting them. To do this, a board of the required length is tried on at the installation site, the cuts are marked, and then all the rafters are cut along it.
- The finished rafters are supported on the ridge beam by the cutting point, and the lower part is secured to the outrigger.
Typically, floor beams are placed perpendicular to the frame so that the support of the rafter legs in the central part of the roof rests on them. Since in the example under consideration the rafters are connected to the extension, the installation of additional supports is necessary. They are placed in such a way as to redistribute the load from the rafters and supports to the walls.
In the end, you need to install three rows of stems on each side. After this, a cornice is attached strictly horizontally to the floor beams and extensions, facilitating further work on the roof.
Video instruction
Sources:
https://krovgid.com/montazh/chetyrexskatnaya-krysha-svoimi-rukami.html
https://krovgid.com/montazh/stropilnaya-sistema-chetyrexskatnoj-kryshi.html
https://krovlyakrishi.ru/vidy-krysh/chetyrexskatnaya-valmovaya/kak-sdelat-kryshu-svoimi-rukami.html
https://krovgid.com/montazh/chetyrexskatnaya-krysha-svoimi-rukami.html
https://krovgid.com/montazh/stropilnaya-sistema-chetyrexskatnoj-kryshi.html
https://krovlyakrishi.ru/vidy-krysh/chetyrexskatnaya-valmovaya/kak-sdelat-kryshu-svoimi-rukami.html
Half-hip
The half-hip variety is distinguished by the ability to add more complex structures instead of triangular slopes. For example, a triangle slope is placed on top, and the bottom ends in the shape of a trapezoid. This makes it possible to create a comfortable entrance to the attic compartment or attic window. The trapezoidal bottom can also be made in the form of a slope.
Sequence of work
Mauerlat and rafters
Installation of the roof begins with securing the supporting base - the Mauerlat. This is a beam with a cross section of 150x150 mm, which is laid along the perimeter of the walls. Its horizontal placement is controlled by a level. The beam should not be on the edge of the wall; you need to leave a distance of 5–7 cm. The Mauerlat is fastened to studs embedded in the masonry, which are tightened with nuts. This beam allows you to connect the rafter system and the walls of the house into a common structure.
ce7050a30d77a0a193e915e3355bf650.jpe
472a6d6d87433316ae8a10165e63d447.jpe
37c9c85fa1f8c8fad9d2a2a85851c438.jpe
To install the racks, floor beams or beams are required.
These elements are made from beams measuring 100×200 mm or double boards. All supports are installed strictly vertically and attached to the bed with a metal corner or plate. For a hip roof, the racks are installed in one line, and a ridge purlin is attached to them. When erecting a hip-type roof, the supports are placed diagonally, equal distances are set aside from the corner. As a result, they form a rectangle on which the purlins are laid. Fastening is done with corners. Description of the hip roof design
The side rafters are installed after processing according to the template. A thin board is taken as a blank, applied to the purlin and the cut is marked. The second end rests against the Mauerlat and the lower cut is outlined. The required number of rafters is prepared according to the template and installed with the selected fastening pitch, it can range from 60 cm to 1 meter. The connection to the purlin and base occurs with staples or self-tapping screws.
Washed down the rafters
Sloping rafters with a ridge purlin form the angle of inclination of the slopes. These rafters are located diagonally and carry additional load, so double boards are used for them. The cutting of the slanted rafters is carried out according to a template, their length takes into account the overhang of 50 cm. In the upper part, the slanted rafters are connected by a crossbar to give strength. When installing a hip roof, the slanted rafters are connected at the ridge unit using tie-rods. The rafters are installed at an angle of 90 degrees and are certainly connected to the walls using wire clamps.
Hip diagram
Short rafters or rafters are attached to the diagonal rafters. They are made of different lengths, but must be parallel to each other. The rafts, together with the ordinary rafters, form the side slopes. For the tent model, installing the extensions and fastening the racks, struts and trusses is also the final stage of construction.
Construction of a hip roof
To relieve the load from the diagonal rafters, trusses are installed under them. These are vertical supports that rest on the beds. The side rafters are secured with struts. One of the horses of the board rests on the leg, and the second is cut at 45 degrees and attached to the rafter leg.
Differences for different types of roofing
Taking into account the angular shape of the slopes, small-piece or soft types of roofing materials are better suited for covering such roofs. The frame of the structure is calculated taking into account their specific weight, but is designed according to general requirements, regardless of the chosen coating. The difference is manifested in the type of sheathing - for soft roofs it is laid solid, for other types - loose, taking into account the manufacturer’s recommendations.
With rare exceptions, the space under the roofing is made ventilated , with fresh air entering through the eaves and exiting at the highest points of the roof.
In systems with solid sheathing, point aerators (from 1 piece per 100 m2 of roof) and air intake devices mounted just above the base of the slopes help ensure complete ventilation of the pie.
Rafters of the main slopes
Calculating a hipped roof is quite difficult to do on your own.
Due to the fact that the safety of operating the system will depend on this, it is preferable to entrust this work to specialists. But the construction of the roof itself can be done independently. It is important to remember that installation begins with the installation of rafter frames. For this you can use hanging or layered rafters, but the latter are considered more preferable
This is due to the fact that the main load from the slope is transferred to the ridge part. Visually, the roof will look more aesthetically pleasing if the angles of inclination, including the main slopes, are the same. For this reason, the first pair of rafters must be located at a certain distance from the corner of the mauerlat. This distance can be calculated simply: for this, the size of the hip side is determined, from corner to corner of the trim. Then the resulting figure must be divided by 2, and the existing value must be set aside from the angle on the larger side. The marked point will be the installation location of the first rafter frame. In this case, it will be possible to achieve the desired, so the slope will turn out with the same angles.
Comparison
Now let’s summarize and compare these two roof systems based on basic indicators:
- Weather resistant. The best in terms of resistance to wind and snow loads is considered to be a 4-pitch roof. It is more durable and can easily withstand extreme loads. But its high heat transfer does not allow the use of these systems in northern latitudes without additional insulation.
- Design. Gable structures with bowls are decorated with attic and dormer windows, weather vanes and platbands, balconies and windows in the pediment. We can say that this is a classic of the architecture of private houses. But 4-pitch systems are made more laconic, since the abundance of parts and elements on them looks ridiculous. Four-slope structures are the standard of European brevity. Such a house looks more solid and respectable, and is easier to sell. However, multi-slope gable roofs can give it good competition.
- Design nuances. If you decide to order a turnkey house, then you should choose a hip or hip roof, since they are an indicator of the balance of the project and require a reasonably organized local area. Gable roofs are more suitable for regions with a lot of rainfall, since only they protect the space in front of the house from snow and water.
- Finance. The costs of laying walls in houses with a hipped roof will be less, but the costs of roof structures will increase. That is why the statement that a 2-pitch system will be cheaper is erroneous if we take into account the total estimated cost of a residential building.
It is also worth remembering that the weight of the roof in a hipped system is distributed more evenly, but during construction and design you will need to hire professional craftsmen. For gable roofs, the consumption of roofing material is less due to the small amount of waste, which cannot be said about the hipped variety.
Creating a Project
Before starting construction, it is necessary to create its design and drawings in order to avoid errors during the installation process. After the length and width of the house are determined, the following calculations are made:
- Calculation of slope angle. This indicator is determined based on three conditions - wind load, amount of precipitation and the selected roofing material. For areas where strong gusty winds blow, choose a slope angle of less than 30 degrees to reduce the windage effect. In areas with heavy precipitation, on the contrary, you should prefer steeper slopes, from 60 degrees and above, so that water and snow do not accumulate on them. For zones with a temperate climate, like central Russia, a hip roof with a slope of 40-50 degrees is suitable. For each roofing material, the minimum permissible angles of inclination of the slopes are calculated, presented in a reference table, which must be consulted.
- Calculation of the height of the ridge. To determine the height of the skate, you will have to remember your school geometry lessons. Since we have already determined the angle of inclination of the slopes, and the base was known to us, trigonometric elementary formulas will help to calculate it.
Hip roof configurations
The geometric design of such a roof combines 4 inclined planes, the bases of which are the load-bearing walls of the house along the perimeter. There are several configurations that determine the shape and relative position of inclined surfaces.
Hip roof
A simple design, in appearance it partly resembles a gable one: 2 planes are formed parallel to the long walls, which are connected in the center by a ridge ceiling. The opposite gables are replaced with inclined hip triangles. The design is used for large buildings, two sides of which are significantly longer than the other.
Half hip roof
It differs in the configuration of the end slopes. The bases of the triangles rise above the bottom edge of the structure. The remaining space is filled by the pediment. The corners at the base of large slopes are cut vertically. This allows you to create a spacious attic under the roof and install double-glazed windows.
Hip roof
Suitable for square houses or buildings where all walls are approximately equal. The four slopes are triangles connected by their vertices at a common central point. Such structures do not have a horizontal ridge.
The construction of all hipped roofs is based on these configurations, including the combination of various elements into complex structures.
Many country gazebos have the shape of a regular polygon; often a hip roof is erected on them. Why a hip roof is used for a small structure is explained by the practicality and aesthetic completeness of such a design. It is impractical to build a roof with two inclined surfaces for a summerhouse: the absence of closed gables will leave part of the structure unprotected from precipitation, for example, during slanting rain. The hipped roof wins in this regard.
Essential elements
It is important to know the basic elements of a hipped roof. The frame or frame structure is designed to support roofing materials, therefore keeping the building watertight
Rafters are the structural members of the roof that support the sheathing. Usually they are perpendicular to the wall and never touch it.
Roof pitch refers to the amount of rise of the roof compared to the horizontal dimension of the roof, called run. As a rule, it consists of 12 units. If the roof rises 4 units in the length of twelve, the height is 4:12. In degrees, this figure is 18.43. Sheets are small overlapping roofing blocks with stepped vertical joints. They are made from wood, asphalt, slate, clay, concrete, metal or other materials.