Currently, lining is one of the most popular finishing materials. It is used for finishing the facades of various buildings and structures. In some cases, the lining does not look very attractive. To give it a zest, so-called aging is used.
Lining can be used to cover walls, facades, ceilings, and loggias.
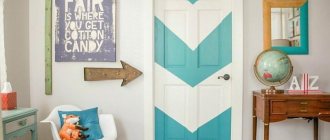
Aged lining looks much more interesting than ordinary coating. Many people do not know how to age lining. In fact, you can age the lining using several methods. All of them are actively used in practice. Of course, you can age the lining with your own hands, but not all methods can be used for this case. It is worth considering them in more detail.
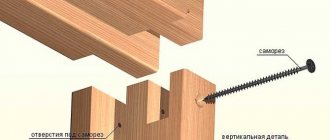
Revealing wood texture using dyes
Revealing the texture of wood using dyes
The patterned shimmer of maple and birch wood, as well as trees of other species, will appear deeper and shine with beautiful shades if you choose this particular finishing method. Here's what you need to know to be successful in identifying wood grain.
Those of you who have been successfully using ready-made stains for many years will most likely be surprised: “Why do you need to use dyes? Who needs them? Just don't rush to conclusions. Compared to pigment stains, which are most often found on sale, dyes produce purer colors that better highlight the natural shine of wood. The difference will be more noticeable if you use dyes to tint dense wood that does not tolerate regular stain, or patterned wood, such as wavy maple. Stain will usually make the wood grain look a bit cloudy, while stain will add impressive depth and richness. These differences are clearly visible in the figure below.
Curly Maple Toning
Stains and dyes have different effects on the appearance of wood, as they color it in different ways. Pigment stain only partially penetrates the wood; the coloring effect is created by tiny pigment particles settling in the smallest cracks and pores. If the wood has a smooth and hard surface (for example, maple), then the pigment particles simply have nowhere to stay.
Gel stains, which have a thick consistency, form a film on the surface, but also do not penetrate deeply into the wood. They prevent stains but hide the grain pattern. In contrast, dyes, being completely dissolved, penetrate deep into the wood along with the solvent and change the color of wood cells (due to these properties, dyes are sometimes mistakenly called mordants). In this case, the surface becomes as if transparent. Some pigment stains add dye, but this combination still does not solve the problems inherent in dense wood.
Craquelure
The technique of aging a surface by creating a pattern in the form of cracks is called craquelure. This type of work requires a special varnish. The effect of an antique surface is created on a light background or using contrasting paint. For aging, craquelure varnish is applied to the grease-free door leaf, and the top is coated with a bitumen-based composition. This enhances the relief of the cracks. Acrylic paint is applied to a dark base over varnish. If the general style of the interior allows, cracks in the door leaf are painted over with gold paint. To make the process easier, buy the composition in cans; it applies easily and neatly to the surface. The choice of colors for the base coat and finishing craquelure is very wide.
How to brush, stain, wax and patina wood (texturing)
Natural wood attracts the eye with its beautiful texture. The alternation of soft and hard growth rings creates an interesting pattern with bends, waves, fancy knots, cracks and wormholes. This truly creative texture was created by nature itself, and our task is only to emphasize it, reveal it, and make it tangible. all technical processes associated with this are called wood texturing.
Brushing, staining, patination and waxing techniques are used to texture wood.
Brushing , from English. Brush is a technique aimed at enhancing wood grain by combing out soft fibers. Wood has its own specific texture pattern due to the peculiarities of the growth of fibrous layers.
EVERYTHING YOU NEED FOR THIS ARTICLE IS HERE >>>
Soft fibers perfectly absorb water and coloring compounds and are easily amenable to mechanical action, in particular, combing, while hard fibers, on the contrary, protrude after combing with hard combs. Comb out soft fibers using special metal brushes.
The working part of such brushes consists of bundles of rigid corrugated wire, fixed in several rows on a wooden or plastic base with a handle (for manual combing) or clamped into a metal disk like attachments for power tools (drills, grinders, engravers) to mechanize the process.
You can buy such brushes at any construction or hardware store. After brushing, the wood pattern acquires a pronounced relief, but only to the touch. To visually emphasize the resulting texture, tinting with stains, waxes, paints and patinas is necessary.
Stain, stain or glaze is a special composition in the form of a liquid for impregnating and tinting wood.
Modern stains are mainly divided into aqueous and non-aqueous (based on organic solvents, alcohol or wax). The main difference is that water stain is easier to apply evenly to the surface and deal with smudges, but after drying it is still afraid of water.
Non-aqueous stain dries faster, but is also more difficult to apply evenly. Thanks to the presence of waxes and oils and other additives, it is able to withstand atmospheric conditions, but has a pronounced odor. For decorative interior work, water stain is the best choice.
Stains are applied to dust-free wood with a brush or cloth swab. At the same time, the composition does not form a surface film, but penetrates to a certain depth, being more intensively absorbed into the soft fibers, due to which the texture of the wood is emphasized even more.
For more intense coloring, you can successively apply several layers of stain with the obligatory drying of each layer.
Compositions for tinting wood (stains, stains, glazes) can be bought both in construction stores and in art stores.
I will give the highest quality examples of compositions (one might say my favorites)
Applying stain
Covered with stain
To create an original color and emphasized wood pattern, water-based stain is used. This composition penetrates the pores of the wood and reacts with tannins. Penetrating deep into the canvas, the stain lifts the wood fibers and makes its structure more prominent. The colors of the stain allow it to be applied to various types of wood, it will highlight light shades, reddish and black. Apply the composition with a foam sponge or brush. The work is carried out in several stages, the first layer being the most abundant. After it dries, you can sand the surface and paint it again. The finished door is waxed.
Wood structuring equipment
Brushed wood in a loft style bathroom interior
Brushing is the most accessible and easy-to-perform method, allowing you to quickly visually age natural material. This process can be carried out in a home workshop using a minimum of equipment.
Brushing wood with your own hands is not difficult
This is one of the few technologies that allows you to achieve excellent results using exclusively manual labor. For this you will need:
- metal brushes of varying hardness, which are used to roughly remove soft fibers from the surface of the workpiece
- sandpaper of various grits for rough sanding and final polishing
- stains and other means to give wood maximum decorativeness
- varnish for opening the product at the end of the brushing process
Strict desk with aged wood effect
Brushed wood floors look very interesting
To further simplify wood structuring work and make it significantly more productive, it can be mechanized. For this, variable speed drills or special brushing machines are used. They come with three types of flat or wide brushes: metal, polymer with abrasive, and sesal or hair brushes. By observing the order of work, with the use of mechanization, you can get impeccably executed work for various products.
Gold plating
Before gilding with gold leaf, you need to prepare a very flat and smooth surface.
I cover the board with gesso primer. I let it dry completely and then sand it with fine-grit sandpaper. After sanding, it is better to smooth the surface with a piece of natural fabric, such as linen. Levskas has an absorbent surface, so you need to cover it with the first layer. In icon painting techniques, where gilding also requires a smooth surface, shellac varnishes are used for this, and here I also use shellac. After this, if any brush marks remain, you can sand and smooth the surface again. Then I apply another coat of shellac varnish.
If you want to get perfect smoothness, reminiscent of an even gold bar, it is better to use alcohol-based gilding compounds. I use acrylic water-based, it won’t achieve perfect smoothness, but you can get another beautiful effect. After the glue has dried to transparency, you can apply gold leaf. I use the classic one.
Ideally, special wide brushes are used to transfer it to the surface. Then the gold leaf will lie more smoothly and evenly. But I think that the resulting cracks and creases have their own charm. Moreover, you can scratch the gold leaf on top with a metal brush (Although I’m sure many would condemn me for this!). According to technology, classic gold leaf is sealed with alcohol varnishes to avoid oxidation. I use shellac varnish.
Features of working with floor coverings
Not only furniture elements, platbands and all kinds of decor can be brushed. This processing technique is often used to imitate the aging of parquet and parquet boards.
The main difficulty in working with wooden floors is the large amount of work involved. The drill is of little use here: uniformity of processing and productivity suffer. At such volumes, it is reasonable to purchase or temporarily use a brush sander. This will allow you to maintain a uniform scratch depth with the brush and then quickly sand over a large area.
For the floor, it is not recommended to show deep wood relief, otherwise the coating will get very dirty and difficult to wash. The optimal depth is 0.5–0.8 mm, so the wood on the floor will become warm and pleasantly rough, and the unnatural gloss will disappear.
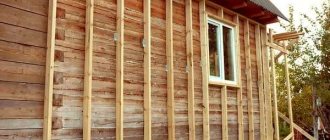
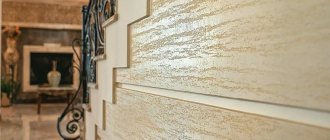
Aged lining: application
Of course, this option is not universal, just like the wood finish itself. For most modern styles, an object or surface serves as a holistic element and does not imply an expressive bright structure. Some classical styles, for example, Rococo, also do not welcome aged products: shine and polishing against a background of rich color and pattern are important here.
- Country is a rustic style that implies simplicity and practicality. Worn lining, a surface with partially peeled paint are more than appropriate here.
- Provence is a French version of country, uses the same solutions, but gives preference to dark wood. For aging, stains are often used.
- Retro style offers the glamor of half a century ago: dark, aged wood, but polished and varnished. Patching is ideal here, creating a noble trace of time.
- Vintage - prefers spectacular color combinations obtained by brushing and painting. The use of different stains and waxes also gives excellent results. It is worth noting that waxed antique lining is the best option for this style.
- In the interior, loft lining is rarely used, but if used, it imitates rough processing. The effect is achieved by brushing and deliberately careless application of stain.
[my_custom_ad_shortcode6]
Brushing equipment
The procedure is considered the simplest and most accessible method of visual aging of wood at home.
It is enough to have a minimum of equipment. Even using only manual labor, you can achieve excellent results. To work you will need:
- Metal brushes of varying hardness. With their help, the primary (rough) removal of soft fibers from the treated wood is carried out.
- Sandpaper with different grain sizes. It is needed for rough cleaning after initial processing and final (final) polishing.
- To give the surface being treated maximum decorativeness, you need to prepare stain and other similar products.
- For final processing, you will need varnish, which is applied to the work surface after the brushing procedure is completed.
Power tools
All work on aging wood can be significantly simplified by mechanization. To do this, you can use either electric drills or angle grinders (grinders). To go with them, you will need to purchase wide or flat brushes of the following types - metal, polymer with an abrasive coating, sisal or hair.
Preparing the door leaf
First remove the old paint
Before starting any artistic work, the door must be prepared. To do this, it is removed from its hinges and laid horizontally on two stools. The canvas is freed from loops, handles and locks. The glass inserts are removed from the canvas along with the glazing beads. The next step is to remove the old paint. To do this, use a hair dryer, it heats up the coating, the paint swells and comes off. Finally, it is cleaned off with a spatula. Small particles of paint are removed by sanding.
Chips and irregularities are puttied
If there are chips on the surface, they are rubbed down with putty to match the canvas. The door must be cleaned of dirt and grease.
No. 2 Paint filling method
This method works best on unsanded wood with a slightly rough surface (such as a wooden fence). With its help, wood can be given a rustic look and an antique effect.
- Clean the wood with soapy water and a brush and leave to dry.
- If your paint is too rich, thin it with thinner.
- After this, pour some paint onto the wood surface, and then take a scraper and spread the paint over the wood.
On an unsanded, that is, not completely flat, wooden surface, the paint layer will not be the same everywhere. A little more paint will flow along the depressions and less on the bulges, that is, in some places the white color will be more saturated, and in others more transparent, which will create the effect of antiquity.
You can see the result of painting a wall using this method above.
Photo
Sketches of antique doors
Antique entrance door
Antique doors
Aged solid wood doors
Beautiful aged door
Beautiful antique door
Antique door fittings
Cracked surface effect in contrasting colors
Oak door
Antique doors
Decoupage of doors
Did the article help you?
Wood tinting
You can preserve the texture of wood by giving it a certain shade. This is done with various paints, including stain. Lighter woods are easier to stain, just like hardwoods.
To ensure that the paint is distributed evenly, you need to:
- sand the wood;
- wet it;
- remove lint;
- degrease.
Natural wood looks better than wood that has been stained. Exception: stain coating.
Multi-layer painting with holes. Using a metal scraper.
The next method is simple, but very effective for those who love aging techniques.
The first color is applied to the primed wood. I took gray linen. In this case, you can apply the color in one thick layer and use an old bristle brush, which leaves marks. I lightly dry the paint with a hairdryer, but not completely. I take a metal spatula and start peeling off the paint.
In those places where it has not dried out, it is very well removed in whole layers. The next color is sage. I apply it randomly, making strokes in different directions. I dry it again and peel it off with a spatula. In some places you can apply force and even scratch the soil right up to the wood.
Glaze
The glazing technique came into decoration from painting, and consists of applying paint in translucent layers. I didn’t have to look far for an example - a beautiful chest of drawers, painted in this style, stood right in the studio. Those gathered repeated this technique on tablets. The sequence of actions turned out to be simple: apply a base coat of paint to the item, dry it, and then work on top of it with a wet brush with a small amount of paint. Each layer should be allowed to dry so that the paint is applied in gentle layers without mixing.
Advice. Instead of water, use a special thinner - it will allow the paint to maintain its thickness and color saturation, the drawing will be transparent, but more clear.
Boat board | multi-layer painting using a wax candle
I paint everything with thinly diluted brown paint.
After drying, in some places I rub the board with a wax candle. Keep in mind that the paint in these places will come off later! Then I paint one half with the color kraplak, and the other with dark green. The main thing is not to forget and not to start blow-drying, otherwise the wax will start to melt! After the paint has dried, I take a metal scraper and start removing the paint. In areas covered with wax, it can be removed very easily. Next, I take a candle and rub new areas with it.
I try to include both new colors and the color that we tore out from under the second layer. I cover one half with orange, and the other with light cobalt green. I dry it naturally in the same way, then remove the paint with a scraper. I cover some parts again with candle wax.
I paint everything with one color - Persian turquoise from the Acrylic De Luxe line. I dry it and scrape through the paint. This is another way of aging.
Transparent finishing materials for wood
It is preferable to select transparent finishing materials for wood in order to preserve the decorative natural texture of the wood. Of course, in times of global shortages it was easier to make repairs - whatever materials were available in the store, they bought them. With the current variety of products, buyers' eyes run wild. In this article we will try to understand transparent finishing materials for wood.
Varnish is a material that forms a uniform transparent film. At the same time, the varnish itself will not necessarily be transparent; sometimes it looks like PVA glue. If the varnish is mixed with various miks (pigments), then this composition is called glaze. Oil varnishes are included in a separate group. They contain less resin and more oil, and this coating takes up to 4 days to dry.
You need to choose a varnish based on the load that the surface treated with it will experience. For flooring, it is better to buy a varnish with high wear resistance; for furniture, a varnish that can withstand medium or low loads is suitable.
Before applying varnish, the surface must be thoroughly sanded and sanded, then apply the coating along the grain with a wide brush. Usually the varnish is applied in 2-3 layers.
Summarizing the above
Similar methods of aging wood can be applied not only to lining, but also to any other surface that is made of wood. Stain is actively used in cases where it is necessary to age, for example, a wooden door or to give a unique shade to a window opening.
As for other aging methods, they are also widely used in practice. They are mainly used to treat furniture to give it an antique effect. However, lining can also be aged by one of them, because it is also an ordinary tree.
You should always remember that all work carried out to age the surface of wooden products must be carried out carefully, since the result may not be exactly the expected effect.
Artificially aged wood Aged wood is a recent trend. It is actively used in interior design and in creating interesting design solutions.
In addition to the fact that wood itself is incredibly attractive and has long been among the leaders in the line of finishing materials, after undergoing additional processing, it acquires additional functional and decorative qualities. So, aged lining looks more interesting than ordinary one, and is deservedly in great demand.
[my_custom_ad_shortcode5]
Patching
From a technical point of view, the method is simple, but quite labor-intensive. However, judging by the reviews, it is this that is most often implemented with one’s own hands, since it is very individual. For patting you will need sandpaper and two paints that differ by a couple of tones. It is not recommended to use contrasting shades, since aged wood does not create bright color differences.
- Just like with brushing, the process of processing the lining is carried out before laying.
- The lamella is covered with a thick layer of base paint. Which combination is preferable - a light background and dark veins or vice versa - depends on the interior.
- When the first layer has dried, a second paint is applied to the surface, but in a thinner layer.
- After drying, the surface is treated with fine-grain sandpaper. In this case, part of the top paint is removed and the bottom paint is visible through its layer.
[my_custom_ad_shortcode2]