The gable roof calculator allows you to perform a comprehensive calculation of the rafter system and roof, and also provides a set of drawings and a 3D project.
A gable roof is a complex, large-area building structure that requires a professional approach to design and execution of work. The largest costs go to building materials for rafters, sheathing, insulation, waterproofing, and roofing material. Our gable roof calculator will allow you to calculate the amount of material.
Using a calculator saves time when designing a roof, and your money. The final 2D drawing will guide you through the work, while the 3D rendering will give you an idea of what the roof will look like. Before entering data into the online calculator, you need to have an idea about the elements of the roof.
Gable roof installation
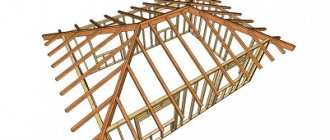
The main element of the attic roof is the rafter system. This is a kind of frame structure that takes on the load from the roof, serves as the basis for the floors and provides the necessary shape of the roof. You can read about attic design here.
The attic rafter system contains the following elements:
- Mauerlat. This element serves as the basis for the entire roof structure and is attached along the perimeter of the walls from above.
- Rafters. Boards of a certain size, which are attached at the required angle and are supported in the mauerlat.
- Horse. These are the designations of the place where the rafters meet at the top.
- Crossbars. They are located in a horizontal plane between the rafters. Serve as a coupling element for the structure.
- Racks. Supports that are placed in a vertical position under the ridge. With their help, the load is transferred to load-bearing walls.
- Strut. Elements located at an angle to the rafters to divert the load.
- Sill. Similar to the Mauerlat, only located on the internal load-bearing floor.
- Fight. A block placed vertically between supports.
- Lathing. Structure for roof installation.
1️⃣ Rafter parameters
To calculate the rafter system of a gable roof, you need to take into account:
- roof load;
- step between rafters.
- type of roofing
2️⃣Recommended rafter board width:
- 100-150 mm with a span length of no more than 5 m, and with additional supports.;
- 150-200 mm with a span length of more than 5 m, with a step of more than 1 m, and if the angle is not large.
Important! The distance between the rafters of a gable roof is usually set at 1 m, but with a roof slope of more than 45 degrees, the pitch of the rafters can be increased to 1.4 m. For flat roofs, the pitch is 0.6-0.8 m.
The rafter legs are attached to the mauerlat, which runs along the perimeter of the house. For it, take either a board with parameters of 50x150 mm, or a beam of 150x150 mm (to distribute the load)
3️⃣ Sheathing parameters
For metal tiles, a sparse lathing is created with a board, the width of which is 100 mm, and the thickness is 30 mm. The board is packed in increments that must correspond to the longitudinal axis of the metal tile module - 35 cm (Super Monterrey).
For flexible tiles, the sheathing is done with a large step, since OSB or plywood will be laid on top of it as a continuous carpet.
Important! When choosing materials, pay attention to moisture resistance and minimum thickness.
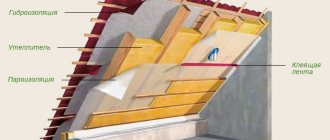
When installing warm roofs, a counter-lattice is made between the waterproofing and the roof, the thickness of which should be 30-50mm.
4️⃣ Roofing parameters
- To calculate the roof of a gable roof, you need to know the dimensions of the roofing material and the amount of overlap.
- Metal tiles for hard roofing are produced in a width of 118 mm (working 110), but the length can be different. The manufacturer can cut any length to order.
- Flexible tiles for soft roofing have different sizes, so you need to look at the specific material
- As for the choice of insulation, for Russia the recommended thickness is at least 100 mm, and the correct one would be 150-200 mm.
How to draw a beautiful house step by step
Probably everyone knows that a house is the same architectural building as, for example, a castle. Therefore, it needs to be drawn in several stages, starting with a general drawing and only then moving on to the “big building” and adding other parts that will decorate our beautiful drawing.
When starting work, first of all, stock up on a ruler and, of course, a pencil. You ask: “Why a ruler?” Thanks to it, the building will be as symmetrical as possible.
In general, a house can be “built” in different ways, based on your preferences. For example, the roof may be made of tiles, and the fireplace chimney is made of brick. I also want to encourage you to think that there are double doors and this can also be mentioned in the drawing, because everything you add will make your masterpiece unique and unforgettable. We recommend adding all this at your own discretion, but do not forget that each house also has mandatory details, such as walls, foundation, windows and doors.
1. Making an initial drawing of the house
So, let's begin the creative process. First of all, draw a rectangle. Measure it with a ruler. You need to divide the house into two parts, so that they are not even, but there is more space on one side than on the other. Draw a dividing line. Perhaps now you are wondering what kind of division of the house it was. We just got two rooms. One of them will be the hallway, and the other will be the living room.
You need to learn to imagine the proportions of the house with the naked eye. When you draw, you don’t have to focus on my drawing; if you want, look for a different house layout.
2. Create the main contours of the roof
On the left half of the building you need to determine the top of the roof and mark it with a dot. Now we separate the walls from the roof; to do this we will draw a horizontal line (it can be pulled to the end of the building). Let's draw a rectangle on the right; in the future it will become the front door.
3. Draw windows
Now you don't wonder why you needed a ruler, because you realized that using it is very easy to draw a house. By doing a task step by step, everything comes out smoothly and the work moves quickly.
To make our house look like a real one, we next need to draw the windows, and then proceed to the foundation. Soon the picture will be almost ready.
You should draw a line at the bottom of the image. It will serve as the foundation. Now you need to outline the contours of the roof. This must be done by drawing additional lines. We need to draw two rectangles, they will be in the living room and are intended for windows.
4. Add some details
We have to “cut” the roof a little. We do this on both sides. As we know, the roof should be depicted at a slight slope. Of course, the roof can be made straight, but I think if we give it a slope, it will turn out interesting and unusual. Now “cut” our roof with oblique lines. This must be done in two designated places. Then we outline the windows using additional lines. We do the same with the door.
To make the lower part of the building beautiful, we should draw an additional plane at the bottom. Now all that remains is to add a chimney, because there is no way to do without it. We will depict the chimney in the form of two rectangles and they must be drawn near the dividing line. Then we should make a line under the roof that will connect the roof to the wall.
5. Final stage
By following my instructions, you have drawn the house step by step, but we have not yet done the roof façade. We do it with a pencil, drawing parallel lines. We should get the appearance of laid out boards. Don't forget that the windows have lintels, so let's draw them.
Now let's start drawing the doorway. We make it from two even halves. Of course, you should draw a threshold below; we depict it at the entrance.
Now it's time to draw the foundation. It will be made of brick, so we divide the general outline into even cells. I propose to decorate our roof, so it will look like a real one. So, we depict the details of the tiles. When completing this task, you need to work a little. We make the chimney out of brick. It should turn out to be a beautiful house.
6. Let's make the picture color
I think our drawing will not look beautiful without the landscape around the house. Therefore, we need to add several trees, pets, green grass, sky, sun, people. If you wish, you can come up with your own landscape.
Now be sure to start painting our house. Do this with colored pencils. Whoever has the skills, let him take up the paints.
Calculation of rafter parameters
In this case, you need to start from the step, which is selected individually taking into account the roof structure. This parameter is influenced by the selected roofing material and the total weight of the roof.
This indicator can vary from 60 to 100 cm.
To calculate the number of rafters you need:
- Find out the length of the slope;
- Divide by the selected step parameter;
- Add 1 to the result;
- For the second slope, multiply the indicator by two.
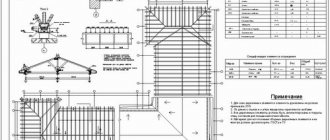
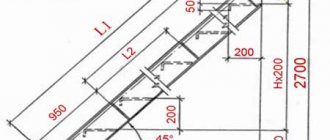
The next parameter to determine is the length of the rafters. To do this, you need to remember the Pythagorean theorem, this calculation is based on it. The formula requires the following data:
- Roof height. This value is chosen by everyone individually, depending on the need to equip a living space under the roof. For example, this value will be equal to 2 m.
- The next value is half the width of the house, in this case 3m.
- The quantity you need to know is the hypotenuse of the triangle. Having calculated this parameter, starting from the example data, we get 3.6 m.
Important: to the result obtained for the length of the rafters, you should add 50-70 cm, taking into account the cut.
In addition, you should determine what width to choose rafters for installation.
For this parameter you need to consider:
- Roof load;
- The type of wood chosen for the structure;
- Rafter length;
- The pitch distance of the rafters.
Method number 2. Drawing a house based on a cube
Step 1
Draw a cube. Its lines will serve as the walls of the house. It's best to keep the lines straight, but don't worry if they're not quite perfect. I understand that everyone knows how to draw a cube with their eyes closed, and yet I recommend that you familiarize yourself with how to draw a cube correctly, taking into account different types of perspectives.
Step 2
Draw two triangles on either side of the cube. Don't make them higher than the walls, otherwise your house will look a little unrealistic.
Step 3
Connect the sides of each triangle to form a roof. Gradually, volume will appear in the flat drawing and a three-dimensional house will begin to appear in your drawing.
Step 4
Add a large rectangle to represent the door and a couple of squares or rectangles for the windows. Remember that we are drawing a three-dimensional house in perspective.
Outline the house and erase all unnecessary lines. In theory there shouldn't be too many of them.
Step 6
Paint the house and you're done! You can use any color scheme you want, but if you need some inspiration, go outside and look at the houses in your area.
Determining the angle of inclination
For such a calculation, you can proceed from the roofing material that will be used in the future, because each of the materials has its own requirements:
- For slate,
the slope angle must be more than 22 degrees. If the angle is smaller, this means water will get into the gaps; - For metal tiles,
this parameter must exceed 14 degrees, otherwise sheets of material may be torn off like a fan; - For corrugated sheeting,
the angle can be no less than 12 degrees; - For bitumen shingles,
this figure should be no more than 15 degrees. If the angle exceeds this figure, then there is a possibility of the material sliding off the roof during hot weather, because the material is attached to mastic; - For roll-type materials
, variations in the angle value can range from 3 to 25 degrees. This indicator depends on the number of layers of material. A larger number of layers allows you to make the slope angle larger.
It is worth understanding that the greater the slope angle, the greater the area of free space under the roof, however, more material is required for such a structure, and, accordingly, more costs.
Important: the minimum acceptable value of the slope angle is 5 degrees.
The formula for calculating the slope angle is simple and obvious, given that initially there are parameters for the width of the house and the height of the ridge. Having presented a triangle in cross-section, you can substitute data and carry out calculations using Bradis tables or an engineering calculator.
We need to calculate the tangent of an acute angle in a triangle. In this case it will be equal to 34 degrees.
Formula:
tg β = Hk / (Lomain/2) = 2/3 = 0.667
How to draw a house with a pencil step by step
In this lesson you can learn how to draw a house. Even a child can handle the lesson; it is designed for completely beginner artists, each step is shown in great detail. To work you will need:
- Simple pencil;
- Eraser;
- Paper;
- You can add crayons, markers, watercolors, or anything else if you want the end result to be a colorful picture of your home.
The result will look like this:
At the first stage we will draw our sheet. I'm only showing part of the sheet, leave more space around the edges for your convenience. The line will be the horizon, and on top of it draw a neat square or rectangle. Its size depends on what kind of house you ultimately want to get.
Now we need to take perspective. To do this, mark a point on the horizon on the side. This will be the perspective point. From the extreme points of the rectangle we will draw neat, straight lines to this very point. You don't have to use a ruler, try to train your hand.
Our drawn house cannot be endless, so we need to mark where its side wall ends. Draw a vertical line as shown in the figure below.
This is how we got it. Now we will make the base for the roof. To do this, divide the side wall with a vertical line exactly in the middle, draw it a little higher.
Let's connect the lines like this so that we get a triangle like this on the side of the house.
If you want to draw a house, then you can’t do without a full roof. Let's finish it as in the picture below.
Now let's draw the front part of our house. It turned out two lines and a triangle on top.
In each of the cells we will draw windows, in the middle bottom cell we will draw a door. All this is still simple rectangles, but this is the whole point of drawing - start from the simple and move on to the complex gradually.
At this stage we drew another part of the roof.
We erase all unnecessary strokes so that they do not interfere with us, do not distract us and do not make the drawing dirty. We also decided to add a small side extension with a large window.
Already starting to look like our ultimate goal, isn't it? If it looks like this, then you are on the right track and you will definitely be able to draw a house step by step with a pencil.
Let's not be distracted from our true goal and move on. So, we already have the foundation of the house ready, with which we can now create whatever our heart desires. To make the drawing look interesting, we start adding details. We draw window frames.
Now we add bars to our cute windows at home.
In this step we draw double contours to the lines of the joints of the walls and the roof of the roof.
Next, we drew the siding (the panels from which the house was built), and decided to make the side extension brick. We begin to draw bricks in different places. If you do this in order, drawing each brick in turn, it will look boring. We draw them randomly, so we get an interesting pattern.
The brickwork was completed.
At this stage, when drawing the house, we depicted glass in the windows and small highlights.
Added even more details.
Next, draw the tiles on the roof of the house.
Just the finishing touches, we're almost done! We darken the windows and some bricks. We finish drawing the grass and paths, darkening the lawn.
If you want to draw the house of your dreams, add a tree, a garage, a car, a garden, a flower bed, a dog house with a dog and the residents themselves. You can also watch a video that shows how it was all drawn.
20
Save
Calculation of loads on the rafter system
Before proceeding with this section of the calculations, you need to consider all possible loads on the rafters. The rafter system comes in different types, which also affects the load. Types of loads:
Types of load:
- Constant.
This type of load is constantly felt by the rafters; it is exerted by the roof structure, material, sheathing, insulation material, films and other small elements of the system. The average value of this parameter is 40-45 kg/m2. - Variable.
This type of load depends on the climate and the area where the building is located, since it is caused by precipitation in a given region. - Special.
This parameter is relevant if the location of the house is a seismically active zone. But in most cases, additional strength is enough.
Important: it is best to make a reserve when calculating strength; for this, 10% is added to the resulting value. It is also worth taking into account the recommendation that 1 m2 should not bear a weight of more than 50 kg.
It is very important to take into account the load exerted by the wind. Indicators of this value can be taken from SNiP in the “Loads and Impacts” section.
To calculate the load produced by snow, you need:
- Find out the snow weight parameter. This indicator mainly varies from 80 to 320 kg/m2;
- Multiply by the coefficient that is necessary to take into account wind pressure and aerodynamic properties. This value is indicated in the SNiP table and is applied individually. Source SNiP 2.01.07-85.
ATTENTION! If the angle of inclination of the slope is more than 45 degrees, then the calculation of the snow load is not carried out,
since such a slope will ensure the snow slides down.
What you will need
You can use any photo of a house you wish, for example, an image of your own home. We won't copy the original image, but we need some kind of background so we know what we're trying to draw. Therefore, the perspective of the house does not have to be perfect - we will create our own view!
You can draw with any tool, but it is better to use some kind of drawing software - perspective does not require fine skill, so you can successfully use the mouse for this purpose. If you prefer to draw in a traditional style, then make sure that you use a large piece of paper, much larger than the intended size of the drawing. And don't forget to use a long ruler!
Recommendations
The roof is one of the most complex structures when building a house with your own hands, so before starting work you need to carefully prepare for the upcoming difficulties - study the relevant regulatory documents, create a high-quality construction project and become familiar with assembly and installation technologies.
The basic requirements for the operational characteristics of roofs are set out in SNiP II-26-76 (SP 17.13330.2011) “Roofs”, SP 31-101-97 “Design and construction of roofs”, SNiP 2.01.07-85* (SP 20.13330.2010) “Loads and impacts”, SNiP 3.03.01-87 (SP 70.13330.2011) “Load-bearing and enclosing structures”, SNiP II-25-80 (SP 64.13330.2017) “Wooden structures”, GOST 11047-90 “Parts and products wooden for low-rise residential and public buildings", GOST 30547-97 "Rolled roofing and waterproofing materials", GOST 25772-83 "Steel fencing for stairs, balconies and roofs".
The tables below present the optimal parameters of elements for typical structures, which you can use as a guide when using the gable roof calculator.
| Parameter, characteristic | Optimal range |
| Roof angle | 20-45° |
| Cornice overhang | 50-100 cm |
| Gable overhang / Exhaust | 40-70 cm |
| Mauerlat size | 100x150 mm 150x150 mm |
| Rafter size | 50x150 mm 50x200 mm |
| The ratio of the depth of the cut and the width of the rafters | 1/4 1/3 |
| Rafter pitch | 60-100 cm |
| Lathing size | 25x100 mm 40x150 mm |
| Lathing pitch depending on the type of roof (soft, tile, corrugated sheeting) | 1-10 cm 30-40 cm 30-65 cm |
| Counter-lattice size | 30x50 mm |
| Waterproofing overlap | 10-20 cm |
| Thermal insulation thickness | 10-15 cm |
Useful diagrams and tables when working with a gable roof:
Drawing a hut with a pencil
The first lesson is devoted to the image of a wooden house from the front. If you are going to decorate your work, prepare markers or paints. Step-by-step actions:
- First you need to draw a rectangular figure, the top part of which is missing.
- At this point there will be a roof that looks like triangular lines intersecting at the top; we outline them on both sides, giving volume. We erase the original mark.
- Let's paint the foundation.
- Now we design the exit of the logs to the outside along the edges, which look like circles.
- There will be three windows - two main, one attic. To the last one we add small windows and a flat triangle at the top.
- Shutters are added to the lower windows, platbands are located above the frames, they can be made in any pattern.
- We attach a brick chimney to the roof, smoke comes out of it.
- Vertical strokes indicate log masonry.
The drawing can be shaded with a regular pencil, using chiaroscuro, or painted in life-like tones. To get a true picturesque picture, next to it we draw a picket fence, trees, a flowing river, grass with zigzag strokes.
Information on the purpose of the calculator
The online gable (gable) roof calculator is designed to calculate the angle of inclination of the rafters, the amount of sheathing, the load on the roof, as well as the amount of material required for the construction of this type of roof. The calculation takes into account all popular roofing materials, such as ceramic, cement-sand, bitumen and metal tiles, ondulin, slate, etc.
All calculations are performed in accordance with TKP 45-5.05-146-2009 and SNiP “Loads and Impacts”.
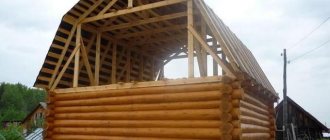
Gable (gable, gable) is a type of roof shape with two inclined slopes from the ridge to the outer walls. This form is the most common and most practical in terms of cost, efficiency and appearance. The rafters rest on each other, and their pairs are connected by lathing. The walls on the end side of such a roof are triangular in shape and are called gables (gables). Most often, an attic space is installed under this type of roof, illuminated by small gable windows.
When filling out the data, pay attention to the additional information with the sign ❗
The following is a complete list of calculations performed with a brief description of each item. You can also ask your question using the form in the right block.
Method number 1. Drawing a house using two-point perspective
Draw a horizontal line and place two dots on the edges. These will be vanishing points of perspective.
Step 2
Draw a vertical line across the horizontal line you drew earlier. Connect each end of the vertical line to the vanishing points.
Step 3
Add one vertical line on each side relative to the first vertical line you drew at the beginning.
Using these lines, draw the outer contour of our future three-dimensional house.
Step 5
Stepping back a little from the center, add another vertical line to the very top. Draw two slanted lines on each side.
At this stage, use additional lines to outline the contours of the protruding roof.
Step 7
Draw all the main contours of the volumetric house more clearly in order to better see and perceive the entire house against the background of auxiliary lines.
Draw a rectangle for the door and two squares for the windows, of course taking into account perspective and vanishing points.
Step 9
Add more small details for your home. Here you can improvise and give free rein to your imagination.
The last stage, all that remains is to paint your voluminous house.
Construction of walls and ceilings
The cost of work is influenced by the size of the house and its design, the presence of decorative elements: arches, bay windows, complex geometry. For all materials except Velox, additional hydro, steam, heat and sound insulation may be required.
| Wall material | Materials | Works | Special equipment |
| Velox | Velox panels insulated, cold, for floors, screeds, concrete, reinforcement, racks for floor slabs | Transportation costs for delivery of materials, installation of walls, reinforcement and installation of floors, monolithic stairs, concreting, rental of racks | Freight transport, portable concrete mixer, concrete pump truck |
| Wooden beam | Timber, edged board, floorboard. supports, vapor barrier materials, insulation, wedges, staples, hardware. antiseptic solution | Delivery of lumber, unloading work, installation of walls, floor beams, hemming of the subfloor, installation of vapor barriers, insulation, installation of the floor base, treatment of timber with an antiseptic, waste removal | Freight transport |
| Brick | Sand, brick, facing brick, concrete, reinforcement, masonry mesh, cement, consumables, lumber, insulation, waterproofing | Transportation costs for the delivery of materials, equipment and fixtures, masonry of external and internal walls with selected parameters, laying of facing bricks with jointing, facade insulation, masonry of partitions, chimneys, columns, installation of reinforced concrete floors, assembly and disassembly of scaffolding, production of floor formwork and its dismantling, reinforcement and concreting of floor slabs, flights of stairs, operation of special equipment, waste removal | Freight transport, concrete mixer, concrete pump, truck crane |
| Blocks | Blocks, glue, reinforcement, formwork, concrete, insulation | Transportation costs for the delivery of materials and equipment, installation of load-bearing walls, internal partitions, installation of a reinforced belt, installation of columns, installation of reinforced concrete floors, lifting blocks with a manipulator, waste removal | Freight transport, manipulator, concrete mixer, concrete pump |
| SIP panels | Sandwich panels, connecting and embedded beams, for tying the foundation, boards, logs, insulation. | Transportation costs for delivery of materials, foundation piping, installation of frames, walls and ceilings, flooring and floor insulation, waste removal | Freight transport |
| Arbolit | Lumber, wood concrete blocks, roofing felt, floor panels, reinforcement, mesh, masonry mixture, hardware | Installation and dismantling of scaffolding, preparation of flooring, laying of external, load-bearing walls, installation of ceilings, metal lintels with primer, operation of special equipment | Freight transport, truck cranes |
An example of estimates for the installation of walls and ceilings made of wood, brick, panels and blocks
Savings in a Velox home
- Minimum transport costs: the slabs are lightweight and compactly stored. For Velox houses in St. Petersburg, we deliver slabs from the Leningrad region, directly from the Rosstro manufacturing plant in Kingisepp;
- All elements of the building: slopes, lintels, stairs, balconies are manufactured during the construction process; they do not need to be delivered and stored separately. Velox can be easily used to make any architectural elements;
- It is advantageous to build monolithic stairs and a porch together with the frame of the house. Fitting a comfortable staircase into an already built house is very labor-intensive;
- compactly stored on the construction site, right in the outline of the house. During construction, all materials are used without reserve;
- almost zero-waste: scraps of Velox boards can be used for finishing outbuildings, embankments, flower beds or plant boxes;
- a house made from Velox does not require additional heat, sound or waterproofing. Cross these items out of your estimate;
- The only special equipment needed is a portable concrete mixer and a concrete pump. Bulky truck cranes and lifts will not ruin your site.
Zero construction cycle
Includes work on preparing the construction site and constructing the underground part of the house: foundation, utility networks and basement. The most important stage, the quality of which determines the durability of the building.
- Arrangement of a construction site, fencing, access to the construction site, delivery and storage of building materials. Garbage removal.
- Drainage works.
- Excavation work: marking, digging and compacting of pits and trenches, removal of soil, installation of backfill/pillows for the pit, laying of underground communications (heating networks, sewerage, water supply), backfilling of the foundation with soil compaction.
- Construction of the foundation, ground floor. How to choose the type of foundation - read the articles: Types and types of foundations What kind of foundation is needed for a house made of Velox: let's figure it out
| Foundation type | Tape | Columnar | Pile-grillage | Slab |
| Works | Production and installation of a frame from reinforcement, production and installation of formwork, phased pouring of concrete, dismantling of formwork | Waterproofing, installation of pile frames, pouring concrete. | Installation of reinforcement, installation of foundations, pouring concrete | Waterproofing Reinforcement Pouring concrete |
Example of cost estimates for the construction of different types of foundations
5. Materials: film, sand, gravel, formwork, concrete, hardware, reinforcement, geotextiles, waterproofing, blind area, laying drainage and storm drains, roofing felt, bitumen mastic.
6. Construction equipment.
- Dump truck - for removing soil and transporting materials.
- Mini roller or vibrating plate - for compacting soil and sand.
- Backhoe loader - for excavation work, removing and leveling soil.
- Concrete truck, concrete pump, deep vibrator - for pouring the foundation.
To build with Velox, choose a strip or slab foundation.
How to save money
- The foundation area of a two-story house is smaller than that of a one-story house;
- combine delivery of cement and reinforcement;
- choose a car with maximum carrying capacity, which will reduce the number of trips;
- use the remaining concrete to fill the foundation of outbuildings, such as gazebos.
Remember that permits must be issued for all permanent buildings.
Single-story vs. two-story
A one-story building with an area of 100 m2 has relatively small dimensions (as an option - 12 x 8.5, 10 x 10 m), which means that it is quite possible to build just such a house on a plot of 6 acres. One-story has a number of advantages over two-story:
· It is safer and more comfortable to live in because there are no stairs. This is especially true if children and elderly people live in the house.
· With the same living area, a one-story apartment has more useful space. Again, thanks to the absence of stairs, the opening for which takes up 5-10 m2, and the inevitable hall or corridor on the top floor “eats” about another 10 m2.
· One-story is cheaper to build. You save on materials and work, because it has a smaller wall area, it does not need an interfloor ceiling and stairs.
Landscaping
The set of requirements for a site is individual. Everyone finds their own balance between the ideal garden with a swimming pool and the need to wear waders in the spring. The resulting solution determines the final estimate.
The implementation of a site design project may include:
- territory planning,
- formation of landscape objects, geoplastics,
- site drainage: passage of water-reducing drainage lines, drainage water pumping station, surface drainage,
- irrigation systems,
- design of landscape gardening facilities, horizontal and vertical site planning, dendroplane, creation of flower beds and green spaces,
- plan of the road transport system, construction of paths, covering and paving,
- installation of a fence, gates, arrangement of an entrance group,
- street lighting system,
- decorative elements: small architectural forms, urban furniture,
- decorative water features: artificial pond, fountain, pool.
More details in the section:
Landscape design of the site. Where to begin?
Paid programs for drawing electrical circuits
There are many paid graphic editors for creating diagrams, but not all of them are needed for “home” use or for work that is not directly related to design. Paying a lot of money for unnecessary features is not the smartest decision. In this section we will collect those products that have received a lot of good reviews.
DipTrace - for PCB development
For experienced radio amateurs or those whose work involves designing radio products, the DipTrace program will be useful. It was developed in Russia, therefore it is entirely in Russian.
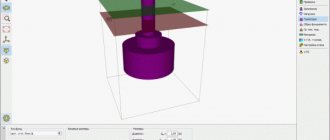
It has a very useful function - it can develop a printed circuit board using a ready-made circuit, and it can be seen not only in two-dimensional, but also in a three-dimensional image with the location of all the elements. It is possible to edit the position of elements on the board, develop and adjust the device body. That is, it can be used both for designing wiring in an apartment or house, and for developing some devices.
In DipTrace you can see what the finished product will look like in 3D format
In addition to the program for drawing diagrams, you will also need to download a library with an element base. The peculiarity is that this can be done using a special application - Schematic DT.
The interface of the program for drawing circuits and creating printed circuit boards DipTrace is convenient. The process of creating a diagram is standard - we drag the necessary elements from the library onto the field, rotate them in the required direction and install them in place. The element that is currently being worked on is highlighted, which makes the work more comfortable.
As the diagram is created, the program automatically checks the correctness and admissibility of connections, matching dimensions, compliance with gaps and distances. That is, all edits and adjustments are made immediately, at the creation stage. The created circuit can be run on the built-in simulator, but it is not the most complex, so it is possible to test the product on any external simulators. It is possible to import a diagram for use in other applications or accept (export) an already created one for further development. So DipTrase diagram drawing software is a really good choice.
If you need a printed circuit board, we find the corresponding function in the menu; if not, the diagram can be saved (it can be adjusted) and/or printed. DipTrace diagram drawing software is paid (there are different plans), but there is a free 30-day version.
SPlan
Perhaps the most popular program for drawing diagrams is SPlan. It has a well-designed interface, extensive, well-structured libraries. It is possible to add your own elements if they are not in the library. As a result, it’s easy to work with; you can master the program in a few hours (if you have experience working with similar software).
The disadvantage is that there is no official Russified version, but you can find it partially translated by craftsmen (the help is still in English). There are also portable versions (SPlan Portable) that do not require installation.
One of the “lightest” versions is SPlan Portable
After downloading and installing the program, you need to configure it. This takes a few minutes, and the settings are saved on subsequent launches. Creating diagrams is standard - find the desired element in the window to the left of the work field, drag it into place. Numbering of elements can be done automatically or manually (selected in the settings). What’s nice is that you can easily change the scale by scrolling the mouse wheel.
After finishing the work, you can save the file as an image that can be printed, and large A4 size diagrams can be created. The main file can be edited later.
There is a paid (40 euros) and a free version. The free version disables saving (bad) and printing (you can get around it by taking screenshots). In general, according to numerous reviews, it is a worthwhile product that is easy to work with.
Design and estimate documentation
May include a package of documents based on the results of geological surveys, a house design, its estimate, assistance from specialized organizations in drawing up an application for permits.
- Geological surveys are recommended at the pre-design stage to take into account the features of the site: possible soil subsidence, tectonic shifts, waterlogging. About the connection between the type of soil and the type of foundation in the article: How to choose a site for a country house. Engineering geological: reconnaissance and marking, geophysical research, mining and drilling work and sampling, field soil testing, hydrogeological and laboratory research, desk data processing. The type of future foundation, the optimal depth level, and the strength of supporting structures are determined.
- Engineering and geodetic: topographic survey work, linking the survey to the local coordinate system, office processing, coordination of underground communications, geological surveys, alignment work. They determine the location of the building, predict changes in the terrain, and are necessary for land surveying.
- Engineering and environmental: sampling of soil, surface and groundwater for analysis, radiometry, assessment of air pollution levels, geobotanical profiling, laboratory research. They will help assess the quality of life on the site and minimize the negative impact of construction on the environment.
How to save money
- Conduct geological surveys in the spring, during thaw, to choose the optimal type of foundation;
- find a suitable option among ready-made standard projects or turnkey houses - for them design services are often provided free of charge;
- discuss with the designer options to reduce costs: it is possible to abandon the basement or architectural excesses;
Engineering section: drawings of rooms and communications
The engineering section contains diagrams and drawings of electrical supply, water supply, sewerage, ventilation and heating systems.
Explanation tables include data on equipment specifications and general calculations. These are separate components of the building located inside the future home. Project of a 6x8 country house with an attic: (read more)
The plumbing section contains a plan for the location of communications in the basement and on each floor. The sewerage system diagram is carried out in a similar manner. Sometimes these two plans are depicted in one drawing. There is also an axonometric diagram of the installation of cold and hot water supply.
Drawings of electrical supply, water supply, sewerage, ventilation and heating systems are prepared at the engineering stage.
The heating installation section presents floor-by-floor drawings, starting with the basement, and a general heat supply diagram for the entire house. Gas equipment and electrical supply systems are shown in separate drawings with individual layout diagrams of gas and electrical installations.
In order to prevent thunder danger, it is necessary to include the installation of a lightning rod in the modeling of houses, since the absence of such protection can not only lead to destruction, but also pose a threat to the life and health of the inhabitants of the house. The installation of a lightning rod is carried out according to a separate scheme with the involvement of qualified specialists.
Program selection criteria
To choose a suitable designer for developing a design project, you need to clarify the problems that need to be solved. The following criteria can serve as selection parameters:
- Do you need a three-dimensional image of the house itself (bathhouse, garage), or do you want to see it in the adjacent landscape, surrounded by a gazebo, pool terrace.
- Availability of ready-made libraries of construction and finishing materials, interior items, lighting equipment. Availability of topics on landscape design.
- Level of detail of the 3D model.
- Ability to visualize various configurations with a choice of construction mats.
- Accurate transfer of dimensions and the ability to apply them to the layout.
- The need to prepare an estimate.
- Ability to save the layout in the cloud.
Visualization of the layout with elaboration of shadowsSource houzz.com
Cottage with a bay window - almost a tower
| Cost of a house in the “thermal circuit” option | 1.16 million rubles. (12.1 thousand per sq. m.) |
| Cost of a house with rough finishing without networks | — |
| External dimensions of the house | 8.4×7.5 m |
| Room area | 96 sq. m |
| Duration of construction | 1.5 months (for shrinkage) |
| Purpose of the house | For permanent residence |
| Used materials | Timber 150×150 of natural humidity, Monterrey metal tiles, Izospan AM waterproofing membrane (for attic floors), jute felt (Indian jute). |
| Heating system | Gas boiler room, radiators |
| Foundation type | Pile-screw |
| Contractor organization | LLC "EkaTerem" |
The house was built according to the standard design N-56, developed by the designers of EkaTerem LLC. On the first floor of the house there are: a vestibule, an entrance hall, a boiler room, a living room and a bathroom, on the second there is a staircase hall and three rooms. Photos of the house are missing most of the windows. They will be cut through after shrinkage.
The cost of the screw foundation was 162 thousand rubles. The cost of a “shrinkable” box is 815 thousand rubles. This price included: a log house with gables, floor joists and floor beams (100×200 mm) and a roof with hydro-wind protection. To bring the building to the state of “thermal contour”, in a relatively inexpensive version, you will need to invest about 180 thousand more. Including 100 thousand for insulation of the ground floor floor, ceilings and attic roof, plus 80 thousand for windows and the front door.
comments powered by HyperComments
Installation of windows and doors
The cost of installing windows is affected by: their number, size, type, material, number of cameras and sashes.
According to the design, the windows can be panoramic, strip glazing, turning and tilting, for corner, dormer and non-standard shaped windows.
| Design elements | Material |
| Frames | Metal, wood, PVC profile |
| Window sills | PVC, wood, natural stone. |
| Slopes | Plaster, drywall, plastic panels. |
| Drainage | Tin, metal alloys. |
Types of materials for country house windows
Also included in the estimate are limiters, window scissors, decorative hinge covers, child locks and window blockers.
A popular choice for entrance doors is a metal leaf with decorative trim. It reliably protects against burglary and withstands environmental influences. The cost is affected by the type and number of locks, deadbolts and other security mechanisms. We recommend entrusting installation to a specialist. Take into account in the estimate the need to install a second technical door for thermal insulation.
How to save money
- choose simpler designs and design solutions;
- study the market for profitable promotions - turnkey installation of windows and doors.
So how much does it cost to build a house? Five advantages of drawing up construction estimates on your own
A well-drafted construction estimate will help:
- Assess your own capabilities. Some construction work is not obvious at the initial stage and is easy to overlook. Careful planning will protect you from surprises in the form of unexpected expenses, for example, for removing soil or leveling walls.
- Explore alternative options. If a project doesn't fit within the budget, you can consider ways to modify it to lower the cost while still maintaining the features of your dream home that are important to you.
- Determine costs for the main items, plan construction according to time, form a hierarchy of mandatory expenses - items on which you cannot save, and categories to which a flexible approach is possible. Make a decision to raise borrowed funds.
- Select the optimal construction technology and options for its implementation, taking into account the planning horizon. Inexpensive materials and solutions may turn out to be extremely unprofitable to operate, but an investment in high-quality construction will pay off in a few years.
- When negotiating with contractors, formulating wishes will protect you from contacts with unscrupulous performers - after all, you are in the same information field.
Thank you for reading this article!
Pixabay illustrations were used: Sammy-Williams, stevepb, jarmoluk, inkflo, Capri23auto, neshom, OtoZapletai, Alexei_other, SkitterPhoto, spanphilov0, PublicDomainPictures, nattanan23 as well as photographs from our constructed objects.
Tags Velox Blocks Beam Brick Monolith Estimate Cost Building a house Sandwich panels Foundation
In what cases and how is a construction calculator used?
To properly use an online construction calculator, you need to clearly understand its pros and cons. At the same time, first of all you have to focus on the shortcomings:
- Lack of flexibility. Any calculator makes calculations solely based on its built-in templates and formulas. If you need to calculate data for which the calculator is not provided, then you won’t be able to reconfigure it and you will have to do everything manually.
- Low transparency of calculations. Even if the calculator contains exact formulas, the user has no way to check what exactly and how correctly he thinks, since everything is hidden behind the user interface intended exclusively for entering primary data.
Behind the user interface, the formulas by which the calculations are performed are not visible - only the initial data and the result Source nkkconsult.ru
Despite such significant disadvantages, various construction calculators are still very popular - this is due to the following positive aspects:
- Based on the initial data that the calculator requires, you can still imagine the progress of the calculations and what to look for when choosing a project or communicating with the specialists who will perform the work.
- Based on the results generated by the calculator, you can compare the cost of work with different materials or compare the price of houses built using different technologies.
As a result, the main task of a construction calculator is to clearly show the user how approximate calculations are made and what the difference is in the cost of houses built using different technologies.
At the same time, it is not recommended to use a building materials calculator for building a house for any precise calculations, since it is often unknown what formulas and with what tolerances the calculations are made.
Foundation
The foundation for a house is one of the most important stages in construction. Despite the fact that it is not the most complex and expensive, we take its implementation responsibly.
Select the required foundation type:
Foundation on screw piles
Suitable for light buildings (sip panels, timber, frame) and for all types of soil.
Not suitable for block and brick houses.
Shallow strip foundation
Suitable for light buildings (frame, timber, vulture panels) and sandy soils.
Not suitable for brick and block houses.
Grillage, pile-strip and pile foundation
Suitable for all types of houses and most soils.
Not suitable for wetlands and peat bogs.
Heavily reinforced foundation slab (monolith)
Universal, suitable for any house and soil.
Monolithic reinforced slabs can be used in any situation.
TISE foundation
For heaving soils and peat bogs (weak soils), heavy houses and when there are differences in landscape height.
Not used for heavily waterlogged soils.
Deep foundation
Used for buildings with a ground floor and/or basement.
Not used if the freezing depth is below the height of groundwater.