A subfloor is required for laying “small-piece” or “soft” floor coverings. The article describes the features of arranging wooden floors, which are often used in houses, and the choice of materials, which is determined by the type of foundation and the type of finishing floor covering. Schemes and stages of work on arranging the subfloor are described. After reading the article, you will learn how to make a reliable, durable subfloor with a flat surface.
The subfloor is the top part of the floor pie Source belinastroy.ru
Kinds
The most common option for a subfloor in a frame or wooden house (or “black”) is to create a durable flooring supported by beams. But for the first floor it is also possible when the logs are installed on a reinforced concrete slab floor on a strip foundation, on a shallow foundation slab or on a concrete floor on the ground. The last three options are not fundamentally different from each other, although in all cases the methods of fastening and leveling the logs horizontally are different.
Since the concrete base itself is strong and reliable, it can be considered as the “underlying” part of the floor of the lower floor (according to the regulatory terminology SNiP 2.03.13-88). In this case, it remains to equip only the “leveling” part (wet, dry or prefabricated screed) and the “intermediate” part (heat, vapor and waterproofing). And lay the finishing coating over the leveling part.
Concrete floors laid on the ground are another common option Source remontik.org
The subfloor is only part of the wooden floor. It is made from edged boards and sheets of moisture-resistant wood materials. The thickness of the flooring (board or sheet) and the layout of the logs have a “direct” relationship: less thickness means less interval between runs.
Important! If we are talking about boards, then when laying diagonally (for example, in rooms with complex geometry), the pitch of the lag should be even smaller. Moreover, the angle between the board and the purlin must be greater than 45°.
Wood flooring is the top layer of the cake. Layer by layer the entire structure looks like this:
- Lining . It does not affect the load-bearing properties of the ceiling, but acts as a support for insulating materials.
The thickness of the lining must be sufficient to support the weight of the insulation Source doma-na-veka.ru
- Waterproofing . Membrane type materials are used. They do not allow water to pass through, but allow water vapor to erode from the insulation, which then exits through the vents in the basement (plinth) of the foundation.
- Thermal insulation . Usually these are mineral wool mats, which, unlike polystyrene foam, are non-flammable materials.
- Vapor barrier . There are three types in total. Films with limited vapor permeability that maintain a “balance” between moisture transfer from the room into the insulation and from the insulation to the outside. Vapor-tight films are a vapor barrier that almost completely excludes the penetration of warm air with water vapor into the insulation. Foil materials (reflex films) are a vapor barrier that returns some of the heat back into the room. All three types, as befits a vapor barrier, have waterproof properties that protect the insulation from above, from the side of the room, from water ingress.
- Flooring.
A multilayer sheet of plywood for the subfloor will withstand heavy loads Source yug-energo.ru
See also: Catalog of companies that specialize in the design and construction of turnkey country houses.
Board size and thickness
The dimensional parameters of the finished floorboard are no less important, because the main load falls on the outer covering. Today on the market there are boards with a width from 80 to 135 mm, the most popular sizes are 100-105 mm. The thickness of the floorboards can be selected from the following sizes: 28, 30, 32, 35 and 40 mm, but most often they choose 30, 32 and 35 mm.
It is not recommended to install lumber with a thickness of less than 22 mm; such a coating will sag over time, and its elements will quickly fail. The quality of wood for external flooring plays an important role, so you should choose the best grade of floorboards with a minimum number of defects.
Device options
There are two main filing options:
- Under the beams . The disadvantage of this method is that in the subfloor of the house there is often not enough “space” to carry out the fastening procedure. The advantage is that almost the entire volume between the beams can be used for insulation. Only when reflective vapor barrier materials are laid should a small gap be left between the film and the flooring.
Fastening to each beam, on both sides of the “opening”, cranial bars - a lining is mounted to them. The most common and easy to implement method. The disadvantage is that the insulation layer will be less than the thickness of the skull block plus the lining.
This is what the floor plan with filing to the cranial block looks like Source derevyannyydom.com
- On top of the beams . Disadvantage - the height of the logs is chosen greater than the thickness of the insulation. As an option, it is possible to lay an additional counter-lattice on top of the logs for another layer of thermal insulation.
In principle, such a complex ceiling device is only necessary for a heated residential building. In a garden or country house for seasonal use, you can limit yourself to only wooden flooring without filing and insulation, although waterproofing in this case must also be laid to protect the wood from moisture.
Important! All wooden elements, from the sheathing to the flooring, must be impregnated with antiseptics and fire retardants. And after sawing and drilling, the ends must be treated again with these compounds using a brush.
Fire and bioprotection is a mandatory stage in the processing of wood working in extreme conditions Source derevovdom.ru
Material requirements
The following materials are usually chosen for flooring :
- edged board;
- waterproof plywood;
- Fiberboard or chipboard with waterproof treatment;
- OSB plate;
- cement particle board (CSB) or GVL.
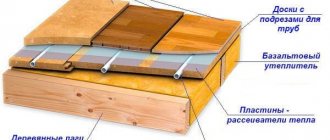
Recommended ratio between board thickness and joist layout Source semanticscholar.org
Plywood is stronger due to its multi-layer structure, and it is much thinner for a subfloor.
Classic scheme
A feature of the classic scheme is the significant distance between the beams.
Typically, the layout step is 0.8-1 m, and this is “reflected” in the choice of board thickness.
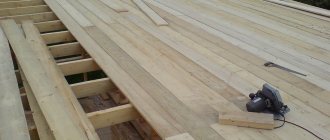
This is what a “powerful” log house floor looks like Source ukrasheniyedoma.com
A typical subfloor structure looks like this:
- timber with a section of 15x15 or 15x20 cm;
- cranial block with a cross section of 4x4 cm;
- hemming with a board 2.0 cm thick (can be unedged, but cleared of wane) or plywood 1.5 cm thick;
- waterproofing (glassine, polymer membrane);
- insulation (stone wool) no more than 10 cm thick - this is all that the remaining volume between the beams allows after installing the cranial block with filing;
- vapor barrier;
- board 4.5-5.0 cm thick.
And now this design is used, but it no longer meets modern requirements for thermal protection. Therefore, a counter-lattice is mounted on top of the beams, between which another layer of thermal insulation is laid.
Another advantage of this method is that the layout of the logs can be reduced to 30-40 cm, and subfloor boards can be chosen with a thickness of 20-24 mm.
Scheme of complex insulation of a frame house with a double thermal insulation contour of the floor and mesh as a backing Source obustroeno.com
The modern scheme for laying a subfloor for a wooden house is more advanced and allows you to insulate the floor without additional “superstructures” in the form of a counter-lattice:
- Boards placed on edge . Fixed to the beam, and, if necessary, supported by intermediate supports, they act as logs. The thickness of the board is 5 cm, and the width is at least 20 cm. The layout step can be made 60 cm (to match the width of the stone wool rolls), and in terms of wood consumption for purlins, this option is more economical than the classic scheme.
- Polymer (wire mesh) for supporting waterproofing and insulation.
- wind and waterproofing film . Allows excess moisture to evaporate, protects the insulation from water ingress and weathering of fibers.
- Stone wool in the form of semi-rigid mats 20 cm thick.
- Vapor barrier.
- Flooring made of boards 36 mm thick.
The only drawback of the modern scheme is the poor stability of the lag. This is due to the large difference between the width (the supporting part) and the height. To ensure the stability of the structure, additional transverse braces are used that “connect” the logs to each other and to the frame (grillage).
Typical ceiling of the first floor of a frame house made of boards on the “edge” Source stranapap.ru
The advantages of the scheme are obvious - savings on lumber (in “volume” equivalent) and a simple one-layer insulation scheme.
What is better to make from: wood or concrete?
To determine which flooring material to choose: wood or concrete, let’s compare them.
Price
The price of wood is much higher than concrete. Concrete is a mixture of sand, gravel and cement. A bag of cement costs 500 rubles. A screed 5 cm thick requires half a bag of cement: 250 rubles.
A bag of sand and gravel mixture costs 100 rubles. To create a concrete solution you need one and a half bags: 150 rubles. Total 400 rubles. If specialists perform the screed, they add 300 rubles/m2 for the work.
The total cost of a non-reinforced screed is 700 RUR/m2.
If you are laying wooden floors that are not insulated, then dry timber with a cross section of 100*150 mm for joists will cost on average 400 rubles/m2. Inch tongue and groove board - 700 RUR/m2. Payment for work—400 rub/m2.
The total cost of wooden floors is 1500 RUR/m2.
These prices are indicative and are as of 2021.
Deadlines
The screed gains strength in 28-30 days. So that cracks do not form on it and it dries evenly, it is covered with film and periodically sprayed. You cannot walk on the screed for three days. Wooden floors can be used to place furniture on and move around on the day of installation.
Engineering Communication
Typically, utilities: water supply, sewerage, heating pipes are located under the floor. In case an old wooden house needs to be repaired or after an accident, wooden floors can be partially disassembled, sawn and easily removed. After eliminating the emergency condition, individual parts can be replaced. With a concrete floor the situation is more complicated. The dismantling process is complex and time-consuming. You will have to use professional equipment and tools.
Durability
Concrete floors last much longer than wood floors. The quality of the coating can be judged after it has hardened. If wooden floors are laid from raw boards, then after a while you can hear a squeak. The floors need to be disassembled and screwed back together.
Subfloor of the second floor (attic) or cold attic
There are no living rooms under the wooden floor of the first floor, so “simple” materials can be used for lining without finishing or decorative surface treatment. The interfloor ceiling is hemmed from below with planed boards or clapboard.
And although insulation of the floor between heated floors is not required, mineral wool is placed between the joists. In this flooring pie it acts as sound insulation. Ideally, you should use acoustic wool. It differs from the usual one in its “chaotic” fibrous structure. But heat-insulating modifications can also be laid - with the same thickness and density, their sound absorption coefficient is only 10-15% lower than that of acoustic ones.
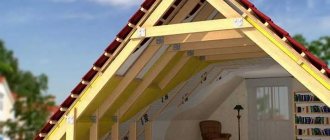
The ceiling of a cold attic must be insulated.
Installation of a cold attic ceiling begins with attaching a vapor barrier Source legkovmeste.ru
And since in a low-rise building even an “uninhabited” attic is used, the insulation must be covered with a subfloor (but without further finishing).
The ceiling diagram of a cold attic looks like this (from bottom to top):
- false ceiling of the underlying heated floor;
- vapor barrier laid in a continuous and continuous layer with sealing tape along the entire perimeter of the ceiling;
- insulation between beams (lag);
- membrane-type waterproofing laid on the surface of stone wool;
- spacer bar stuffed onto the beams, providing a ventilation gap;
- attic subfloor.
Important! The layer-by-layer structure does not reflect the installation sequence. At the first stage, a vapor barrier film is attached to the bottom of the floor beams. And on top of it, a block is mounted on the beams, to which the sheathing for the false ceiling is attached. If you first hem the boards, the film will have to be laid on top of the beams. In this case, water vapor will penetrate into the wood, but there will be nowhere for it to erode, which will lead to wetness of the floor beams and create conditions for their rotting.
Nuances of technology
The subfloor allows the use of decorative floor covering material that does not have self-supporting properties, rigidity and resistance to bending loads. The main difficulties arise with the installation of partitions and remote consoles.
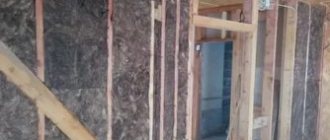
Partitions and walls
To ensure the operational life of the partitions, their installation should be carried out along the floor beams. If an internal non-load-bearing wall passes between the beams, they must be reinforced with jumpers made of boards or bars according to the diagram below. In order for the subfloor wood to withstand the loads, the following conditions must be met:
- jumper spacing within 1.2 m;
- The minimum section of the bar is 40 x 90 mm.
Important! Jumpers are not needed if the partitions run perpendicular to the beams.
The internal main wall of a wooden cottage must rest on the lower wall or floor purlin. It can be shifted by 0.6 m in any direction relative to the support unit of the floor beam between floors and by 0.9 m in the attic.
Reinforcement under partitions.
Subfloor under tiles
The technology of how to properly make the subfloor of a wooden house for laying tiles has its own characteristics if a board is chosen for the flooring.
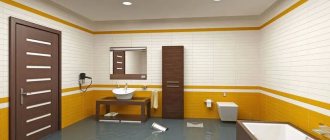
Tiles in a wooden house in some rooms are simply necessary due to the nature of their use Source et.aviarydecor.com
Unlike wood, ceramic tiles do not change their linear dimensions with changes in humidity levels. Moreover, wood reacts differently to such differences in the directions along and across the fibers. And to compensate for these changes, a “damper” layer must be laid on top of the boards.
Plywood or moisture-resistant plasterboard is chosen as the top layer of the leveling part of the subfloor. Although plywood is made of wood, it does not change its linear dimensions due to its multi-layer structure with multi-directional arrangement of fibers in each layer. But we must take into account that both materials are subject to deformation during prolonged contact with water or when used in a room with a “wet” regime. And in such areas, before laying the tiles, you need to make another waterproofing layer.
What problems can you encounter without insulation?
Wooden buildings do not retain heat well, so in winter the room is very cold. A private wooden house requires mandatory insulation.
If such actions are not carried out, you may encounter the following problems:
- heating the building will require a lot of heating materials;
- the flooring is most often made of wood, so it allows for drafts;
- the appearance of dampness in the room;
- Most often there is a basement under the house, so without insulation the room will have an unpleasant odor;
- Since time, rodents and other pests have been destroying wooden buildings.
A properly laid thermal insulation layer from the inside makes the room comfortable and warm.
Many summer residents, after insulation, live in their dachas even in winter, without spending a lot of money on heating materials.
It is difficult to heat a wooden house without insulation
Plate
If a wooden house stands on a slab (foundation or ceiling on a brick plinth), then the floor of the first floor is equipped with a screed. In this case, the same technologies are used as in stone houses.
On a solid base, logs can even be installed on point adjustable supports Source pinterest.it
Even for installing a wooden subfloor, there is a choice among a wider list of methods:
- installing joists on supports on a concrete base without fixing them to the base and load-bearing walls (floating floor);
- installation of logs on adjustable supports;
- installation of adjustable plywood.