A floating screed is a cement-sand screed laid not on the base, but on a separating layer of insulation. This type of screed must be used when constructing the floors of the first floors, since usually underneath there are either technical rooms or an unheated basement. In addition, it is the floating screed that must be used when installing heated floors, this will increase the efficiency of the entire structure.
When installing a floating screed, in some cases, not insulation, but soundproofing material can be used as a separating layer. Such a screed can be created in a room located on any floor.
A floating screed has its advantages over a conventional cement-sand screed, since the insulation layer used in its construction also serves as a soundproofing layer. In addition, the insulation allows you to reduce the thickness of the screed itself, which reduces its weight and, accordingly, the load on the floor. This version of the screed device is well suited in cases where for some reason it is necessary to reduce the thickness of the screed, for example, there is a limit on the height of thresholds, doors, etc.
The main feature of using a floating screed is that there is no contact between the cement mortar and the base of the floor and the walls of the room. The screed is poured into a layer of insulation, which forms a kind of trough, covering the ceiling and the lower part of the walls. The result is the following structure: floor and wall overlap (hard layer), thermal insulation (spring) and concrete screed (hard layer). This design completely or partially protects the concrete floor and walls from the transfer of various energies, such as heat or shock waves.
To create a heat-insulating and sound-proofing layer, the following material is used:
- Extruded polystyrene.
- Foamed polystyrene foam (PSB-S-35 or PSB-S-50).
- Mineral wool for floors.
To create sound insulation, the following roll materials are used:
- Schumanet-100 Super.
- Schumanet-1002.
- Izolon PPE.
Other rolled insulating materials marked “for screeds” can also be used.
In the installation of floating screeds on the first floors of apartments, under which there are warm but damp rooms, all kinds of construction wool or other insulation with open pores are used, laid on a plastic film, which will create a vapor barrier layer. When laying the film, it is worth remembering that the joints do not need to be glued. If you have chosen closed-cell insulation materials, such as polyethylenes, foamed polystyrenes or polyurethanes, to create a thermal insulation layer, then it is not necessary to install a vapor barrier, since these materials have low or almost zero vapor transmission capacity. If you choose not rolled insulation, but in the form of tiles, then it is better to create a layer of vapor barrier, this will protect your screed from steam penetration through the joint seams. When using closed-cell roll insulation, there is no need to create a vapor barrier layer.
When installing a screed in an apartment above a cold basement, a vapor barrier layer must be laid on cotton wool insulation. In such rooms it is possible not to create a vapor barrier layer if rolled foam vapor-proof material was used as insulation. In such cases, you will only need to tape the seams between the heat-insulating sheets with tape.
When creating a vapor barrier layer, you need to remember an important rule: the vapor barrier is always installed on the side where the air is warmer. For example, if the air in the basement is warmer than in the apartment, then the vapor barrier layer is laid first under the insulation layer. If the basement is unheated and cold, then first install insulation, and then a vapor barrier.
In fact, installing a vapor barrier layer in screeds is not always an urgent need; in most cases it is just a tribute to fashion. Of course, when installing floors on the first floors, you cannot do without a vapor barrier; here it prevents steam from entering a colder room, which is the basement. But when installing floors on other floors of the house, creating a vapor barrier layer is pointless, since the difference in temperature in different apartments is insignificant, and, consequently, the movement of steam is negligible.
Floating screed device
When installing a screed on slab insulation, it must be at least 50 millimeters, and it is necessary to reinforce it with a steel mesh with a cell size of 40x40 millimeters and rods with a diameter of 1.5 millimeters. You can also make a reinforced screed using fiberglass instead of steel mesh.
Stages of a floating screed device:
- Marking the screed.
- Preparing the base.
- Installation of beacons.
- Vapor barrier device.
- Laying insulation.
- Laying the screed.
The essence of the process
Grouting the cement screed is the final stage of constructing a concrete foundation, aimed at leveling the finished surface. This process is performed:
manually - for rooms with an area of 25–30 m2; with a trowel (helicopter) - for processing large areas.
The screed is rubbed down so that the “concrete milk” that protrudes on the surface of the damp foundation does not peel off in the future.
As the cement mortar dries, heavy particles of crushed stone and grains of sand settle, and fine suspension and liquid come to the surface. They leave uneven and empty areas that reduce the performance of the concrete.
Grouting allows you to increase the adhesion strength of different particles, avoiding the occurrence of microvoids. This result is achieved due to the vibration-mechanical effect on the material.
Installation of beacons
Pin beacons are installed in any case, whether a vapor barrier layer is laid under the insulation or not. It is impossible to install pin beacons in a structure that involves creating a vapor barrier layer without tearing the insulating material. Therefore, to create a vapor barrier, thick insulation is used, as a rule, extruded polystyrene foam, which has the lowest level of vapor permeability. In such cases, you don’t have to do a vapor barrier at all, and just limit yourself to gluing the joints between the heat-insulating material with tape. For these reasons, when constructing a floating screed, rigid mineral wool boards are not used; instead, polystyrene foam board insulation or rolled thin polyethylene foam is used.
Concrete Grouting Operations
Grouting a concrete screed is divided into several technological operations:
- Rough grouting, during which the cement laitance is squeezed out and the top layer of concrete is pre-compacted;
- Final grouting of the screed;
- Surface treatment with a liquid polymer that seals the smallest pores;
- Cutting expansion joints.
You can try to perform all these operations (see video) with your own hands, but only qualified personnel are able to correctly determine the moment of the beginning and end of each technological operation.
Technology for laying concrete floor screed
Vapor barrier device
In a room above a damp but warm basement, when installing a screed, vapor-tight thermal insulation is first laid, after which a vapor barrier layer of polyethylene film is installed. It is made in the form of a trough with an overlap on the walls above the level of the intended screed.
In rooms above a cold basement, a vapor barrier layer is not installed, but on the walls of this apartment and apartments on subsequent floors, it is necessary to install polyethylene tape and a damper along the entire perimeter of the walls. It is also necessary to create a trough, only without a bottom; polyethylene is laid overlapping on the walls above the level of the screed and on the ceiling.
If there is a need to lay a continuous vapor barrier, then you will have to sacrifice the integrity of the polyethylene due to the beacons. In such cases, it would be better to first lay polyethylene and then install beacons, so the damage to the vapor barrier layer will be less significant. It is worth repeating that polyethylene is used as a vapor barrier layer only when cotton insulation or non-extruded polystyrene foam is used as a thermal insulation layer. If extruded polystyrene foam or polyethylene foam is used as thermal insulation, then there is no need to create an additional layer of vapor barrier using a polyethylene carpet.
What will it take?
In addition to the reinforcement itself, you will need some other materials, including tools:
- Fittings.
- Threaded studs.
- Nuts and washers.
The technology of screeding a house using reinforcement is not complicated. Metal corners with holes whose diameter corresponds to the diameter of the studs are installed at the corners of the house. Studs are welded to the ends of the reinforcement, after which the reinforcement with threads at the ends is inserted into the corners, which are installed on opposite corners of the building. After this, nuts and washers are screwed onto the studs, and then the nuts are screwed on. The structure is tightened by turning the nuts. Naturally, without a special wrench, this will not be possible.
Laying insulation
Before laying the insulation, you must make sure that the base is level. Sometimes concrete floors are not laid level, so they will need to be leveled. This is done with sand, which is poured onto the lower parts of the base, but you do not need to pour too much so as not to overload the ceiling. It is necessary to pour in enough sand so that the insulation being laid does not sway on the floor. This can be achieved in other ways, for example, by adding crumbs made from insulation to the bottom or cutting the bottom of the insulating boards.
Thermal insulation material must be pushed onto the pin beacons. There is no need to trample down the insulation by walking, as this creates paths that are more trampled and less trampled. The thermal insulation layer needs to be rolled out, and you need to start doing this from the far wall of the room and move towards the door. When laying tile polystyrene foam insulation, the seams between them must be taped.
House collapse: what is it?
The collapse of a house is when the walls of a building are piled inside the building. There are partial and complete blockages. In this case, all work is carried out inside the house using fittings that are welded together using electric welding.
A complete collapse is characterized by the collapse of three walls, regardless of the degree of their destruction. The reason for this problem should be considered a violation of construction technologies, as well as insufficient reinforcement of the belt. To eliminate this problem, you will have to use a powerful metal structure installed using through-fastening elements.
A partial collapse is characterized by damage that touches two walls. Repair involves installing a partial frame according to the principle of installing a continuous sheathing.
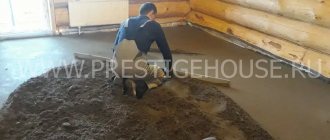
Laying a floating screed
To construct a floating screed, a semi-dry cement-sand mortar is used. You need to start laying the screed from the front door, gradually moving towards the opposite wall, while taking rest breaks and “smoke breaks” is unacceptable. The procedure for laying semi-dry screed is simple - prepare a solution and throw it through the doorway onto the insulation prepared in advance. First, the ties must be laid to approximately half the final height, while you need to focus on the pin beacons; they need to be covered with solution at about half or a little higher. Then, starting from the front door, move along the newly laid semi-dry mortar to the opposite wall of the room.
After the semi-dry mixture is evenly distributed over the entire area of the room, the screed must be compacted using normal compaction, then lay down the reinforced mesh and trample it down again. There is no need to link adjacent meshes; they are simply overlapped on top of each other by about three cells.
The next stage of creating a semi-dry floating screed can be performed in several ways:
- Place profiles for PN plasterboard on the beacons and, as a rule, align the screed with them.
- Fill and align the screed with the pin beacons.
Craftsmen who have experience in installing screeds use the second option, but for those who are inexperienced, it is better to use the first method, since they most likely will not be able to align the screed exactly with the heads of the bolts. They will need to make guide beacons along which the screed will be aligned as a rule.
If you put PN profiles on the beacons, you can speed up the work of leveling the screed. The work then proceeds as usual:
- A solution is applied between the beacons.
- The screed is trampled underfoot.
- It is leveled by the rule, while the PN profiles, if necessary, must be shifted along the heads of the pin beacons.
It is also worth noting that if plasticizers are not added to the cement-sand mixture, then the semi-dry screed will be difficult to level properly. In such cases, you will have to use a trowel; with its help, the tubercles will be removed and the holes will be leveled. The rule will not be used for grouting and leveling the screed, but to check its level.
After backfilling and leveling the screed, you need to start grouting. The screed is grouted using plaster floats, which cut off the mortar tubercles along the way and fill in the holes. If the screed does not rub well, this means that the solution is too dry, but there is no need to add water to it, you just need to wet the grater and continue working, repeating the procedure periodically. It is much worse if there is more water in the solution than needed. In such cases, it is simply impossible to wipe down the screed properly, as this can lead to cracking of the screed.
During the grouting process, if necessary, we remove the beacons and fill the holes from them. If a vapor barrier material was placed under the screed, then after removing the beacons it will naturally remain damaged. In such cases, the hole must be sealed using silicone, which is pressed through the holes left by the beacons.
Typically, professional builders do not use pin beacons when constructing a floating screed; instead, they make the beacons simultaneously with the screed. But, without sufficient experience, you should not make mortar beacons at the same time as making a screed, since this is by no means a pin beacon, by turning which you can lower or raise the mark.
After filling the holes from the removed beacons, you need to put a second “row” of mortar. Its height should be equal to the height of the screed. After which, the scattered solution is rubbed with a trowel, so that two islands are first formed, which are leveled with a laser level to the required level of the top of the screed.
The next thing to do is to rake or shovel the solution spread over the screed so that you have two beds. After which they are rubbed with the rule to the level of the screed along the islands made in advance.
Quality of fittings and its types
Reinforcement is metal building elements that are used to form reinforced concrete building structures. The use of reinforcement and concrete makes the structure especially durable. In addition to reinforced concrete products, reinforcement is used in construction to strengthen various building structures.
The connection between reinforcement and concrete is carried out:
- By friction.
- By shift method.
- The method of adhesion of reinforcement elements during the concreting process.
- Electrochemical method.
- The method of compression with concrete after laying.
What kind of fittings are there?
There are several types of fittings, depending on the conditions of use.
There are different types of fittings:
- Straining.
- Unstressed.
And:
- Working.
- Assembly room.
- Anchor.
- Constructive.
Including:
- Transverse.
- Longitudinal.
As you can see, there are many types of reinforcement and it is very important to know which one to use in this case.
Floating screed device
At first glance, the device of a floating screed using mortar beacons is a simpler technology than the device of a screed using pin beacons, but it seems so only at first glance. An amateur master, looking at the work of a professional, may decide that it will be enough for him to simply repeat his actions, but this is not so. And the point is not at all that when constructing a floating screed in this way, there are some secret secrets known only to the most qualified craftsmen, it’s just a matter of experience. If the master does not have sufficient experience in constructing a screed, then you can spend a lot of time creating a mortar beacon, pouring, smoothing, cutting off a bed of mortar and repeating this again and again until you get what you need. And the screed does not tolerate delay, it will not wait while you create a mortar beacon there with an inexperienced hand; the mortar of the lower level of the screed will begin to set even before you can lay the upper level, which will lead to delamination of the screed.
Modern construction technologies greatly simplify the work of craftsmen; for example, when installing a floating screed, ready-made non-shrinking mixtures make the work much easier. Working with them is carried out in almost the same way as when creating a screed from cement-sand mortar. The first layer is thrown over half the height of the screed, and the reinforcing mesh is laid on it. After that, plaster profiles are mounted on the pin beacons, and the process of leveling the screed along these beacons using an aluminum rule begins. The main advantage of ready-made mixtures is that they produce a solution that is convenient to lay, it rubs well with the rule and does not need to be grated. When the screed has dried to the point where you can walk on it, you need to remove the beacons, and first seal the remaining holes with silicone and then rub them with a solution.
If you added reinforced fiber fiber to the solution, then there is no need to install a steel mesh between the layers of the screed. Fiber fiber itself serves as reinforcement for the screed and prevents cracks from appearing in all directions. The device of a floating screed using fiber fiber is no different from the device of a conventional floating screed described above. You need to buy a dry mixture for screed with fiberglass. You can also prepare your own solution with the addition of fiberglass, which can be purchased at construction stores.
It’s easy to create a solution for such a screed yourself; fiber fiber is added to the cement-sand mortar. An important advantage of fiber is that it is evenly distributed throughout the solution when stirred. Fiber fiber does not stick to the tool used to mix the solution and does not form lumps in the mixture. After installing the screed in this way, fiber fiber hairs will be visible on its surface, but after grouting they will disappear.
Use of fittings
Construction reinforcement is strong enough to hold together the walls of a building, preventing further cracks from occurring. Despite this, such a technical operation will require certain skills, as well as the ability to use an electric welding machine. In addition, you will have to find the necessary information to correctly calculate the amount of reinforcement and its diameter. Calculations depend on the size of the building, as well as the nature of its damage.
Naturally, you can try and find all the necessary information, although it is better to involve an experienced construction organization. In this case, you will have to invest some money, but the calculations will correspond to a high professional level.
If the walls do not have serious damage, then in places where cracks appear, the brickwork can be replaced, and in cases of a high degree of destruction, it is better to use reinforcement, either reinforced or conventional.
Preparatory work
Such a screed can be mounted on a solid base, which is not inferior in strength to a concrete coating. Before starting the main work, the following preparatory processes should be completed:
- dismantle the old coating down to the concrete slab;
- clean the surface of debris, do not leave anything that could weaken the floor;
- carefully inspect the base for cracks and defects;
- seal gaps and deep recesses with cement mortar or tile adhesive;
- if large slopes are observed, level with concrete screed;
- Treat the lower part of the wall with antiseptics, which will protect the surface from fungi, mold, and high humidity in the room.
Finish care
After finishing the work, cover the surface with film so that the solution sets. Monitor the condition of the screed over the next few days. If necessary, periodically moisten the mixture with a spray bottle. Avoid drafts or temperature fluctuations. After three days, you can walk on the surface, but do not exert any pressure.
Important! After 25 - 28 days, check for shrinkage; if everything is in order, sand and proceed to the finishing layer using a self-leveling mixture.
When installing a floating screed without knowledge and experience, you can make some mistakes:
- failure to use edge tape will result in the formation of sound bridges;
- cracks will appear in the screed due to improper installation of the thermal insulation layer;
- no gap around the perimeter of the room;
- laying the screed on an uneven surface.
A well-made screed can provide a solid foundation with excellent sound-proofing and heat-insulating properties.
More information on how to make a floating screed with your own hands can be obtained from the video:
Average score of ratings is more than 0
Share link
Comments There are no comments yet, but you could be the first...
Strong collapse
The main signs are the appearance of noticeable cracks in the walls and foundation of the building, as well as a combination of other reasons that are characteristic of light and medium destruction. The cause of the appearance may be destruction of the foundation of the house.
To avoid complete destruction of the building, continuous support and corner clips, as well as a retaining belt of the foundation, are used.
To strengthen the foundation, reinforced concrete is laid along the entire length of the base.
Calculation of the required amount of building materials
Calculations of the required amount of materials for the screed are carried out with the addition of + 15% of consumables (in case of additional needs). In order not to make a mistake in the process of preparing the purchase of material and not to overpay extra funds, it is best to contact a construction specialist for calculations, who will attach a sheet with the calculation operation performed to the work report and estimate.
The screed of a brick wall is calculated using the formula V = L x W x T , where:
- D – length;
- W – width;
- T – thickness.
Calculations are based on the building design. The area of the walls is calculated, the type of masonry, type of frame, and reinforcement pitch are taken into account.
Waterproofing system
An example of installing a waterproofing roll layer before pouring the screed:
- lay the roofing material on the surface;
- place plastic film on the insulation or prepared subfloor;
- For fastening materials, use bitumen-based mastic and moisture-proof paints.
First of all, apply water-repellent paint to the base, then a layer of waterproofing. The most effective method is fusing. To do this, roll out a roll on the floor and make an edge along the pre-marked marks on the wall.
The material should be fused with a construction hair dryer or a gas torch. An analogue of the operation performed can be gluing strips of roofing felt with mastic. Apply the prepared composition to the base with a spatula or brush, and lay waterproofing on top.
Laying waterproofing
Then cover the walls. Cut strips with a width that covers the height of the screed. For the process, use isoplasts or isoplasts - materials with high functional characteristics.
Pros of pouring the floor
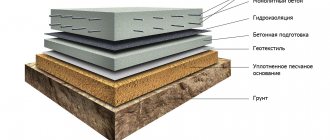
In cross-section, such a screed looks like a sandwich consisting of various layers of building material. Positive characteristics include:
- The insulating materials used for floating filling retain heat well and have good sound insulation. Noise is reduced by up to 50%.
- The screed has a layer of no more than 5 mm, so cement is saved.
- When temperature fluctuations occur, the finishing layer does not change its original shape.
- Compared to conventional pouring, there is no large load on the coating and it is light in weight.
- It is possible to place various communications under the screed.
- The multilayer structure ensures the rigidity and strength of the floor.
- The midlayer provides excellent cushioning while walking.
- The floating system smoothes out uneven surfaces.
- Surface care is undemanding.