Author of the article
Maxim aka WisH
Higher education with a degree in Information Systems. Experience as a system administrator - 5 years.
Ask a Question
Often providers do not bother with connecting the wires in the apartment to the required point. Then you have to negotiate with the installers, or install the Internet in the apartment yourself. Wiring an apartment is not that difficult if the end goal is clear. Here we will tell you about the best way to attach a cable to the walls in an apartment or house, how to choose a wire and how to connect it to a router or other equipment.
The meaning of a dedicated channel
Typically, the connection occurs by laying a twisted pair cable by the provider to the apartment and a little in it. They often hang the router above the front door or place it on the closet closest to the entrance. The provider can lay wires in the apartment, but for an additional fee. Sometimes there is no such service, then all that remains is to negotiate with the installers about unofficial work or install twisted pair cables in the apartment with your own hands.
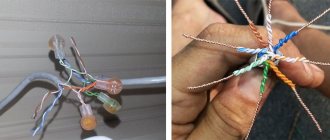
Your further actions depend on how exactly the room is connected and what you will continue to pull from. If the installers left a large piece of wire in the apartment, then all that remains is to extend the Internet cable further yourself. If it is plugged into the router, then you can pull a second wire from the router or extend the original one. In the second case, it will be possible to organize the installation of the router in the right place, and not near the entrance. There will be a weak point where the provider cable connects to your piece of wire. So don’t skimp and buy normal connections, like adhesive tape, heat shrink or any other type. Electrical tape is simple, but not very reliable in terms of durability.
Bottom line
As you can see, the appearance of the device is a little deceptive, and the splitter itself is used for other purposes. For additional information, I would encourage you to read two helpful articles for educational purposes. First, read the article from my colleague about Wi-Fi. It tells in simple terms about this simple technology, which is actually used almost everywhere. I also advise you to read the article about the router - which describes the basic principle of operation and the main points of operation. Everything is written in simple language and in an interesting way.
About twisted pair
Twisted pair has been used for over a hundred years, even if it originally looked a little different. It was first used on American telephone lines. It got its name due to the fact that the paired conductors through which the signal travels were twisted together along the entire length of the line. This protected against interference and interference, and if changes did occur, they affected both cables equally.
Twisted pair is still used to build low-current networks up to 24 V: telephones, Internet, cameras, alarms, security and industrial networks. For a home, the conductors are too thin to organize electrical wiring. Will not withstand high stress.
Has the following characteristics:
Advantages and disadvantages
Cheapness
Difficult to damage until the signal is completely lost
Can be bent at large angles
Resistant to interference
Often receives microdamage when bending too much or when pinched by heavy objects, which leads to a weakening of the signal
Susceptible to electromagnetic fields as standard
Twisted pair cable ensures stable data exchange between devices in the apartment and the Internet at a speed of 1 Gbit/s, if all devices have the appropriate connectors. A good choice for carrying out the last few tens or hundreds of meters to the final equipment. For longer distances or connection speeds, optics are used.
Using a print server
The last option is to connect via Wi-Fi. The method allows you to control the printer via the Internet even from a relatively large distance within the same network. The main disadvantage of this method is that it can only be configured if the printer supports a network connection.
How to setup:
- In the “Devices and Printers” section (we can find it through a search), click on the “Add a printer” button.
- Select the local connection method.
- Set the port using TCP/IP.
- Set an IP address (it must be free) on your network.
- Set “Device Type” to “Special” and select “Options”.
- We use the “LPR” protocol, the queue name is “turn1”, we enable byte counting.
- Install the driver for the printer.
- Follow the remaining recommendations of the installation wizard.
If a USB switch for a printer for 2 computers is the simplest connection option for small workplaces, then the local network option is a more functional and expandable method for medium-sized offices. The Internet option is even slightly better than the local one, since it does not require the use of an intermediary computer; communication between different devices is established directly.
Sources
- https://vpautine.ru/internet/razvetvitel-dla-kabela
- https://WiFiGid.ru/raznye-setevye-ustrojstva/razvetvitel-dlya-internet-kabelya-na-2-kompyutera
- https://PoPrinteram.ru/kak-podklyuchit-odin-printer-k-dvum-kompyuteram.html
- https://tvoykomputer.ru/kak-podklyuchit-printer-k-dvum-kompyuteram-vse-metody/
- https://printeru.info/podklyuchenie/odin-printer-k-dvum-kompyuteram
Wire selection
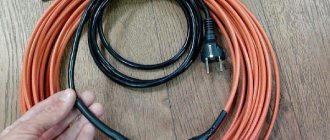
To install an Internet cable in an apartment, you can use any twisted pair cable. The main thing is that there are 4 of these pairs in it. Just come to the store and ask for “wire for the Internet” and they will show you everything you need.
The best option for an apartment is an unshielded cable of category 5E.
They differ only in the manufacturer and materials, but there is no significant difference between manufacturers in use. So take the one that is in the store. Unless you take a lot at once, then buy it in special boxes, where it is laid in a special way and there is a hole for removal. This will help you quickly unwind it and conveniently move it from place to place.
Sometimes it makes sense to consider purchasing shielded wire. First of all, it protects against electromagnetic radiation and removes interference. So you need to take it if the couple passes near electricity lines or equipment that generates such fields. To a lesser extent, the dense foil shell protects against mechanical damage. You may want to consider this option if the cable is accidentally touched or if it ends up in an open area.
Direct access
If home computers are connected to a local network, then they can receive cable Internet if one of them already has such access. To do this you need to do the following:
- On the PC that has access to the World Wide Web, you need to enter the Control Panel and go to the Network Connection Control Center.
- There is a menu on the left side of the screen. In it you need to select the line “Change adapter settings”.
- After clicking on the link, a list of existing connections will open. You need to select the one that relates to the Internet and enter its properties. To do this, simply click on the desired connection with the right mouse button and go to the corresponding menu item.
- You will need the Advanced tab. In it, you need to check the box to make the World Wide Web accessible to the entire local network. After confirming the entry, the Internet will be available on each computer connected to the original one.
Important! Please note that on the settings page there is permission for each computer to manage sharing. If this is undesirable, then you need to check the corresponding line of the “Advanced” tab.
If there are several networks, then on the settings page there is a drop-down list that allows you to make a selection.
After completing these steps, access to the World Wide Web was split.
Wiring methods and basic laying rules
In general, there are no differences in the Internet wiring diagrams in an apartment or a private house. They differ only in what will be at the end point of the cable laying.
- To the computer. This connection assumes that you run your wire directly to the end device. This sets strict limits, because there is only one place for the computer, you can’t move it and you can’t play with the spacer.
- To the router. In this case, the network extends to the router. Then he distributes wireless Internet. The case is simpler, because the router is connected only to the outlet. Choose a place so that it is in the center of the house or apartment for even distribution of the Internet.
- To the router and beyond. In this case, the provider’s cable is plugged into the router, and then you need to distribute the Internet throughout the apartment to other wired devices that cannot work via Wi-Fi. A difficult option, its problems grow with each new device. If only a computer is connected, then there are usually no problems. In this case, the router is usually placed next to the computer.
Basic rules to follow when laying cables for the Internet:
- Do not make strong bends. Bend the wire 90 degrees is a bad idea. Even if it doesn’t break right away, it will break at any moment. There are also recommended values, such as 4 radii, but at home they are rarely observed. The main thing is that there are no sharp corners, kinks or creases.
- Do not place near high-voltage lines and radiating devices. If the pair is shielded, then this point is less important, but if not, then interference will occur on the line, interfering with normal data transmission. The speed will drop and communication will be intermittent.
- It is not recommended to install near hot places, such as radiators. It is also not worth laying it openly outside if there is frost. It is less sensitive to them than to high temperatures, but it is still better to put the wire in a box or underground.
Internet cable double: tips for use from WiFiGid
Ethernet splitter - the simplest and cheapest option
Without a doubt, this is the cheapest option, but it is also the most tempting, while also offering the fewest options. An Ethernet splitter is a small device with three Ethernet ports, two on one side and one on the other. In case of an abundance of short Ethernet cables, but only one or two long cables, we can make the most of it.
It is important to remember that an Ethernet splitter reduces the number of cables used in a Cat 5e Ethernet cable, but reduces the data transfer rate from 1000 Mbps to 100 Mbps. Its advantage is that it allows you to use a network cable for two Ethernet connections, and they are cheap. However, the downside of these Ethernet splitters is that they slow down network traffic. Therefore, depending on whether these computers require more or less bandwidth, they may not use the full speed offered by the Internet connection or that local network.
It should also be noted that the Ethernet splitter is also limited to a maximum of two devices per cable. In some specific situations they may be fine. However, considering that we can buy a switch from 15 euros with many more capabilities, this means that in most cases it is not worth buying an Ethernet splitter.
How to share the Internet on several computers
The easiest way to solve this problem is to use the tools available in the Windows operating system. The main thing is that all devices connect to the same network. Network cards and the necessary cables are the most important elements, without which the problem cannot be solved. Otherwise, the LAN splitters will not work.
An appropriate cable is purchased for the physical connection between all machines. The main device is equipped with two network cards, which provides Internet access.
Note! From the very beginning, you need to give each computer a different name. To configure the parameter, just right-click on the “My Computer” icon. From the context menu that appears, go to the “Properties” item.
The relevant information is checked in the “Computer name” tab. The same workgroup is established for all computers using the same section.
Next, the order of actions is as follows:
- The computer name can be adjusted when the user clicks on the “Change” button. The working group can be changed in the same tab if necessary.
- The user account must be named differently than the computer itself. Information in this regard can be easily obtained by clicking on the “Start” menu, and then going to the following items: “Settings” - “Control Panel” - “User Accounts”.
- The last requirement is the installation of identical protocols on devices related to the network. To do this, go to the “Control Panel”, then find the connections icon.
- Right-click on the connection and select “Properties”. The main thing is that the same components are installed for all connection participants. In this case, twisted pair splitters for the Internet will be quite effective.
All that remains is to go to the properties of the second network card installed on the computer device. Here, go to the “Advanced Settings” tab to allow both types of connections currently available to users. After this, other users will be able to connect to the Internet, which is distributed from one or another computer. All you have to do is click OK.
Note! Don't forget about the TCP/IP Protocol component.
The IP address is filled in by the user himself. The subnet mask is set automatically. Gateway is a line that is left empty by default.
In the lower field, if you wish, you can check the box next to the “Obtain a DNS server automatically” function. Another option is to manually enter the IP address associated with the network card. This is a field called "Preferred DNS Server". After this, the so-called divider can be turned on.
Ethernet switch: ideal choice in most cases
If we want to turn our network cable into two or more, without a doubt, a switch is the best option to buy in most situations. His way of working is very simple. What we need to do is connect the Ethernet network cable from the router to the switch. We can then use the remaining available Ethernet ports to connect new devices that we couldn't use before. Simply put, turning a single Ethernet port into multiple Ethernet ports, switches give incoming data from your network devices their own paths without data interfering with each other.
Free Yourself switch also supports Full Duplex communication. This means that devices connected to it can send and receive data at the same time and this translates into a faster network, of course we will still have the fastest possible network speed, usually Gigabit Ethernet, although the former are already starting to appear. Multi-Gigabit switches with 2.5G and 5G speeds.
On the other hand, if we compare them with an Ethernet splitter, which had two devices as a limitation, with the simplest switch we could connect up to five. As we mentioned earlier, since they are also very cheap and offer great performance, they make switches the most recommended option.
What is it for?
Look, a network cable like this usually has 8 wires or 4 pairs. So the maximum data transfer speed can be up to 1000 Mbit per second. But most often in a local network, and even on the Internet, they use only 4 wires or 2 pairs. The remaining 2 pairs are simply not used.
This device is used to connect two computers at once via one cable. That is, 4 wires for one computer and the rest for the second. But at the very end it is usually necessary to install a similar tee, which branches the connection back. Also, some switches with a 1 Gbps port can work with a single connection. They immediately split one connection into two using hardware and software.
That is why if you want to connect several devices to one Internet cable, it is better to use a home router. It acts as a kind of gateway that will receive an Internet signal, build a local network and intelligently distribute packet flows between connected devices.
That is why it is also called a router, since it works based on a routing table. In this case, there will be no failures, and the Internet speed will not drop. An additional advantage is the ability to use a Wi-Fi connection. That is, the device will build a wireless local network around itself. And you can already connect to it from your phone, tablet, laptop and other devices that have a Wi-Fi module.
Ethernet Hub: A Vanishing Solution
Free Yourself The Ethernet Hub is probably the least interesting option since it was replaced by the Switch. A hub can be defined as a large chamber filled with network traffic where packets enter and leave to find the computers they are trying to connect to. From a technical point of view, the hub uses so-called half-duplex communication. As a consequence of this way of working, it generates data holds and contention, monopolizing valuable bandwidth and causing network slowdown. The situation becomes more complicated when multiple commands are used simultaneously.
One thing to keep in mind is that Ethernet hubs are physically very similar to switches. So, when buying them, you have to be very careful not to go wrong between them, although hubs don't sell that much anymore.
Finally, remember that we have switches with all the features, high speed and the ability to segment the network if we buy managed switches, which are slightly more expensive. The hub will be an intermediate solution that does not compensate for the price, and finally we will have an Ethernet splitter, which may be interesting in some situations.
Wiring before repair
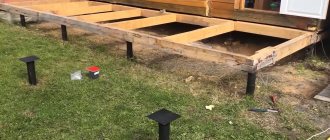
Wiring and installing an Internet cable in an empty house is a great idea. There are no obstacles, you can plan everything from start to finish. The result will be a beautiful system that will please the eye after moving in.
Examples of wiring diagrams:
Scheme for 1k/2k apartment
Scheme for a 3k apartment
Here are a few nuances:
- You need to clearly understand where and what will be located in the room.
- Select in advance the location for the router from which all other wires will disperse.
- The cable is laid simultaneously with sockets and other cables.
You can run cables in the wall or remove them during repairs under the plaster. Popular choice, but not worth doing. Now it is recommended to run all wires in cable ducts. This is important because if the cable breaks, short circuits, or some other problem, they can be quickly found and repaired. Once the renovation begins, all the channels will be hidden; in addition, they are bought to match the color of the room or furniture so that they stand out less. If there are none, then paint them yourself.
As a result of such planning, you will get such sockets. A telephone, TV, computer and any device that requires power are immediately connected to them. You won't be tied to one place in the whole house and can move your TV or computer at any time. Or connect to the network for a minute from anywhere in the house.
How to connect two PCs via a switch
What are the differences between 3G and 4G networks: features, advantages and disadvantages
When there is only one cable laid from the provider, and it is necessary to connect two computers to the Internet, then some simply switch the cable from one PC to another. However, there is a possibility of how to divide the Internet cable between 2 computers in such a situation.
In this case, it will be necessary to purchase a network hub, also called a “switch”. It provides several places to connect those wires that connect to computers.
You need to disconnect access as follows:
- One of the two computers must be the master. It is this PC that connects to the Internet via the provider’s cable. He needs a second network card. It can be installed in the system unit of this computer or used as an external one via a USB connection. The wire from it is connected to a network hub. The cable from the second computer is also connected there.
- You will need to configure the Internet on the first PC. After this, in the connection properties you need to check the box that allows access to the worldwide network to all computers on the network. After entering and confirming the parameter, the additional network card will be assigned an IP address of 192.168.0.1.
- Next, you need to set the network settings on the second PC. You need to assign it a network address of 192.168.0.2. Next you will need to move on to determining the address of the core gateway. Here you need to put the address of the first computer: 192.168.0.1.
- In order for the second computer to have access to the World Wide Web, the first one must be constantly turned on. This method of branching access can be used in order to work not with two, but with a large number of devices. They will need to indicate an IP address that differs from the first two.
When connecting the switch, you need to consider the following:
- There are configurable and non-configurable devices. It is easier to choose the latter for use, since they are easier to work with.
- You need to choose the right place for this device. In this case, it is necessary to ensure that as little cable as possible is used to connect PCs included in the local network.
- The connection is made using RJ 45. If the sockets belong to non-configurable ports, then you can insert them into any. Configurable ones are intended for those devices through which the local network will be managed.
It must be remembered that for the network hub to work, you need to provide an outlet with a 220 V power supply. If the electricity goes out, the hub will not work.
Wiring after repair
Running an Internet cable through an apartment after renovation is more difficult. Mainly because you will have to move the furniture and lay it out so that it does not get in the way and is not conspicuous. There are two options here:
- Modern skirting boards have channels for multiple cables. Open them one at a time and route the wires inside the baseboards to their destination. There will be problems with doorways; you will have to lead directly or around the door.
- Cable channels. Buy small cable channels, raise them to the ceiling or hide them behind furniture. Then run all the wires through them. More work, but it will turn out nicer than hanging wires.
If there are no options at all, then leave the router in the hallway and place a repeater in the desired room. Connect all the necessary devices to it. Connection speed and stability will suffer, but this may be the best option.
Crimping a network cable directly and crossover for printing on a b/w printer
1.When connecting Computer-Hub/Switch (card-hub/switch), the following crimping scheme is used:
One side crimp | Crimping on the other side | ||
1: White-orange 2: Orange 3: White-green 4: Blue 5: White-blue 6: Green 7: White-brown 8: Brown | 1: White-orange 2: Orange 3: White-green 4: Blue 5: White-blue 6: Green 7: White-brown 8: Brown | ||
When connecting two computers crossover (card-to-card), the following crimping scheme is used:
One side crimp | Crimping on the other side | ||
1: White-orange 2: Orange 3: White-green 4: Blue 5: White-blue 6: Green 7: White-brown 8: Brown | 1: White-green 2: Green 3: White-orange 4: Blue 5: White-blue 6: Orange 7: White-brown 8: Brown | ||
Pinout and connection
After running the cable, you need to connect it. This will require RJ45 or 8P8C connectors. Twisted pair crimping is described in detail in a separate article. To crimp, remove the shield and protective sheath from the twisted pair. Next, distribute the pairs in the connector as shown in the left figure.
On both ends, crimp in the left direction. The right one is needed only in the case of a computer-to-computer connection, then one end is crimped using the left option. There is a special tool for crimping, which costs from 500 rubles. If you don’t want to buy, then after inserting the twisted pairs into the connector, use a thin screwdriver to press the gold plates on top. They have to cut through the wire to make contact.
This is how the pairs are located in the connector itself and this is how it looks. The connector is inserted into the crimping tool, you need to press the handles and you're done. If you quickly and forcefully press on the contact plates with a thin screwdriver, you can achieve the same effect.
Compression methods
The Internet cable uses twisted pair, which consists of 8 cores (or less - 4). Therefore, it is necessary to use special connection methods (preferably with special equipment), because if the contact is of poor quality, then working with the Internet will become unavailable.
To carry out the operation, it is advisable to use a special crimper for the RJ-45 Internet connector sockets. You can also use special pliers called “crimping”. In emergency situations, experts can use a regular flat-head screwdriver or pliers, but this procedure will be one of the most unreliable (there is a risk of damaging the cable and the plug itself).
Important! The crimping method itself is quite simple: you just need to insert the wire into the socket and use special pliers, pressing them all the way. It is much more difficult to decide on a scheme.
Using pliers, you can not only carry out the above operation, but also clean the insulation, bite off excess cable, or straighten the wires before crimping.
If there is no special device, then, as mentioned above, you can use the “home method” of crimping - using a screwdriver and a knife:
- carefully strip the cable without damaging it;
- insert the wires into the connector according to the required pattern;
- press on each contact in turn, thus securing it.
The home method has a number of disadvantages, for example, the screwdriver will constantly slip off, and there is a possibility of damaging the wire.
You can also use the pliers method to perform the operation. But it is very inconvenient to carry out such an operation, since the plastic housing of the connector can be damaged. It is required to crimp on each side of the cable. If in the middle several leads do not press completely, then it is advisable to return to the method with a screwdriver.
Wifi routers in a residential complex are something...
So, living in a large apartment complex sucks for Wi-Fi, and because of where the cable/internet outlet runs, network cables are not possible, so I want to improve the Wi-Fi throughput.
Right now I'm seeing severe slowness and lag on my WiFi network. I have a 300/300 connection from Frontier FiOS (formally Verizon FiOS), and while their wireless router does the job, there are so many other Wi-Fi networks that all the channels are full.
1. Will a simple new router help?
2. Will a router with DFS support help?
3. What routers are recommended?
WiFi Connectable Devices: HP All in one Printer, 2 x Microsoft Surface Pro 4, 2 x Gaming PCs, 3 x Xbox One, 2 x iPhone, 1 x Android Phone, 1 x iPad
I've been reading about DFS and I think it might help if I'm on a channel that others probably aren't using. The first problem is that I live near the Tampa airport and I think DFS might not work for me because of their radar.
The second problem is that NETGEAR only supports button-pushing morons who can't answer simple questions about DFS support on their routers for US customers. I talked to them 10 times and got different answers. 99% of the time they tell you that DFS is not supported on any of their US routers, yet the 7800 firmware release notes say it is, and the Amazon product page for the R9000 says it is, but NETGEAR says that no. T.
As long as I'm connected to my router I'm seeing 300/300 speed tests, but on Wi-Fi if I get 10/10 I'm lucky, and that's if I don't get disconnected all the time. I had Frontier replace the router to make sure it was not a problem, but there seem to be hundreds of wifi networks that I can see with really strong signals.
.