Protecting the premises of the lower floor from water leaks, protecting the wall and floor materials from getting wet - these are the two main tasks that bathroom waterproofing solves. This stage of work cannot be skipped, because even the use of wall finishing such as glass or glazed ceramic tiles with moisture-resistant grout does not provide a complete guarantee against moisture getting inside the room’s enclosing structures.
A waterproof barrier must be reliable Source sandiegowaterandmold.com
Why do you need to waterproof your bathroom floor?
At first glance, there is no need to carry out waterproofing work under the tiles in the bathroom - a concrete screed + deep penetration primer + tile adhesive + the tile itself creates a powerful, multi-layer waterproofing barrier against water. However, not everything is as simple as it seems.
Firstly, concrete only looks like a monolithic cement stone . In fact, a concrete surface actively absorbs water in any condition. And a couple of years after installation, this process accelerates significantly, as many microcracks appear.
Secondly, emerging microcracks are not always stopped with a primer . “Betonokontakt” (deep penetration primer) has the ability to penetrate into the resulting microcracks and seal them, but with an increase in the number and size of the cracks, this ability disappears.
Thirdly, cracking concrete tears the glue (it has low elasticity) - microcracks also form in it, through which moisture can pass to the ceiling of the neighbors below.
Fourthly, something needs to be done with the technological gap between the wall and the screed . This is the easiest way for water to move from the floor down. Sealing the junction of the tiles with the wall with silicone sealant cannot completely solve the problem - during a flood there will always be at least one microcrack that the water will expand.
This is one side of the problem: fighting water inside the bathroom.
There is a second problem, which for some reason is forgotten: increased humidity among the neighbors below. Penetrating through pores and microcracks, moisture from below creates an unfavorable environment not only in the bathroom, but also inside the floor elements. Dampness appears there, followed by mold and mildew, which destroys the screed and negatively affects the glue. This is especially unpleasant when there is linoleum on the bathroom floor instead of tiles - the floor covering begins to collapse from below (sometimes they say rot, which is not entirely accurate).
Conclusion. Carrying out waterproofing before floor screed allows you to:
- prevent water from reaching neighbors below;
- protect the floor elements in the bathroom from moisture from neighbors below;
- when using roll materials, at the same time solve the problem of sound insulation of the room.
Areas of special attention
The shower room is completely exposed to regular moisture. However, there are areas that take on the greatest load, the so-called high-risk areas. This is, as a rule, the lower part of the walls, the location of the washbasin, the floor, the shower (without a tray or with it). As well as the places where communications enter and the pipes themselves, if we are talking about metal elements susceptible to corrosion. These vulnerable areas and elements of the shower require special attention when installing waterproofing.
Features of combating moisture in the bathroom
At all times, the only method of dealing with water was waterproofing. She also comes to the rescue in the bathroom. But there are several points that need to be considered in more detail.
1. Ideal waterproofing is a sealed bathtub with sides up to 30 cm high, extending onto the wall. Such protection allows you to maintain a continuous layer of water on the floor up to 2-3 cm thick (up to the height of the threshold) for an indefinite amount of time.
2. Waterproofing the floor is done according to two classic schemes:
- before pouring the floor screed - “floating screed”;
- along the screed, immediately before laying the floor covering - a “floating floor”.
For all rooms of the apartment, it makes no difference how the waterproofing is done. The bathroom is an exception. Here, waterproofing materials must be laid (applied) on the base of the floor, under the screed, since in this room it is necessary to additionally protect the screed itself from moisture from the bathroom from neighbors below. When there is no certainty about the presence of insulation under the screed, it is additionally performed in the “floating floor” version.
3. For ceramic tiles and linoleum, it makes no difference what material is used when waterproofing a bathroom under a screed. However, everything changes when the waterproofing material is laid directly under the floor covering. For linoleum, you can use all available types of insulation (the underlay for this floor covering eliminates the characteristics of each type of insulating material), and for tiles it is advisable to exclude bitumen coating, rolled materials, liquid glass and rubber.
The reason is that, being an intermediate gasket between the screed and the tile adhesive, these materials do not provide the required level of adhesion of the tiles to a solid base.
Attention: many online resources recommend sprinkling them with quartz sand or treating them with “Betonokontakt” to ensure adhesion of the glue to bitumen, rolled materials, liquid rubber and glass. Practice shows that waterproofing a bathroom floor under tiles using this technology leads to the destruction of the tile over time - it cracks and lags behind. Therefore, you should not take risks and it is better to immediately abandon the listed materials. Here we need completely different waterproofing agents, which will be discussed below.
4. The technology for applying waterproofing under “floating screed” and “floating floor” for each type of material, as well as under different floor coverings, is identical. Therefore, it makes no sense in this work to consider separately the waterproofing of floors under tiles and under linoleum.
5. Technologies for carrying out waterproofing work for a concrete base differ from waterproofing a plank base in a private house, and therefore will be considered separately.
Tips for laying tiles
Immediately clean the seams between the tiles from glue.
The glue from the seams must be cleaned off immediately
First, the glue can change the color of the grout. Secondly, it does not retain moisture, and it needs to be grouted with special compounds. Otherwise, the installation technology does not differ from the usual one.
Applying grout
Seal grout joints with great force. The recommended rubber spatulas cannot always create them; it is better to use wooden ones. There are no factory ones - use an ordinary thin lath about 5 cm wide. Press the grout into the cracks until the excess protrudes at the edges of the spatula. It is better to do final grouting and cleaning of surfaces after a few hours. During this time, the material will harden a little and will be easier to remove. Wipe the seams with a damp sponge. Read the link for cast iron bathtubs with hydromassage.
Types of waterproofing for bathroom floors
How to waterproof a bathroom floor? Trade offers a wide selection of materials. For the convenience of studying the technology of work, we classify them all according to the method of application (laying). Based on this criterion we can distinguish:
- roll materials, which are divided, in turn, into pasted, welded and laid;
- penetrating waterproofing;
- plaster mixtures;
- coating agents, of which cast materials are sometimes classified as a separate group.
Roll materials
Rolled materials for waterproofing, in the form that is familiar to us, appeared at the beginning of the twentieth century. These were rags or paper (reinforcing material) soaked in bitumen (insulating material). Today on sale you can find a huge assortment of rolled waterproofing, differing in the method of application and type of reinforcement.
According to the method of application they are distinguished:
- adhesive insulation - attached to the base of the ceiling or screed with bitumen mastic or special adhesives (the method refers to the universal installation method);
- fused - the insulating film is fixed with bitumen melted by a gas burner, which at the production stage is applied in a thin layer to the reverse (bottom) side of the waterproofing material, rolled into a roll. This method of laying is considered an ideal option for protecting concrete from moisture;
- laid. The peculiarity is that on the protected surface there is no attachment to the base. Only the joints are glued with various mastics or construction tape. Sometimes they are attached to the wall with nails or staples at a height of 15-30 cm from the ceiling or screed. This is the best option for waterproofing wooden bases.
Roll waterproofing is produced on the basis of various materials. It can be:
Cardboard or paper is a classic for waterproofing. Thanks to these materials, roofing felt appeared, as well as roofing felt and glassine - the first waterproofing materials. They are classified as laying materials, which allows installation without problems.
They are very cheap, but they protect against moisture very effectively. However, like any cheap material, there is a drawback, and a significant one. Roofing felt, roofing felt and glassine are short-lived, and therefore their production is gradually being phased out.
Ruberoid.
Fiberglass and fiberglass. Fiberglass in its parameters is similar to cardboard: it is easy to install, has a low price, and resists moisture well. But, unlike a paper base, it lasts longer. Disadvantages include low strength: it breaks and delaminates if handled carelessly.
Fiberglass.
Fiberglass fabric is much more expensive, which is explained by its high strength and elasticity (3 times higher than that of fiberglass) and long service life (about 5 times longer than materials based on cardboard and paper).
The general disadvantage is related to the principle of the insulating material: bitumen or polymer mixture is applied on both sides. The material, made of fiberglass, does not allow the applied layers to form a strong adhesion (it seems to separate them). As a result of temperature changes or mechanical loads, the waterproofing material delaminates after some time.
Polyester. Polyester-based roll materials are indispensable in new buildings, where buildings are shrinking, and on wooden floors. It has high strength and ductility, which allows it to maintain integrity under large deformations, for example, stretching. The level of strength can be demonstrated by this indicator: the material breaks only when elongated by more than 30%.
Non-woven materials (polyester).
Polymer membranes. Conducts moisture in one direction. They are mainly used in conjunction with heated floors when it is necessary to remove condensation from the screed.
Foil - used in combination with a laminate backing. Waterproofing agents include: bitumen, tar and butyl rubber (rubber compounds). In addition, experts add polyethylene film to a separate group of waterproofing materials. It is very often used to waterproof the subfloor.
Mostly technical film is used. It is thicker, and the price, on the contrary, is lower than that of conventional film. The greatest effect is achieved when protecting wooden bases on which a 3-4 cm thick screed is laid.
Rolled waterproofing has both strengths and weaknesses. The advantages include:
- elasticity, which allows you to maintain the ability to protect the room from moisture penetration when cracks appear and deformation of the subfloor;
- simple and convenient installation;
- maintaining performance characteristics during the stated service life;
- suitable for any type of surface, from concrete and wood to metal;
- short period of time between flooring and further work (dries quickly);
- virtually waste-free installation;
- low price.
Among the disadvantages:
- simple and convenient installation does not mean that the work can be done by one person - at least a partner is needed;
- the installation process itself extends over time;
- places high demands on the level of foundation preparation during previous work;
- emits a sharp, unpleasant odor;
- prone to fire during installation, especially when working with open fire;
- can only be laid at positive temperatures, at least +5oC.
Penetrating waterproofing
The action of penetrating compositions is based on the ability of concrete to absorb moisture and the ability of the ions of the chemically active additive of the composition in the pores of concrete to enter into a chemical reaction with calcium, aluminum ions, oxides and salts of metals contained in concrete, forming a crystal lattice up to 50 cm thick (“ Penetron"). This barrier layer becomes a powerful barrier to water penetration in both directions.
For information: many may have considered the Penetron penetration depth of half a meter to be a mistake. Laboratory tests have shown that the composition reacts with concrete at a distance of 600 mm from the surface, creating a crystal lattice.
The validity period of such waterproofing is equal to the service life of the concrete structure, since crystalline hydrates become an integral part of concrete, thereby strengthening its mechanical properties.
Pros of penetrating waterproofing:
- strengthens the surface of concrete, increasing the service life of the structure;
- reduces the period of waterproofing work;
- can be applied from any side of the concrete slab - the penetration depth is sufficient to form a protective film both inside and outside the ceiling;
- can be applied to a concrete structure with any service life;
- ecologically pure;
- resistant to various types of influences, including chemical and mechanical;
- applied at any temperature.
Among the disadvantages:
- Can only be used on concrete surfaces. No chemical reaction occurs on other materials;
- to seal the joints between the base of the floor and the walls, other waterproofing materials are needed;
- high price.
Plaster mixtures
Waterproofing plaster mixtures are made from cement with sand and an additive in the form of liquid glass or ceresite. In addition, to improve viscosity, elasticity and adhesion, various plasticizers are introduced into the composition.
For information: ceresite is an aqueous emulsion of alumina, oleic acid, lime and ocher.
By mixing the cement mortar (1 part Portland cement and 3 parts sand) with liquid glass or ceresite, you get a waterproof plaster that:
- can be applied to surfaces of any configuration;
- has a simple and convenient application technique;
- environmentally friendly;
- applied to any surface;
- serves for a long time.
At the same time, it is not used in new buildings and in houses near construction sites, highways, airfields and metro lines - it loses its properties (cracks) due to vibrations and shrinkage of buildings.
Lubricants
The first types of coating insulation can be found in ancient times, when liquid clay was used to protect against the effects of water. Today, waterproofing mastics are made from completely different materials:
- bitumen;
- bitumen with polymer additives;
- cement with polymers;
- polyurethane;
- liquid glass;
- polymers, which includes the well-known “liquid rubber”.
Mastic applied to the floor effectively clogs pores and microcracks on the concrete surface, leaving no untreated areas. To increase the level of protection, the composition is applied in several layers, creating a hydrophobic film of several millimeters.
Advantages of the method:
- good tightness of the coating due to the absence of seams;
- high elasticity of the material, which allows maintaining the integrity of the layer during the formation of microcracks on the surface of the concrete floor;
- the ability to perform work using a mechanized method;
- easy application (only for cold-type mastics);
- the level of noise protection and thermal protection characteristics of the base are increased;
- complex surface topography is not an obstacle to the use of mastics.
Disadvantages of this method:
- the need to apply at least 2 layers;
- weak mechanical strength - can be damaged quite easily during further work;
- relatively short (up to 20 years) service life;
- very toxic solvents;
- mandatory installation of cement screed after waterproofing to protect the layer from mechanical damage;
- flammability of materials, which is especially important for hot application methods.
What materials will you need - what to choose from
Based on the method of application, materials for waterproofing barriers can be divided into two groups:
- painting, coating and impregnation;
- roll and sheet.
There are also formulations for injection, but this method of application (more precisely, “implementation” into the structure) is not used in bathrooms.
As the name suggests, the first three types are liquid or paste-like substances that can create a seamless, waterproof coating.
Roll and sheet materials are glued to the surface in the form of thin sheets, overlapped or end-to-end, with welded, soldered or glued seams.
Typically, when creating a waterproof barrier, not one, but two or three materials are used in combination. And this set of tools is determined by the selected waterproofing scheme.
What type of waterproofing is better to choose based on the principle of cheap-easy-reliable
When starting a repair, you always want it to be carried out according to the formula: cheap-easy-reliable. This is very difficult to achieve when waterproofing a bathroom floor. For example, rolled materials cost pennies, but require the participation of an assistant when laying the flooring. And durability wants to be better. Impregnated insulation is easy to apply, protects against water penetration reliably and for a very long time, but is expensive.
Therefore, in such situations, as always, options with average characteristics come to the rescue. In our case, this is Kalmatron waterproofing made in Belarus (not advertising). The technical characteristics of the mixture make it possible to classify it as a universal product that has many advantages over similar materials, including those made in Russia. One of the main advantages is the harmonious combination of price and quality. In addition, the product has convenient packaging, from 5 to 25 kg.
If you lose a little money, you can also use:
- Knauf Flachendicht water dispersion (5 kg);
- mastic Ceresit CL 51 (5 kg);
- coating waterproofing KIILTO Fiberpool (7 kg);
- mastic Plitonit HydroElast (4.5 kg).
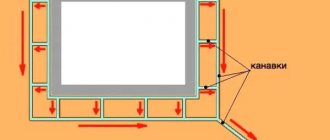
Drain installation
An important step for future waterproofing of a shower stall is the installation of a drainage drain. The drainage structure is mounted on a concrete base. Then the drainage pipe is connected to the sewer system and the entire structure is filled with a solution that fills the voids. The surface of the ladder is placed below the finished floor level. As a result, the structure drains water correctly.
After installing the drain, seal the seams using an elastic profile. The seam between it and the floor is coated with waterproof glue (sealing cloth). If the drain is located in the center of the shower stall, then a slope of 3 degrees is made to it on all four sides. When installing the ladder in a corner, it should be 2 degrees.
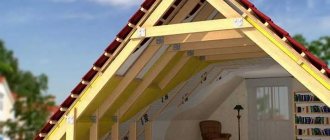
Instructions for installing waterproofing on a wooden base in a bathroom
Waterproofing a wooden floor in a bathroom under tiles begins with preparatory work, which consists of two stages.
Stage I. Purchase of materials and tools.
Stage II. Preparing a wooden floor for application (laying) of waterproofing.
Materials and tools
To carry out work to protect the wooden subfloor from moisture, you need to purchase:
- rolled waterproofing material or one of the types of mastic related to coating insulators;
- wood mastic for sealing cracks and crevices;
- bioimpregnations to protect wood from rot, mold and woodworm;
- fire retardant impregnation;
- primer for wood (one of the best options is a water-soluble emulsion primer based on bitumen);
- waterproofing self-adhesive tape;
- rubber liners or raw rubber.
In addition, you will need:
- vacuum cleaner or broom with dustpan;
- construction knife.
Flow calculation
Calculation of the need for materials for waterproofing a bathroom floor is carried out according to the standard scheme: the area of the room is multiplied by the consumption rate per 1 m2 and the number of insulation layers. However, due to the interaction of various factors, this calculation is approximate. Moreover, for each type of material the difference in consumption per 1 m2 is different:
- "Penetron" - impregnating waterproofing for concrete structures. Per square meter it will take from 800 g to 1.1 kg;
- "Kalmatron" - coating insulation for concrete and brick. When applied in 2 layers, from 1.6 to 3.2 kg/m2 will be required;
- coating insulation based on bitumen will require 2-3 kg per 1 m2 of area.
More accurate figures can be obtained by calculating the amount of roll waterproofing. Here you just need to take into account the width of the material, the approach to the walls (20-25 cm) and the overlap (10-15 cm).
Preparatory work
Preparing the base for waterproofing consists of several operations:
- the wooden base is cleaned of dust and construction debris;
- boards and joists are inspected to detect damage;
- repair work is being carried out to restore wood (details about repairing the wooden subfloor can be found in the material “Preparing the floor for pouring screed”);
- cracks and crevices are sealed with wood mastic or deck sealant (simple waterproofing materials tend to peel off and swell after a while);
For information: before applying the sealant, the boards along the cracks are sealed with masking tape. Since it is difficult to rub the paste deep into the crack, you need a construction gun, therefore, you need to buy the sealant in a tube. The masking tape and protruding insulator are removed with a spatula.
- the base of the floor is removed again;
- floors and walls up to a height of 25 cm are first treated with bio-impregnation and then with a fire retardant compound;
- The primer is applied to the impregnation in two passes: the floor and the walls;
- after the impregnation has dried (you can check with a cotton swab - it should remain clean), self-adhesive waterproofing tape is used to glue the joints between the floor and the walls, as well as between the boards;
- the passages of various pipes are sealed with raw rubber or caoutchouc and also sealed with tape.
Selecting the type of insulation
To insulate a wooden base, you can use three types of waterproofing: roll, coating and plaster. Some experts suggest using drying oil for waterproofing (paint waterproofing). However, in the bathroom, paint insulation is excluded due to its short service life (4-6 years). The choice of insulating material is also influenced by the type of finishing coating.
Thus, waterproofing a wooden floor in a bathroom under tiles excludes the use of rolled materials and bitumen-based mastics - there is no adhesion to tile adhesive (this condition also applies to waterproofing concrete floors). In all cases, you will have to fill the screed. Any waterproofing materials are suitable for linoleum (a backing is laid, and linoleum is laid on it).
But even among rolled materials, not all can be used to protect wood from moisture. For example, the use of fused materials (TechnoNIKOL) is carried out using an open fire, which is not recommended in conditions of dry wood - there is a very high probability of fire.
Video description
The whole process and possible nuances are clearly shown in the video:
The minimum number of layers is 2. Each next one is applied after the previous one has dried.
After completing the creation of the waterproofing layer, the floor is ready for pouring the screed and laying the finishing coating (tiles or self-leveling polymer floors).
Self-leveling 3D floors can be misleading Source pol-master.com
Insulation technology
Considering that different types of insulating materials are needed for tiles and linoleum, we will consider separately the waterproofing for each topcoat.
Under tiles
When laying tiles according to SNiP, it is necessary that the tile adhesive has a rigid adhesion to the base. This condition for waterproofing a wooden floor is met by plaster materials that do not contain bitumen components (Knauf Flachendicht, Ceresit CR-65, etc.) and coating insulation based on polymers.
For information: the waterproofing “Glims Vodostop” has proven itself well. However, there are many fakes on sale: instead of insulating materials, there are M150 cement in bags.
The application technology is simple: ready-to-use insulator is applied with a brush or spatula to the prepared floor and the bottom of the wall. After the first layer has dried, the procedure is repeated. Particular attention should be paid to the corners and joints of the floor and the wall.
Work should start from the far corner and move towards the exit. The second layer is applied perpendicular to the first. If there are more passes, then each time the mixture must be applied perpendicular to the previous layer.
Until the last layer of the solution has hardened, it is sprinkled with fine (fraction 0.3-0.8 mm) sand. Consumption is approximately 1.7 kg per 1 m2. The operation is needed to increase the adhesion of tile adhesive to the insulating material.
Under linoleum
Waterproofing a wooden floor in a bathroom under linoleum can be done with rolls and coating materials. The technology for applying coating insulation is the same as for under tiles. Therefore, let’s look at how to properly lay rolled materials. There are several steps here.
Step 1. The number of insulator strips is calculated. In this case, you need to take into account the approach to the walls and overlapping installation. The strips are cut to length. Experience shows that it is better to add about 10 cm than what was obtained during measurements - the excess can always be cut off.
Step 2. The cut strips are spread on the floor for a day so that the material takes on a linear shape. Then they are rolled up on both sides (the output is two rolls) and laid in the middle of the room on the floor prepared for waterproofing (this makes it easier to control the direction of laying).
Step 3. The protective film is cut with a construction knife. As the roll rolls out, the film is removed from the adhesive layer. The insulation sheet should fit tightly to the boards. Any air pockets that appear are immediately removed. If you delay, you will have to puncture the material to remove air (many experts consider the puncture safe, since it will heal over time). To enhance the adhesion of the insulator to the floor, the laid material is rolled with a roller.
Step 4. A similar operation is performed with the other part of the roll.
Step 5. The next strip is overlapped.
This is how roll materials are laid.
Approaching walls along the length can be done in two ways:
- lay the whole strip close to the wall, and then glue a narrow strip 30-40 cm wide to the floor and wall. This is simple, but less reliable;
The film should extend onto the walls by at least 20 cm and the floor by 10 cm.
- approach the wall as a whole strip at once. Inconvenient and difficult, but more reliable.
Video description
About mistakes when waterproofing premises in the video:
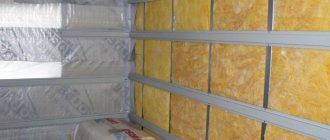
Stages of work
For walls there is also a preparatory stage, which has almost the same appearance as for the floor:
- cleaning of old coating;
- correction of surface defects;
- applying a primer with hydrophobic and antiseptic properties.
After the soil has dried, apply a waterproofing solution with a spatula or trowel and spread it evenly over the wall. And since this is not putty, a perfectly flat surface is not needed here - small unevenness and roughness is compensated by a layer of tile adhesive.
Even moisture-resistant drywall needs to be protected Source finkarus.ru