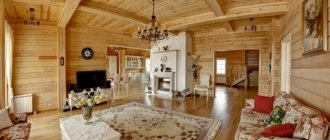
The desire for environmental safety is driving city dwellers closer to nature. And increasingly, wood is becoming a building material. And this is understandable. A wooden house has numerous advantages compared to a stone one or one built from artificial materials using modern technology. One of the most important parts of your home is a properly installed floor.
We make floors in a wooden house with our own hands
Classic laminate floor design
The classic design of laminate flooring is typical for new houses or houses and apartments undergoing major renovations.
The main requirement for the entire laminate floor structure, starting from the base, is to ensure a horizontal, even, smooth surface. Laminate is sensitive to unevenness, and it can only be laid on a surface with an unevenness of 0.2% of the room dimensions. Unevenness is checked with a two-meter rod. The check is done for slope and clearance. That is, the slats are laid on the floor in different directions, at the same time the unevenness of the floor in terms of slope and clearance is visible. There should be no visible gaps between the slats and the floor.
1. The basis of the classic design is a concrete floor slab. The slab must be cleared of construction debris. If there are technological protruding irregularities on the slab, they need to be knocked down. Protruding reinforcement, if any, must be cut off.
A cement-sand screed can serve as a replacement for a concrete slab. The screed is made from cement-sand mortar using a wet or semi-dry method.
Note: The semi-dry method, unlike the wet method, involves adding polymer fiber to the solution, which allows you to reduce the amount of water in the solution without losing strength.
2. I repeat, the main requirement for a base under a laminate is its evenness. Ideal evenness of the base is achieved by installing a thin self-leveling floor made of polymer-cement leveling mixtures (finish self-leveling floor). The thickness of the finishing self-leveling floor is up to 5 mm. As a primer, you can use a mixture of PVA glue and water in a ratio of 1:9.
3. A layer of polyethylene film is laid on top of the self-leveling floor only on floors where moisture penetration is likely, these are basements and first floors. The polyethylene film is laid in layers with an overlap of 20 cm and taped with construction tape along the seams. An overlap of 10-15 cm is made on the walls.
4.The next layer is the backing for the laminate. The underlay is a mandatory layer in laminate floor construction. It provides sound and heat insulation of the floor. It is better to lay the rolled backing perpendicular to the direction of laying the laminate and be sure to glue it along the seams where the panels join.
5.The final layer of the structure is laminate. Laminate flooring is installed without glue. However, to protect the seams from moisture, you can and should use a special sealant such as aquastop.
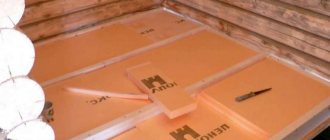
Why choose penoplex?
The popularity of penoplex is due to a number of important advantages:
- Fine cell structure . The presence of many cells increases the effectiveness of penoplex, aimed at retaining heat in the room.
- Moisture resistance . This property is maintained even with prolonged use of the heat insulator. Thanks to its ability to resist fungi and mold, penoplex retains its performance and characteristics for a long time.
- High level of strength . Penoplex has an increased compression resistance. Thanks to this property, sagging of the laminate can be prevented.
- Compatible with underfloor heating system . Contact with hot surfaces does not negatively affect the performance of the insulation. The exception is temperatures above 80 degrees. In this case, deformation of the heat insulator and partial or complete loss of its properties is possible.
- Fire resistance . Thanks to this property, penoplex can be used in wooden houses.
- Versatility . Penoplex is used for insulating floors placed on the ground, above basements, on floors, balconies and loggias. In any conditions, the material is able to provide an optimal level of comfort for people to live in.
- Relatively low cost.
Due to its characteristics, penoplex can be effectively combined with laminate of any thickness.
When choosing penoplex for laying laminate, it is important to consider that this heat insulator loses its properties under the influence of ultraviolet radiation and has lower sound insulation rates than other heat insulators, for example, fiberglass or mineral wool.
Technical characteristics of penoplex of different brands
| Penoplex brand, properties | 31 | 31С | 35 | 45.45С |
| Density (kg/m3) | 28-30.5 | 25-30.5 | 28-37 | 35-45 |
| Compressive Strength(MPa) | 0.20 | 0.20 | 0.21 | 0.41 – 0.50 |
| Flexural strength (MPa) | 0,25 | 0,25 | 0,4 | 0.4-0,7 |
| Water absorption coefficient, % | 0.4 | 0.4 | 0.4 | 0.2 – 0.4 |
| Fire hazard | G4 | G1 | G1 | G4 |
Video: Laying laminate flooring on penoplex - without screed
Penoplex has many positive properties and high performance characteristics. Therefore, novice builders assume that it can be installed without it. In reality, this opinion is incorrect, but although the video shows how to do it.
Contact floor screed in an apartment on floor slabs
Floor screed on the floor slab using the contact method, without any substrate between the screed and the floor slab.
With the contact method of screeding, a damper tape is not necessary.
Using the same principle, old screed is leveled with self-leveling mixtures, self-leveling floors or thin-layer screed - all this is a contact type of flooring.
- floor slab
- reinforced mesh (2.5-4mm)
- finishing contact screed (possible thickness 1-60mm, depending on the flatness of the floor slab)
How to properly make a self-leveling floor with your own hands, step-by-step instructions
If you decide to fill the self-leveling floor yourself, read the step-by-step instructions for completing the work.
Be sure to read the contents of the manufacturer’s instructions, you need to remember each of its points and act according to it in the future.
Compliance with it is the main condition for obtaining a high-quality final result.
It is recommended to prepare the necessary materials and tools in advance, having previously calculated the required amount of building mixtures that will be used for pouring and priming.
Necessary tools to fill the self-leveling floor in an apartment
In order for work to proceed without stopping when pouring a liquid quick-setting composition, you should immediately prepare:
industrial vacuum cleaner;
If there is no special equipment to measure surface moisture, then prepare plastic film. It will help determine the necessary parameters.
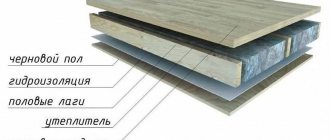
Finish screed cake with floor covering (laminate / parquet board)
Section of a finishing floor screed with floor covering in an apartment/house. Floating floor.
- floor slab
- thermal insulation / sound insulation / bedding (20-50mm)
- reinforced mesh (2.5-3mm)
- damper tape (5-10mm)
- finishing semi-dry / wet floor screed (60-80mm)
- underlay for laminate/parquet boards (2-5mm)
- finished floor covering (laminate / parquet board) (10-20mm)
Floor pie in a bathroom/bathroom with electric heated floor under the screed
Floating floor in the bathroom/bathroom with electric floor heating under the screed.
- floor slab
- thermal insulation (30-100mm)
- electric floor heating cable (3-6mm)
- reinforced mesh (2.5-4mm)
- damper tape (5-10mm)
- finishing floor screed (60-80mm)
- elastic waterproofing with overlap on walls (1-2mm)
- elastic glue (2-5mm)
- finished flooring (ceramic tiles / porcelain stoneware) (8-12mm)
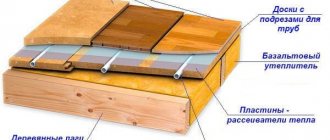
Insulation technology
It is best to consider the insulation of the floor along the joists visually, with options for installing various types of heat insulators. But first, a series of preparatory work should be carried out with the wooden structure.
Advice
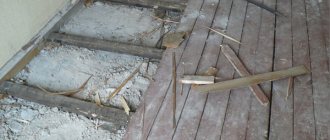
If the thermal insulation layer will be installed in an old structure, a thorough inspection of the wooden floor should be carried out.
During long-term use, wooden elements could be exposed to moisture or mold, which leads to a deterioration in their performance properties. Therefore, they are carefully checked and, as necessary, restoration work or complete replacement is carried out. This procedure is not required when laying new floors.
After this, you can begin installing the insulation. Regardless of its type, the subfloor is waterproofed first. Often it is also made of wooden boards; it is much less common to find a soil base. In the latter case, the beams are attached to the walls of the building and to the ground using special supporting structures.
After checking the condition, you can begin installing the thermal insulation layer. The general scheme is the following design.
The order of work is as follows:
- Formation of the internal waterproofing layer. To do this, you need to use special mixtures. It is best to treat the base before its installation - in this way you can ensure maximum impregnation with the waterproofing compound. Most often, bitumen mastic with the addition of polymer components is used for this. It is necessary to treat both the outer and inner surfaces of the flooring.
The use of rolled materials is not recommended. During operation, a condensation film may form between the boards and the film, which will be absorbed by the wood. The reason for this phenomenon is the temperature difference between the foundation plane and the inner surface of the board. Often the dew point is located right here, which leads to condensation in winter.
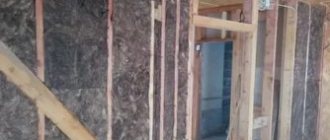
- Installation of lag. If load-bearing wooden structures have not yet been installed, they must also be treated with protective waterproofing material. During their installation, the optimal distance between the lags should be taken into account. It depends on the width of the span and the size of the installed beams.
If the installation takes place on a brick or concrete wall, you need to arrange the place where the beams and load-bearing structures of the building are connected. For this, it is best to use rolled waterproofing material, such as roofing felt. Once installation is complete, you can proceed directly to insulation.
- Installation of thermal insulation. The choice of insulation installation technology directly depends on its type. For rolled materials (basalt wool), it is enough to spread the material on the surface of the subfloor. During work, it is important to minimize the size of the gaps between the layers. Due to the fact that the height of the logs is often 250 mm, several layers can be installed. It is recommended to develop the scheme in such a way that the joints of each subsequent one do not coincide with the previous one. This is required to prevent the appearance of so-called cold bridges - zones where the temperature will be significantly lower than in the main thermal insulation layer.
Advice
For sheet material (foam plastic, extruded polystyrene foam), it is not recommended to fasten it using mounting dowels. Since individual thermal insulation elements will be located between the beams, it is important to correctly draw up a plan for cutting them. When closely connected to each other, an optimal energy saving factor will be ensured. The absence of mechanical load helps to preserve the primary arrangement of insulating sheets.
If bulk heat-insulating materials - expanded clay - are used, the composition must first be prepared. To do this, mix components of different fractions (from 10 to 20 mm), and then evenly fill the space between the logs.
- Ventilation gap. Before installing the main covering (boards or solid ceiling), an air gap is created between it and the thermal insulation. It is best to install wooden slats on the surface of the beams for this. With their help, you can create ventilation voids necessary to remove moisture and level the finishing surface.
Floor pie in a bathroom/bathroom with electric heated floor under the tiles
Floating floor in the bathroom/bathroom with electric floor heating under the tiles.
- floor slab
- thermal insulation (30-100mm)
- reinforced mesh (2.5-4mm)
- damper tape (5-10mm)
- finishing floor screed (60-80mm)
- elastic waterproofing with overlap on walls (1-2mm)
- electric floor heating cable (3-6mm)
- elastic glue (2-5mm)
- finished flooring (ceramic tiles / porcelain stoneware) (8-12mm)
General principles
Beams, or logs, are laid parallel to each other between two walls on a layer of concrete screed or on a base slab. Previously, logs were only made of wood, but now variety is introduced by metal and polymer materials, which more successfully resist the deformations and squeaks that arise over time when the finished floor is laid on top of the boards.
The role of beams can be played by thick boards laid on edge, but more often it is an ordinary beam, fixed level in a single plane of the floor. The space between the joists is filled with insulating materials. Sometimes there is a layer of insulation underneath it. It serves as an additional barrier against high humidity.
Floor pie in the shower using insulation. Floating floor
Floating floor with insulation (or bedding) in the shower stall/room.
- floor slab
- thermal insulation / bedding (20-100mm)
- reinforced mesh (2.5-4mm)
- damper tape (5-10mm)
- finishing floor screed (60-80mm)
- elastic waterproofing with overlap on walls (1-2mm)
- elastic tile adhesive (1-5mm)
- finished floor covering (ceramic tiles / mosaic) (2-12mm)
Preparation of the solution
They are mixed immediately before pouring. After combining the epoxy or polyurethane component and the hardener, the polymerization time of the mixture is short (about 30 minutes).
The prepared solution must be homogeneous and must be worked out before it begins, within the time specified in the instructions, until it hardens.
When preparing the mixture, it is necessary to take into account the dosage of any composition; it is indicated on the packaging. It should be remembered that self-leveling floors are sensitive to inaccuracies.
Even a slight deviation from the indicated figures easily leads to a decrease in the quality of the final coating. Average rate: for 25 kg of dry ingredients 50 liters of liquid.
Mixing the components is done using a construction mixer at medium speed.
After obtaining a homogeneous mass, it is recommended to check the composition for viscosity (try pouring a small amount of the mixture).
Add dry ingredients to the liquid solution (while maintaining the proportions) in a thick liquid.
It is better to prepare the composition in small volumes so that it does not begin to harden before the end of pouring.
Floor pie in the shower over the floor slab. contact floor
One of the types of contact floors - the screed is made directly on the floor slab without any backing.
- floor slab
- reinforced mesh (2.5-4mm)
- finishing floor screed (60-80mm)
- waterproofing with overlap on walls (1-2mm)
- elastic glue (1-5mm)
- finished floor covering (ceramic tiles / mosaic) (2-12mm)
Fill
It is advisable to avoid drafts; to do this, just close the windows. Start work from the far wall of the opposite door, gradually distributing the mixture in an even layer towards the exit.
Particularly carefully level areas in corners and near walls, sometimes using a spatula. For large areas, experts recommend doing the work in strips. A squeegee will help distribute the composition evenly.
After distributing the poured composition to the required thickness, it is processed with a needle roller. Using this device, air bubbles are removed from the mixture.
If there are bubbles in the floor, defects will result. After hardening, the resulting voids will make the floor unsuitable for use with the planned loads.
The surface will harden in just a few hours (you can already walk on it). After this, it is recommended to cover it with film and leave it until completely dry.
It is recommended for this period (about 1 - 2 weeks) to maintain a standard temperature in the room (15-20 C) and not create drafts.
Features of preparatory work
There are at least a dozen different ways by which you can create a strong and stable foundation for any facing work. The choice of suitable technology is carried out depending on the design of the floor in general, and its condition in particular, as well as the need to raise the mark or install insulation (including installation of a heating system).
Pie diagram with slab insulation
We will try to consider the most frequently occurring situations and tell you how to act in a particular case.
Prices for Kronospan laminate
Can an old topcoat serve as a base?
If you want to lay laminate flooring in a used room without spending time and money on dismantling the old covering, you need to at least know in what cases this is possible.
In principle, new laminate cladding can be applied over almost any covering except carpet. Due to the fact that its pile is crushed, the boards will “play” and break the locks. So, let’s dismiss this question right away.
Laminate cannot be placed on such linoleum
The old linoleum does not need to be removed, but provided that there are no holes, bumps, or separations from the base - it is more reliable when it is glued to the subfloor. In this case, linoleum will play the role of a substrate, and there will be no need to purchase it under the laminate.
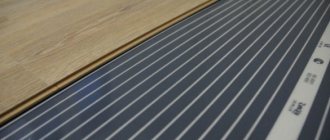
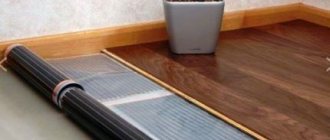
Substrate and penoplex
During installation work, it is important not to confuse penoplex and the substrate, which can be cork or polyethylene. The task of the latter is to prevent the penetration of noise and moisture.
The substrate itself is not capable of preventing the destruction of penoplex. This function is performed by the screed. Therefore, during installation work you should not deviate from the technologies developed by specialists.
It is important to adhere to the established rules and use all structural elements: penoplex, screed, substrate and laminate. In addition, it is forbidden to violate the order of laying the listed components.
Only if the technology is followed will it be possible to obtain a beautiful, reliable and warm floor that can last for many years. Otherwise, within six months, new repairs will be required to correct the mistakes made.