Wooden houses are warm and energy efficient, provided that they are sufficiently protected from the effects of cold. Losses through the floors of a building reach 7-10% of total heat loss. And the comfort of living is largely determined by the temperature of the surface on which you have to constantly walk. Insulating the floor in a wooden house is an important task, but not technically difficult. It can be solved quite simply with the help of modern materials and technologies.
Scope and consequences of insufficient insulation
In a residential or administrative building, the following structures require insulation:
- floor on the ground in a heated basement or basement;
- the floor of the first floor with an unheated basement or technical underground;
- exterior walls;
- covering the upper floor when installing a cold attic;
- roof pie when designing a usable attic or warm attic.
If you use insulation of insufficient thickness or neglect it altogether, you may encounter the following problems during operation:
- high heating costs;
- uncomfortable room temperature;
- condensation from warm air;
- the appearance of mold and mildew.
How to insulate a wooden floor step by step: expert advice
To comply with the technology, it is worth understanding the step-by-step description of the process; it is not complicated, but requires strict adherence to ensure the best effect. Professionals perform thermal insulation work as follows:
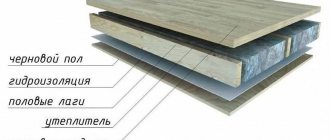
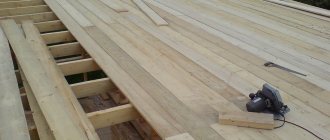
- Prepare the base, first you need to make a subfloor, if there is none. They use an unedged board, it can even be nailed with slots, it doesn’t really matter.
- Then you should lay the waterproofing, and lay it in such a way as to cover the joists. The easiest way to secure material in niches is to use a construction stapler. Make overlaps of at least 10 cm at the joints and seal the joints with tape.
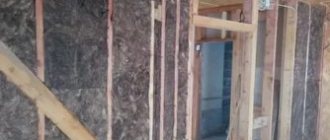
- Place mineral wool in the niches as densely as possible. Cut soft mats 2-3 cm larger to push them in. Rigid slabs should be cut precisely and laid so that there are no voids.
- Place a vapor barrier membrane on top and secure with a stapler, not forgetting to glue the connections.
For your information!
It is mineral wool that is considered the most suitable insulation for wooden structures.
Insulating the floor in a wooden house is not difficult if you follow the recommendations from the review. First you need to select the optimal insulation, and then lay it according to technology. The work is best done during the construction or major renovation stage.
Advantages and disadvantages of the material
Foam, which is supplied in small cylinders, allows you to obtain a hardened material with a lot of positive characteristics. Insulation with polyurethane foam, which is the main component, has the following advantages:
- safety during operation and work;
- does not cause allergic reactions;
- long service life;
- ease of installation;
- absence of joints through which cold air can penetrate;
- antibacterial properties help prevent the appearance of mold and mildew;
- resistance to moisture and steam;
- no need for fastening materials.
Despite the large number of advantages, before starting work you need to familiarize yourself with the disadvantages that this heat insulator has:
- flammability;
- relatively high cost;
- the need for cladding.
This video describes the features of this material:
Main conclusions
Having considered the advantages and disadvantages of various thermal insulation materials, we can draw some general principles:
- When urgent preparation of a private wooden house for winter is required, floor insulation can be approached without completely dismantling all the constituent elements of the structure. When choosing thermal insulation materials, you can use penofol or polyurethane foam.
- If it is necessary to thoroughly insulate the entire structure, a special technology is used to develop a double floor with a heat-insulating multi-layer cake.
- The main materials for insulating wooden floors are mineral wool, expanded clay, ordinary and extruded polystyrene foam.
- Every owner of a private home can carry out high-quality installation of any of the described materials, even without having professional skills and special knowledge. The main requirement during installation is compliance with the technology of laying and creating a heat-insulating layer in stages.
- The most economical options for good insulation of wooden floors are expanded clay and ordinary polystyrene foam.
- The highest quality and most reliable material for insulating wooden floors is extruded polystyrene foam. It provides better thermal insulation performance, and its service life is much longer than the others, subject to compliance with operational requirements. That is why its price is significantly higher.
Types of polyurethane foam
Foam for insulating walls and floors is available in two types:
- Professional - requires expensive equipment. Such insulation with polyurethane foam is economically beneficial only for hired workers who have a large volume of orders.
- Semi-professional - suitable for do-it-yourself insulation. Cylinders are supplied completely ready for use. Insulation with polyurethane foam in this case is not inferior in quality to professional material.
Foam sprayed using special installations can significantly reduce the time required for large volumes of work. During self-construction, the installation can be rented.
Equipment for applying foam and the material itself
The only differences are in the design and price of the cylinder. The ease of installation and the quality of the insulation layer do not suffer.
How to insulate the floor in a private house under linoleum
Even before starting work, you need to level the surface; without this, the linoleum will not lie as intended. There are many ways, it all depends on the material the floor is made of. As for insulation, it is best to use one of two options:
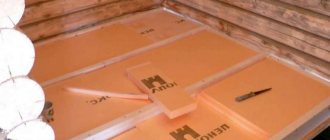
- Extruded polystyrene foam. Unlike ordinary foam plastic, it has a high density and does not bend under the weight of a person or furniture. The sheets can have a thickness from 20 to 50 mm; it is better to select thinner slabs so as not to raise the level too much. There are grooves that make it easy to join the sheets; the edges are cut with a hacksaw. For reliability, the joints are taped with foil tape.
- Polyethylene foam insulation with reflective surface. Its main advantage is its small thickness, which does not take up space; heat is retained due to the reflective coating, which should be directed into the room. The roll is simply spread out, cut to length and fixed; the seams need to be sealed with a special tape so that heat does not escape through the joints.
Important!
If the floor is very cold, you can combine both options for maximum effect.
If the linoleum has a backing, it can be laid on top of the thermal insulation layer. If the covering is unlined, a special material made of cork or jute is laid; it is not worth laying the floor covering without it.
Features of insulation of various structures
Depending on the surface being treated, the order of the measures taken may be different. The advantage of polyurethane foam insulation is that it can be used for both horizontal and vertical elements. Insulating a house with foam has a high degree of adhesion to the surface, since the material penetrates into the most inaccessible places.
Insulation of floors
Can be done both from below and from above. For flooring above a cold basement, the most appropriate option would be to insulate the floor from below. Polyurethane foam is practically the only insulation that is convenient to work with in these conditions. To protect the attic floor, polyurethane foam is applied from the cold attic side.
Waterproofing and vapor barrier are not required during operation. It is recommended to carry out installation in the following order, regardless of whether insulation is performed from above or below:
- removing dirt and dust from the surface being treated;
- to increase adhesion, you can treat the surface with a primer;
- nailing slats or profiles, installing floor joists, between which heat insulation is sprayed;
- filling the space between the profiles with expanded polystyrene;
- finishing the ceiling or installing a clean floor.
It is important to remember that hardened foam is not a durable material, so the floor design should prevent direct impact on the insulation.
Wall insulation
Insulation of walls with foam can be done from the outside and from the inside. External thermal insulation would be a smart solution, but if necessary, internal work is allowed, for example, with additional insulation after the facility is put into operation. The only differences are in the finishing.
The work is performed in the following order:
- surface preparation, cleaning from dirt and dust;
- marking the wall and installing vertical sheathing;
- filling the space between the frame with foam;
- installation of the facing layer.
Polyurethane foam prevents the harmful effects of moisture, but it is still recommended to treat the frame slats with an antiseptic.
Mansard roof
Insulating the space between the rafters with foam will allow you to choose the pitch of the rafters regardless of the dimensions of the material, as is the case with mineral wool. The insulation is installed in the following order:
- installation of elements of the rafter system and roofing;
- cleaning the base;
- spraying polyurethane foam between the rafters from the eaves to the ridge;
- installation of sheathing;
- ceiling cladding, such as plasterboard.
Technologies for applying polyurethane foam
The algorithm for applying foam aerosol insulation in a balloon package is as follows:
- The cylinder is equipped with a blowing tube or mounting gun. The cover is removed in advance.
- Then you need to mix the composition. To do this, just vigorously shake the container for at least one minute.
- The surface to be insulated must be abundantly moistened, which will increase the degree of adhesion of the materials to each other.
- The container must be turned upside down so that the bottom is at the top. The voids are filled to 30% of their volume, since after application the composition begins to increase in volume.
When the gap is completely filled with foam insulation, its surface should be slightly moistened. This will improve and accelerate the polymerization of the composition. The time required for the final hardening of polyurethane foam can vary significantly among different manufacturers of the composition. Surface hardening usually occurs approximately 20 minutes after spraying. It will be possible to correct the insulation by cutting it no earlier than 4 hours from the moment of application. The period of full strength gain for balloon floor insulation lasts at least 24 hours.
Providing protective equipment
When spraying foam for installation in a balloon version on the floor surface, you should take into account the fact that the substance is difficult to remove from clothing and skin. The process must be carried out in a special suit using protective gloves and glasses.
If polyurethane foam is sprayed using professional equipment, all manipulations are carried out in protective clothing, which 100% eliminates the possibility of accidental contact of the composition with the skin and mucous membranes of the respiratory and visual organs.
Thermal insulation of the floor by spraying
Application of polyurethane foam to the floor surface during insulation must be done using special equipment. The components that make up the foam insulator are located in different containers. Preparation of the working staff takes place directly at the work site. Substances are fed into a cylinder, where they are mixed and react in the required manner, after which they enter a spray nozzle and are applied under pressure to the surface to be insulated.
Tips for spraying foam
Insulation will last much longer in the construction of floors, walls or roofs if you follow simple rules:
- moisturizing and pre-cleaning the surface before application;
- shaking the can before use;
- heating the cylinder to a temperature of 20 degrees Celsius before starting work;
- use of protective clothing, masks and gloves to prevent foam from getting on the skin when working with polyurethane foam.
About the features of the material application technique:
Compliance with all these points will allow you to competently and efficiently protect your home from the penetration of cold.
Calculation of thermal insulation thickness
Insulation that is too thin does not provide sufficient heat retention, and it is uneconomical to use insulation that is too thick. Therefore, before starting work, it is recommended to calculate the thickness of the thermal insulation.
It is clear that this value varies in different climatic zones. The colder the weather and the longer the duration of the cold period, the thicker the insulation should be. The calculation is carried out according to the method described in SP 50.13330.2012. The parameters of the building, the characteristics of the enclosing structures, what room the floors are located above, the climate, and much more are taken into account.
First, the SP determines the normalized heat transfer resistance for a specific structure in a given climatic zone and under given operating conditions. Then the total resistance of all floor layers is calculated, taking into account the thermal conductivity coefficient of each material and thermal heterogeneity.
The values are compared. If the resulting resistance is equal to or greater than the normalized one, everything is in order. The thickness of the insulation is sufficient. If not, it is necessary to increase the thermal insulation layer and carry out the calculations again.
Without appropriate preparation, it is difficult to find all the necessary values, so they use ready-made recommendations compiled for a specific insulation and climate zone. For example, a wooden house with a cold underground in the Moscow region will require mineral wool insulation with a thickness of at least 160 mm. In Krasnodar - 110 mm, in Yakutsk - 300 mm. There are also thermal calculators that calculate the thickness of the material based on specified conditions.
Method No. 1
The first method involves the use of any mineral wool insulation. It is better if it is in slabs rather than in rolls. But if you really need a completely budget option, you can use the latter.
The width of the slab or roll should be several centimeters greater than the distance between the joists. This is necessary so that the insulation “sits” tightly. In terms of thickness, it is better to take a material 30-50 mm thinner, lag. So that there is an air cushion between it and the finished floor. You can use thin insulation in several layers. Then you need to lay it with an overlap - so that the joint of one layer overlaps the sheet of the second.
With a very small budget, you can do without boards - ropes will suffice.
Waterproofing
Low air temperature in an uninsulated basement can lead to condensation on the warm surface of the ceiling. If moisture is constantly in contact with the wood, even high-quality treatment will not save it from fungal damage.
Condensation is also dangerous for mineral wool and loose foam - moisture entering the pores reduces the thermal insulation properties of the materials. Therefore, it is impossible to do without installing a waterproofing film material.
The waterproofing film is laid over the installed rough base. Make sure that the overlap of the canvases is at least 12 cm, and glue the joints on both sides with reinforced tape. The canvas is laid over the walls to a height of about 20 cm; it must follow the contours of the mounted structure so that thermal insulation material can be placed in the cells between the joists.
Method No. 2
The second method of insulating such a floor will cost you a little more, but it is much easier to implement.
In this case, EPS - extruded polystyrene foam - is used as insulation.
Simply cut pieces of the required size, insert them between the joists, and blow out the joints with polyurethane foam. This material can also be laid in several layers with overlaps.
EPS is not afraid of moisture, which means there is no need to make a vapor barrier. You can attach it with self-tapping screws directly to the finished floor boards.
Source