Cold rooms for recreation, attached to a private residential building, greatly increase the comfort during the operation of the facility in the summer season.
In addition to porches, balconies and loggias, such premises include verandas and terraces.
They are included in the total area of the building and can be open or covered with panoramic translucent structures.
Sliding windows for verandas and terraces allow you to use these rooms not only in warm weather, but also in the autumn or spring seasons.
What is the meaning of frameless glazing?
Any frames make the interior heavier, if not to say that they greatly spoil the appearance of the balcony from the street.
Frameless glazing technology was invented in Finland, where winters are also quite harsh. They do not aim to insulate the balcony, but only try to protect it from the effects of wind and precipitation. At the same time, such rooms are filled with daylight as much as possible. Even such glazing can create a vestibule between the apartment and the street, which significantly retains home heat. In our country, the main purpose of glazing a balcony is to increase the heated area of small apartments, which undoubtedly is some kind of distortion in consciousness. For the sake of increasing living space, we sacrifice the opportunity to relax in the fresh air. If you use frameless glazing, you can easily turn a balcony or loggia into an excellent recreational area next to your apartment. In addition, if the windows are open, the sashes will not be visible; in such structures they are usually sliding or folded into an accordion.
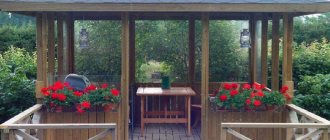
Frameless glazing technologies are often used in the construction of verandas and terraces
Frameless glazing looks great on any balcony and loggia, be it old or new, elegant or bulky. This cannot be said about the traditional type of windows with frames. When using them, you have to edit the design project very carefully to maintain its attractiveness. Among other things, frameless glazing has found its application in the construction of terraces, verandas, gazebos and other similar objects.
The lack of frames forced engineers to rack their brains over how to fix glass in the openings so that they would stay there no worse than with them. As a result, the following constructive solution was invented:
A special aluminum working profile is attached to the top slab of the balcony with anchor bolts. This is done with an accuracy of 2 mm along the outer border of the balcony. A guide profile is attached to the railing, which does not carry a load. For frameless glazing purposes, only tempered glass is used. All fittings are glued to it before being installed in place. There are other requirements for glass: if the sheet height is less than 2 m, you can use 6 mm glass; if it is taller, you will need 8 mm glass. The width of the doors varies from 60 to 80 cm. Tempering the glass prevents it from breaking from an accidental blow or gust of wind. The glass is moved along the profile using special racks with plastic wheels. To avoid rattling and jumping off, all structural parts are glued with polyurethane glue. To protect against precipitation, an inter-glass acrylic seal is always installed between the glasses.
The profile and the doors are also not in direct contact, since there is a rubber gasket between them. To have an idea of frameless window construction, you can pay attention to how the door mechanism in sliding wardrobes works.
The design of sliding glass, as in sliding wardrobes
- When creating the structure, only durable, reliable materials are used that are not afraid of corrosion, as well as polyurethane sealants, which are not susceptible to light.
- Polyester or plastisol ebbs are installed on the outside.
There is another way to open the doors - the “book” method. In this case, all the doors not only move along the guides, but also swing open. This design resembles an accordion.
Glazing with sashes that fold out and slide like an accordion
Creation example
To create sliding windows mounted on a terrace or veranda, you must adhere to the following technological map :
- A drawing of the future structure is being developed, based on pre-taken dimensions.
- The bars are fixed on the workbench with a vice.
- Using a milling cutter, the required grooves are selected on the bars until a cross section with the desired geometry is achieved.
- After processing, the profile is cut by a cross-cutting machine to the required length.
- At the ends of the profile, grooves are selected to form a junction of mutually orthogonal elements using the “groove-tenon” method.
- The bars are covered with a layer of paint.
- The frame elements are mated to each other with preliminary gluing with epoxy glue.
- Leave for 24 hours until the glue is completely polymerized.
- To increase rigidity, the structure is reinforced with steel corners.
- The glass is marked according to the internal contour of the frame, and then cut with a glass cutter.
- The finished glass is installed in the frame, after which it is fixed with glazing beads.
- Runners with roller supports are attached to the ends of the movable sashes, and rail guides are installed in the seats of the window sill and lintel parts of the opening.
- At the final stage, handles are installed on the vertical imposts to control the movable sash.
Note. If it is necessary to manufacture several structures of the same type, experts recommend pre-assembling a jig or slipway, with which you can prepare modular parts with identical geometric parameters.
Frameless glazing of balconies and loggias
Rice. 2. Frameless glazing of balconies.
Frameless panoramic glazing finds worthy application in the interior of balconies and loggias. As mentioned earlier, due to the absence of frames, the illusion of the integrity of a single large glass is created. This design feature makes it possible to get an almost unique view of the surrounding city, without limiting the view with frames.
Before you start glazing, you should dismantle the old windows, while observing safety precautions. Then it is necessary to carry out the required processing of the walls (leveling the surface, with a preliminary check using a building level, etc.). Afterwards the profiles are installed. Next, you should treat the gaps remaining between the profile and the wall using special solutions. At the last stage, the installation of window sashes, turning mechanisms and locks takes place. It should be noted that the use of frameless glazing of balconies and loggias is more appropriate on the upper floors of high-rise buildings. Owners of private houses can use this technology at will. But at the same time, it is necessary to be aware of all the disadvantages and limitations of frameless panoramic glazing.
Preparatory process
There are two types of terraces: straight and arched.
Straight - the roof is supported by columns, pillars, walls. The roof is a system of slings with beams with a cross-section of 50×100 mm, lathed for the subsequent installation of panels.
Arched - semicircular or oval. The supporting structure is made of a metal profile and requires additional supports and jumpers.
You have to choose the type of terrace before starting the design - the type of materials used in construction depends on this.
Prepare materials and tools in advance:
- polycarbonate sheets;
- bars;
- boards;
- metal profiles, other connecting elements;
- mastic;
- scotch;
- building level;
- hammer;
- axe;
- saw;
- screwdriver;
- screws, self-tapping screws, nails.
Aluminum glazing
Aluminum glazing appeared relatively recently. Just ten years ago, aluminum was not used at all in the construction of residential buildings.
Now this method is becoming more and more popular. This is primarily due to the fact that only recently we have received an aluminum alloy that meets the requirements for thermal insulation. This was the main problem with aluminum and the main reason why it was rarely used.
Also, the advantages of aluminum include environmental friendliness and fire safety, so we can say with confidence that this method will only become more popular.
Summarizing
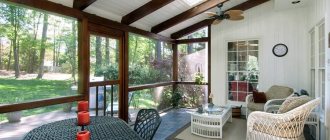
Any homeowner can convert an open terrace that is not used in the winter into a closed one, if only they have the desire. To do this, you need to properly insulate it from the inside or outside, think about glazing and heating devices.
The impossibility of heating a terrace with panoramic glazing on a budget is refuted by many examples on our portal . Here is the veranda of our participant with the nickname Selshio, which is always warm.
Veranda 6x3, panoramic glazing height 2.8m, SP 1-chamber 36mm, underfloor heating. It’s -30 outside, +19 on the veranda, as it gets warmer outside, it’s hot on the veranda.
Balcony Glazing Guide
Do-it-yourself: balcony glazing
Balcony glazing work is carried out in several simple stages.
Recommendations for taking measurements
Scheme for taking measurements for balcony glazing
Measure the front and side balcony handrails. You must make sure that the roof of the balcony overhangs its railings. To do this, use a plumb line. Also make sure that the upper perimeter of the balcony room coincides with the lower one.
If deviations are detected, be sure to take these points into account when manufacturing (ordering) double-glazed windows. Draw up a sketch of the glazed balcony indicating the measurements obtained.
be59038af8e275601e5179936236d58b.jpg:large 1a06f1e8bdd700af21a6996a297a9d89.jpe 1e8a5ea9e471c5aa9e87e47b239792e5.jpe
Installation of wooden frames
Preparing for glazing a balcony Strengthening the base for glazing Support structure
First step
Install a box made of wooden beams. The lower beam must be fixed at the level of the railing. Attach the top one to the ceiling using brackets. The side elements are fixed with brackets to the walls.
To further increase the structural strength, install a third horizontal beam.
Scheme of rigid fastening of a wooden frame
Second step
Install sheathing to install decorative trim.
Third step
Install glazed wooden frames. Treat the wooden elements with an antiseptic and paint if necessary.
Aligning the frame in the opening
Fourth step
Install galvanized canopies outside to protect the wooden structure from atmospheric moisture and improve the appearance of the balcony.
Installation of metal-plastic systems
Balcony glazingAdditional sealing of factory unitsAdditional sealing of factory units
Metal-plastic systems are installed on the parapet before installing the window sill.
First step
Install corner, end and intermediate support posts. It is very convenient to use a wooden beam for this.
Second step
Attach the support posts to the overhead slab and parapet. For fixation, use corners and screws. If desired, you can sew up the structure with a PVC strip.
Third step
Remove the glass units from the frames to avoid damaging them during installation.
This is extremely simple to do: pry up the glazing beads with a narrow screwdriver, pull them out and remove the double-glazed windows.
Fourth step
Remove the doors. To do this, press out the top window hinge pin and pull it out using pliers, then lift the window sash and remove it from the hinge.
Fix the support profile at the bottom of the window frame.
Frame installation Fasteners
Seventh step
Insert the frames into the prepared openings, making sure there are no distortions or other defects. If distortions are detected, level them using wedges.
Foam seams around the perimeter of the glazing
Eighth step
Secure the frames by screwing self-tapping screws into the anchor holes provided for this purpose.
Combined glazing fastening
Ninth step
Return the sashes and double-glazed windows to their places.
Make sure the system is working properly. At the end, all you have to do is foam the grooves, mount the window sill and complete the final decorative finishing.
Protection of the upper part of the glazing
Which double glazed window to choose
Single-chamber and double-chamber double-glazed windows are in greatest demand. One chamber means that the window structure consists of two glasses, between which there is an air gap. It prevents the penetration of cold air. Single-chamber glass can be installed in a gazebo that will not be used in winter.
If you plan to create a year-round gazebo, then it is best to use double-chamber glazing. Such canvases include three glasses, between which there are two air spaces. It is this design that will provide the best protection from the cold.
Such a gazebo with sliding windows will be functional and comfortable.
Gazebo made of plastic windows
A gazebo with plastic windows may involve the use of such windows as a frame. This means that the structure will not have classic support pillars. All its walls will be represented exclusively by plastic windows. Sliding windows into this type of gazebo are also possible.
- Such buildings have certain features that need to be specified in more detail:
- Plastic gazebos need a foundation. After all, plastic windows themselves with a PVC or aluminum profile cannot serve as support for the entire structure. They cannot simply be installed on the ground or secured in any other way;
- The configuration of gazebos with glazing can be any - rectangular, square, with six corners, and so on. But creating a round gazebo will not work, since the profiles will inevitably create many angles. But outwardly such a design will be very similar to a round one;
- Plastic windows must be installed on a solid foundation. For this you can use a wooden beam. Such logs are laid directly on the foundation. They are strong enough to support the weight of the structure;
- When constructing such gazebos, it is necessary to make the foundation correctly. The durability of the building and its stability will depend on its strength.
You need to know that the base for the gazebo must be larger than its boundaries. That is, the dimensions of the base should exceed the dimensions of the gazebo by 50 cm on each side. At the same time, gazebos made of plastic windows are very beautiful. They let in a lot of light and leave room for decorating the interior space with decorative elements. At the same time, a gazebo with sliding plastic windows retains heat perfectly. If you build a hearth or stove inside, the building can be used in any weather.
Installation of windows in a polycarbonate gazebo
The glazing can be continuous. In this sense, the use of polycarbonate should be noted. This material can simultaneously act as glazing and as the walls of the gazebo.
The construction principle will be standard. It is necessary to attach polycarbonate fragments that were made in advance to the support pillars.
Such gazebos have a number of significant differences. They need to be described in more detail:
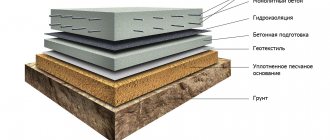
The important elements will be the floor and foundation. To construct the foundation, you must use columnar technology. They consist of erecting low brick columns, on which wooden logs are subsequently laid
The columns should be raised above the ground level by 30 - 40 cm; In addition to the foundation, serious attention should be paid to the construction of the floor. The basis will be horizontally laid timber logs
Boards and moisture-resistant plywood are laid on the indicated logs; Supports for fastening polycarbonate are attached to horizontal joists using angles and brackets.
Installation of windows taking into account the roof
Since plastic windows or aluminum profiles cannot withstand high pressure, heavy roofing materials should not be used. It is not recommended to use metal tiles or natural tiles.
Polycarbonate or soft roofing is ideal. If you plan to install natural tiles, you should make a strong top trim from timber. It will be able to withstand the load of a heavy roof and protect the frame made of plastic windows from damage.
In this case, glazing can be combined with wooden fencing. It can reach one and a half meters in height. An aluminum profile or plastic windows are installed on this fence as a frame.
Windows are installed using construction foam. This is a universal option for such designs.
DIY frameless glazing of verandas and terraces: step-by-step development
Developing the installation of a frameless glazing system is quite simple. If you follow the installation procedure and assembly instructions, you will be able to complete the work without hiring professionals.
b65d332805adfcf9bdc0c1418488a99e.jpe
Non-specialized work procedure:
The preparation of the opening depends on the stage of construction at which the glazing is performed. If you have an old window unit, you need to dismantle it. The following steps: remove the sashes, ebb, window sill and internal strips;
Using a hacksaw or jigsaw, cut through the bottom of the box, dismantle the sides, top and bottom sides;
Remove debris and clear the gap. Processing quarters: use a hammer and an ax to remove sagging old mortar and protruding stones;
Treat chips and potholes with a quick-hardening construction mixture for facade work;
Level part of the opening on the inside of the room with plaster. At the upper end of the opening, mark the place where the profile is secured. Attach the bar and tighten the fastening anchors. Adjust the horizontal placement of the profile with adjusting plates 0.5-4 mm thick - the size depends on the differences. Join the corner top profiles using corners and check the horizontality of the surface. Measure the height of the glass sheet from the top and apply the appropriate mark at the base of the opening. Make a hole, install a securing anchor and a corner metal plate. Attach and secure the lower profile with bolts. Upon completion of installation of all profiles, check and align their horizontal placement. Following the instructions, hang the glass alternately. Almost always, the upper guide is wound on first, and then the lower one is positioned. Check the tightness of the joints of the window sashes.
Important! When doing frameless glazing of a gazebo yourself, you may not be able to save much. But many manufacturers provide a warranty on the product only subject to experienced installation.
DIY frameless glazing of the veranda: video
Tips for the care and maintenance of frameless glazing systems
To extend the life of glass structures and maintain the initial gloss, you need to follow simple rules:
All cleaning products for glass and mirror surfaces are suitable for cleaning glass. The inside can be easily cleaned while the doors are closed. The rollers must be lubricated every year with a Teflon spray. The inner surface of the lower and upper profile should be cleaned once a year. To remove accumulated dust and dirt, simply wipe the slats with a damp cloth. For cleaning, do not use products with abrasive particles or based on solvents or acids. Scope of implementation of sliding frameless glazing
An elegant and modern glazing system is used in the arrangement of:
Gazebos and terraces. Transparent structures offer beautiful views of the surrounding nature. Such glazing allows you to enjoy the garden and landscape composition even in bad weather. A feeling of unity with nature is created.
Winter Garden. To place flowers, “insulated sliding systems” with duralumin fastenings are almost always used. This structure provides for the possibility of ventilation and heating in winter. Loggias and balconies. There is no desire to hide the beautiful view on the other side of the window behind bulky window blocks. A good solution to the problem is to install frameless glazing yourself or with the help of professionals. Uncluttered large windows will visually expand the space and emphasize the dignity of the home. Summer areas of restaurants and cafes. Frameless structures allow the use of an additional summer area before the onset of frost. If the structure is insulated, the veranda can be used all year round.
Showcase. Glazing display windows with frameless systems increases the range of visibility of the products on display. Facades. The method of warm glazing without frames is used to equip many facades of new buildings for offices and shops, working in tandem with insulated double-glazed windows. Sliding glazing is often combined with fixed sashes to increase the thermal capacity of the building and obtain a truly panoramic view.
Photos of examples of glazing of balconies and loggias
Panoramic windows on loggias appeared relatively recently. Glass is made:
- transparent;
- matte;
- pasted over with reflective film if the walls are facing south.
Stained glass glazing of a large loggia will look very “expensive” and attractive.
On the north side, floor-to-ceiling glass solves the problem of low light.
By glazing the loggia using the frameless method, you can complement the parapet with a forged side. It can be light and contrasting depending on the finish. A good option is plastic lining. Budget-friendly and aesthetically pleasing, large selection of colors.
6fbc3490847a6440cb54a4d8afe8ec87.jpe
3ceb52c2b9048b4c032dc71d50ce48ea.jpg:large
Owners of apartments on high floors of new buildings should pay attention to such details.
Stained glass with white frames looks elegant. If the windows face the street, the standard white finish is preferable. Lightweight PVC panels do not turn yellow from ultraviolet radiation and are easy to clean.
Difficulties arise with the glazing of balconies on the top floors. We have to make an additional roof. In recent years, transparent sloping roofs similar to dormer windows have become popular.
Panoramic glazing looks great on large and medium-sized balconies.
In temperate climates, balconies are often used to store unnecessary items. Glazing radically changes the situation; the useless area of the apartment can be turned into a comfortable place to relax. A warm option is an opportunity to enlarge the room. Glazing, even in its simplest form, protects from street noise and dust. Becomes an additional barrier for attackers.
In such a room you can relax and unwind a little, especially if there is a picturesque picture outside the window.
Open-closed terrace. First stage of evolution
It happens that family members cannot agree on one decision, and then a compromise has to be sought. A member of our portal with the nickname Pavel Again lived in an old house with an old veranda, the lower part of which was covered with boards, and the upper part consisted of frames with many pieces of glass of different shapes.
When they started modernizing the terrace, some family members insisted on an open version, while others dreamed of a closed one. We agreed on removable windows. Here is the technology used:
We screw threaded rods into the wall and hang sheets of transparent plexiglass on them from the floor to the roof (this is about 2.5 meters).
This is how this terrace lives: in autumn and winter it is closed.
And in the summer it is open.
Main types and types of glazing
There are 3 options for installing glass blocks:
- Cold (1 frame). It requires laying powerful insulation between the windows so that the balcony can be used as a refrigerator in winter.
- Warm with insulation of the loggia inside and outside. The frames are equipped with thermal inserts. Although the option of preserving and retaining heat in the room may result in the appearance of mold and condensation on the glass. It is impossible to do without arranging natural ventilation.
- Sliding. Suitable for small loggias, saving space and protecting from dirt and precipitation. The mechanism of action is to slide one flap behind another. Although the option is not suitable for the harsh conditions of the Russian climate. In winter, the roller mechanisms may fail and freeze. Another disadvantage of the design is single glass. It will be cold on the balcony in winter.
- Panoramic - a type in which there are no frames. Guides with grooves are installed along the bottom and top of the balcony. Durable, thick glass with maximum insulation is inserted, from floor to ceiling in a hinged, sliding or tilting manner.
- With takeout. Modified version. Steel profiles are welded to the parapet. The window sill is taken as the basis. The entire plastic (aluminum) structure is mounted on it. This is a good option if the balcony is small and narrow and the parapet is durable.
- With supporting frame. A durable, wear-resistant method with the ability to turn a loggia into a warm living space for 20 years to come. But the outside will have to be radically changed. One person can't do it. Need a specialist assistant.
When is installation allowed?
Sliding windows for terraces and verandas attached to private residential buildings can be installed in any of the following situations :
- It is necessary to ensure the transformation of the space being used, when open doors in the summer will not block part of the room.
- When glazing a terrace or veranda, there is enough free space to move the sashes.
As a rule, for normal operation of sliding windows, piers or blind parts of translucent structures of the same width are required. - If the space-planning solutions for the veranda space imply a direct connection with the street (for example, access to the backyard). In such situations, sliding window units play a role in sliding doors or pencil cases.
- In the case when the load-bearing parts of the vertical posts of a terrace or veranda cannot withstand the impact of a couple of forces when installing a swing structure. Sliding windows ensure the transfer of vertical load strictly in the center of gravity of the section of the supporting structure.
At the same time, such designs of translucent blocks are not suitable for the following types of premises :
- Impossibility of installing runners for sliding sashes.
- Lack of free space (piers) for normal opening of such windows.
- The need to insulate and seal the space of a veranda or terrace and transform it into a warm room.
Important. Before ordering, purchasing and installing window sides for terraces, it is recommended to develop a full working design, with specifications, and also provide additional structures that will allow the new sliding window units to operate normally.
Tips for choosing frameless structures for a balcony
- The thickness of the glass is selected depending on the height of the opening and the floor where the balcony is located. The higher the structure is installed, the more the wind load will affect it. If the height of the opening exceeds two meters, then the permissible glass thickness is at least eight mm. In other cases, glazing with a thickness of 6 mm is suitable.
- Before receiving the product, you must check the property level of the glass sheet. There should be no protrusions, pits, stains or damage.
- For installation, duralumin profiles with a smooth surface are used. Any shortcomings are unacceptable.
- It is better to give preference to popular manufacturers of balcony glazing systems. Consumer reviews about the quality of the design, the production time of the system and the professionalism of the installers can be viewed on the Internet in specialized forums.
Materials for glazing balconies and loggias - types
The following types of materials are used for glazing:
1. Natural wood. Windows made from wood have a beautiful appearance and can be used for both warm and cold glazing options. This material is natural and environmentally friendly, but has a number of disadvantages:
- a labor-intensive process to preserve their original appearance;
- peeling of paint due to temperature changes;
- formation of cracks requiring puttying;
- short period of operation.
Glazing and finishing of a balcony with wood: photo
2. Aluminum. Frames made from this material are very strong and durable. Glazing of balconies with aluminum profiles is used only for cold glazing due to the lack of ability to retain heat. Pros:
- possibility of installation on a metal parapet;
- little weight;
- easy installation;
- low price.
Aluminum glazing of balconies: photo
3. Metal-plastic. Warm type glazing is used. Has a number of advantages:
- good appearance;
- tightness of the structure;
- long period of operation;
- excellent thermal and sound insulation performance;
- resistance to temperature changes.
Glazing of balconies with metal-plastic: photo
Advantages of polycarbonate
For the construction of the roof, tiles, slate, profile sheets, etc. are traditionally used. But only polycarbonate will give the terrace reliability, durability, aesthetics, reduce installation time, and save the budget.
Polycarbonate, produced in the form of sheets, can be cellular or monolithic.
Cellular polycarbonate - with cellular voids - has the following advantages:
- lightweight – allows the use of lightweight load-bearing elements during construction;
- flexible – easily takes the desired shape without heating;
- durable - withstands loads in the form of snow;
- light transmission capacity – 80%;
- reliably protected from ultraviolet radiation;
- shockproof;
- incombustible.
Disadvantages:
- can be scratched easily;
- exposed to aggressive environments.
Monolithic polycarbonate, consisting of a homogeneous material, has the following advantages:
- transmits 90% of light;
- high strength;
- heat resistant;
- fireproof, will not release highly toxic substances during combustion;
- bends easily.
The disadvantage is the fact that the material requires thermal molding to impart curvilinearity.
When choosing a material for a terrace, you should focus on the characteristics of the supporting structure and the influence of various factors during the operation of the structure.
Features of glazing balconies and loggias
There are many methods and technologies for constructing glass frames. The designs differ in many ways, the main one being the degree of thermal insulation. There are two types of shielding systems:
- Cold glazing protects from street noise, precipitation, excess dust and dirt brought by the wind. Lightweight structures do not create much pressure on the protrusion of the slab. The temperature in a closed space is 5–7 degrees higher than outside.
- The warm option involves the arrangement of glass in several rows. This can be glazing of balconies with plastic windows, aluminum or wooden double-glazed windows. Additionally, surfaces in contact with the street are also insulated, as are the upper and lower slabs, since reinforced concrete has a non-porous structure and heat leaks.
Today there are many glazing methods.
Glazing is classified according to the material of the frames and sashes. There are three types of structures:
- made of metal-plastic using polymer seals;
- wooden beams of various tree species (it is better to choose frames of dense wood);
- aluminum profile insulated with thermal insulation gaskets.
During renovation work, loggias and balconies require special attention.
On balconies and loggias it is possible to install various structures:
- frames, which are glass or double-glazed windows framed with a profile, are attached to support posts;
- frameless glazing (French windows) implies the absence of support posts; glass blocks are held in place by being fixed at the level of the ceiling and floor (or railings);
- bay windows are assembled from a large number of elements;
- corner corners of complex shape are made with additional cantilever fastenings;
- remote structures involve expanding the supporting perimeter.
Complex work is carried out to glaze such structures.
Window opening mechanisms are of vertical and horizontal type, hinged and sliding.
Note! When installing plastic windows, micro-ventilation becomes possible; the frame can be tilted in the transverse plane
Converting a summer terrace into a dining terrace with transparent walls. Third stage of evolution
Our forum member with the nickname crystalik has a 6x6 meter bath house at his dacha near Novosibirsk, but the third part of this room is an open terrace.
This distribution of space seemed non-functional to him, and he decided to expand it into a larger space, which would include a kitchen, a dining room and a solid fuel boiler. The following project was born:
The terrace stands on 5 thick-walled stilts. The frame from the side of the house was attached to the protruding heads of the piles on which it stands. From the side of the house, the frame was placed on the heads of the piles on which the house stands, and in two places I additionally screwed in the beam fasteners.
The craftsman covered the closed part of the terrace (where the boiler is planned) with OSB sheets. I installed large windows “warm, not country.”
To avoid condensation on the windows with such a glazing area, low radiators are planned along the perimeter.
To avoid large heat losses, the owner of the house insulated the ceiling well.
We arrived at two o'clock in the afternoon. It was -24 on the veranda after a cold night. They turned on a two-kilowatt convector. The next morning at 11 o’clock it was +12 there, and -10 outside. We warmed up to +22 with a fan heater in an hour, drank tea and relaxed in the warmth.
Advantages and disadvantages of frameless glazing
To better evaluate the possibility of glazing the balcony of your apartment using a frameless method, you need to familiarize yourself with all the pros and cons of this design:
- The absence of frames allows you to create a panoramic view. This is especially in demand in places where there is a beautiful landscape. And to get rid of the unusual feeling of being visible to everyone, you can apply glass tinting.
- In rooms where there is a glazed balcony outside the window, twilight usually reigns. If the glazing is made frameless, then there will be an abundance of light in this room, as if there was no balcony at all.
- Frameless glazing technology is suitable for any type of balconies. The exception is the antique round railings with elaborate curved railings.
- This glazing looks good in both straight and corner structures. Even rounded balconies can be glazed with special glass, reminiscent of doors in a shower stall.
- Frameless glazing can reduce noise levels by approximately 10 decibels, which corresponds to 15% of the total street noise level. This is facilitated by the presence of seals and sealants that block sound
- The casements of such windows take up very little space due to their design.
- The ventilation of the balcony is very good, which prevents condensation from settling on the glass.
- When you go out onto the balcony, you can fully open all the windows and breathe fresh air.
- Opening and closing windows is very easy if high-quality fittings are installed.
- Cleaning glass from dirt does not cause any problems, especially those that can fold into a book.
Frameless glazing also has some disadvantages.
- You can only use the balcony in the warm season, since in winter it is almost as cold there as outside.
- You cannot attach a mosquito net to frameless windows. Therefore, there is no escape from mosquitoes.
- Tempered glass leaves dirty streaks that are noticeable. Therefore, this design requires constant maintenance.
- On the lower floors, frameless glazing can cause discomfort because it creates the feeling that you are being looked at into an aquarium.
- Frameless glazing cannot provide even part of the sound insulation that double-glazed windows have.
However, tempered glass has such undeniable qualities as its strength and safety. Tempering creates a compressive stress on the glass surface, which guarantees increased strength. Even quite strong blows are not able to destroy its integrity. The only way to break the glass is to hit the end of it. However, even in this case, the canvas breaks into small cubic pieces that do not pose any danger.
Thus, if you want a beautiful, stylish and modern balcony, then order frameless glazing. But it will not be able to serve as an additional warm room during the cold season.
Unheated terrace. Second stage of evolution
The next stage in the evolution of the terrace is a glazed unheated terrace. At this stage, terrace owners often have doubts about why they should cut off an unscorched terrace at all. But it usually turns out that there is a sense in this, and a considerable one.
A member of our portal with the nickname igestor built a beautiful house with a large open terrace, and in the very first winters he encountered all the disadvantages of such a structure on a hill and in an open place. This room, open to all winds, was uncomfortable even in summer.
But I am mainly tormented by the question of the feasibility of solid glazing of the terrace.
Like all owners of unheated terraces, our user was afraid of condensation and the fact that the double-glazed windows would not withstand frost. But he still decided on glazing: in the far side opening it is solid, and in the rest, including the door, sliding frameless.
Our other participant with the nickname Vit070476 came to the same decision, and after the very first winter.
The result exceeded expectations; we essentially got a gazebo, but without the snow and dirt.
His advice: be sure to provide opening doors, otherwise in the heat it will simply be unbearable to stay in such a room.
I was advised to do this at the construction stage, but I’m the smartest. In the end I did it and I’m very happy about it.
The double-glazed window serves without incident, there are no distortions, no condensation forms - apparently, the room is cooled evenly. In winter, the terrace is 10 degrees warmer than outside.
Here is a version of a member of our portal with the nickname Sintetik. The experience of operating an open terrace quickly showed that it is impossible to live like this any longer, it needs to be glazed.
The unheated terrace will be used only in warm weather; the rest of the time it is just a vestibule in front of the entrance to the house, protection from bad weather.
The terrace area is small, 16 meters, so instead of a simple double door that would eat up space, they decided to install sliding structures.
Aluminum profile with one glass. All three glasses move, height 2.8, width 60-85 cm, paired rollers, 4 rollers per sash.
Choosing glass for your home
Double-glazed windows for a half-timbered house must be durable, weather-resistant, heat-saving, and sound-proof. Only if these requirements are met do they help create a comfortable microclimate in the rooms.
Note! For half-timbered houses, double-glazed windows are almost never used. They are heavy and thick (about 8 cm)
Practice shows that a sufficient level of noise and heat insulation can be achieved when installing single-glazed windows.
The following glasses are suitable for half-timbered glazing:
- hardened - they are obtained by heating to high temperatures, followed by uniform and rapid cooling;
- multifunctional - have a multi-layer coating that performs sun protection and energy saving functions;
- triplex - consist of several layers firmly glued together.
All windows can be additionally tinted to the desired shade, armored and equipped with electric heating.
When calculating the area of a translucent structure, it is assumed that the weight of one square meter of glass 6 mm thick reaches 16 kg. The weight of a double-glazed window ready for installation ranges from 30-50 kg.
Foundation load calculation
The amount of load acting on the foundation is the sum of:
- constant (the weight of all building structures including the foundation);
- temporal.
Live loads consist of:
- short-term (weight of people, wind and snow load);
- long-term (weight of furniture, equipment, glazing);
- special (seismic loads)
Wind and snow loads depend on the weather conditions of each specific region. Average snow load in Russia:
- 190 kg/m2 for Northern regions;
- 100 kg/m2 for the Middle Zone;
- 50 kg/m2 for southern regions.
The permanent load is calculated using tables of mass and density of a specific building material. It is not necessary to separately calculate the load from furniture and household appliances. The tables already contain a margin of safety, which makes it possible not to take into account the mass of individual items.
The weight of the walls is determined based on the material of the building. The area of the walls is calculated including window openings (simply multiply the height of the wall by its length).
Table of weight per square meter of walls (thickness 15 cm)
| Reinforced concrete | 350 kg/m2 |
| Brick | 250 kg/m2 |
| Logs or beams | 100 kg/m2 |
| Frame construction | 50 kg/m2 |
When making calculations, it is necessary to take into account the weight of the floors: multiply the floor area by the specific weight of the material.
Table of specific gravity of materials
| Reinforced concrete | 500 kg/m2 |
| Wooden beams (insulation density up to 500 kg/m3) | 300 kg/m2 |
| Wooden beams (insulation density up to 200 kg/m3) | 150 kg/m2 |
The weight of the roof depends on the roof area and roofing material. You can use the following table for calculations:
| Roof tiles | 80 kg/m2 |
| Slate | 50 kg/m2 |
| Soft cover | 50 kg/m2 |
| Metal | 30 kg/m2 |
The weight of the foundation is calculated taking into account its volume, material and design features. For example, the weight of a concrete foundation is equal to the volume of the foundation multiplied by the specific weight of reinforced concrete (2,500 kg/m3).
Based on these data, we can draw the following conclusion: the reliable foundation of the veranda, which is integral with the foundation of the building, can withstand almost any type of glazing. For a terrace attached to a house with a separate foundation, calculations will be required so as not to overload the fragile structure.
Frameless balcony glazing
If you choose this cold method of glazing a balcony, then you can do it in two ways:
- you invite specialists and they will equip your balcony with a frameless glazing system at the highest level. It will have a good seal. The doors in it not only open and close, but also fold completely. Improved glass with low thermal conductivity will even slightly increase the temperature on the balcony. By installing heated floors, you will get an additional room;
- You yourself carry out all the work on glazing the frameless balcony.
Components of a frameless glazing system
The frameless glazing system consists of:
- tempered glass panels having a thickness of 0.6 to 1 cm;
- upper and lower profiles. Most often they are made of aluminum;
- bearing wheels with ball bearings;
- platbands;
- low tides;
- glass covers;
- floor lamp lock;
- fixative;
- lock handles;
- rubber or acrylic seals that are placed on the edge of the glass;
- fixing tape. With its help, the sashes are secured.
Frameless glazing technology
To avoid many problems and not be disappointed in the chosen glazing method, it is necessary to perform its installation efficiently. Frameless glazing technology consists of the following stages:
- fastenings of the upper ebb;
- attaching the upper aluminum profile;
- installation of a system of ball bearings serving to hold double-row rollers in the upper profile;
- installing a top brush silicone seal with an insert of a top glass profile and a tempered glass panel;
- performing work on installing a glass profile, a silicone seal and a lower aluminum guide profile;
- fastenings to the balcony parapet of the lower ebb;
- sealing the cracks formed between the glass and the walls with sealant.
It should be noted that nails and screws are not used. The structure is held together with glue specially designed for this purpose. All these operations are not difficult to perform, but not everyone can do them efficiently. You just need jeweler's precision, otherwise the money and efforts to bring the idea of frameless glazing to life with your own hands will be wasted.
A video of frameless glazing will help you better imagine this process:
Note: sometimes monolithic polycarbonate is used instead of tempered glass. Craftsmen replace expensive guide profiles with corresponding parts from sliding wardrobes, but in this case there can be no talk of high quality.
If difficulties do not frighten you, and you are ready to experience them for yourself, then when ordering ready-made elements of a frameless glazing system, give preference to reliable manufacturers.
Which is better, polycarbonate or glass?
If we compare these materials, we can note the elasticity and impact resistance of polycarbonate. A broken window is a very dangerous area; the fragments can cause serious problems. When using polycarbonate, you can forget about this.
In addition, bending a sheet of plastic is very simple; curved surfaces coated with this material are found everywhere. On the contrary, bending a sheet of glass is very difficult and requires sophisticated equipment. It is impossible to make curved glass with your own hands at home or in a summer cottage.
The transparency of cellular polycarbonate is much lower than that of glass. In this regard, opinions are divided: some believe that this is a big plus, since through the windows you cannot see what is happening inside. In addition, the sun's rays, passing through a plastic barrier, are partially scattered and do not dazzle as much as with conventional glazing. Others believe that opaque windows limit the view and deprive the owner of the opportunity to contemplate the beauty of the surrounding world. Both sides are right in some way, so you just have to accept the situation as it is.
Frameless glazing design - advantages and disadvantages
Frameless glazing has a range of advantages. It is often preferred due to the following advantages:
- versatility. Frameless glazing is used not only for balconies, verandas, loggias and terraces, but also to create original interior solutions, as well as lightweight partitions;
- elegance. Glazing installed using frameless technology combines well with various architectural styles and looks quite impressive;
- increased light transmission. Due to the absence of frames, the area of openings increases. The sun's rays illuminate the room better and make the space more voluminous.
The main advantages include ease of washing, increased service life, reliability and simplicity. In addition, the use of this design reduces the amount of heat loss and reliably protects the room from the effects of natural factors.
When planning to install a frameless glazing option, you need to know about its disadvantages. The weaknesses of frameless glazing include the following:
- low thermal insulation characteristics. Frameless design can only be used for cold balconies;
- increased visibility of the room from the outside. To ensure privacy, you cannot do without blinds and curtains;
- entry of insects, dust and fluff into the room when the doors are open. The possibility of installing a mosquito net is excluded.
A serious drawback is also the reduced tightness of frameless glazing, which causes low temperatures and high humidity, as well as low noise insulation properties.
The frameless design is relevant for glazing various rooms in accordance with modern architectural trends. Installation should only be entrusted to trusted specialists who are fluent in installation technology.
83db4c96d48433cf8cb1d920b67e919a.jpe 8f2f699752dd7d65df13e42e69ed54c3.00_jpg_srzIs it necessary to legalize the veranda
Any construction that resulted in an increase in the area of an existing facility must be legalized, so documentary evidence is necessary not only for the construction of rooms or balconies, but also verandas.
Learn about the features of a terraced landscape.
To coordinate the redevelopment of a house, you must adhere to the following algorithm:
- Specialists must check whether the residential premises comply with the technical passport.
- After this, the construction project itself is analyzed, according to which it is planned to build a veranda.
- Then the status of communications is checked (whether they can be used to service the additional area). If approved, appropriate reporting is drawn up.
- Then the building is registered with the State Property Management Committee, and the owner receives ownership rights to the object being built.
Follow the above rules for choosing and installing glazing for closed verandas, and you will get an excellent option with a modern design and beautiful finish. You should also take care of the tightness and density of the structure so that even in severe frosts the extension will be warm. Do not forget that this type of construction must be approved by the relevant authorities.
