Many summer residents want to make a parking lot on their site, at least to make parking more convenient. However, only a few of them know which type of coating is the most durable and affordable. And also how to get the job done quickly and efficiently. In this article we will look at how to make a platform for a car in the country.
Types of country parking areas
The construction of a site for a car depends on the personal desires of the summer resident and general conditions. How much a person can or wants to spend on a job is also important. You can create parking at your summer cottage without spending a lot of money.
There are seven different coatings:
- bulk parking - made of crushed stone or pebbles;
- lawn or eco-friendly parking;
- paving slabs;
- concrete;
- asphalt;
- rubber tiles;
- stone;
- lattice.
The above coatings have different performance characteristics, which is why some are cheaper, others more expensive. Some types go well together. The most inexpensive and functional is considered to be a platform for a car in a country house made of crushed stone. If you build it according to all the rules, and also use geotextiles, the crushed stone will not mix with the soil, at least in the first weeks. But if there is no geofabric, you can always add crushed stone instead, because it is sold at reasonable prices and is not difficult to find using the Internet.
Dimensional characteristics
The dimensions of the future parking lot at the dacha directly depend on how many cars are planned to be parked here permanently. Plus, this is also influenced by the size of the plot itself, since some dachas are really small, and you definitely can’t fit more than one car on the property.
Experience shows that the optimal size for one car is a platform of 3x5 meters. This is about 15 square meters. Such a zone is enough to park calmly, not to maintain the millimeter and not to press against the edges, just to avoid driving into the lawn or crushing the planted strawberries. 15 squares is enough to have access to all doors and trunk, as well as to get around the car from all sides.
Pros and cons of different options
Each type of coating has its own advantages and disadvantages. For example, a gravel parking lot can drain water on its own, so additional drainage is not needed. But perhaps a drainage system will still be needed.
Nowadays, green car parks are quite popular. Summer residents usually make not a simple lawn, but a special one, covered with a plastic lattice, which partially hides the lawn. Thanks to the correct weight distribution, this lattice structure prevents the car's wheels from falling through.
The advantage of such a car platform is that it has a large number of functions. You can relax on it, but you need to take care of it, like grass - watering, trimming. Such parking can really decorate the area, and it’s really easy to use. The disadvantage is the high cost of seeds, since special varieties of grass are required for parking.
Paving slabs
For this type of site, both coarse sand and coarse granite chips are suitable before starting laying.
Choosing a parking space on the site
If you decide to build a parking lot, then first you need to choose a place that should be level. A strong slope is not suitable for parking: the vehicle will regularly need to be put on the handbrake, and limiters installed under the wheels. In addition, you will think about the safety of your car every day.
Important! The parking lot at the dacha should have a slight slope: this makes it easier to enter the site and water will not accumulate. The parking lot should be located above ground level.
Asphalt
When laying this material, it is worth considering that asphalt will serve you for a long time if drainage is properly organized. When using this material, it is better to make a slight slope, so the platform will last a long time.
A little advice: choose the type that suits you best based on the type of soil and your budget. We have outlined for you the least expensive and more acceptable options.
Parking space dimensions
Before you build a platform for a car on your summer cottage, decide on its size. For one car, you can make a platform of 5 x 2.5 m. For large vehicles (for example, a jeep or minivan) you will need dimensions of 3.5 x 6.5 m. But if you park several cars at your summer cottage, then there should be even more space.
FAQ:
Parking is needed, but heavy construction equipment will still enter the site. What to do?
Answer
In this case, we recommend a sand and gravel parking lot. It is not a shame to damage it with construction equipment, it is easy to repair and can later be used as a base for concrete or paving stones.
What loads can your concrete parking option withstand?
Answer
The option we offer is designed for a loaded passenger car weighing up to 3.5 tons. Depending on your requirements, we can change the design of the parking lot: increase the thickness of the concrete or the diameter of the reinforcement.
Will the paving stones in the parking lot ripple after prolonged use?
Answer
The formation of waves or ruts depends on the type of foundation. If the base is concrete, then deformations are excluded. On a sand and gravel base, deformation of the paving cloth is possible under heavy loading or high groundwater levels.
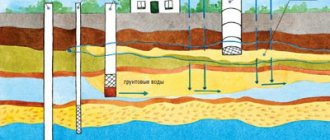
Water drainage
When you have decided on the dimensions, during the construction of the parking lot, resolve the issue with the drainage system. If you do not intend to do concreting, liquid may seep through the crushed stone or tiles.
If you decide to use a different material, it is better to make drainage. Its arrangement also depends on how much water stagnates in your summer cottage. If there is no drainage system, you need to sprinkle it with crushed stone, about 40 centimeters wide. Water will flow onto it and be completely absorbed into the soil.
If there is drainage, pipes must be laid along the perimeter of the parking lot 10 centimeters below the covering, and the upper part must be covered with crushed stone. The supplied pipes must be inserted into the drainage system.
Entry requirements
In addition to external design, convenience for owners and compliance with your budget, these areas in front of the house are limited by the requirements of regulatory documents and are prescribed for the purpose of safety of movement:
- opening width is at least 4.5 meters;
- if there is an adjoining road, the expansion must be at least 8 meters and provide a turning radius of 5 meters.
- the pipe used as drainage is at least 0.3 meters and at least 4 meters in length;
- The slope of the pipe in the trench must coincide with the slope of the main road;
- the entrance bordering the main highway must coincide with it at the junction.
The nature of entry into a private area should not create obstacles for road users on the main road.
Installation of curbs
When constructing a parking lot, do not forget about curb stones, they are very important and help solve several problems at once. If the platform for a car at the dacha is built from crushed stone, the fence will prevent it from crumbling. If the parking lot on the site is made of tiles, the curb will save you from sand being washed away. And the most important thing is that the site with side stones looks better.
Important! If you are going to build a garage or something similar, you can also install a small carport - a shelter that will help protect your car.
To build this building, you will need strong pipes to create a frame. And you will need to throw a tarpaulin or film over it. There is no point in making the structure high, as it will not protect the vehicle from slanting rain. The height of the frame structure should be about 2.5 m.
Stone
The stone looks the most natural. But you should not choose very large stones. The algorithm for laying such soil under a parking lot is very simple;
- The top layer of soil is removed;
- Compacted;
- Laid;
- Fill the gaps with sand, but first mix with lawn grass seeds.
You should use such a platform only after it has completely dried, after about 3-4 weeks. If it rains, cover the area with film.
For this type of site, a stone with a thickness of 4 to 6 centimeters is well suited.
Sequence of laying layers
After the final selection of a parking lot, highlight the selected dimensional characteristics of the site (taking into account the water drainage system). Then carry out everything strictly according to the plan below:
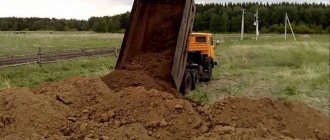
- First, remove a layer of soil 30-35 cm deep.
- Remove all unnecessary stones, roots, level the area.
- Then, using a tamper, compact the soil thoroughly.
- Lay out geofabric. It should be 0.7-1 meters larger than the parking lot. When arranging a drainage system, wrap the drainage pipe in the “excess” geofabric.
- Add a layer of sand, level it, compact it. When compacted, the layer is 10-15 cm. If you want to make the work easier, wet the sand with water.
- Add a middle layer of crushed stone.
- Place a layer of coarse gravel (20-40 mm) on the sand, level it, compact it. Its thickness is 10 centimeters when finished.
- Medium gravel layer (5-20 mm). Level, compact. Its thickness should be 10-15 centimeters.
- The next layers will depend on the type of coating used.
Typically, the size of the layers depends on the structural properties of the soil and the load. For example, for loose and unstable soils, a road mesh is laid at the bottom of the pit for stabilization.
Second option: a regular layer of geofabric is laid between sand and gravel. The bottom layer is needed to stabilize the base and stop the growth of vegetation, which will be difficult to remove on your own.
Crushed stone
If you want to make a parking lot out of crushed stone, then this option does not require additional drainage; the water will find a way out on its own, since this type has free drainage. Although, if you look from the other side, parking made of crushed stone is the cheapest and easiest option.
The nuances of building a parking lot from different materials
Under the tiles and bricks, pour coarse-grained sand or small granite chips (1-4 mm). Do not forget that for a parking lot, tiles with a thickness of at least 50 mm are required (materials from 30 mm are suitable for paths).
Concrete
So, how to make a platform for a car at your dacha with your own hands from concrete? You will have to spend a lot of time and effort on concreting. A concrete parking lot will require the installation of formwork and reinforcement. Wire mesh with a thickness of approximately 10 mm is often used as reinforcement.
From it you need to make a lattice, the pitch of which will be 15 centimeters. Pieces of wood, chipboard, and plastic are suitable as formwork structures. Above the crushed stone at a height of 15 centimeters, support structures are made and a mesh is installed on them. A concrete mixture with a layer thickness of 15 centimeters is poured on top of this base. For a parking lot designed for a large number of cars, if you perform all the manipulations yourself, you will need expansion joints.
If you decide to work with concrete, remember that the solution will take about a month to harden. It will also be necessary to water the concrete mixture during the process. Especially if it's warm outside. If you don't like to wait a long time, you can add a product that will speed up the hardening process. Remember, it is with the help of concrete that you can quickly create a durable and high-quality platform that will serve you for many years.
Preparatory stage
If you decide to make a parking space at your dacha for a car without involving specialists, that is, with your own hands, you need to study some of the features of this procedure. This way the parking will fully satisfy your expectations. Or maybe it will surpass them.
Regardless of what materials you use, the preparation stage always looks pretty much the same. Therefore, before parking your car at your dacha, perform several mandatory steps:
- Remove the layer of soil. Remove about 10-20 centimeters of the layer. This will get rid of all vegetation, which will then not break through the coating and destroy it. If there are deep roots, it is better to remove them in advance, otherwise they can create many unnecessary problems later;
- Make a pillow. It is done by filling a prepared pit with a depth of 10-20 centimeters of sand or crushed stone. Next, it needs to be thoroughly compacted. Ideally, vibrating plates are used for such purposes, but you can get by with simple compaction with your feet. You can walk something heavy over the surface, which will allow you to better press the crushed stone or sand;
- Drainage pipes are laid along the edges. It is better to install them, since during rainfall or when washing the car, water will accumulate under the car. It will be much more correct if excess water is drained.
After this, you can begin laying the coating you have chosen. Some choose it purely based on financial capabilities, others look at optimal practicality and performance characteristics.
Also, do not forget that the appearance of the parking area has its own significance, and can become a real decoration of the summer cottage, or significantly spoil it.
Lawn grid for eco-parking made of concrete
Concrete lawn eco-parking on a garden plot is characterized by increased strength, which makes it possible to use it to create parking spaces for trucks.
Other positive qualities include:
- concrete lawn grating is economical, its cost is much cheaper than its plastic counterpart;
- durable and wear-resistant;
- Helps quickly get rid of excess moisture after heavy rains;
Concrete grids for eco-parking also have a number of disadvantages:
- complexity of installation and dismantling. Considering the significant weight of the structures, it will be quite difficult to work with the product without special equipment and skills.
- It heats up quite strongly in the sun, which can negatively affect the vegetation planted in the cells.
Features that can be considered both pros and cons include the clarity of the contours of the structure. They can be played up in design and made a highlight of the landscape design, but they cannot be hidden.
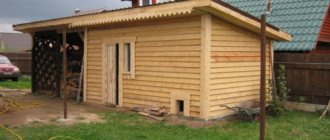
How to build a carport with your own hands
Building a carport for a country house with your own hands is not a difficult task for those who are minimally familiar with the basics of construction. For the construction of the structure, the most suitable location is selected and a detailed project is drawn up. Next, you need to pour the foundation, put a frame with supports on it, design the site, and install the roof itself. The easiest way is to make a pitched roof yourself, supported by six to eight pillars.
To date, a large number of projects have been developed that allow you to build a canopy.
Selecting a location, creating a project with drawings, diagrams
The most suitable place to create a shelter is from the entrance to the site. It is leveled, cleared of debris and large plants. If there is a garage, the canopy is adjacent to it in front or on the side. When creating a drawing, you need to measure the length, width, height of the car - it should not be “cramped”, and enough space should be left on the site to easily walk around the car.
In regions where the wind is strong and gusty, the roof slope is made flatter and the angle of inclination is 25 degrees.
Making the foundation
The base for a heavy canopy with supports made of brick, stone, metal tiles, is made monolithic - made of concrete. To do this, markings are made, a trench is dug, a frame of reinforcement and formwork is installed, poured, and the base is leveled.
For a small car, a light shelter made of boards and polycarbonate, a pile foundation is sufficient. Under the piles, which are taken according to the number of support pillars (6-10 pieces), holes are drilled or dug. The latter are filled with cement after the support (pile) with the “anchor” has already been placed inside, and crushed stone and sand have been poured onto the bottom. In another option, screw piles are screwed directly into the ground, to a depth of 1.2-1.6 meters, and pipes of the required height are welded to them on top.
Construction of a frame with supports
The frame is installed on a pre-prepared base - the concrete must harden and dry well. Afterwards, supports are mounted on pre-installed embedded parts, horizontal jumpers and inclined parts of the sheathing are placed on them. The standard distance between supports located on the side is 120-150 cm, from the entrance side - 270-290 cm, height - 215-250 cm. The depth of the support elements into the foundation depends on the weight of the roof - 50-70 cm.
Venue design
The shelter site itself is poured with concrete, laid out with bricks, paving slabs, and porcelain stoneware. It is permissible to decorate the platform with pre-painted boards impregnated with anti-rot and insecticidal compounds, but such a coating is not very durable, especially if the machine is large and heavy. It is permissible to install railings and full high walls on the sides of the structure.
Roof installation
The roofing structure is mounted on a pre-created metal or timber sheathing. First, the longest horizontal beams or pipes are laid on the supports, then crossbars and inclined parts are screwed, nailed, or welded to them. A small canopy is covered with one or two sheets of material; for larger ones the number of elements exceeds 6-12.
Corrugated sheeting, polycarbonate, and tiles on a sloping roof begin to be laid from the bottom edge so that rainwater flowing from above does not accumulate on the surface. The parts are placed “overlapping” by 20-30 cm, using fasteners suitable for a particular material in sufficient quantities.
Design
The canopy structure is decorated at your discretion, but so that the decorations do not interfere with the entry and exit of the car. For a metal or brick structure, elegant forged parts (railings, cornices), plants in pots located under the roof, LED lighting, and garland are optimal. Made of wood - decorated with carvings, tinted to match elite species, hand-painted with patterns. Installation of railings made of turned wooden balusters and openwork decorative grilles is allowed.
All parts must be coated with a layer of a suitable protective composition.