Not all owners of suburban areas are lucky with the relief. Ideally flat areas are not found today as often as we would like. The construction boom that has swept the country has baffled many regional authorities. Therefore, land for the construction of private houses outside the city began to be issued in problem areas: in lowlands, on slopes, swampy, littered. And this did not discourage developers, because the problem can be solved by filling the site. What it is, how it is carried out, what materials are used - everything is in this article.
Filling a suburban area Source pesok-klmn.ru
Methods for drying an area yourself
There are many different factors that influence the appearance of swampiness, as well as several degrees of flooding.
Swampiness can be caused, for example, by a special topography or type of soil, when water does not have the opportunity to flow through the area due to the natural slope. In this case, such a slope must be made manually, carefully calculating the trajectory. Additional soil may be required to fill the excavations. There is also an option that water stagnation occurs due to heavy clay soil. Then, if it is impossible to add soil, it is necessary to do drainage. Thanks to drainage, you will be able to dry out the swamp on your site. If you still have to build drainage systems, then you simply cannot do without knowledge about this system, accurate calculations and planning. To make your life easier, you can contact us. We can carry out any work related to soil drainage for a fee. Of course, you can do everything yourself, but in this case you need to be 100% confident in your calculations.
A reservoir is created at the lowest point of the dacha, from which water flows into the drainage system. This pond can serve a variety of purposes: it can be used for watering or perhaps as a decorative element in your area with ornamental plants.
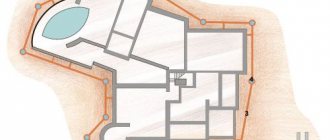
The essence of draining a site is to remove water from its territory. The best situation is when the site has its own water drain, but there are various obstacles to this. For example, the location of the dacha plot is lower, relative to others, or when there are obstacles in the form of some buildings or a fence at the water drainage site. A way out of this situation could be centralized water collection. It can be arranged using a system of canals and ditches.
Water from ditches needs to drain somewhere. The drainage location must be determined on site, looking at the positions of adjacent areas. The drainage is done below the level of ditches and canals.
When it has a relatively flat surface and a pronounced slope, then the drain is arranged parallel to the fence and placed as low as possible. The width of the drain should be up to half a meter, its depth – up to a meter, and its length – about two to three meters. The excavated soil must be spread evenly over the lowest parts of the site.
Throughout the year, you need to regularly compact the gutter with various debris; construction waste is perfect. It must be carefully compacted, adding more and more new debris until the ditch reaches the lower level of fertile soil. After this, a similar one is created near the filled ditch, which becomes, as it were, an addition to the previous one.
The excavated soil from the newly created additional drain is compacted into the previous one. By following these steps, you will become the owner of a high-quality drainage system that will work throughout the entire site. Then what is the point of creating drainage at the highest point of the site? This is left to your discretion, because the meaning of such a ditch is for those whose plot is not the first, that is, another one may be located higher, then such a ditch will catch the water of this plot and not allow it to flow through your territory.
We can summarize all of the above. To properly and efficiently drain your area, the best solution is to combine several methods. That is, fill up the soil, equip drainage and create a network of canals and drainage ditches. But how to drain an area without drainage? There is another way that has not been discussed. This is a biological method, the essence of which is to grow special plants that consume a lot of moisture.
Rest area in the pit
If the pit is large, then you can develop the previous idea and also arrange a recreation area around the barbecue. And those who are not used to barbecuing in the middle of the yard or are afraid of getting a fine for it can easily arrange a recreation area without a barbecue, providing an entrance to it in the form of steps and installing benches or even sofas in the low area. However, in the second case, you will also have to make a kind of roof (similar to a carport), which will protect all this splendor from weather conditions.
- Recreation area in the country: examples for inspiration
What should be in the recreation area? Will a hammock be enough or is it better to build a gazebo? Or maybe it’s still worth equipping a patio?
Types of drainage
Site drainage is a complex system with many nuances and features. In structure, it can be local (local) - to solve a problem in a specific area. Most often this is drainage of the foundation, basement and semi-basement (basement) floors. Also, water drainage systems on a site can be general - to drain the entire site or a significant part of it.
Soft drainage without pipe. Suitable when it is necessary to drain a small amount of water in a summer cottage or near the house
By installation method
According to the installation method, the drainage system can be:
Open. Concrete or stone trays are used and ditches are dug around the site. They remain open, but can be covered with decorative grilles to protect the system from large debris. If you need a simple solution for draining surface water at your dacha, these are ditches along the perimeter of the site or in the lowest zone. Their depth should be sufficient so that the water does not overflow at maximum flow. To prevent the unreinforced walls of drainage ditches from collapsing, they are made at an angle of 30°,
To prevent the walls of open drainage ditches from crumbling, ground cover plants are planted on the slopes or laid out with cobblestones
Open drainage near the driveway, parking lot, does not spoil the picture at all. Drainage option for a summer cottage - cheap and cheerful
A drainage ditch can be used to decorate the area. Drainage of storm water from the house and paths can be decorated like this
Can remove significant amounts of water
- Closed. Water is captured by laying special water-permeable drainage pipes. The pipes are led into a storage well, into a drainage ditch, a ravine, or a nearby body of water. This type of site drainage is good for permeable soils (sandy).
- Backfill. This type of site drainage is usually used on clay soils or loams. In this case, the pipes are also laid in ditches, but they are filled with layer-by-layer sand and gravel backfill, which collects water from the surrounding soils. The worse the soil conducts moisture, the more powerful backfilling is required. Drainage pipe in gravel backfill
The specific type of site drainage is selected based on site conditions. On clays and loams, an extensive gravel-sand zone is required, into which water will flow from surrounding areas of the soil. On sands and sandy loams there is no need for such a cushion - the soils themselves drain water well, but only a specialist can say specifically based on the results of geological research.
By type of implementation
There are several types (schemes) of drainage devices on the site:
- Annular. The pipes are closed in a ring around the object. Usually it is the house. It is rarely used, since the drainage pipes have to be deeply buried - the pipe itself must be laid 20-30 cm below the groundwater level. This is expensive and difficult to implement.
- Wall drainage - to drain water from the walls. It is located at a distance of 1.6-2.4 m from the walls (in no case close to each other). In this case, the drain is located 5-10 cm below the basement floor. If the floor is poured on top of a large crushed stone cushion, the drain is laid 5-10 cm below this level. The correct solution for drainage from the foundation is a storm sewer system and drainage
- Reservoir drainage. Used when constructing slab foundations in difficult situations. Necessary for drainage of overhead water, usually used together with wall water drainage. Reservoir drainage is layers poured into a foundation pit - sand, crushed stone, waterproofing (as they are poured from bottom to top). The reinforcement is already laid on top of this cushion and the foundation slab is poured.
- Systematic and radial. Used to drain areas. They differ in the way the drains are located relative to the central pipe. With a radial scheme, the system looks like a herringbone (already existing plants can be taken into account); with a systematic scheme, drains are laid with a calculated step (usually arranged when planning a site). Radiation drainage of the area
When draining a site, the central drain or collector is made from pipes of larger diameter (130-150 mm versus 90-100 mm for conventional drains) - the volume of water here is usually larger. The specific type of drainage system is selected based on the problems that need to be solved. Sometimes it is necessary to use combinations of different schemes.
Useful tips
Some expert advice for proper leveling of the site.
- The places where it is planned to plant green spaces are filled with sand. For vegetable and fruit crops, the layer of sand should be at least 30 cm. For flower beds and lawns, it is enough to lay out a sand layer of 15 cm.
- Crushed stone is poured under vehicle platforms, under access roads and under paths. The material is expensive, so they buy recycled crushed stone. It is a building material granules that are obtained by crushing disassembled building structures. The granular material contains asphalt, brick, concrete structures, etc.
- Under car areas and access roads, 20-40 mm crushed stone fractions are used for backfilling, and 5-20 mm fractions are used for backfilling under paths.
- Many people make the mistake of using clay for filling. The density of the material does not allow water to pass through. Therefore, there is a risk of the area becoming swampy. If there is no other building material, then clay must be mixed with sand.
- Some specialists lay geotextiles between the backfill layers. The material prevents the layers from mixing. But its expensive installation is not always suitable for the materials used for filling.
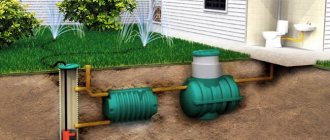
Components of storm drains and their types
All elements of storm drainage in a private house must be connected into a system. Here's what it might consist of:
Well. It must be large in volume. How big depends on the amount of rainfall, the size of the roof and the area from which the water is collected. Most often it is made from concrete rings. It differs from the water one only by the need to make a bottom. To do this, you can put a ring with a bottom down (there are factory ones), or you can fill the slab yourself. Another option is plastic wells for rainwater drainage. They are buried to the required depth, anchored (chained) to poured concrete platforms so that they do not “float up”. The good thing about this solution is that there is no need to worry about the tightness of the seams - such vessels are completely sealed.
Hatch over the storm well. It is best to take a ring and a separate hatch (plastic, rubber or metal - your choice). In this case, you can dig in the rings so that the upper edge of the installed lid is 15-20 cm below the ground level. To install the hatch, you will have to lay out a brick or fill the neck with concrete, but the lawn planted on top will feel good and will not differ in color from the rest of the planting. If you take a ready-made lid with a hatch, you can add only 4-5 cm of soil
On such a layer of soil, the lawn will differ in both color and density, drawing attention to what is underneath it.
Point storm water inlets. These are relatively small containers that are installed in places where precipitation accumulates.
They are placed under drainpipes, at the lowest points of the site. Stormwater inlet bodies can be plastic or concrete. Concrete is used when constructing deep storm drains. They are placed one on one, achieving the required height. Although today there are already built-on plastic storm water inlets.
Linear storm water inlets or drainage channels. These are plastic or concrete gutters. These devices are installed in areas of the highest rainfall - along roof overhangs, if a drainage system is not installed, along pedestrian paths. Can be installed under gutters as gutters. This option is good if, during the construction of the blind area around the house, no pipes were laid to drain water. In this case, the receivers are placed outside the blind area, and the second end of the tray is connected to it. This is a way to make a storm drain without destroying the blind area.
Sand traps. Special devices in which sand is deposited. They usually install plastic cases - they are inexpensive but reliable. They are installed at some distance from each other on long sections of the pipeline. Sand and other heavy inclusions are deposited in them. These devices need to be cleaned periodically, but this is much more convenient than cleaning the entire system.
Lattices. In order for water to drain away better, the holes in the grate should be large. They come in: cast iron, which is a good option, but the paint doesn’t last longer than 2-3 years even on the most expensive ones; steel ones are the worst option, as they rust very quickly; made of aluminum alloys - the most durable and have a consistently good appearance, but also the most expensive.
Pipes. For storm drainage, it is best to install polyethylene pipes for outdoor use (red color). Their smooth walls do not allow sediment to accumulate, and they also have greater conductivity than pipes of the same diameter made of other materials. Cast iron and asbestos pipes are also used. A little about the diameter of stormwater pipes. It depends on the amount of precipitation and the branching of the system. But the minimum diameter is 150 mm, and better yet, more. The pipes are laid with a slope of at least 3% (3 cm per meter) towards the storm water inlets, and then towards the well.
Inspection wells. These are small plastic or concrete wells that are placed along a long section of the pipeline, in places where the system branches. Pipes are cleaned through them, if necessary.
The storm sewer system in a private house does not always contain all these devices, but from them you can build a system of any configuration and complexity.
https://youtube.com/watch?v=2lnlbpiI6JE
Criteria for choosing the type of leveling layer
Depends on the following parameters:
- backfill height;
- dumping object.
When the height of the leveling layer is no more than 40 cm, then soil will become the optimal and most useful material. Buying fertile soil is not a problem today. Of course, the material itself, transportation, unloading and dumping will not be cheap. But this option is the best and it is the only one for this backfill thickness.
Just don’t think that you can cut off the fertile soil layer on an abandoned plot and transfer it to you. The land belongs to the state. For any action with land you must have permits or a license. If you start exporting without permission, at best you will pay a fine.
When the height of the leveling layer is more than 40 cm, the filling is done in two layers. The bottom layer consists of cheap materials, and the top layer is made of fertile soil.
For example, on a plot of land, half of the area is lowland, in some places up to one meter deep. In such terrain, the bottom layer can be sand and gravel, broken bricks, secondary crushed stone or excavated soil. And the second layer is fertile soil.
What is excavated soil? If there is a construction site near you, then the soil excavated from the trenches is considered a foundation pit and must be disposed of. It costs a penny, and if the construction is close to the site, then the drivers will bring it to you with their own transport.
Reasons for the need for drainage
You can get rid of this problem by installing a drainage system. There are many organizations that drain areas with high groundwater levels, and do it quickly and efficiently.
First you need to find reliable specialists, invite them to inspect the site, estimate the cost of the work and draw up a list of necessary materials and a drainage diagram for the site. This, of course, is a way to solve the problem, requiring significant financial costs.
But there is another way - draining the site with your own hands. First you need to understand what reasons necessitate its construction.
They are as follows:
- the site is located on an uneven surface and there is no water flow;
- the basis of the site is clay, which retains moisture in the upper layers;
- the site is located in a swamp;
- The groundwater is not deep.
Having understood the cause of stagnant water, you need to study the design of the drainage system, look at a number of photos of the drainage system on the site and make it yourself.
If timely measures are not taken, you will have to live in constant dampness, the floors in the house will begin to rot, and the house itself may crack.
Working in the garden after the rain, digging up dirt, is also not much fun. This means that the answer is clear: if there is a problem with water leaving the site, then without any doubt it must be solved immediately.
If possible, then it should be installed on an area that has not yet been developed, so as not to destroy the developed landscape later.
FAQ:
1) At what stage of landscaping is leveling for a lawn necessary?
Answer
Leveling the area for a lawn, as well as sowing the lawn itself, is carried out as the last stage of landscaping the site. After the communications have been laid, the paths and parking area have been paved.
2) What is (vertical) layout?
Answer
Proper vertical planning is necessary to level hilly areas with large differences in elevation, to create the necessary slope of the area for the outflow of rain and melt water. This leveling is one of the stages of preparing a site for construction.
3) How do you know that you can start finishing leveling the area in the spring?
Answer
For leveling in the spring, as well as in rainy summers, the soil must be dry by at least 20 cm. Determining whether this is so is quite simple - just dig on the bayonet of a shovel. If there is no water in the tumbled earth, then work can begin.
Materials for production
How long home furniture will last and how comfortable it will be to use depends on the materials from which it is made. The issue of reliability and durability is extremely important. Today, kitchen furniture manufacturers have plenty to choose from.
Traditional materials and new developments, as well as their unexpected combinations, are used for production.
Let's take a closer look at some of them:
- Tree. The natural texture of the material, different types of wood and different processing methods provide a rich and varied range of products made from this material. A round wooden table is a classic example of a design solution for a dining area. The material requires protection from mechanical damage and careful handling.
- Glass. Modern material, resistant to temperatures and moisture, does not absorb odors. Furniture with glass elements does not clutter up the space; the transparency of the glass makes the kitchen interior modern and light. The material requires protection from mechanical damage, careful handling, and careful maintenance.
- Veneered chipboard/MDF. Modern practical, lightweight and inexpensive material. A coating similar in appearance to wood, a variety of colors and relatively low cost make products made from veneered chipboard/MDF popular and in great demand. The material requires protection from mechanical damage, is afraid of moisture, and requires careful handling.
- A natural stone. A natural material characterized by beauty, fragility and high cost. It is not often used in furniture making due to its heaviness, difficulty in processing and impracticality in use. The material requires protection from mechanical damage, careful handling, and careful maintenance.
- Fake diamond. A modern artificial material, lighter than natural stone, less expensive, more practical and reliable. Easy to use, does not require careful maintenance.
- Plastic. Modern practical and inexpensive material. Plastic products are lightweight and come in a variety of colors and textures. The material is easy to use and does not require careful maintenance.
- Metal. Most often used for the manufacture of bases and additional decorative elements of the table. Reliable, adding weight and stability to the structure.
Preliminary stage
Before raising the ground level, a work schedule is drawn up, including planning, demolition of buildings, clearing the area of debris, drainage and backfill. At the preliminary work stage, topographers are invited to study the soil. They will select the material with precision.
If the top layer is good, it is removed and set aside for subsequent work. Level the area with cheap material and return the soil to its original place. The filling is carried out in the prepared space - the success of the work depends on this.
Preparation for raising the earth includes:
- Familiarization. At this stage, the soil for raising the site, its composition, holes and their number are studied. The process is short.
- Layout. The data is processed and the location of objects is determined.
- Clearing. Optional step. If there was previously a house on the territory, it is demolished, the rubble is cleared, and the garbage is removed.
If stumps were uprooted when preparing the site, the root holes will need to be filled with soil. Having cleared the area, they move on to filling.
Drainage in a summer cottage: the simplest method of installation for specific conditions
Before making a drainage system on a site, it is necessary to select its type based on operational features. It is worth considering the most optimal options for installing water drainage systems, which are popular under certain conditions.
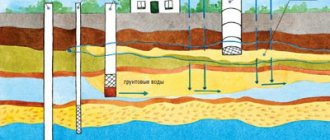
A drainage system is being created from the foundation of the house.
An example of site drainage with a high groundwater level
If groundwater is close to the groundwater level, a deep linear system may be the best option. It will drain moisture from the entire area into a drainage well, ravine or ditch located a level below. It is proposed to use perforated plastic pipes in a geotextile filter as the main elements.
Special pipeline with perforation and geotextile
One of the simplest methods of drainage in a summer cottage with groundwater located near the surface comes down to the following scheme:
- A trench is dug to the distance where the soil freezes. Its slope should be 2 cm per linear meter towards the liquid collection point. A layer of sand is poured for leveling.
- Geotextiles are spread on the prepared bottom so that its edges overlap the walls of the pit by at least 1-2 m. A small layer of gravel is poured on top.
- Next, plastic pipes are laid, after which they are again filled with approximately the same layer of gravel. The ends of the geotextile are rolled up to form a protective barrier. The rest of the trench is filled with soil.
Visual diagram of closed drainage with linear collection
At high groundwater levels, the drainage system takes on a tree-like appearance
Related article:
BBQ place in the pit
In a small pit it is possible to create a place for a barbecue. What exactly it will be - a barbecue, a smokehouse, a tandoor or some other hand-made device - is up to you to decide. The unusual design has an undoubted advantage: located in a “ready” recess, it will not take up space on the surface, which may be useful for other purposes.
- Grill, oven, barbecue – what to choose for cooking in the country
We bring to your attention a brief overview of the main devices for cooking in the country.
Is compacting or rolling necessary?
It is optimal if the imported clay is sequentially unloaded completely at the upper level of the dump, and then pushed into unfilled areas with a bucket. This is how high-quality compaction occurs, in which the final shrinkage takes place in one or two wettings.
Tamping is used when there is a need for high speed of work, for example, when the optimal time for filling an embankment is limited by season or weather. With alternate tamping, you can pour 0.6–1.0 layers of pure clay one after another without prior wetting. Let us note once again that only swollen clay is suitable for compaction; dry clay will not acquire water-resistant properties until swelling and subsequent compaction.
Layers of 30–40 cm can be compacted by rolling, but wheeled vehicles are not suitable for these purposes. A crawler excavator is indispensable if the site is being raised to a height of more than a meter; in other cases, it is wiser to resort to manual transportation and leveling, and to entrust compaction to precipitation.
Please note that it is often not necessary to manually grade the site. Due to the movement of surface water, the fresh embankment will eventually take on a natural slope. If there is an abundant supply of water, sometimes it is even necessary to slightly raise the embankment at the bottom of the slope in advance.
Classification
All soils are divided into several main types:
- Rocky. They are a solid rock mass. They do not absorb moisture, do not sag and are considered non-heaving. The foundation on such foundations is practically not deepened. Rocky soils also include coarse soils consisting of large rocks. If stones are mixed with clay soil, the soil is considered slightly heaving; if with sandy soil, it is considered non-heaving.
- Bulk. Soils with a disturbed natural structure of layers. Simply put, artificially poured. Buildings can be built on such a foundation, but a procedure such as soil compaction must first be performed.
- Clayey. They consist of very small particles (no more than 0.01 mm), absorb water very well and are considered heaving. Houses sag on such soils much more than on rocky and sandy soils. All are classified into loam, sandy loam and clay. These include loess.
- Sandy. Consist of large sand particles (up to 5 mm). Such soils compress very weakly, but quickly. Therefore, houses built on them settle to a shallow depth. Sandy soils are classified according to particle size. The best substrates are gravelly sands (particles from 0.25 to 5 mm).
- Quicksands. Dusty soils saturated with water. Most often found in wetlands. They are considered unsuitable for building construction.
This classification by type is carried out in accordance with GOST. Soils are examined in laboratory conditions to determine physical and mechanical characteristics. These surveys are the basis for calculating the capacity of foundations for buildings. According to GOST 25100-95, all soils are divided into rocky and non-rocky, subsidence and non-subsidence, saline and non-saline.
Processing Features
First of all, you need to take into account that such an area requires competent processing. Otherwise, you won't be able to grow anything at all. There are several basic requirements:
- processing twice a year;
- frequent loosening of row spacing;
- abundant addition of organic matter.
During autumn-spring processing, it is very important to carefully break up the lumps, in which case the clay will mix with organic matter. You can add some sand.
When loosening the soil during the season, you need to do it very carefully. Be sure to loosen it after watering and rain. A pitchfork is an excellent tool.
Calculation of the amount of sand for sand preparation
As a rule, during any construction work, it is important to at least approximately know the amount of materials in order to understand the approximate amount of upcoming expenses.
In our specific case, we need to find out how much sand needs to be brought in for leveling work.
To do this, you need to know the area of the site and the thickness of the sand soil for backfilling. We find out the area when we multiply the sides of the plot - we multiply the width by the length, we get the number of square meters of the plot.
For example, it is necessary to level 6 acres of land (600 m2), the backfill height is 0.5 m. We calculate the volume of sand:
- 600 * 0.5 = 300 m3.
After compaction, the sand settles down, the thickness decreases, therefore, according to unwritten construction laws, we add another 10% to the resulting figure, we get 330 m3 of sand.
When ordering sand for delivery, you need to take into account the capabilities of dump trucks, for example, a Kamaz can load 12 m3, a Maz will take 6 m3, and a Zil will take 3 m3 of sand. It is better to buy in dry weather, when the material is dry, otherwise excess moisture increases the weight of the sand.
Sand for filling the site is used in the usual quarry form; this is the most inexpensive option, which is used for rough work.
Chernozem filling
If you rush and bring in chernozem before the final compaction of the clay, erosion will quickly have a detrimental effect and the area will greatly lose its fertility. Unfortunately, only plowing the soil in spring and autumn can save you from this phenomenon, and even then only partially.
It is better to pour the chernozem or fertile layer dry and not roll it, preferably manual distribution and leveling of the soil. The equipment must import chernozem in the reverse order from the order in which the clay was poured. The area from the edges to the central access trench is filled. At the end of the backfill, it is also filled.
This is the most labor-intensive stage of raising the site: in addition to the fact that it is necessary to level the soil not only in one plane, but also with uniform compaction, the top bulk layer may not be uniform. Usually, before unloading chernozem, formwork is installed, the foundation is cast and waterproofed, and then covered with crushed stone. Surface support mounds are also installed before the fertile layer is formed.
Embankment for leveling
If the area has a slope, then using clay you can try to get rid of it. The slope is leveled with clay and sand (it is advisable to alternate a bucket of clay with a bucket of sand). The poured layer requires wetting and compaction. After shrinkage, the raised area can be covered with fertile soil or black soil. In the first years, planting here is done in prepared holes that contain all the substances necessary for plant growth.
Plastering walls
You can plaster with clay any surface both inside and outside the house. Among the advantages:
- the material is fireproof and environmentally friendly;
- easily sticks to any materials, even wood;
- is able to absorb moisture at high humidity and release it at low humidity;
- adsorbs many allergens.
Among the disadvantages, it should be noted that it has less strength and ability to retain heat than gypsum, and a long drying time.
Furnace laying
Clay is an ideal material for a binding solution when laying a stove. To achieve the best results, several rules should be followed:
- Do not use clay from the upper layers. It may be contaminated with organic matter. But it should be taken into account that the fat content of clay decreases with the depth of its location.
- For masonry, clay of a certain fat content should be used. Very oily material cracks when dried, forming large pieces. Skinny people do not have strength and ductility.
- To prepare the solution, clay is mixed with water in a ratio of at least 4:1 and left for two days. Then mix thoroughly and add sand at the rate of 1 part clay - 3 parts sand.
- There are many ways to determine the quality of a solution, but the simplest is as follows. They make a ball out of it and throw it on the ground. If it crumbles, add clay; if it flattens too much, add sand. Normally, the shape remains virtually unchanged.
Delivery of finished soil
The fastest way to improve a site is to bring ready-made fertile soil to the site. There you can get the maximum effect in the first season and ensure sufficient yield.
supplies high-quality fertile soil on favorable terms. All soil fully complies with GOST requirements. Delivery is carried out throughout the Moscow region, as well as Moscow using the company's transport. To order, you just need to contact our representatives at the phone numbers listed on the website.
Grinder for seedlings
A clay mash can be used to achieve several purposes. Firstly, if you dip the roots of seedlings in a mixture of clay, water and earth, then dip them in sawdust and wrap them in burlap, they will not dry out for a week or more. This mixture should be washed off before planting.
Thick mash can be used as a substitute for garden varnish. The wounds are treated with a 3% solution of ferrous sulfate and wrapped in a cotton cloth soaked in clay mash. The bandage should not be removed for six months.
It can also be used for whitewashing trees and for long-term storage of root crops and dahlia bulbs.
Basic physical characteristics
When conducting laboratory studies, the following soil parameters are determined:
- Humidity.
- Porosity.
- Plastic.
- Density.
- Particle density.
- Deformation modulus.
- Shear resistance.
- Particle friction angle.
Knowing the density of particles, it is possible to determine such an indicator as the specific gravity of the soil. It is calculated, first of all, to determine the mineralogical composition of the earth. The fact is that the more organic particles in the soil, the lower its bearing capacity.