An armored belt for aerated concrete should not be built according to the principle “the wider and thicker the better.” The right decision is to strictly follow the design parameters and solutions. If the developer is familiar with design, you can calculate the reinforcing structure yourself. If the project and the necessary knowledge are not available, then it is necessary to be guided by general average practical recommendations.
According to their purpose, there are two types of reinforced belts: for strengthening the roofing system and for constructing floors.
How to make formwork for pouring concrete
If at least one side of the armored belt goes outside the building, the construction of mandatory formwork is required.
It can be made from flat boards, OSB, plywood sheets, laminated chipboards. The formwork is attached directly to the aerated concrete walls using wood screws. If boards are used, then it is necessary to provide vertical jumpers to ensure structural rigidity.
Horizontal jumpers are attached to the top of the formwork, securing it on both sides. The jumpers are screwed with self-tapping screws or nailed every 80–100 cm.
If the insulation layer extends onto the outer wall of the house, and wall finishing has not yet been provided, it can be disguised. To do this, the formwork is not installed flush with the wall, but directly on the wall. After removing the formwork, a depression about 3 cm deep remains, which is quite enough for a layer of finishing material.
Approximate construction time
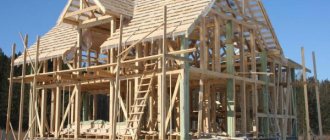
The entire process of building a house from ceramic blocks, without interior decoration, can actually be completed in 1-3 months, with the foundation work ready .
This is especially good for the warm season, during the spring-summer-autumn season, before sub-zero temperatures set in.
Construction time depends on the arrangement of the selected foundation and the need for its shrinkage. This period includes the calculation of time for earthworks (creating a pit or place for a foundation, backfilling of sinuses, formation of drainage).
For example, a monolithic foundation, which is especially recommended for heaving soils, will require a year of shrinkage, while a strip foundation will require up to 6 months. The only exception is the foundation made using LSR ceramic blocks. This group of products does not require shrinkage, so they can be used to build walls as soon as the site for construction has been prepared and marked and the ground work has been completed.
In what cases is an armored belt needed?
For walls
Reinforcing walls with a reinforced belt is not always required. Therefore, there is no need to waste money on its device in the following cases:
- under the base of the foundation lies a strong soil (rocky, coarse clastic or coarse sand, not saturated with water);
- the walls are built of brick;
- a one-story house is being built, which is covered with wooden beams rather than reinforced concrete panels.
If the site contains weak soils (pulverized sand, loam, clay, loess, peat), then the answer to the question of whether a reinforcing belt is needed is obvious. You cannot do without it even when the walls are built from expanded clay concrete or cellular blocks (foam or aerated concrete).
These are fragile materials. They cannot withstand ground movements and point loads from interfloor floor slabs. The armored belt eliminates the risk of wall deformation and evenly distributes the load from the slabs onto the blocks.
For arbolite blocks (the wall thickness is not less than 30 cm, and the strength grade is not lower than B2.5), an armored belt is not needed.
For Mauerlat
The wooden beam on which the rafters rest is called the Mauerlat. It cannot push through the foam block, so someone may think that an armored belt is not needed under it. However, the correct answer to this question depends on the material from which the house is built. Fastening the Mauerlat without an armored belt is allowed for brick walls. They securely hold the anchors with which the Mauerlat is attached to them.
If we are dealing with light blocks, then the armored belt will have to be filled. It is impossible to securely fix anchors in aerated concrete, foam concrete and expanded clay blocks. Therefore, a very strong wind can tear the Mauerlat from the wall along with the roof.
For the foundation
Here the approach to the amplification problem does not change. If the foundation is assembled from FBS blocks, then an armored belt is definitely necessary. Moreover, it must be done at two levels: at the level of the sole (base) of the foundation and at its upper cut. This solution will protect the structure from intense loads arising during the rise and settlement of the soil.
Rubble concrete strip foundations also require reinforcement with a reinforced belt, at least at the level of the sole. Rubble concrete is an economical material, but not resistant to soil movements, so it needs reinforcement. But a monolithic “tape” does not need an armored belt, since its basis is a steel three-dimensional frame.
There is no need for this design for a solid foundation slab, which is poured under buildings on soft soils.
What types of interfloor ceilings require an armored belt?
Under panels that rest on expanded clay concrete blocks, gas or foam concrete, a reinforced belt must be made.
It does not need to be poured under a monolithic reinforced concrete floor, since it evenly transfers the load to the walls and firmly connects them into a single spatial structure.
An armored belt for a wooden floor that rests on light blocks (aerated concrete, expanded clay, foam concrete) is not required. In this case, it will be enough to pour concrete support platforms 4-6 cm thick under the beams to eliminate the risk of pushing through the blocks.
Someone may object to us, pointing out a number of cases when the reinforced belt is poured under the wooden floor of the floor. However, in this case, reinforcement is required not because wooden beams on concrete pads are capable of pushing through the masonry, but to increase the spatial rigidity of the building frame.
warm ceramics: is an armored belt necessary or not?
- Tomsk
Good afternoon to all forum participants.
I propose in this topic to discuss the need for a full-fledged monolithic reinforced concrete belt under the floor slabs.
There is enough information on cellular concrete, less on warm ceramics. I'm going to build from 14.3NF, according to the project the support is 13cm. According to the album, the solution for the porotherm should be enough. But for some reason doubts gnaw at me... Although the absence of an armored belt was one of the advantages when leaving SIBIT... Who thinks about this? Can he increase the support heel from 13cm to 23cm by taking one step along the floor slabs + reinforced mesh into the mortar under the slabs and calm down? Who thinks about this? I will be glad to receive constructive comments. Thank you.
- Tomsk
if the house is not higher than 2 floors - NOT NEEDED.
- Tomsk
I have two floors with an attic...
- Tomsk
This is not decided by voting, but by calculation.
Some empirical rules for preliminary determination of whether an armored belt is needed or not: if you have a shallow foundation, if construction is carried out on a slope or at a close distance from a ravine or river, if the soil at the base is determined to be subsiding, then the installation of an armored belt may be required.
Increasing the depth of support is not only unnecessary, but also unacceptable. Since when hollow core slabs are pinched in the wall, support moments arise for which neither the slab nor the ceramic blocks are designed.
- Spacious
The question was asked, as far as I understand, specifically about blocks and is associated with subjective doubts regarding the fragility of blocks for resting the edge of floor slabs on them without distributing the load with a harder reinforced belt. And the strength of the foundation, soil and frame of the house as a whole is another separate reason for pouring an armored belt. And the calculations for them are separate.
The guide has already said that you need to pay attention to the strength grade of the blocks of a particular batch. Warmer and porous ones are more fragile and vice versa. And apparently the number of floors was discussed because of the weight of the house and the total load on the block (not only from the slabs)!
- Tomsk, Beautiful pond
As far as I remember, some manufacturers recommend laying real bricks under the slabs, 3 rows in the place where the slabs rest. Those. builds a wall from 14.3NF, and in front of the slabs one row is changed to 10NF + brick
- Iglakovo
This is not decided by voting, but by calculation.
Should we write this as a motto at the beginning of each topic? Otherwise, the principle of collecting votes for technical decisions has already become dominant.
- Tomsk
and in front of the slabs one row is changed to 10NF + brick
maybe just lay out 3 rows of bricks, a 13 cm grip on the slab will be enough
- Tomsk
Yes, absolutely right, it is this aspect of the issue that worries me. An interesting statement about the inadmissibility of increasing the support area of the slabs - why in the album of technical solutions they write no less than 120mm and no more is specified...?
- Spacious
I didn’t understand either! Perhaps this means a reverse fracture of the edge of the slab due to a poor fit?
- Tomsk
The floor slab bends under the influence of its own weight and payload - elastic deflection - under the influence of shrinkage and creep of concrete - plastic deflection. The resulting deformation causes stress in the embedment areas, which depends on many factors, including the embedment depth. Therefore, the depth of embedding cannot be increased according to the principle - you can’t spoil the porridge with oil
- Tomsk
I ask for your advice, I will describe the situation: in May 2014, a strip foundation was poured, width 40 cm, depth 170 cm -120 cm (the area is not level), the top and bottom rows were reinforced with 16 reinforcement bars, vertical and horizontal 12, tape dimensions 8.7x8.3, there is 4 jumpers. The soil is loam. After 35 days, the laying of tenth blocks of warm ceramics began. Reinforcement of the masonry every 3 rows with reinforcement 8 is laid in the grooves in two rows. Upon completion of the masonry of the first floor, a 20x25 cm reinforced belt is poured, then again masonry with similar reinforcement of the blocks.
After the walls of the second floor were erected, the builders did not fill in the reinforced belt, but laid the mauerlat (20x20 cm timber) on blocks, releasing the studs from them in advance; the studs were placed on a chemical anchor every 1-1.5 m. The gables are also made from a block (I don’t know about the reinforcement, since I was no longer present when they were laid). Next, the rafter system was assembled, rafters 50x150 with a pitch of 60 cm, a ridge girder 100x150 in connection was laid on a support beam 200x200, the beam rested on floor beams 100x150 (connected to each other). Metal tiles have been laid.
I have a question that haunts me, namely, is it possible for the walls to be destroyed if the armored belt under the roof has not been filled? Thanks in advance for your answer.
- Rainbow
I ask for your advice, I will describe the situation: in May 2014, a strip foundation was poured, width 40 cm, depth 170 cm -120 cm (the area is not level), the top and bottom rows were reinforced with 16 reinforcement bars, vertical and horizontal 12, tape dimensions 8.7x8.3, there is 4 jumpers. The soil is loam. After 35 days, the laying of tenth blocks of warm ceramics began. Reinforcement of the masonry every 3 rows with reinforcement 8 is laid in the grooves in two rows. Upon completion of the masonry of the first floor, a 20x25 cm reinforced belt is poured, then again masonry with similar reinforcement of the blocks.
After the walls of the second floor were erected, the builders did not fill in the reinforced belt, but laid the mauerlat (20x20 cm timber) on blocks, releasing the studs from them in advance; the studs were placed on a chemical anchor every 1-1.5 m. The gables are also made from a block (I don’t know about the reinforcement, since I was no longer present when they were laid). Next, the rafter system was assembled, rafters 50x150 with a pitch of 60 cm, a ridge girder 100x150 in connection was laid on a support beam 200x200, the beam rested on floor beams 100x150 (connected to each other). Metal tiles have been laid.
I have a question that haunts me, namely, is it possible for the walls to be destroyed if the armored belt under the roof has not been filled? Thanks in advance for your answer.
if the rafters are normal, non-expanding, then nothing will happen to your walls. And in general, if the foundation is good and calculated for the ground, if the structural components are correctly executed and if there are no other “savings”, then armored belts are not needed. But we build for ourselves and play it safe
- Moscow
With such reinforcement, nothing will happen to the walls.
The scheme is non-expandable according to the description.. True, usually the anchors are run under the masonry (it is cheaper).. In general, if you have any doubts, then only in fastening the mauerlat.
- Iglakovo
If the interfloor ceiling is wooden and the house is two-story and made of 14.3NF, is it worth making an armored belt? What do you think?
- Moscow
If the interfloor ceiling is wooden and the house is two-story and made of 14.3NF, is it worth making an armored belt? What do you think?
I think it depends on the foundation.. if there are no questions about it or about the places where the beams are supported, it’s possible without a belt..
Ceramics, as it were, does not oblige you to gird yourself, but quite the contrary.
- Iglakovo
If the interfloor ceiling is wooden and the house is two-story and made of 14.3NF, is it worth making an armored belt? What do you think?
I think it depends on the foundation.. if there are no questions about it or about the places where the beams are supported, it’s possible without a belt..
Ceramics, as it were, does not oblige you to gird yourself, but quite the contrary.
The foundation is a tape 500 width 1000 height, there seem to be no questions about it, but what could be in the places of support? There's a block...
- Tomsk
The armored belt evenly distributes the load. so that you can sleep peacefully and not be afraid of this
….ugh, ugh, God forbid….
- Barnaul
An armored belt will not save you from mistakes in the foundation. Maybe it will only prolong the agony.
But the rigidity of the walls will increase. I think so
- Tomsk
Such trashes are formed not only because of mistakes with the foundation.
Scheme of an armored belt under the Mauerlat
It is also worth noting that it is better to install the reinforcement cage at the place where it is poured, since when assembled it will weigh a lot.
The formwork must be strong enough to withstand the pressure of concrete
Pay special attention to leveling the formwork on all planes
For the armored belt, it is recommended to use thick concrete grade M300, followed by compaction with a vibrator. Filling must be done continuously, at one time.
If you don’t have a professional tool for vibrating concrete, you can use the following method: take a hammer drill and hit the reinforcement in hammer mode, the concrete is compacted and air bubbles come out.
We highly recommend watching the video from self-builder Konstantin, who is working on the armored belt in this series, enjoy watching.
Manufacturing of reinforcing mesh/frame
In order for the reinforced belt to be of high quality, and therefore the house to be reliable, you need to know how to properly make the reinforced mesh/frame. The connection of the reinforcement bars to each other is carried out using a knitting wire, and not a welding seam. This is due to the fact that during welding, the area near the seam being made overheats, which leads to a weakening of the strength of the reinforcement. But you can’t do without welding seams when making mesh. The middle and ends of the frame are welded, while the remaining connecting nodes are tied together.
The frame is laid in an armored belt.
The rods are fastened to fix the reinforcement in the required position when pouring concrete. For these purposes, thin wire is used; the strength of the mesh/frame does not depend on it.
For the manufacture of armored belts, only ribbed rods are used. Concrete clings to the ribs, which helps to increase the load-bearing capacity of the structure. Such a belt can work in tension.
To make a frame, take 2 wires 12 mm thick and 6 m long, while for transverse reinforcement you will need rods 10 mm thick. The transverse reinforcement should be welded in the center and edges. The rest of the rods are simply knitted. After making two meshes, hang them so that a gap is formed. Weld them from the edges and in the center. This way you will have a frame. There is no need to weld the frames to make the belt. They are laid with an overlap of 0.2–0.3 m.
Belt composition
As the name implies, the base is a monolithic beam made of concrete. The cement mixture itself acts as the basis of the belt, forming a reliable support. If we are talking about construction on a home construction site, then you should also prepare means for creating formwork. A niche is formed from the timber for subsequent pouring of concrete. The formwork can be made from boards 2.5 cm thick. The better the quality of the wood, the more perfect the geometry of the structure will be - accordingly, the monolithic belt will fit more neatly into the frame of the house
Special attention is paid to the reinforcement of the structure. Reinforcement with metal rods is the key to the strength of the beam itself, so you should also prepare for the introduction of reinforcing bars using, possibly, a welding machine or a specialized tool for knitting iron rods
Tools and materials
Before starting work, you should prepare the following tools/materials:
- Fittings.
- Cement.
- Sand.
- Crushed stone.
- Wire for tying reinforcement.
- Boards.
- Self-tapping screws.
- Brick.
- Shovel.
- Concrete mixer.
- Crowbar/crowbar.
- Welding machine.
To ensure that all the work you perform is done with high quality, we suggest that you familiarize yourself with the techniques for manufacturing reinforced mesh/framework and formwork.
Interfloor reinforced belt
This type of construction is made for slab or beam floors. The main purposes of floors include the perception and transfer of the load of its own weight, the interior, people onto the walls, the division of the internal space of buildings into floors, and the overlap of spans. This is a load-bearing structure supported by external and internal walls along the entire perimeter.
The basis for pouring the armored belt is the supporting surface of the load-bearing walls, which absorbs the entire mass of the building. General requirements:
- installation is carried out along the entire perimeter of the future building, taking into account the internal walls;
- for external load-bearing walls, blocks with a density of at least D-500 are used;
- height, made according to the height of aerated concrete, or less is allowed (200-400 mm);
- belt width – 500 mm (possibly reduced by 100-150 mm);
- It is recommended to make the armored belt square (in cross-section), this shape is more resistant and holds mechanical loads well;
- the reinforcement frame is placed on supports (brick, pieces of blocks, plastic fasteners) 3 cm high so that it does not touch the walls, thus creating a so-called protective concrete layer;
- For pouring, concrete of at least grade B-15 is used.
Formwork for pouring concrete mortar with reinforcing mesh Source parki48.ru
Reinforced belt for aerated concrete under floor beams, poured into pre-prepared formwork. This frame is made from:
- Plastic.
- Aluminum.
- Gland.
- Plywood.
- Tree.
- Aerated concrete blocks.
Wood formwork
This type of formwork is used most often. This is the cheapest and most popular option. When installing a double-sided removable wooden frame (wood panels), it is secured with self-tapping screws on both sides of the wall (to aerated concrete blocks). The upper part is tightened with wooden jumpers (step 800-1000mm). This is necessary so that when pouring concrete the structure does not move apart.
Wood formwork is the most common option due to its availability Source two-room.ru
The reinforcement frame (reinforcement diameter 8-14 mm), made in the form of a “ladder” (connected by jumpers in increments of 5-7 cm), is placed in the prepared space. The rods are knitted together using knitting wire (every half a meter), forming a square shape. It is not recommended to use welding, due to rusting of the welds in the concrete. For beam floors (with not a high load), a frame of two rods, with a monolith height of 30 cm, is sufficient. For covering with slabs, an armored belt with increased reliability is used (4 rods and a monolith - 40 cm).
After removing the formwork, the outer wall is insulated along with an armored belt. If, during finishing, the outer walls are only plastered, then to remove the “cold bridge”, the formwork is moved deeper into the wall. And then insulation is installed in the resulting niche.
You can use one-sided removable formwork. In this case, the external function is performed by aerated concrete blocks (10 cm thick). They are laid on the bottom row using glue. A wooden frame is attached to the inside. After that, insulation (5 cm) and fittings are laid. The top is also tightened with jumpers.
Where are armored belts made?
Strengthening the house with continuous strips of reinforced concrete or brick is carried out on all sections of the walls: from the bottom (grillage, basement reinforced belt under the floor slabs of the first floor) to the top (belt between floors and under the mauerlat). In houses made of lightweight building blocks, rows under window openings and lintels above them are also always reinforced.
- jumpers, as an element of an armored belt
According to the rules for the construction of houses made of aerated concrete and similar materials, areas above window and door openings are always reinforced with monolithic lintels.
This requirement applies to both load-bearing walls and partitions. In this case, the width and height of the lintels coincide with the thickness of the walls and the dimensions of the blocks, the length depends on the parameters of the opening. Each edge extends onto the walls by at least 25 cm; for unusually wide openings this value increases to 40 cm.
Jumpers with a length of over 150 cm are reinforced with rods with a cross-section of 10 cm and higher, with 3 to 6 rods placed at the bottom and 2-4 at the top. To fill the lintels, thick concrete with a strength grade of M300 is used; long structures are always insulated from the outside.
An alternative to monolithic reinforced concrete are ready-made factory products or U-shaped aerated concrete blocks reinforced with metal and mortar, mounted on top of rigid supports. At least 4 metal rods are laid inside such blocks; the requirements for the solution remain unchanged.
Regardless of the installation method, the lintel is left unloaded for 7 days; ideally, the structure gains strength within the 28 days prescribed by the standards.
-between floors
An interfloor armored belt is laid along the perimeter of all load-bearing walls in order to strengthen them and redistribute the axial loads of the floor slab support onto the frame of the house. Its recommended height coincides with the width, provided that at least a 4-row volumetric frame made of rods with a cross-section of 12 mm is installed. According to the standards, a structure poured from concrete is left unloaded for a full 28 days; the requirements for insulation and concreting remain standard.
-in front of the Mauerlat
Reinforcement in front of the Mauerlat is carried out with the aim of leveling the horizontal of the upper row of walls, relieving thrust stresses from the rafter system and simplifying the work of securing the beam itself.
At the stage of constructing the belt, in addition to the mandatory horizontal reinforcement (2-6 rods in the bottom row, 2-4 in the top row), vertical metal studs are fixed inside, the outer wall is insulated with 50 cm of expanded polystyrene or laid out from a thin aerated concrete slab.
Unlike interfloor belts, such belts are poured or laid out from blocks only along the perimeter of the external walls, an exception is made only if the house is large, the weight of the attic floors is high, and the roof has a complex configuration.
Types of belts and their functions
Reinforced concrete belts are poured to strengthen structures such as:
- Grillages are poured as a foundation along the tops of the piles.
- Seismic belt along the upper part of the walls of the building, as well as under the interfloor ceilings.
- For uniform unloading of the roof of the building onto its walls.
- Strengthening walls made of soft and fragile materials (aerated concrete blocks, foam blocks and others).
- In this case, the armored belt performs the following functions:
- Increases the strength of the building.
- Does not allow the foundation and walls to deform due to uneven soil settlement, as well as when it is heaving, during high moisture or frost.
- Does not allow fragile aerated concrete blocks to collapse under the weight of floor slabs.
- Allows you to rigidly fix roof rafters to the walls of a building made of soft materials.
Sometimes, when constructing small outbuildings, a reinforced brick belt is used on aerated concrete walls. To do this, 4 or 5 rows of building bricks are laid out on the walls, covering their entire width. Between the rows, in an armored belt made of bricks on walls made of aerated concrete, during the work process, a metal mesh welded from wire 4 - 5 mm thick with cells of 30 - 40 mm is laid on the mortar. Floor beams or a wooden Mauerlat can be placed on top to secure the roof.
Reinforced armored belt on aerated concrete
For the reinforced belt, which is poured over blocks of aerated concrete, concrete mortar grade M 200 is used. Load-bearing reinforcement with a cross-section of 12 mm is fastened in a frame with transverse square or rectangular clamps using knitting wire. Clamps are made from smooth reinforcement with a diameter of no more than 4-6 mm. The supporting reinforcement is overlapped with each other with an overlap of at least 150 mm and tied together with soft knitting wire.
The belt can be made without a three-dimensional frame of 4 reinforcing bars. Sometimes a flat frame of two rods is sufficient, which is assembled in almost the same way as a volumetric one. Only in this case, for transverse ligation, not clamps are used, but separate reinforcing bars.
The connected frame can be laid in wooden formwork, which is made from boards. You can also use aerated concrete blocks of the top row as formwork. But first you need to cut out the inside of them so that the block becomes something like a box without end walls. The blocks are stacked with the resulting shelves up, after which the frame is laid in them.
When laying the frame, you need to make sure that there is a small space of about 20 - 30 mm between the reinforcement and the formwork walls, as well as the lower blocks.
After laying the reinforcement frame into the formwork, you can additionally make and attach to it the necessary embedded parts that will be needed to secure the mauerlat or other elements from the house structure.
Height and width
Before making an armored belt for aerated concrete, you need to carefully calculate everything and determine such main parameters as height and width. The main parameter of the aromatic belt is its height, which should be at least 18 centimeters. A height of 30 centimeters is considered sufficient.
The standard width of the armored belt is equal to the width of the aerated concrete wall - 20-40 centimeters. But experts advise making the width slightly smaller than the wall in order to leave a gap needed when insulating with different materials. Typically, aerated concrete is insulated with extruded polystyrene foam, PSB-25 foam, mineral wool boards or other materials.
Blitz tips
- When pouring the cement composition, you should ensure that the elements of the reinforced mesh do not touch the walls of the formwork.
- To increase the functionality of the armored belt, a frame made of reinforcement is installed on the surface using a level.
- The strength of concrete after it is poured is facilitated by periodic moistening, especially in hot weather. It is recommended to moisten the structure every day for five days. The best effect is achieved by covering the moistened surface with plastic film.
- The formwork can be removed after a week, but it will function as intended only after two weeks, when the cement mixture has completely hardened.
- If you plan to insulate the unloading belt, then you should not make it flush with the wall. Experts recommend shifting the formwork inward with the further purpose of filling the resulting niche with insulating, heat-insulating material.
- There is no need to spend money on a reinforced belt if there is strong soil not saturated with water under the foundation, brick walls, and also when building a one-story house with wooden beams rather than reinforced concrete panels.
Functions of a brick armored belt
The main task of the armored belt is to perceive and distribute multidirectional loads and forces of varying magnitude.
In small commercial and residential buildings, a brick belt will successfully replace similar concrete monolithic structures. The brick belt provides sufficient stability of the walls under strong wind loads, subsidence of the soil and uneven heaving. Unlike a concrete structure, the quality of a brick belt is not affected by the timing of its installation: a monolithic belt should be poured simultaneously around the entire perimeter, and bricks can be laid without haste, at any time.
Aerated concrete is an excellent wall material, but it cannot be tied firmly enough to other building structures. This is a problem not only with gas silicate, but also with other porous, lightweight blocks for building walls. This disadvantage of porous blocks is compensated by the construction of an armored belt - it contains various fastening embedded parts for connections with the structures of floors and roofs.
How to make an armored belt for aerated concrete?
To do this, you need to buy additional blocks 10 cm thick. The blocks are laid on the outside of the house using glue, then a thermal circuit is made from extruded polystyrene or mineral wool. Then, 5 cm thick blocks or formwork in the form of plywood are placed from the inside of the house. The result is a homemade block, inside of which the reinforcement for the armored belt is placed, from 8 to 12 in diameter.
It is laid in the form of a rectangle, while frames are knitted - two rods at the top and bottom. In any market you can purchase special fastening sprockets that are used in the work. This is done so that the reinforcement does not lie on the block itself, but is in the air - a so-called protective layer of concrete is created, with a gap of 3 cm at the top and bottom.
After this, concrete is poured, carefully leveled, and a ready-made reinforced belt for the floor slabs is obtained. A more detailed description can be seen in the video; the photo also shows drawings, diagrams and step-by-step instructions for manufacturing the structure.
If you look closely, you can see studs around the entire perimeter, to which the ceilings will subsequently be attached so that the roof is kept as level as possible and does not move to the sides. The length of the studs depends on the thickness of the overlap. As a rule, meter-long elements are taken and cut in half.
How to properly fill an armored belt with your own hands? This question worries many, especially novice craftsmen. Probably, many are familiar with the picture when concrete is poured from a hose - a special concrete pump that supplies the material to the desired location. But in most cases, the installation of an armored belt does not allow this task to be completed, since concrete under pressure will fall from a great height, and the formwork can simply fly apart. Therefore, it is often necessary to use manual labor, no matter how hard it is.
When pouring an armored belt in a house made of aerated concrete, the subsequent load should be calculated. If it is not supposed to be too large, you can save money. The volume of the structure can be made smaller, but not by narrowing it, but by reducing the thickness
Experienced craftsmen know how to correctly calculate the dimensions of an armored belt and reduce the cost of its production, without losing the quality of the entire structure, which is very important
Regarding pouring, there is one more important tip. This process should be performed one-time, and not in several passes. If this is not possible, then it is recommended to first install special wooden jumpers. When the time comes to pour a new part, the ceiling is removed, the joints are thoroughly moistened, and only then can a new portion of concrete be poured.
At the end of laying, it is necessary to compact the concrete mixture to eliminate voids. To do this, take a piece of reinforcement and pierce the concrete with it. If the work is carried out in the summer, at high temperatures, then it is recommended to cover the armored belt under the Mauerlat with polyethylene so that the moisture does not evaporate and cracks do not form on the surface.
If all processes are completed correctly, then literally in 3 days the structure will be ready, and you can begin further installation and construction work.
Frame: brief instructions
There are several rules when constructing a reinforcement frame. It is advisable to adhere to them so that the armored belt for aerated concrete turns out to be monolithic and sufficiently rigid.
Basic rules for arranging the frame of an armored belt for aerated concrete:
- Continuity of design
- Arrangement on all load-bearing walls
- Making an armored belt frame from two rows of reinforcement with a minimum thickness of 2 rods
- The overlap of the longitudinal reinforcement must be at least 8 centimeters
- The minimum diameter of longitudinal reinforcement is 10 millimeters, transverse – 6-8 millimeters
- The rods for the armored belt should be as long as possible (6-8 meters), trimmings can only be used when reinforcing corners.
- The pitch of transverse reinforcement should be 20-40 centimeters
- The reinforcement must be protected on all sides by a layer of at least 50 millimeters of concrete
- To bind transverse and longitudinal reinforcement, use a special knitting wire
- At the corners, the longitudinal reinforcement is bent, overlaps are made as far as possible from the corners
- The frame of the armored belt is arranged strictly horizontally, checking with a building level
- The distance between the rods is calculated in accordance with the height and thickness of the reinforced belt and the protective layer of concrete, which should be at least 5 centimeters on all sides
How to make an armored belt correctly?
The technology for constructing a reinforced stiffening belt is no different from the method of pouring a monolithic foundation.
In general, it consists of three operations:
- Manufacturing of reinforcement frame;
- Installation of formwork;
- Pouring concrete.
Certain subtleties and nuances in the work appear depending on the area where the armored belt is located.
Reinforced belt under the foundation
Answering the question of how to make a reinforced belt under the foundation (level 1), let’s say that its width should be 30-40 cm greater than the width of the supporting part of the main concrete “ribbon”. This will significantly reduce the pressure of the building on the ground. Depending on the number of storeys of the house, the thickness of such a stiffening belt can be from 40 to 50 cm.
The reinforced belt of the first level is made for all load-bearing walls of the building, and not just for the external ones. The frame for it is made by knitting reinforcement clamps. Welding is used only for preliminary connection (tack welding) of the main reinforcement into a common spatial structure.
It is recommended to fill such a belt with concrete in one step to eliminate joints that reduce strength. The diameter of the main reinforcement can be from 16 to 20 mm. The diameter of the transverse clamps is 8-10 mm, and their pitch is no more than 20 cm.
Armoyas of the second level (on the foundation)
This structure is essentially a continuation of the strip foundation (rubber concrete, block). To reinforce it, it is enough to use 4 rods with a diameter of 14-18 mm, tying them with clamps with a diameter of 6-8 mm.
If the main foundation is rubble concrete, then there are no problems with installing the formwork under the armored belt. To do this, you need to leave free space in it (20-30 cm) for installing the reinforcement cage, taking into account the protective layer of concrete (3-4 cm).
The situation with FBS blocks is more complicated, since formwork is not installed for them. In this case, wooden spacers should be used, which support the formwork panels from below. Before installation, cut boards are stuffed onto the boards, which protrude 20-30 cm beyond the dimensions of the formwork and prevent the structure from moving to the right or left. To connect the formwork panels, short crossbars are nailed to the top of the boards.
Option for attaching armored belt formwork to foundation blocks
The fastening system can be simplified by using threaded rods. They are placed in pairs in the formwork panels at a distance of 50-60 cm. By tightening the studs with nuts, we get a sufficiently strong and stable structure for pouring concrete without wooden supports and crossbars.
This system is also suitable for formwork, which requires an armored belt for floor slabs.
The studs that will be filled with concrete need to be wrapped in glassine or a little machine oil applied to them. This will make it easier to remove them from the concrete after it has hardened.
Reinforced belt for floor slabs
Ideally, its width should be equal to the width of the wall. This can be done in the case when the facade is completely lined with slab insulation. If it is decided to use only plaster mortar for decoration, then the width of the armored belt will have to be reduced by 4-5 centimeters in order to leave room for foam plastic or mineral wool. Otherwise, a through cold bridge of very substantial dimensions will appear in the area where the stiffening belt is laid.
When making an armored belt on aerated concrete, you can use another solution. It consists of installing two thin blocks along the edges of the masonry. A steel frame is placed in the space between them and concrete is poured. The blocks act as formwork and insulate the belt.
If the thickness of the aerated concrete wall is 40 cm, then partition blocks 10 cm thick can be used for this purpose.
If the wall thickness is smaller, you can cut out a cavity for an armored belt in a standard masonry block with your own hands or buy a ready-made aerated concrete U-block.
Reinforced belt under the Mauerlat
The main feature in which the armored belt under the Mauerlat differs from other types of reinforcement is the presence of anchor pins in it. With their help, the beam is firmly fixed to the wall without the risk of tearing off or shifting under the influence of wind loads.
The width and height of the reinforcement frame must be such that after embedding the structure between the metal and the outer surface of the belt, at least 3-4 cm of a protective layer of concrete remains on all sides.
Video on the topic:
For floors
The reinforced belt for the installation of interfloor floor slabs is made in a similar way to the roofing belt, but has some features.
A rigidity line between floors is arranged for reliable installation of overlapping structures. These can be reinforced concrete or lightweight slabs, wooden or other panels and flooring - a belt is necessary in any case.
Calculation of the reinforcement belt between floors is carried out depending on the type and weight of the floor. For heavy slabs, load calculation is required.
One of the main parameters of the belt design is the area of support of the floor slabs on the concrete strip of the belt - the larger it is, the more reliable.
The minimum width of a monolithic belt for floors is 20 cm, height is 15 cm.
Tips for creating an armored belt
To create a strong and rigid armored belt that is suitable for installing a Mauerlat, you need to follow the following tips:
- If it is impossible to pour concrete in one stage, different areas are additionally reinforced with reinforcement. This happens with the help of releases of steel rods.
- To prevent the appearance of voids inside the beam, the poured mortar is additionally compacted.
- In hot weather, a freshly poured armored belt must be constantly watered with water. To prevent excessive evaporation of moisture, the surface of the concrete can be covered with plastic film.
Dismantling technology
When making design changes, expanding or improving the space through dismantling work used to arrange the location of partition walls, you must adhere to the following technology :
- Determine the purpose of the wall (load-bearing structural walls cannot be removed, especially when the floor slabs have already been laid and the roofing work has been completed).
- You need to start the process with prepared tools (crowbar, pickaxe, hammer drill, sledgehammer, hammer, chisel, steel wedges) and support (sliding ladder, table), not forgetting about protecting your eyes and upper respiratory tract from dust (goggles, respirator). In some cases, attachments may be needed.
- Using a tape measure and a marker, mark the surface of the wall that will need to be removed.
- Work must begin with the blocks of the first row. Use a hammer drill, crowbar, pickaxe and sledgehammer. You can use a drill around the perimeter of the marking, and then you can use a grinder with a diamond wheel for cutting (or a saw with a special attachment).
- After this, they move along the remaining rows, putting the fight away in pre-prepared bags for construction waste.
If the building was connected to communications, you need to take this into account when dismantling. Builders need to be especially careful when electrical wiring has already been installed and connected. In this case, it is necessary to have thick rubber gloves to protect yourself from possible impacts if it is impossible to turn off the power supply (for example, the need to work with power tools).
Carrying out dismantling in an already registered apartment should not have legal consequences. Permission to work is issued in the architecture department of the local government. If the house has not yet been accepted for use, then permission from the local government is not required.
Video description
The advisability of using an armored belt or its absence is described in the following video:
It is recommended to fasten the Mauerlat to aerated concrete without an armored belt using anchors 500 mm long. The installation technology is as follows:
- A waterproofing layer is laid between the wall and the wooden beam. It will prevent the penetration of moisture, which leads to the development of mold. To create waterproofing, you can use roofing felt.
- The wooden beam is laid in its design position. Markings are made to indicate the installation locations of the rafters.
- Taking into account the position of the rafter legs, holes are made for installing anchors.
- The fastening element is driven until the washers under the nut stop.
- The anchors are tightened tightly, ensuring the rigidity of the created structure.
Errors during construction
Technology violations include:
• Using heterogeneous concrete mixtures or pouring the belt with long technological breaks.
• Savings on reinforcement, namely the use of rods with a cross-section of less than 8 mm2, no overlap at joints and
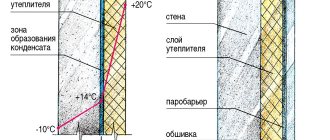
• The absence of an insulating or insulating layer, shifted to the outer edge, which in turn leads to the formation of “cold bridges” and the accumulation of condensate in blocks adjacent to the reinforced belt. With external insulation of the facade, this problem manifests itself less, but it cannot be ignored. In practice, this means that when determining the width of the reinforced belt and the need for its insulation, you need to know in advance how the facade will be finished.
• Refusal to reinforce other sections of the house made of blocks (in particular, lintels and rows) and install the Mauerlat. The opinion that an armored belt strengthens all the walls of a house is wrong; its main function is to redistribute loads, and not to increase the strength of the original materials of load-bearing structures. For the same reason, when installing any wooden rafter systems, a solid mauerlat made of timber is always placed on top of the armored belt. An exception is allowed in rare cases of installing a metal roof, but such heavy systems are not recommended to be laid on walls made of porous blocks.
• Filling the belt in winter or in adverse weather conditions. During a sharp cold snap, the formwork needs to be covered and insulated; concrete hardening at temperatures below +5°C negatively affects the strength and service life of lintels and tapes.
A typical mistake for beginners is also weak fastening of the formwork, which can lead to it bursting under the weight of the concrete. To avoid such situations, the formwork is laid from thick sheet materials (plywood, OSB, plastic) or tightly packed even boards and tightened along the upper edges with boards in increments of 1.2-2 m or in the middle with threaded rods.
The lower edges of the boards can be screwed directly to the aerated concrete with pins 75 mm long.
Use of chemical anchors
To attach a wooden beam to a wall where there is no reinforced belt, you can use chemical anchors. They appeared on the market not so long ago, but have managed to prove themselves well. Chemical anchors are divided into the following types:
- Capsule design. An ampoule containing a special composition is inserted into the hole made under the anchor. After contact with air it begins to harden. A pin is driven into the prepared hole, which breaks the tightness of the ampoule. After 30-45 minutes, the composition in the hole polymerizes, forming a reliable connection.
- With cartridge. The anchor design contains a pipe filled with a polymer composition. A dispensing gun is used to supply the mixture into the hole. The polymer hardening time is about 45 minutes.
Comparison of conventional metal and chemical anchors Source ack-nn.ru
Chemical anchors, despite their high cost, are very reliable. The service life of such connections reaches 50 years. The polymer composition penetrates deep into the pores of aerated concrete, providing a high degree of adhesion.
Requirements for thickness, strength and other parameters of structures
The basic requirements for the construction of walls made of ceramic blocks are indicated in the regulatory provisions of the TTC.
The presented document also talks in detail about masonry technology. The length of one ceramic block, according to the established standards according to the above document, can be 248 mm (250), which allows you to place as many as 4 identical ceramic products in 1 linear meter.
The thickness of the walls for large blocks is the following numbers - 80; 115; 250; 300; 380; 440; 500 (mm).
It is necessary to determine the required thickness of the future structure at the design and drawing stage. A ceramic wall, with any chosen thickness, will be in relation to strength indicators from 128-135 kgf/cm2.
The requirements for the walls are the correct distribution of ceramic blocks, according to types and brands: for example, solid blocks or LSR are used for structural ones; or slot-shaped, with the possibility of reinforcement, but with high density. In order not to make a mistake with the selection of products, it is best to take advice from specialists from specialized companies or a local architectural bureau.
The walls are erected after completion of all types of earthworks and the process of arranging the foundation, backfilling and drainage formation. The blocks are laid using a crane, using roofing felt or a more modern material - waterproofing - for waterproofing. Special consumables and tools are used for masonry.
The work is carried out strictly according to technological rules, using prepared “warm” mortar or cement mixture.
Preparatory work
Before making an extension from aerated concrete and starting construction, you must obtain official permission from the relevant authorities. To do this, a new part of the building is first designed, preferably with the participation of specialists, to avoid significant mistakes during independent construction, leading to destruction during operation.
An additional room, bedroom, veranda, kitchen, loggia, etc. can serve as an extension. When constructing any type of extension, the required elements are the foundation and walls. The roof can be made in the form of:
- adjoining the slope of the roof of the house;
- adjoining the gables;
- devices of the general rafter system;
- independent design option.
Attention: construction from aerated concrete blocks is quick and does not require significant construction knowledge and skills. Taking into account the differences in loads, it is recommended to make the foundation of a new room separately to prevent the formation of cracks during possible seasonal heaving of the soil
It is more rational to make the walls of the extension from modern analogues of concrete. We are talking about aerated concrete and blocks made of this porous thermal insulation material. Aerated concrete is indeed a very effective material, having a high degree of thermal insulation, due to the presence of a lower density and a large number of internal pores
Taking into account the differences in loads, it is recommended to make the foundation of a new room separately to prevent the formation of cracks during possible seasonal heaving of the soil. It is more rational to make the walls of the extension from modern analogues of concrete. We are talking about aerated concrete and blocks made of this porous thermal insulation material. Aerated concrete is indeed a very effective material, having a high degree of thermal insulation, due to the presence of a lower density and a large number of internal pores.
Waterproofing and insulation
The thermal conductivity of brick is much higher than that of aerated concrete. Therefore, it is recommended to insulate the brick belt. This can be done in various ways, much depends on further options for finishing the internal and external walls of the building. One of the most common insulation options is that the armored belt is hidden behind a thin aerated concrete partition located on the interior side.
After the mortar has set, the top of the masonry is covered with a waterproofing layer of roofing felt or its analogues. This will prevent the formation of condensation on wooden structures supported by an armored belt.
Reinforcement of partitions and walls
To prevent the formation of cracks, it is necessary not to deviate from the recommended wall installation technology, including:
- it is imperative to equip a reinforced strip foundation in accordance with building codes and a depth below the soil freezing level;
- strictly maintain the horizontality of the rows of walls made of aerated concrete blocks,
- reinforce (strengthen) the masonry every two to three rows in height;
- install monolithic reinforced concrete lintels over openings,
- competently perform a monolithic reinforced concrete belt along all load-bearing walls under floor and roof slabs.
According to the technological map for the construction and reinforcement of aerated block walls from products of the Ø 500 - Ø 600 brand, it is recommended to perform reinforcement every three rows in height (for h 250 blocks).
Recommended reinforcement scheme
Reinforcement with rods
The technology for reinforcing wall structures made of aerated concrete differs from that set out in SNiP 3.03.01-87 and is due to the fact that the thickness of the adhesive joint for aerated concrete should be no more than 3 mm. While for masonry made of stones of regular shape, the thickness of the horizontal seam is no more than 12 mm (for masonry reinforcement - no more than 16).
Rounding of Ø 8 reinforcement in corners
To lay rods in walls with a thickness of more than 200 mm, at a distance of 60 from the edges of the block, two 25x25 grooves are made using a chase cutter. The difference from the reinforcement of structures made from other piece materials is that it is allowed not to use transverse rods: at the corners, the grooves are cut with a rounding, the Ø8 reinforcement in the roundings is bent in place.
Overlap of reinforcement at mating nodes.
Before laying the reinforcement, the furrows are cleaned of dust, moistened, and filled with glue, which must cover the reinforcement completely - this is a prerequisite for preventing metal corrosion. Before laying the next row, all unevenness of the previous one must be cleaned and sanded.
A simplified version of reinforcement of interface nodes
Before laying the reinforcement, the furrows are cleaned of dust, moistened, and filled with glue, which must cover the reinforcement completely - this is a prerequisite for preventing metal corrosion. Before laying the next row, all unevenness of the previous one must be cleaned and sanded.
Filling furrows with glue
In technical solutions, it is recommended to reinforce the masonry under window openings with class AIII reinforcement Ø 6-8 mm, extending it 50 cm beyond the window opening. Reinforcement is carried out using the above method: the rods are placed in grooves filled with glue.
Making reinforcement joints in accordance with SNiP 3.03.01-87
Video: Reinforcement of aerated concrete walls:
Mesh reinforcement
There is an opinion that reinforcement can be done with reinforcing mesh. A prerequisite for selecting a mesh is to limit the thickness of the adhesive seam, the need to protect the metal from corrosion and ensure good thermal insulation along the transverse reinforcement (no “cold bridges”).
It is proposed to use a mesh made of reinforcing wire with cells of 5x5 cm or fiberglass reinforcement mesh. It is recommended to lay it at a distance of 5 cm from the outer edge of the outer wall.
It should be taken into account that the diameter of the reinforcement mesh rods is 3 mm and above will entail an increase in the thickness of the horizontal seams: the mesh is laid on a layer of glue, another layer is applied on top, then the blocks are mounted.
Reinforcement of walls with reinforcing mesh. Technical solutions for reinforcement are not provided in the albums.
Brick belt on aerated concrete walls
It is a regular brickwork, additionally reinforced with reinforcing mesh between the rows.
The construction of such a belt is extremely undesirable, since brickwork, even with reinforcement, is less durable than a monolithic concrete structure.
Two or three rows of bricks will not ensure uniform distribution of loads on the wall structure , which can lead to cracks in it, or even complete destruction. Therefore, such a risk is not justified.
Nevertheless, this option is most often used by unscrupulous builders due to the ease of execution and savings for the developer.
The installation of a reinforced belt for wall structures made of gas silicate blocks is a mandatory measure. It will ensure high-quality operation of the building and extend its service life for many years.
The need for a seismic belt in an aerated block house
The reinforced belt is made, as a rule, on weak walls made of aerated blocks, in the form of a closed structure. It is a monolith, brick or U-blocks.
This protective structure is created for the purpose of :
- Uniform distribution of the weight of the roof and transfer of the total load through the walls to the foundation, thereby protecting the walls from overload and cracking.
- Strong connection of the roof with external load-bearing walls.
- Seismic protection of the house.
- Compensation of deformations in aerated concrete walls with non-uniform overload or elastic modulus.
- Reliable fastening of the Mauerlat to the load-bearing aerated concrete wall with anchor connections.
- Carries the function of a thrust when using a complex of hanging rafters.
In the photo there is an armored belt for aerated concrete under the Mauerlat:
Aerated blocks have a lot of advantages as a wall material. This is primarily heat resistance and lightness due to the porosity of the internal structure. However, with an increase in the porosity coefficient, the mechanical strength characteristics of aerated concrete decrease, which is not able to withstand significant local static and dynamic overloads from a heavy roof.
A reinforced belt is quite often called a seismic belt, which corresponds to this term, since the structure is capable of accepting uneven loads, distributing them evenly , thus protecting the wall system from destruction.
This is explained by the fact that concrete or reinforced brick has much greater resistance to external compressive loads than gas silicate, and the reinforcement integrated into the structure prevents tensile failure. Due to the joint functioning of these 2 building materials, such a protective belt can even withstand much more powerful stresses than the standard ones.
The monolithic structure of the reinforced belt forms a sufficient stiffening rib in the gas silicate wall system, thereby preventing its destruction.
Read more about the need for armored belts on walls made of aerated concrete blocks here.
Consequences of absence
For modern concrete blocks, such as aerated concrete, the installation of a reinforcing belt is mandatory. Despite the fact that brick walls have higher strength compared to aerated concrete and, in principle, the Mauerlat can be attached to them with classical anchors, nevertheless, in areas with seismic activity, the installation of such a seismic belt under the Mauerlat is required even for brick buildings.
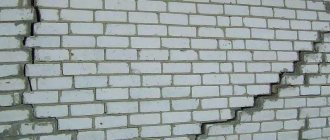
If the developer does not install an armored belt on aerated concrete wall structures, the house will be subject to the following negative phenomena :
vertical loads will not be evenly distributed and buildings will lose rigidity;- a process of movement of the floors will occur, since this is caused by the characteristics of aerated concrete, which expands when moisture and steam enter it;
- the edges of the upper blocks will collapse under the influence of ceilings;
- destructive point loads from roof beams will occur;
- making holes in gas blocks under the Mauerlat will lead to the appearance of wall breaks; hanging rafters create multidirectional loads, which can cause the blocks to spread.
DIY construction instructions
The technology for constructing an armored belt consists of 6 important stages: installation of formwork, production of reinforced frame, installation of reinforced frame, insulation, concreting process and dismantling of formwork.
Technology for reinforcing the protective belt under the Mauerlat:
- carry out thorough cleaning of wall structures from all types of contaminants in the area where the belt is installed;
- lay steel outlets under the installation of formwork;
- assembly of wooden formwork elements;
- installation of a reinforced frame, with clamps, to ensure the creation of a protective concrete layer;
- installation of insulation so that after filling it is located on the outside of the armored belt;
- set notches and an indicator of the level of concrete poured into the structure;
- preparation of working areas and platforms for receiving concrete mortar;
- installation of scaffolding and ladders in order to have access to each section of the structure after laying concrete, for monitoring and wetting the concrete of the monolithic belt;
- pour the concrete mixture manually, carrying the solution in buckets or mechanically, using a concrete pump and supply hoses.
The formwork is made removable or permanently insulated . The first structure is made locally from wooden products - boards or unnecessary furniture panels. They are secured to the wall and then on top with wooden blocks. When dismantling the formwork, the upper bars are removed, and the lower ones remain in the concrete structure.
In addition, to prevent the formwork from moving apart under the weight of concrete, side stops and threaded rods are used, inserted into prepared holes in the formwork. In order to insert a pin to tighten the structure, first select the diameter of the tube, and then insert a pin into it, install washers and tighten firmly. After dismantling the formwork, only the tubes will remain in the structure.
The upper edge of the formwork structure must be set strictly horizontally using a building level. In the process of forming the strength of the monolithic belt until the concrete belt is completely matured over several weeks, daily moistening should be carried out.
The reinforced structure in the seismic belt works in bending, forming significant intrinsic rigidity. The reinforcement is continuous along all load-bearing walls. In the case where there are very long openings in house construction, these places in the protective belt are reinforced below with additional reinforcement. The structure is knitted with standard knitting wire , so that the rods are inside the frame.
At the corners, the reinforcement must be bent and reinforced with additional clamps. It is convenient to bend the fittings using long pipes.
Concrete is poured directly after transporting the prepared mortar to the construction site using a mixer machine. It can also be done directly on the construction site. It should be poured into the formwork no later than 6 hours after preparation.
The poured mass is subjected to vibration with a special device, or manually, piercing the thickness with a piece of reinforcement. This is done to remove air bubbles from the thickness of the solution. Concrete is poured into the formwork at a time so that it has a monolithic structure. In the poured reinforced belt, the embedded parts of the Mauerlat fasteners are laid.
The wooden formwork is removed no earlier than after 24 hours , and preferably after 3-5 days; the structure gains strength in no less than 4 weeks.
Grillage
Initially, you should determine the depth of the foundation. This parameter depends on the type of soil, the depth of its freezing, as well as the depth of groundwater. Then you should dig a trench around the perimeter of the future house. This can be done manually, which is long and tedious, or with the help of an excavator, which is quick and efficient, but entails additional costs.
After special equipment is used, the bottom and walls of the trench should be leveled to solid ground. The surface should be as hard and smooth as possible.
Now you need to form a sand cushion, the height of which should be 50–100 mm. If it is necessary to backfill sand more than 100 mm, it must be mixed with crushed stone. This activity may be necessary to level the bottom of the trench. Another way to level the bottom is to pour concrete.
Making a frame for a grillage
After filling the sand cushion, it must be compacted. To complete the task faster, pour water on the sand.
Then the reinforcement should be laid. During the construction process, under normal conditions, you need to use reinforcement of 4–5 cores, the diameter of each rod should be 10–12 mm. It is important that when pouring the grillage for the foundation, the reinforcement does not touch the base. It must be recessed in concrete. Thus, the metal will be protected from corrosion. To achieve this, the reinforcing mesh should be raised above the sand cushion, placing brick halves under it.
Grillage for a strip foundation
If you are building a house on heaving soil or where the groundwater level is high, then the grillage should be made more durable. To do this, instead of reinforcing mesh, you should use a reinforcement cage. He imagines 2 meshes consisting of 4 wires with a diameter of 12 mm. They should be laid below and above the armored belt. Granular slag is used as a base instead of a sand cushion. Its advantage over sand is that over time, granulated slag turns into concrete.
To make the mesh, a knitting wire is used rather than a welding seam.
For the grillage, M200 concrete should be used. To ensure that the filling height corresponds to the specified value, install a beacon in the trench - a metal peg equal in length to the height of the grillage. It will serve as your guide.