Drywall is a universal building material that is in great demand. With its help, the easiest way to create partitions in a house or to level the walls in an apartment. It is easy and convenient to work with, which is why it is often chosen by craftsmen during repairs to perform the work listed above. However, the material also has its own characteristics. One of them is its rather low strength, and therefore it is not so easy to hang anything on walls made of this material. But still possible. How to hang a cabinet on a plasterboard wall? Let's figure out how to solve this problem.
How to hang a cabinet on a plasterboard wall
How to hang a shelf on drywall
Page navigation
Often home craftsmen are faced with the task of hanging a lamp, hanger, shelf or TV on a plasterboard wall. But many of them are quite justifiably afraid that the wall will begin to crumble and crumble due to drilling and other manipulations. Accordingly, all work must be carried out with caution, following the recommendations below.
Are Americans the only ones who don't follow instructions?
“The chests of drawers are only being recalled in the US and Canada. In other markets where IKEA furniture is sold, and there are more than 40 of them, this furniture is not being recalled, including Russia,” an IKEA representative in Russia told bbcrussian.
According to him, the furniture is no different from what is sold in the United States. A mandatory safety requirement is to secure the furniture to the wall; special brackets are included in the kit.
“The company is recalling chests of drawers in the United States because the company may want to understand why American customers are not following the instructions, which is leading to such unfortunate incidents. “No such cases have been registered in Russia or other countries except the United States,” the Russian division emphasized.
What is the maximum weight you can hang on drywall?
The maximum load-bearing capacity of drywall depends on a number of factors:
- quality of material;
- reliability of fastening drywall to the wall;
- dimensions and weight of loaded objects.
According to builders and manufacturers, the maximum weight that drywall mounted on a wall can withstand is 55 kilograms.
You should not focus on such a large figure in your planned work. As a rule, in most cases in practice, a comfortable weight in some situations can be either 15 kg or five.
Mounting rail
If you don’t want to spoil the appearance of the wall, then the mounting issue can be solved using a mounting rail. Of course, such a wall will not withstand a heavy load, but it will be possible to attach small cabinets or shelves.
This method is mainly suitable for walls with plasterboard frame fastening. You need to take the butterfly dowels and secure the mounting rail with them. In places where the profile is located, it is necessary to use self-tapping screws. The distance between fastening elements should not exceed 10–15 cm.
How to attach a shelf to a plasterboard wall
In general, hanging a shelf on drywall is a very difficult task, which becomes possible if you follow the right approach.
A well-organized and carried out work process using appropriate quality materials and correct weight distribution are in this case the key to success. You can attach shelves to a plasterboard wall using special dowels. Such fasteners can be of various types, but one of their advantages is that when screwed into the wall, they begin to open, thereby forming sufficient support and taking on a significant part of the load.
What you need
To hang a shelf on a plasterboard wall you will need:
- tools for manually or mechanically creating holes in the wall;
- dowels;
- screws;
- heavy items will require anchor bolts;
- If necessary, a cementing mixture is used.
Do not forget that during drilling a large amount of dust is generated, especially considering the composition of a material such as drywall. You will need to worry about protecting the room from dust, as well as personal protective equipment when carrying out such work.
How to attach the fixing moment (fastening)
After drilling the holes for the fastenings, dowels are inserted into them, which go against the grain. After this, a screw is inserted into the dowel, for example, with brackets or hooks.
How to hang a heavy shelf on a drywall wall
You can attach a heavy shelf to a plasterboard wall by mounting it to a metal frame using special fasteners. To do this, you will need to perform a whole list of works:
- The locations of the fasteners are marked on the wall.
- Holes are drilled in the designated places, but not only through the drywall, but also directly through the profile.
- Butterfly dowels are inserted into the resulting holes and screws with fasteners mounted on them are tightened.
- The screws should not be overtightened, as long as they are able to withstand the weight of the shelf and the pressure it exerts on the wall.
Attaching a stretch ceiling to a plasterboard wall
Stretch ceilings have earned popularity because they allow you to quickly obtain a flat surface. Conventional installation methods involve fastening to durable, preferably solid walls. The plasterboard sheet is fragile and cannot withstand the resulting load. But there are technologies that allow you to securely attach the tension fabric to the gypsum board. Let's consider each method in detail.
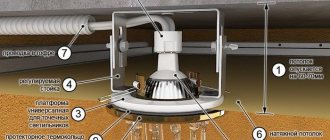
Installation of embeds
Before starting work, it is necessary to determine at what height the suspended ceiling will be mounted.
Mortgages for drywall - installation of embeds or how to make embeds for drywall.
Features: if built-in lighting is not planned, the indentation is kept minimal - 3-5 cm. Otherwise, the ceiling is lowered by 10-15 cm (depending on the size of the lamps).
Marks are placed at the required height. Next, the plasterboard sheathing frame is installed. At the level where the suspended ceiling will be, it is necessary to attach the mortgages. For this, two types of materials are used:
- Wooden beam (section not less than 6x6 cm).
- Metal profile (preferably wider, from 10 cm).
The second option is only suitable for small spaces. The mortgage will take on the main load from the canvas. It must be securely fastened:
- the profile is screwed to each rack;
- the beam is attached to the main wall with dowels and galvanized screws 4.5x60 mm (in at least two places).
READ What does a suspended ceiling or wallpaper do first?
How to make an embed in drywall
After this, the frame is sheathed with plasterboard. Take sheets with a thickness of 12.5 mm and fasten them with self-tapping screws every 10-15 cm. A more frequent step than with conventional installation gives additional strength.
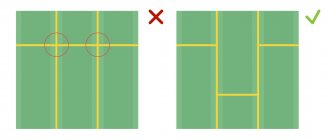
Important! It is recommended to fasten the gypsum board in such a way that the edges fall in the middle of the profile.
The gaps between the sheets are reinforced with sickle and putty. Then the walls are painted or wallpapered. Then, in the area of the mortgage, a baguette for suspended ceilings is attached to the plasterboard. The standard step is 10-15 cm. After this, the film web is stretched.
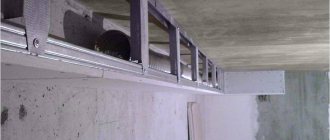
The second option is to attach the stretch ceiling to a plasterboard box installed around the perimeter of the room. This design allows you to hide utility lines and integrate lighting. And the height of the room will decrease slightly.
Let's look at how to mount a rectangular box along walls with a suspended ceiling in the central part. More complex structures (including those in rooms with niches and projections) are assembled according to the same principle.
First, the frame for the plasterboard part is mounted:
- A profile is attached along the perimeter of the ceiling.
- The required depth is measured from the lowest point.
- Using a level, marks are made at the same level on all walls.
- At this height, the lower profiles for drywall are attached.
- The width of the future box is measured and markings are applied to the walls.
- The profiles are mounted parallel to the previous ones.
- Horizontal jumpers are placed between the lower parts of the frame (perpendicular to the walls). The distance between them should correspond to the width of the gypsum board.
- Then vertical jumpers are installed.
- The height at which the suspended ceiling will be located is measured.
- At this level, a continuous horizontal profile (which serves the same function as the mortgages) is attached to the vertical lintels.
The frame is sheathed with gypsum board. Then the suspended ceiling is attached to the plasterboard box:
- The baguettes are screwed on (the screws must fit into the frame).
- The PVC film heats up.
- The fabric is stretched and tucked into the profiles.
Sometimes it is necessary to install a suspended ceiling on finished plasterboard walls. In such cases, other methods are used:
- screwing in self-tapping screws at an angle;
- use of special fasteners for gypsum boards;
- installation of ceiling molding.
The first two are recommended only for film covering, the third is also suitable for fabric ceilings.
Important! Before starting work, you need to make sure that both the frame and the plasterboard sheets are holding well enough. There should be no rattling, deflections, backlashes, cracks, etc. The upper part of the walls, closer to the ceiling, is especially carefully checked.
Tips and tricks
One of the most common fastening options is anchor bolts.
Using this method of fastening allows you to ensure a strong connection and the shelf will not come off. To create such a mount, you will need:
- Working holes are drilled at the locations of future fasteners.
- Now recessed holes are made in the monolithic load-bearing wall.
- The next step is to insert the anchors into the drilled holes.
- Anchor bolts can be used as fastenings or additional brackets can be installed on them.
For small and light objects, Driva dowels are used as an alternative.
But this is acceptable in cases where the drywall is glued and not held on the frame. Despite the apparent fragility of a material such as drywall, with the proper approach and compliance with all work conditions, it demonstrates sufficient strength to hold most pieces of furniture and other objects on the wall surface.
Features of drywall
Drywall is a material now known to everyone. It is made from compressed gypsum, and the word “cardboard” in the name is due to the presence of ordinary thin cardboard on one and the other side of the gypsum sheet. This is an absolutely safe and environmentally friendly material that helps maintain an optimal microclimate in any room, does not emit toxic substances into the air, is easy to use and is not flammable. It also has a good level of sound insulation, can bend if necessary (just moisten it with water), and can be painted and pasted over. Drywall is usually used during major renovations of premises to create arches, suspended ceilings, level walls and build partitions.
The history of the appearance of plasterboard boards
Physical and technical characteristics of plasterboard sheets
Drywall also has its disadvantages, which limit the possibility of using the material in repairs and construction. So, it does not like high humidity and is picky about storage conditions . It should not be used for finishing ceilings if there is a risk of flooding of the apartment from above. This material is quite fragile and cannot be used as horizontal shelves.
There are different types of drywall
There are several types of drywall; you need to choose the most suitable one depending on the work being carried out, as well as operating conditions.
Table. Types and types of drywall.
| Type | Description |
| Wall or standard | This is ordinary drywall, the sheets of which are usually blue or gray in color. It does not contain any additives - it is pure gypsum. This is a universal material with a certain level of sound insulation, which is usually used for leveling walls and creating partitions. The humidity in the room where it is used should be no more than 70%, otherwise the material will begin to deteriorate and deform. |
| Moisture resistant | This drywall is green in color and, as the name implies, is highly resistant to moisture, namely, it contains special antiseptic additives that will prevent mold and mildew from developing. It can be used in rooms such as a bathroom, toilet, basement - that is, where air humidity is high. |
| Ceiling | This material is used to create suspended ceilings, which were very popular in Russia in the 90s and 2000s. This drywall is highly flexible and can be used to create a range of decorative designs. This property is due to its thickness being smaller than that of a standard sheet. The difference is about 3 mm. |
| Refractory | This type of drywall is gray in color and has certain markings. Typically used for creating and finishing fireplaces, stoves and chimneys, as well as in rooms that have special fire safety requirements. Gypsum contains certain fire-resistant additives. |
| Acoustic | This type of drywall has small holes on the surface, and on the reverse side there is a special fabric. This material is used to improve the acoustic properties of premises such as recording or concert halls, etc., that is, where increased sound insulation is required. |
| Arched | The best material option for creating complex and arched structures. These are very thin sheets that are easy to bend to the desired position. However, craftsmen advise buying it only if it is impossible to use the usual standard material, since such drywall contains fiberglass, which makes it difficult to cut and fix. Yes, and it costs more. |
Sheets of moisture-resistant plasterboard
On a note! Despite the fact that plasterboard is easy and pleasant to work with, hanging something on walls finished with it is not easy due to the fragility of the material. All methods of fixing objects on the surface of this material should be carefully studied in order to prevent the collapse of structures in the future.
How to cut drywall
How to choose the right mount
Of course, there can be no clear answers; the question is quite controversial and ambiguous. Much depends on how carefully and in accordance with weight restrictions you are willing to use the piece of furniture attached to the wall.
To attach such shelves, it is enough to use screws.
Which installation option can you carry out yourself, and for which you will need the help of professional builders. Finally, what kind of frame is under your drywall, how correctly is the structure created.
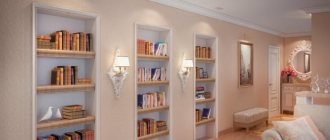
It's easy to attach a small shelf.
If you need to attach a small shelf on which a couple of souvenirs will show off, then you can attach it with dowels directly to the drywall. If the shelf is intended for books and its width is more than 10 cm, then it is better to attach it to the profile.
Therefore, when fastening heavy objects, it is worth using several profiles.
Finally, in the case when you need to attach a shelf to the wall for arranging heavy and expensive items, it makes sense to play it safe and install it directly to the wall using anchor bolts.
Drywall cannot be called a material that can withstand super heavy loads. However, with the right approach to the issue of fastening, even on plasterboard walls you can easily place shelves for books, clothing hangers or small stands for souvenirs.
Do not place heavy objects on such a shelf.
And remember, if you are not sure how exactly the shelf will be used, it is better to give preference to the most reliable mounting method.
Lack of damper tape on the guides
When installing the frame, a special sealing tape is glued to the mounting plane of the guide profile. It acts as a layer between the base and the frame. This allows you to compensate for the expansion of plasterboard sheets, and the tape is also an important element of the sound insulation system.
Sound propagation through ceilings and drywall frames.
Read about the mistakes that are often made when installing drywall in the article “10 Mistakes When Installing Drywall.”
Using profiles for other purposes
Each type of plasterboard profile has its own purpose. Sometimes a ceiling profile is used instead of a rack profile, this leads to the fact that the partition structure turns out to be fragile. In addition, this is associated with difficulties in work, since sheets cannot be attached to the ceiling profile on both sides. It is not recommended to bend profiles, cut or change their geometry.
This error is due to the fact that the use of ceiling profiles is allowed when covering walls or when creating boxes for shelves, a fireplace or a TV.
Ceiling profile partition.
Read more about the types of profiles for fastening drywall in the article “Profile for drywall: a brief educational program”
Method 5. Anchoring into a solid wall
This solution is used for main walls covered with plasterboard; it is not suitable for partitions made of gypsum plasterboard. Anchoring into the wall allows you to hang large structures, household appliances and cabinets on a plasterboard sheet.
To do this, hatch holes are cut into the gypsum board so that you can drill into the main wall with a hammer drill and install anchors. The anchor consists of a metal or plastic dowel and a long threaded screw or hook. I don’t take into account chemical dowels, because... they are used quite rarely and have some difficulties in installation.
You can hang heavy furniture on anchors if the distance from the main wall to the gypsum board does not exceed 5 cm. At a greater distance, even a thick screw that can withstand significant loads will bend over time. In this case, you can use a combined method, for example, by securing the tire to anchors and adding several attachment points to the gypsum board.
After installing the anchors, the cut sections of drywall are mounted in place. The joints and the hole around the anchor head are sealed with putty.
Anchoring is effective if the main wall is made of concrete or brick without voids. In cinder block or foam concrete, the anchor holds much worse.
You can increase reliability by passing the anchor through the rack profile of the plasterboard lining. Unfortunately, the places where furniture is attached do not always coincide with the location of the metal frame parts.
The disadvantage of mounting on anchors is the need for very precise markings. Possible distortions and deviations will become noticeable only when the furniture is already secured to the anchors, and it will not be possible to hang the cabinet “a little higher” or move it to the side.
No hangers
When creating a suspended ceiling, it is not recommended to skimp on hangers. Fastening without the use of hangers is often used when they want to install a frame on an uneven base; this temptation is especially great when working with wooden coverings.
As a result of such installation, the profile loses its mobility - due to shrinkage deformations, cracks may appear on the surface of the drywall. In addition, when rigidly fixed to the ceiling, the main advantages of a suspended structure are lost: the ability to level the surface, hide communications and additional insulation inside the ceiling.
Plasterboard ceilings are mounted on an anchor or direct suspension. Read more about installation methods in the article “Drywall - ceiling installation”.
Sophisticated adjustable closet awnings
Press-in mounting for wall-mounted cabinets Traser-6
The Traser-6 wall cabinet mount is designed for attaching a wall cabinet to a wall. Mounted on the side wall of the cabinet.
The hitch has the following adjustment options: vertically (18 mm), horizontally (16 mm), front (25 mm). The canopies are suitable for cabinets with a height of 600-1000 mm and a depth of 300-350 mm. One suspension can withstand a significant load of 65 kg.
| Rice. 5. Press-fit mounting for Traser-6 wall-mounted cabinets |
| Rice. 6. Adjustments for hinges for Traser-6 wall-mounted cabinets |
The concealed mounting bracket is located behind the rear wall after installation. To access the adjusting screw, a through hole is made in the rear wall.
To hang cabinets, in addition to the hangers, you need a counter strip or rail, which is attached to the wall at the required height using dowels.
| Rice. 7-8. Striker for awnings |
| Rice. 9. Press-fit canopy for upper cabinets - rear view of the product |
Cabinet hinge with protection
The safety cabinet mount also has the pleasing aesthetic feature of being concealed behind the rear wall. Withstands a load of 130 kg per pair. To hang a cabinet using such canopies on the wall, you need a rail or a strike plate, a rail, whatever you call it.
To access the adjustments, a through hole is made in the rear wall.
| Rice. 10. Installation diagram of the canopy on the side wall |
| Rice. 11. Live photo of the canopy |
| Rice. 12. The hanger is mounted on the side wall of the cabinet |
| Rice. 13. Through hole in the back wall made of chipboard for access to the adjusting screws |
Hinge for cabinets Scarpi-4
The hangers are completely made of metal. Vertical adjustment is 13 mm, horizontal adjustment is 8 mm, front adjustment is 17 mm. The adjustment screws are accessible from inside the cabinet. The load of the hitch can withstand a significant load - 65 kg for one hitch or 130 kg for two hitches.
| Rice. 14. Set of hangers for Scarpi-4 cabinets |
| Rice. 15. Installation diagram of hinges for Scarpi-4 cabinets |
| Rice. 16. Adjustment of hinges for Scarpi-4 cabinets |
| Rice. 17. Hinges for Scarpi-4 cabinets, right and left, on plugs |
| Rice. 18. The hanger is installed on the side wall of the bathroom cabinet |
Adjustable canopy
An adjustable canopy with screws is also used for securely fixing cabinets and shelves on the wall; this is the most popular and at the same time reliable way to hang a cabinet on the wall.
The canopies have three-dimensional adjustment: down – 7 mm, up – 11 mm, back – 3.5 mm, forward – 12.5 mm. A pair of canopies can withstand a load of 130 kg. Like the previous awnings, it is used in conjunction with a mounting plate or, in other words, a rail or rail.
There are options for universal canopies, as well as with division into right and left. The second option is preferable. Moreover, awnings of European origin, for example from the Blum company, are superior in quality and reliability to Chinese ones, but are also much more expensive.
| Rice. 19. Adjustable canopy right and left from Blum |
| Rice. 20. Adjustable universal canopy |
| Rice. 21. Installation diagram of an adjustable canopy |
| Rice. 22. Hook with which the awnings cling to the rail on the wall |
The Pros and Cons of Hanging Cabinets on the Wall Using Sophisticated Adjustable HangersPros of using sophisticated adjustable awnings
Cons of Using Complex Adjustable Awnings
|
For lightweight structures
Method 1. Adhesive installation
Once the paneling and finishing are complete, we may be wondering how to attach a shelf to a drywall wall. The problem is that drywall is a rather fragile material, and therefore it will crumble under load. This means that when hanging shelves we will have to use a variety of devices that will allow us to compensate for this shortcoming of drywall.
Such shelves can be attached with glue
The choice of fastening method directly depends on two parameters:
- The weight of the shelf itself.
- The planned load on it.
We will build on them when planning our work.
This composition is quite suitable!
For decorative shelves, stands for small photographs or keys in the hallway, you can use adhesive mounting. This method is the easiest to implement:
- We apply markings on the wall for installing a decorative object.
- Following the markings, apply a thin layer of contact adhesive to the surface covered with gypsum board.
- Apply the same layer of glue to the back of the shelf.
- Let the glue sit for some time (depending on the type of composition) and press the shelf against the wall. The pressure should be tight, but not too tight: it is advisable to dose the force so as not to crush the drywall.
If you don't put too much pressure on it, the glue will hold!
The described method requires virtually no labor costs, but its reliability is low.
Method 2. Fastening with screws
If we are dealing with a structure whose mass is small, but does not allow the use of the adhesive method, we can simply fix the shelf with self-tapping screws. The choice of fasteners depends on where we will carry out the work:
If you don’t load it, then a shelf like the one in the photo holds perfectly on four self-tapping screws
- if the shelf will be installed simply in drywall or in a wooden frame element, then we use wood screws (black);
Such fasteners hold well in a gypsum layer or in a wooden frame
- if the position of the shelf can be adjusted so that the fasteners fit into the metal profile under the casing, we use metal screws with a drill.
The length of the self-tapping screw must be sufficient to completely go through the gypsum board and penetrate into the wooden beam or steel profile. For single-layer sheathing, it is advisable to use elements from 25–35 mm.
The instructions for performing the work are extremely simple:
The fastener with the drill is well fixed in the metal profile
- Select the installation location. As I noted above, it is desirable that the fasteners fall either into the vertical posts of the frame or into the horizontal cross members.
- We put marks on the wall.
- Place the shelf against the wall and tighten the screws according to the marks. It is advisable to use a screwdriver: this way the hole will not “break”.
The correct screw depth will ensure a secure fit.
If tightened too tightly, the reliability of the fastening may decrease due to the integrity of the cardboard layer. And it is also undesirable to unscrew the screws and re-tighten them back: the thread destroys the plaster, and when re-attached it will hold much worse.
At the stage of installation of the frame, no attachments were made for hanging things
If you plan to use drywall in finishing work, then you need to immediately think about hanging heavy things, because to secure them inside the frame you need to make embedded parts from wood or plywood. Embeds are a reliable guarantee that a TV or shelf will not fall off the wall.
An example of using mortgages to install a TV.
Connecting profiles with self-tapping screws and a press washer
The rack profile is inserted into the guides; self-tapping screws are sometimes used to fasten them together. The most unfortunate solution is to use a self-tapping screw with a press washer. The head of such a self-tapping screw will stick out strongly on the surface of the profile. It will not allow the sheet of drywall to be placed evenly on the wall.
A self-tapping screw with a press washer does not allow the sheet of drywall to rest completely against the frame.
Many beginners believe that the stronger the connection of the profiles, the more reliable the final plasterboard structure will be, but they forget that the main part of the rigidity is provided by the sheet itself, which holds the frame together. If the gypsum board does not adhere sufficiently, the strength decreases.
Fastening the shelf with dowel nails
This method is applicable if the load on the shelf is small, but at the same time, fastening with glue is not suitable. Fasteners are selected based on the location of the structure:
- The plasterboard wall has a wooden frame.
- A gypsum board wall contains metal elements.
- The surface was leveled with plasterboard using a frameless method.
Depending on the weight of the shelf, different types of dowels are applicable
Attention! The length of the fastener must be such as to pass through the shelf material, drywall, frame and be firmly fixed in it. For example, if the wall is made of one layer of gypsum board on a metal frame, the fasteners should be 35 mm long.
Installation algorithm:
- Choose a place for the shelf; it is advisable that the fastening is on the sheathing: vertical or horizontal;
Before attaching the shelf, you should take measurements and markings - Apply markings. To do this, you will need a simple pencil or chalk (the drawing instrument should be easily erasable). You will need a level to ensure the item is mounted evenly.
- Place the shelf against the marks, check the levelness and height from the floor (comfort of use).
The shelf is applied to the plasterboard wall and the levels are checked - Using a drill, you need to make a hole with a diameter that matches the size of the dowel.
The size of the drill bit can always be adjusted to the size of the dowel - Using a hammer, carefully insert the dowel into the hole you made.
- After this, fix the shelf with a self-tapping screw. If it is hung with hidden hooks, then after completely screwing in the self-tapping screw to the head, use a screwdriver to unscrew the fastener 2 turns. Hang the shelf on this fastener.
The shelf with dowels can support sufficient weight
After installation, the shelf can be used depending on its purpose.