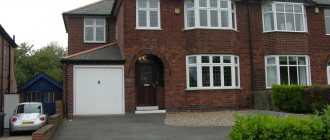
Very often, additional recreation space is added to country houses, cottages, and private houses.
Namely, various covered verandas or terraces are being built. As a rule, such an extension has the same base as the house and is an additional room. But the terrace is built on a separate foundation, so it can be built after you build the house. If you understand what this structure is, then drawing up a project and erecting a veranda near a brick house or near a timber house will not be difficult for you. What is needed to get started? How to attach a veranda to a house made of timber or brick? Let's look further...
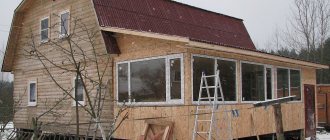
Main construction
Frame. There are several ways to attach a veranda frame to a house. The most common materials used for construction are brick, wood, and foam concrete blocks.
Roof. The most common roofing option for a terrace is a single-pitch type of construction. It is recommended to use the same material from which the roof of the main structure is made.
The basic steps of equipping a roof in this way are:
- The boards are attached tightly to the rafters;
- Roofing felt is laid overlapping and fixed with galvanized steel nails;
- Additional fixation of the canvas is carried out with slats with a certain fastening pitch;
- The lower edge of the covering is folded and fixed.
An interesting material used in the construction of veranda roofing is transparent polycarbonate. This is a modern building material that is durable. In addition, the buildings, including the roofs, look quite stylish.
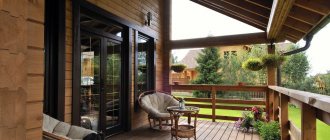
Interior decoration primarily depends on whether the terrace is open or closed. An open veranda is exposed to negative environmental factors: wind, rain, frost. In this regard, the finishing material must be resistant to temperature differences and moisture resistant.
The materials are varied, for example, wooden lining, panels made of MDF or PVC, as well as siding. All of the listed materials are quite diverse in color palette and texture, which pushes the creative boundaries of interior design projects. The photo of the veranda inside shows trends towards natural finishing materials and textures.
Floor covering. As a rule, the material for finishing the floor on the terrace remains classic - wooden boards. The boards are laid directly on the joists on top of the thermal insulation. Upon completion of installation, the boards are coated with paint and varnish.
Grillage arrangement
A grillage is a framework for the foundation, or a kind of hard sole. Thanks to it, the weight of the terrace or veranda will be evenly distributed over all the supporting pillars of the base. The grillage is made of beams, metal profiles or reinforced concrete. The simplest option for a terrace is wood. And thanks to the reinforcement bars that were walled up in the supports, you can make a strong connection between the pillars and the frame.
But, before laying the boards, you should take care of waterproofing. To do this, you need to lay several layers of roofing felt on each post. Only after this can you engage in grillage. The connection of the beams is made in half a tree. In those places where the reinforcement will pierce the timber, holes must be made in advance. In the photo you can see exactly how everything looks when finished.
Construction of the foundation has been completed. Now everything is ready to start building a veranda or terrace.
Rules for laying the foundation
Types of foundations.
Regardless of what type of foundation is chosen, it must be made at the same depth as the foundation of the entire country house. At the same time, you should not turn the foundation of the buildings into a single whole - it is better to make a gap of about 4 cm. A heavy house has a greater degree of shrinkage than a light veranda, so it can simply pull the extension along with it.
When choosing the type of foundation, it is very important to take into account the general quality of the soil and the material from which the walls will be made in order to avoid “playing” of the foundation or excessive shrinkage of the veranda
Strip foundation
If the owners decide to make a large and heavy veranda, then they should pay attention to the strip foundation. It can easily withstand buildings made of brick or blocks that are covered with slate
Below is the order of actions:
- A trench is dug along the prepared markings.
- Wooden formwork is erected to the height of the main house.
- Concrete is mixed from cement, sand and crushed stone (proportions 1:3:6, respectively).
- A third of the concrete is poured with the addition of stones, after which the foundation is left to cure.
- We pour another third of the concrete, again adding stones.
- Stones are not added to the top layer - on the contrary, it is leveled to make it easier to lay bricks.
If construction takes place in the middle of a hot summer, then at least once a day it is necessary to water the foundation with water so that it does not crack.
Columnar foundation
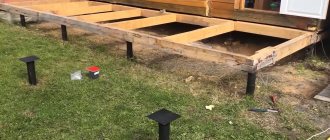
If the veranda is wooden or frame, then you should use a columnar foundation. It is specifically designed for light buildings. However, when using this type of foundation, it is worth taking into account soil heaving due to temperature changes. In order to prevent the foundation from starting to “play,” the columns need to be dug to a depth below freezing of the soil (in central Russia - more than a meter). If the veranda is small, you can limit yourself to only supports in the corners. If you plan to make a large room, then it is worth digging in intermediate posts in increments of about half a meter. The construction algorithm is as follows:
96a1852fa49e5f01439e831eceb8c389.jpe c58b0a8a76ed62a8a1775b89cf75bb54.jpe aa4fbfc55afd8b054a497bc4cc0ce3bf.jpe b35ae1d2951418da36794bc60f08 6006.jpe 489f9826901effa499d07c6607166e20.jpe 25e6125742cc5115f91732683c8e9979.jpe 835494a52533261d30968caea70d088e.jpe
- A hole is being dug for the post.
- 20-30 cm of sand is poured to the bottom.
- It is poured with concrete flush with the ground, which is left until the solution hardens.
- Sand is poured into the gap between what happened and the ground. The column is pre-coated with bitumen.
The support is adjusted to the height of the foundation of the main building with bricks or blocks. There should be at least 30 cm left to the future floor of the veranda.
Construction of the veranda frame
To ensure that the floor of the veranda attached to the house does not play when walking on it, it is necessary to make a reliable, rigid base. Therefore, for the construction of the lower frame it is best to use 150*150 mm timber, and make the floor joists from 100*150 mm timber.
The timber is laid on a columnar foundation through waterproofing material and attached to the house using metal corners. To extend the life of wood, it must be treated with special impregnations. Since the veranda is located not indoors, but outside, you can use the old fashioned method and treat the harness and floor joists with used machine oil.
The beams are fastened together with metal pins. It is also better to make racks for the veranda from 150*150 mm timber, it is more reliable, and a massive thick pillar looks better. The timber for the racks must first be planed and thoroughly sanded.
Photo of attaching the timber to the floor joists:
At the bottom, the racks are also attached to the beams using studs, and at the corners with galvanized metal corners. Before attaching the racks, you must ensure that they are in a strictly vertical position using a building level. The top trim is also made from 150*150 mm timber, and is attached to the posts with 300mm nails.
Before fastening the beam, it must be drilled at the place where the nail is driven in. This will make it easier to hammer in the nail and help avoid cracking of the timber. The top frame is attached to the house using a special metal bracket, which can be purchased at a hardware store or made by yourself, with your own hands.
Beautiful examples
To ensure that all the details of the house and its surroundings are in harmony with each other, when choosing them it is important to adhere to the same style. For a country house, this could be an appropriate direction, reminiscent of a ranch, country house or medieval mansion
In the city, the terrace can be located on the roof, above a garage or underground parking. This saves space, but in this case the fences should be more durable and preferably solid.
Multi-level terraces occupy a special place. A wave-shaped barrier can tie all levels together. The cascade of fences of different heights looks interesting. Using fences of different heights, you can create a place on the veranda for relaxing, eating, and performing water treatments. In these same places, to create the appropriate atmosphere, you can place material of a different color or texture more densely.
A win-win option is to decorate the fence with lamps. They can be mounted on posts or supports. The LED strip can be laid along its entire length and hidden at the base or under the handrails. In some cases, plants, furniture, curtains, textiles and other items that your imagination points out to you can be used as a temporary hedge option.
For an overview of the wooden terrace, see the video below.
Installing the roof and floor
As a rule, the veranda has a pitched roof, flatter than the roof of the main building.
Let's learn how to install a roof and floor with your own hands:
- We install dense sheathing to the rafters (you can take uncut boards to save the budget calculated for the project);
- On the sheathing we make a flooring from roofing felt or take any other roofing material (if you want to additionally protect the space from moisture, you need to put a layer of waterproofing material);
- When laying the floor with your own hands, we nail edged boards about 3-4 cm thick onto the joists (to treat the boards we use an antiseptic, this will protect the floor from rotting and fungi);
- Next, we paint the boards or cover them with a floor covering (for example, linoleum).
After installing the frame, installing the roof will not cause you any problems. The photo below shows the assembled frame structure.
Installation of railings
The second is to hire a private craftsman who will carve the original posts, decorate any parts for the railing with intricate carvings, and assemble everything himself. You will be able to monitor the progress and quality of work, as well as gain useful information from communicating with a specialist.
423c3725e75ac11d2e837e7c43bcb642.jpe
f9671c5c7626638e5b7c1a5a762f6227.jpe
The third and most interesting thing is to create a reliable support for yourself and your loved ones. To do this you need to have at least some woodworking skills. In addition to materials, you will need tools:
- Drill, set of drills for wood;
- A machine for processing balusters (this is already a high level of skill);
- Screwdriver, jigsaw (for assembly);
- A set of cutters (if you plan and know how to cut wood);
- Chisel, hammer;
- A level for measuring the curvature of walls and other parts of a structure.
When the preparation is completed, they begin to make the handrails themselves.
- The height of the staircase railings should be 90 - 100 cm, no less;
- The extreme points of support experience the greatest load. For this reason, they are made with a large cross-section and reinforced for reliability. The thickness of the edge cabinet (or the corner one that holds the railing on the balcony) is made no less than 100 * 100 mm;
- The enclosing structure is necessary if the staircase to the terrace has 3 or more steps;
- Any railings or wall handrails must withstand a load of more than 100 kg/m;
- The handrails should be sanded and varnished, they should become even, smooth, without nicks or splinters.
By following these simple rules, you will create not only an elegant decoration for your home, but a reliable structure that will ensure the safety of you and your loved ones.
How to attach a veranda to a house: main stages of work, similarities and differences
Regardless of what type of veranda is planned to be built, most of the work follows the same pattern.
- Site preparation. The area planned for development is cleared, all debris is removed, the condition of the foundation, the walls of the house and the blind area (if there is one) in this place is checked. If there are communications in this area, it is necessary to mark their location so as not to damage it during the construction process. It is better to remove the top layer of soil and uproot the plants. To prevent the roots from damaging the building in the future, it is advisable to treat the soil with special compounds.
- Marking. First of all, the corners of the building are marked, then the perimeter is outlined along the cord. For columnar and pile foundations, marks are placed for future supports in accordance with the project; for strip foundations, the width of the strip is marked.
- A pit/pits are being dug. This applies only to buried foundations; screw piles are screwed into the ground without first digging out the holes.
- A sand and gravel cushion is installed. This type of preparation is also carried out for screw-pile foundations, but the embankment is carried out around already installed piles. The distance from the axis of the pile to the outer edge of the cushion is at least 0.5 m. If the soil on the site includes loose sand, the cushion can be partially replaced or supplemented with a layer of hot-filled bitumen.
- The foundation is being completed. For columnar supports, columns are made of brick, blocks or monolithic concrete, strip bases are poured into formwork or mounted from blocks. The upper part of strip or column supports must be protected with horizontal waterproofing, the underground part is treated with roll or coating waterproofing. The strip foundation or pillars are “connected” to the foundation of the main building with mortgages at the reinforcement stage.
- A grillage is being installed. This stage is required for columnar and pile foundations.
- Racks are mounted or columns are laid out/cast. It is mandatory to connect these elements to the foundation with mortgages or other fasteners. The racks or columns adjacent to the wall are connected to the main wall. For light structures made of metal or wood, the connection can be omitted.
- The upper and lower trim are assembled. The lower one is only for light frame structures. For permanent verandas made of blocks, bricks or monoliths, the top frame is replaced with a mauerlat, on which the rafters will subsequently rest.
- The roof frame is assembled. More details about the connection of rafters or trusses with the upper frame (mauerlat) can be found in the article.
- The roof is laid with the selected material. For any design, waterproofing the seam between the roof and the wall of the house is mandatory. It is also advisable to arrange water drainage and a so-called “rain apron”.
- The base and flooring are being installed. The most popular is laying decking boards, decking or tongue and groove boards over wooden joists.
- The veranda fencing is being installed. It can be light or substantial, in the form of masonry or a monolith, complemented by glazing, mosquito nets, sun protection elements, and so on.
- Finishing is in progress.
Taking into account the difference in materials and qualifications of builders, the duration of work can range from 2 days to several weeks.
Below is a video on how to install a veranda made of wood with your own hands:
The Ural plant of multifaceted supports offers:
RANGE OF FACETED CONICAL SUPPORTS
OGK-3 support is 3 m high with an upper diameter of 60 mm. It is used mainly for lighting local areas and park areas. The support of OGK-4 is a 4-meter mast with an upper diameter of 60 mm. Installed on a embedded part with a height of 1.25 m. OGK-5 support – height – 5 m, top diameter – 60 mm. The recommended embedded element is FM-0.108-1.5-160(14). OGK 6 supports – a 6-meter mast with a mounting hole for a 60-mm bracket. Installed on a 1.5-meter embedded element. The OGK-7 support is a 7 m high structure with a mounting hole for a 68 mm bracket. OGK-8 support – height – 8 m, mounting hole – 68 mm. The recommended embedded part is FM-0.159-1.5-300(14). OGK-9 support – total height of the mast – 10 m, top size – 68 Dv. The OGK-10 support is a 10-meter mast with mounting holes of 68 and 100 mm. Installed on embedded parts up to 2.5 m high.
Veranda attached to the house: stages of construction
First of all, you need to decide on the type - open/closed, what material it is made of, and choose the type of foundation. It is also necessary to decide what size it will have, where and how it will be located. It is advisable to draw all this on the plan. Even better - order a project. Construction according to a project is rather an exception for us, but at least there is a plan with dimensions and an indication of the location, reference to paths, etc. you must have.
The construction of a veranda for the house with your own hands proceeds according to the following plan (we build it from wood):
- Use pegs and twine to mark the outlines.
- Remove the turf and fertile layer. If this is not done, the vegetation under the flooring will rot, spreading aromas.
- Mark out the foundation. At this stage, questions may arise: what height should it be. If the foundation is made incoherent and “floating”, the level of the veranda flooring should be 5-10 cm below the floor level. This is necessary so that even when raised, the extension does not block the front door. If you don’t want the floor to be lower, you will have to make a high threshold in the front door: to guarantee the freedom of opening the door. The height of the support beam depends on the height of the extension floor. It is nailed to the wall of the house, and floor beams are attached to it. The height of the foundation is marked along its lower edge (these are the next two steps).
- Nail a support beam to the wall, along the lower edge of which the height of the foundation is measured.
- Build the foundation.
- While the concrete gains at least half strength, you complete site preparation. If at the bottom of the pit (the fertile layer has been removed) the soil allows water to pass through well (sandy, sandy loam), add crushed stone to the bottom. It can be compacted, or you can do without it. If there is loam or clay under the fertile layer, you will have to fill the pit either with the same soil (but not fertile) or with clean clay. It must be compacted well to avoid creating voids in which water will accumulate (it is better to lay it soaked to a paste in layers).
- A layer of waterproofing is laid on the finished foundation.
- Support posts for the roof are installed and secured.
- They tie the racks: they nail a beam 100*150 mm thick around the perimeter. It can be nailed to the outside of the studs or between them. Sometimes the racks are nailed after the floor has been laid. This is not the best option: the floor will most quickly become unusable. With such a structure, in order to replace it, you will have to dismantle everything, right down to the roof. If you install the racks first and then the floor, it can be repaired without problems.
d502de4c28531c06920904d925941f53.jpe
328e6eedbcbb251535987a44fa68c462.jpe 2a7fbbdc5494b7429b504365619652af.jpe f41b38b9995994836d3c764ba5766a95.jpe db3767418426e83dc864faec7 edf759a.jpe - Floor beams (beam 100*150 mm) are attached to the foundation and support beam. The step of their installation corresponds to the step of installing piles or columns.
- Assemble the rafter system.
- Side railings (for open ones) or walls (for glazed ones) are installed. At this stage, the general technology ends. Further, for indoor ones it is longer; an open veranda is easier to attach to the house:
- For open ones, floor boards are nailed onto the beams.
- For glazed ones, an insulated floor is made. The subfloor is nailed to the beams. There are joists on top, insulation between them, and a finished floor on top.
- Roofing.
- Wall decoration inside and outside.
These are just general steps. To have a more complete idea of how to make a veranda for a house, we will next consider the most problematic aspects of construction in more detail.
Perhaps you are interested in building a gazebo? You can read how to build a wooden gazebo here.
Brief instructions for installing wooden railings on a staircase or terrace
The cross-section of the baluster can be different, for example: round, square, rectangular. This is not particularly important during installation (only in some cases). Often, for the sake of convenience and for aesthetic purposes, a baluster is installed. It is a wooden strip with a groove, which is placed on top of the bowstring.
The balustrades make the structure more stable and easier to assemble. They give the fence the correct proportions.
Separately, it is worth mentioning the outer support pedestals (pillars). These are massive elements that are installed at the end and beginning of the span. They begin to assemble the staircase. When installing a balustrade, veranda, or balcony railing, you may need more than two of them for structural rigidity.
Let's carry out the initial marking. We will proceed not only from personal convenience, but also from safety standards. The height of the handrails is recommended to be at least 90 cm. The distance between the supports depends on the weight and purpose of the structure. It is about 120 cm. If there are children at home, the distance between two balusters should be at least 15 cm.
We start with the edge pedestals. They are secured in different ways:
- “Fixing with a capercaillie” - A hole is sawn through the bottom of the rack itself (a groove with a beveled angle for a large bolt).
- A rectangular groove is cut out. This can be done using a segment washer and a wrench designed specifically for this purpose. Not everyone has the tools for such an operation, so it is only available to specialists.
- The stand is attached to anchor bolts. This option is universal. It is suitable for everyone who has undertaken to make wooden supports with their own hands.
- Support pedestals are often equipped with brackets, reinforcing the fastenings.
A rope is attached to the top of the edge posts, along which a handrail is then placed.
Next, mark the places where the columns with other elements will be fixed. Approximately the center of the axis of each vertical part of the fence is drawn. The most common installation method is assembly with bolts, studs and other metals:
- A round hole is drilled in the balusters, the center of which falls on the axis of the transverse cut;
- A hairpin with a diameter of 8 -10 mm. (usually) screw in a couple of centimeters. Remains outside 5-7 cm;
- It is fixed in the hole, fixed with glue or resin;
- Screw in the self-tapping screws in the places where the posts will stand (on the outer steps above and below);
- A cord is pulled between the extreme points;
- The points where the remaining elements will be attached are marked along the cord;
- Drill a round hole, add a little glue inside;
- Install the product and fix it in the hole.
The last stage of fencing assembly is attaching the railings. It is necessary to connect their parts with pillars and balusters. The most accurate calculation is necessary here, since the slightest mistake can ruin the whole work. Therefore they do this:
- A groove is drilled or machined into the handrail. The resulting hole should ideally match the thickness of the support strip;
- Make a rail suitable for the groove in the handrail;
- They attach the rail to the side so that the balusters can be cut evenly, because the stairs involve climbing;
- The rail is screwed on with self-tapping screws;
- The handrail is fixed and aligned in length so that there is no gap;
- All that remains is to secure the railing in place with resin or hardware.
Railings are also installed on the stairs located in the corner of the house. They are usually attached directly to the wall using any suitable fittings. A wall support rarely needs additional pillars; balusters are not placed near the wall.
Where the veranda roof joins the house
As a rule, when covering the veranda roof, the same roofing materials are used as when building a house, so as not to disturb the overall design of the building as a whole. The connection of the roof of the extension to the house can be done in various ways, depending on which wall the veranda is attached to. If the roof of the veranda is ultimately a continuation of the roof of the house, then the task is greatly simplified, since it is enough to splice two rafter systems. It turns out that the roof of the veranda is adjacent to the roof of the house.
In this case, proceed as follows:
- The upper trim of the veranda is formed with the fastening of the posts.
- Ceiling beams are attached to the frame, to which the veranda ceiling will subsequently be attached.
- The rafter legs of the house are shortened so that they do not extend beyond the wall.
- The elements of the extension truss system are attached to the house truss system as shown in the image below. The mounting method is selected depending on the complexity of the structure. For greater reliability, metal linings are used.
- To ensure that the structure is reliable and can withstand loads, special reinforcing struts are attached, the purpose of which is described in the image below.
If the width of the veranda is more than 2 meters, and also if heavy roofing material is used, additional spacers are installed. As a rule, they are not attached to the sides of the rafters, but are inserted between the upper and lower beams, after which it is better to secure them.
In order to prevent the roof from sagging, spacers are installed between the ceiling beams and rafters
Sometimes it turns out that the roof of the veranda is adjacent to the wall of the house. To solve this problem, you need to make a groove in the wall and lay a special profile in it, carefully sealing all the cracks. The second side of the profile extends onto the surface of the roofing material, which prevents precipitation from entering the space that is caused by the adjoining of the structure to the wall.
How to attach a veranda roof to the wall of a house
You can make such a profile yourself by bending a piece of galvanized steel accordingly. The design differs in that it is necessary to strengthen a special beam, which moves this apron away from the wall to the required distance. The apron is also attached not to the wall itself, but to a beam embedded in the groove. In fact, if the design of the extension is simple and primitive, then such an apron can also be attached to the wall by bending the edge accordingly. After this, it is better to seal the groove with sealant.
The second option for connecting the roof of the extension to the wall of the house
The rafters are attached to the outer top frame using metal corners, as shown in the photo below, since the dimensions of the elements do not allow special cuttings to be made, as with a Mauerlat.
Method of attaching veranda rafters to the top frame
The solution is simple and reliable, although it does not look very good, but in fact no one will see it after the roofing material is laid on the roof and the ceiling is lined with any finishing materials.
Schemes and drawings of finished structures in different styles
To implement any of the patterns in practice, it is necessary to develop a sketch of the future section in advance. The drawing is selected based on the preferences of the owners and the design style of the structure.
Photo: various options for fence sections
There are plenty of forging styles to choose from. Let's look at the main features of the most popular of them. This:
- Russian. Convex shaped elements are used. Patterns are created with natural motifs.
- Russian-Byzantine. Very similar to the previous one. The parts also have a convex shape. Decorated with floral ornaments. But the main difference is that the composition is complemented by geometric shapes.
- Baroque. The fence is full of small patterned details. They can be flowers, baskets, crowns, figurines, ornate ornaments. All these elements create an overall picture of luxury and sophistication.
- Gothic. The fence turns out to be an elongated shape, directed towards the sky. Often the main detail is a pointed arched structure, which looks very impressive.
- Rococo. It acts as a continuation of the Baroque, but it has much fewer small details. The main emphasis of the style is elegance.
- Modern. Forging is full of abstract elements, evenly or unevenly spaced curved lines.
Roof construction
After building the frame, they begin to install the rafter system. For the rafter system of the veranda, the same 150*50 mm board is used as for the rafters of the house itself. The angle of inclination of the veranda roof must correspond to the design. If you decided to attach a veranda to the house on your own, and was not supposed to according to the design, then the roof should not be made too flat, otherwise it may collapse under the weight of the snow.
The rafters are sawn to the required size and attached on one side to the frame using nails, and on the other side to the house using two metal corners. The corners are attached to both sides of the rafters, which are drilled through. A pin is inserted into the drilled hole and the corners are pulled together.
Photo of fixing the rafters in the wall:
Thus, we obtain a strong, reliable fastening. If the veranda is planned to be insulated in the future, then the roof will also require insulation. To avoid the insulation getting wet, a vapor barrier is stretched along the rafters, a counter batten is nailed, and then the sheathing is made. If the veranda is open, then the rafters are immediately lathed with 150*25 mm boards. Roofing materials can be laid on such a sheathing: profile sheets, slate, metal tiles.
If you want to cover the veranda with flexible tiles, you will have to make a solid base. To do this, you will have to put sheets of plywood on the board sheathing, and then the tiles themselves.
Photo. Plywood base for flexible tiles
Peculiarities
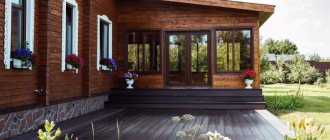
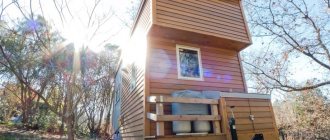
Usually there is no heating in the veranda. Entrance doors are located inside. The timber structure looks great, is durable and does not require complex maintenance.
A timber veranda will be a successful addition to a private home.
Classification of terraces is carried out according to different criteria. Depending on the type of extension, they can be corner, end and façade. It is important to choose the right place for the extension so that wind and precipitation do not spoil your vacation.
Also, the veranda can be:
- open - mainly used in summer, with the arrival of spring;
- closed with glazing - polycarbonate or special curtains are best for finishing;
- combined – the presence of sliding partitions is noted.
Sometimes the room is insulated. Due to this, you will be able to use the veranda even in the cold season. When filled, the structure can turn into a full-fledged part of the house. In most cases, verandas are made with a minimum number of interior components.
Timber is an excellent material for constructing a building. Its advantages:
- good appearance;
- low cost;
- ease of work;
- strength.
Having chosen what type of room you like, you can begin drawing up drawings.
Glazing: what and how
Even a large open veranda can be glazed if desired. The easiest way is to call a measurer from a company that sells metal profile windows and listen to their proposals. They may offer windows that open or not. Here the choice is yours. The glazing of the veranda looks like the photo below. For a summer residence, this option may be unsafe: if the territory is not guarded, it can be broken up.
b76aad4ce6a766298c8387ed903857fb.jpe 4c85e95761ad41d4d91c4185895aaee8.jpe
Glazing of a large veranda
Even with this solution, questions arise:
- Install single or double frames. If you have finances, it’s better to bet double. They hold heat much better. Even if you only come to your dacha in winter to check how things are going, in spring or autumn it will be much warmer. To the point that if the veranda is on the south side, while the house is heated, you will bask on the veranda: the sun heats the air, and the frames retain the heat. It will be especially warm if you make an insulated floor. But even with a single deck, the temperature in the glazed extension will be much higher than in the house.
- The windows must be burglary resistant or not. If there is no security nearby, then even the best ones will be able to break into it. Even tempered reinforced glass will not last long against brick. And in order not to provoke thieves, the entrance to the house should be behind a reliable metal door, but the entrance to the veranda can be equipped with simple doors.
In the photo below, the veranda at the dacha was glazed with double windows. With a cracked floor in the spring, the extension is much warmer than in a log house.
When deciding how to glaze the veranda at the dacha, keep in mind that double races retain heat better even in an unheated extension
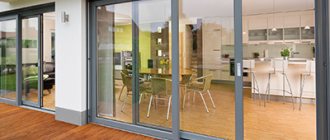
Large glazing area - large sashes. If you order double frames made of wood, they will open inward (the same as fiberglass). If the veranda area is small, they can get in the way. There are several options here. First: order ones in which both frames will open outward (there are some). The second is to install sliding ones. One point: sliding ones are made only from aluminum profiles. Even if they can make you one from wood, they will cost a lot (this type of window, even made from aluminum, is not cheap at all). You can see the glazing of the country veranda with sliding metal-plastic windows in the photo.
Sliding windows made of aluminum profiles on a country veranda: comfortable and warm
If the veranda in a house is made of logs, and it was cut down along with the house and was originally planned as open, the white windows in it will look, to put it mildly, “not very good.” Not everyone can afford windows with wooden frames over a large area; metal-plastic is still cheaper. The solution is simple: there is laminated aluminum. A film imitating the surface of wood is glued onto it. You select the required color and everything looks good (an example of such glazing of a veranda on two floors is in the photo below).
Glazing of a veranda at the dacha made of logs (the mounting foam is visible, it will then be covered with flashings)
After the veranda has been glazed, I want to build an open gazebo. How? Read here.
Another option is frameless glazing. In this case, a strong strapping is made at the top and bottom, special glasses are inserted between them, and the gaps between them are sealed with rubber seals or covered.
Frameless glazing of the veranda in combination with a log house is not the best solution
Wood and polycarbonate combine better. Its advantage is that you can install it yourself: make frames with a quarter removed, install polycarbonate sheets in them with sealant. They are attached to the frame with self-tapping screws with special thermal washers that compensate for different temperature expansion. The seams between the sheets are filled with transparent sealant, but there are special mounting profiles for joining the sheets.
Glazing the veranda with polycarbonate: you can do it yourself
You can glaze the veranda yourself in this way. Polycarbonate weighs relatively little, is not so demanding on transportation conditions, and is easier to work with than glass. Due to its cellular structure, it retains heat even better than glass: it is used in greenhouses and greenhouses. So a veranda at the dacha can not only be built with your own hands, but also glazed.
Construction of a wooden veranda
First of all, you need to make a frame:
- A beam is placed on the floor for strapping, in which grooves are cut for attaching the racks. The racks are installed and fixed with nails. Those that are adjacent to the main building must be secured with anchor bolts. A step must be taken equal to the width of the window in the place where it is planned. It is best to leave a place for the door somewhere at the end to avoid drafts.
- Another beam is attached to the racks on top to create an upper frame.
- Where the roof slope of the main house is located, you need to attach the purlin beam with anchor bolts.
- The rafters are being installed.
Roofing "pie"
The roof is created according to the same principle as in the main house, only it is usually made pitched and more sloping. An important point is that a vapor barrier on the veranda is not needed, since there is no under-roof layer. It also does not need to be done when insulating walls and floors. Steam should not accumulate inside and will escape into the attic where it will escape from the house. Most often, for waterproofing, a superdiffusion film is laid, which allows moisture to pass through only in one direction. However, when using metal tiles, they are not used, since the metal will rust from condensation. In this case, you should buy a special condensate film.
75d1e35715edc3035db78a241ca54329.jpe
c86fe39b8cd70ec052b1d3ec59684c62.jpe 42139d3df4b581bfdfb86133d46a19de.jpe
9bddee2da33a2d258da15210d9fc0754.jpe
Project
You can schematically designate the veranda at the design stage of the entire building. But the thought of adding to the main room usually comes later.
Creating a veranda project is necessary for accurate calculation of materials
Remember that any large-scale construction must be carried out according to a design that takes into account:
- functionality;
- design;
- architecture;
- organic combination of the structure and the house.
In addition, a building permit cannot be obtained without a project. The practical benefit of drawings is the ability to roughly calculate how much material will be needed. By doing the work step by step, the likelihood of errors is reduced.
To make a project, you need to know certain nuances. You can take on the drawing yourself, using the Internet and special programs as an assistant. Or turn to professionals, but it's not free.
The project indicates:
- location of the structure relative to the house;
- entry point;
- dimensions;
- other nuances.
Thanks to the drawings, you can schematically imagine what the building will look like.
Preparatory work
When planning to modify a domestic building, it is important not to lose sight of a large number of features. The extension is always organized from the door side, since it is its characteristics that determine the length of the selected structure
The width is determined directly by the owner, and depends on personal preferences, as well as available materials.
Drawing and site preparation
The layout of the base directly depends on the option of the extension and its approximate appearance, so you first need to decide on these parameters and sketch out ideas on a piece of paper. The next step will be to transfer all the preferences into a computer program for creating drawings - there are quite a lot of them, they are easy to use, so this stage will not take too much time. However, it is quite important because it helps to arrange all the components symmetrically and rationally in relation to each other.
A fairly simple way that does not involve a lot of time is to search for ready-made drawings on the Internet - often they are all for standard extensions, but you can also find quite unusual ones.
If you are not confident in your abilities, you can choose the simplest, but at the same time the most expensive option - contact a construction company. There, in a short time, you can get a finished project that is absolutely correct in all respects, without worrying that the site being built will collapse.
Find out whether the veranda and terrace are considered the area of the house according to SNiP.
When the sketch is ready, you can begin preparing the site. First of all, it is necessary to clear the desired area of land from weeds, debris, dry leaves, etc. Then arm yourself with a building level, wooden pegs and rope - with the help of these materials you will be able to trace the extreme points of the future structure. Next, the area for the extension must be cleared of the top layer of soil (20 cm), covered with crushed stone and sand so that each layer is 10 cm, plus small layer-by-layer compactors.
When done correctly, a square or rectangle will have equal diagonals. If the digital values of the segments do not coincide, under no circumstances should the structural elements be left in this form.
Required materials and tools
Regardless of the type of building, you will need the following building materials:
- wooden boards for making sheathing 25 mm thick;
- beams 50×50 and 100×100 mm;
- reinforcement, rods or mesh;
- flooring boards 3 cm thick;
- roofing sheets that match the material from which the trailer roof is made;
- any desired windows (if veranda);
- fencing and partitions (for terraces);
- ready-made railings and jibs or beams for their manufacture;
- control supports - 4 units (necessary if the area where you live has high humidity and the soil is prone to subsidence).
Important! Since the building is temporary, it is recommended to insulate it with inexpensive materials such as polystyrene foam or glass wool.
The amount of materials is taken from the calculation of schematic data. Screws, nails, straight and oblique metal corners, as well as self-tapping screws are used as fasteners.
Required tools:
- hand or chainsaw;
- drill;
- Bulgarian;
- screwdriver;
- electric planer, etc.
Decorating the terrace
Beautiful and useful design of the terrace space is an important part of the style of a modern home. The active decor of a recreation area can be forged or wooden fencing elements, stained glass partitions, and airy tulle curtains around the perimeter of the structure.
d75ffb50c7b828076a676e680cdf9821.jpe 1a465e3eafb64abdf8ba395b9acd70ca.jpe cb800eb3e2d2dc1f007f72497a99c2ea.jpe
a8b458caa38c36a7bdf30cd314040729.jpe
In the recreation area you can place wicker furniture, beach umbrellas, sun loungers, tables, and a barbecue. The unique style of a terrace depends on many details. This means that you should think not only about practical things, but also about things that are pleasing to the eye.
You can complement the interior with plants and flowers in pots, hedges, wind chimes, and paper Chinese lanterns.
If you don’t have any ideas for your own design, then photos with examples of terrace design can inspire and suggest in which direction you should move.
Stylish housing from the manufacturer
Manufacturing companies transport, produce and assemble wooden objects of any level of complexity. The production uses excellent wood, which is obtained mainly from Kostroma forests. Forests from Kostroma are famous for their long service life, which is praised even abroad.
Thanks to professional employees, work in large companies is carried out:
- within the agreed period;
- Full construction;
- with a high level of quality.
Leading manufacturers on the market actively use:
- the best innovative ways to build residential premises;
- new equipment;
- transport for project delivery;
- working technologies.
This creates truly stylish housing. Thanks to these advantages, the designs are not only beautiful and practical, but also durable.
Important: when purchasing a set of timber housing from the manufacturer, people have a guarantee on all materials.