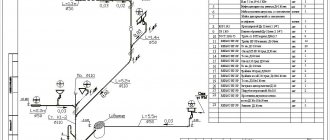
Before you begin installing a sewer system in your dacha, you need to decide what exactly the drainage and filtration scheme will be. There are several technical points that should be present in every system:
- The distance from the receiving well to the water wells must be in accordance with SNiP.
- The diameter of the pipeline through which sewage will be drained must correspond to the number of plumbing fixtures and the approximate efficiency.
- The depth of the external trench cannot be higher than the soil freezing layer.
- It is necessary to have a sealed well or septic tank for drainage.
Types of devices for a country house
- Filtration septic tank with a compartment for settling the thick fraction. This is an advanced technology, the main operating principle of which is to separate sewage that enters the collector and divide it into fractions. As a result of passing through several filtration chambers, the liquid is purified to a state that is safe from the point of view of sanitary standards.
- Local treatment plant. In fact, these are mini-purification plants based on the use of bacteria to purify water.
- Using the container as a cesspool.
Country drainage can be separate and common
The first case is when wastewater from different plumbing fixtures enters different containers for sedimentation and filtration. In addition, separate delivery of water from street storm water collectors and the internal network is considered a separate form.
The general sewage collection and drainage system consists of laying a single pipeline both for indoor appliances and for collecting water outside.
Simplest cleaning
If there is a lot of wastewater and you are afraid of rapid siltation of the filtration well or filtration field, it is better to supply wastewater to it after preliminary treatment . The easiest way to do this is with a sump tank - an open, wide container located between the water discharge points and the filtration system. The pipe draining water from the tank should be located 0.2–1 m above its bottom. In the sump, the water is aerated, which helps purify it, and solid waste falls to the bottom. Purified water goes further. Of course, the bottom of the sump will have to be cleaned periodically.
Year-round accommodation and summer
If no one lives at the dacha in winter, then it is enough to assemble a summer sewage system. In this case, there is no need to dig a deep trench and lay a larger diameter pipeline.
The outlet from the house also does not need to be installed at the very bottom of the foundation. The exit is made directly from the top point of the plumbing fixture. A simple scheme for collecting summer sewage in the photo:
As for the collector into which the water will be drained, it must still be sealed and securely installed. There is no need to install a septic tank; a regular drainage pit will do just fine. At the end of the summer season, it will simply have to be pumped out and preserved for the winter.
If you live year-round in a private house, you will have to complicate the task a little. To use water and a toilet in cold weather, it is necessary to ensure good insulation of external sewer pipes. In addition, there are still some difficulties during installation. This includes the depth to which the external sections of the water supply system are buried, its insulation, and many other factors.
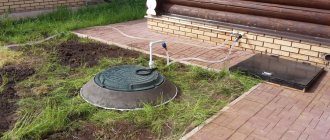
How to mothball a well
The well is preserved for the winter so that in the spring it is completely ready for use. This means that throughout the winter we will not be able to use it; access to water will be completely blocked. We have already done the main work: we drained the water from the pipeline, heater and plumbing fixtures, and removed the pump.
Now the well is not in danger, the main thing is to close the wellhead correctly: screw on the head, which will protect sheets, etc. from rain, snow, and seal it with film.
In a water supply system arranged according to all the rules, a caisson is made - it deepens the well below the freezing point, protecting it from rain and groundwater. A well with a caisson will survive any frost, the only thing is that this device is not cheap.
A FORUMHOUSE user with the nickname Lesha-Samurai has a fairly standard situation: there is a well 75 meters deep (self-flowing 10-15 m3 per hour), which will not be used in winter, and a categorical reluctance to install an expensive caisson.
According to FORUMHOUSE administrator Andrey 203, a caisson is the only reliable option in a leshy case.
A caisson is needed to move the wellhead below the freezing depth of the soil.
However, a successful method of caisson-free well conservation has yet been found. Using this technology, Lesha-Samurai and his friend have been preparing their well for winter for several years now.
The algorithm is like this:
- Take 6-7 soda bottles (there should be some drink left in each bottle), shake each bottle to create pressure in them.
- Remove the head of the well and insert bottles into it.
- Put the head back.
- Pump air into the well using a car compressor through the nipple (pump for about 10 minutes). This will ensure that the water level in the well is reduced to the level of soil freezing.
- Shut off the air outlet from the well with a ball valve.
Lesha-Samurai
You can take a plug for 1, use a drill to make a hole of a suitable diameter in it and insert a nipple into it with oil.
Even if air leaves the well through elements of such a structure and the water level rises, the bottles will prevent its expansion.
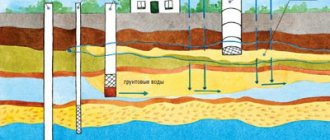
Norms for the distance of treatment facilities on the site
According to SNiP, treatment facilities and pits must be located at a considerable distance from the house, water well and other engineering facilities.
- From a residential building - at least 5 m to a septic tank, VOC, cesspool to avoid unpleasant odors entering the room. And also prevent in advance the possible disastrous consequences of the influence of a humid environment on the foundation of the house.
- It is 30-50 m to a water well. Of course, it is very difficult to follow this rule, since the size of the plots is very limited. It is still necessary to remove the septic tank from the water supply system as much as possible, to the extent technically possible.
- To the borders of the neighboring plot - at least 2 m.
- From the collector to plants and trees - the location is 2-4 m if the tree roots are large.
Neutralization of sediment from a septic tank
When you clean out the drainage pit yourself and try to place sewer sludge on top of the ground, the result is the same - an abundance of flies and infections among household members. Waste can and should be converted into compost, completely disinfecting it from microbes.
Having chosen a place - 15 m from the house, 25-30 m from the well - you need to dig a hole half a meter deep and of the required size. Its pit is waterproofed with crumpled clay in a 200-300 mm layer, concreted or lined with bricks with the sides raised above the ground surface.
Sides are required - the sewage collected in the compost pit should not penetrate into the soil and contaminate it. To completely eliminate moisture exchange, cement mortar is applied to the walls of the pit, followed by ironing. It is also useful to coat the surface with bitumen.
The bottom of the compost pit is sprinkled with a 150 mm layer of peat or dry soil, and waste is placed on top. Having increased the layer of sewer sludge to 250-300 mm, you need to cover it with a 100-150 mm layer of peat or dry soil.
Having raised the compost heap to a height of 1000 mm above the ground in a layer-by-layer manner, you need to fill it completely with earth or peat 150-200 mm thick and leave it for 8 months to mature.
If, during the process of filling a compost pit, you sprinkle the layers of waste with a small amount of ash and pour a little water on them, then the compost will ripen faster and of better quality.
Materials and tools
- To dig a trench, you will need a small excavator. If there is no possibility of heavy equipment coming in, you will have to take up shovels.
- The pipes need to be cut with something, some people use a grinder with adjustable speed, or you can use a hacksaw with fine teeth.
- Jackhammer, perforator - make holes in the well and foundation of the house.
- Sand or fine ASG for fixing the pipeline in the trench.
- Insulation, thermal insulation in places where laying sewerage through an external network to a depth below the soil freezing layer is impossible.
The main segment of the drainage system is the pipe, here are its main options:
- Red PVC is available in various sizes.
- Black polyethylene ones also come in diameters from 50 to 159 mm.
- Ribbed - pragma. The length is 4 and 6 m, the diameter is from 100 mm to 500 mm.
- Gray polypropylene (plastic).
Summer water supply at the dacha made of polypropylene pipes - design options
The problem of water supply to a summer cottage worries many summer residents, because without watering you can’t even dream of any harvest. Carrying water from the nearest pond or well is simply physically impossible. The most effective way out of this situation is to install a summer water supply system at the dacha using polypropylene pipes. Of course, this will require certain investments and physical effort, but the result is the ability to water the site in a very short time. And since there is water in the well or well that is quite suitable for drinking, in addition, you will provide yourself with drinking water. Consequently, summer water supply at the dacha can significantly make life easier for the owners of the plot, create conditions for more rational use of the land and even for comfortable living in the dacha.
Do-it-yourself system installation in a private house
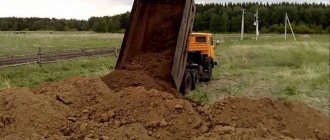
After the cesspool is placed on the site, you can begin to dig a trench to the required depth. In the central part of Russia it is 2-2.5 meters, in the northern regions it is a meter more, and in the southern regions it is 1-1.5 meters. They begin to dig a trench from the wastewater intake point to the top, towards the house.
Now a fine sand and gravel mixture, a “cushion,” is poured onto the bottom of the pit along its entire length. It’s better to immediately “shoot” the slope at least a little and level the sand.
The next step will be laying the pipeline itself. First, the end is inserted into the well so that the socket faces towards the house. It is advisable to immediately secure the pipe in the hole with mortar or foam. Then they are connected in series with the blank end into a socket. To simplify the process, the rubber bands are lubricated with motor oil or special lubricant.
Each pipe is measured to ensure it meets the required slope. This can be done with a building level, but it is better to take a level.
According to SNiP, sewerage is laid along a slope corresponding to the diameter of the pipe. For a diameter of 40-50 mm, the roll is 3 cm per meter, 85-100 mm - 2 cm per 1 m, and for 150 mm it will be 0.8 cm per 1 m.
After assembling the outer line, the line is aligned along its entire length so that the entire straight section is visible through the hole.
Surface drainage
This water drainage system is designed to drain storm and melt water from the site (overflow) and is called surface drainage.
It’s easy to protect yourself from melt and storm water:
- It is necessary to dig ditches half a meter deep along the perimeter of the site with walls sloping at an angle - they will discharge water into a common drainage ditch behind the lowest point of the site. Their bottom is covered with crushed stone, broken bricks, straw, poles, and the top is covered with earth;
- A more rational and reliable way to prevent your site from turning into a swamp and the foundation from “floating” is to install a more serious surface drainage system, which involves laying plastic channels or rectangular polymer concrete gutters around the perimeter (linear drainage). Plastic ducts are inexpensive and come in several varieties, but they all resemble halves of a pipe cut lengthwise. They allow you to quickly install a branch over large areas using special fasteners and adapters. The channels are covered from above with protective grilles;
- Polymer concrete gutters are more expensive, but the quality of this material is much higher than that of plastic. They are just as light, but more durable, abrasion resistant and waterproof;
- Storm water inlets. These adapter tanks are used to collect rain and melt water from the roof of a building (with a vertical drain) or are installed at the “point of intersection of slopes”, collecting water flowing from the entire site (with a side drain). To protect against debris and leaves, cast iron, steel or plastic grilles are mounted above them.
When installing surface drainage for an area, you must remember that it cannot be connected to the drainage of the foundation, otherwise storm water flows may flow under the base of the house and undermine it.
How to make proper sewerage when the groundwater level is high
If, when digging a trench, water has already appeared in the upper parts, you will still have to dig to the required depth.
If the sewage system is assembled correctly, groundwater will not affect further work. To prevent water from interfering when laying pipes, the trench needs to be dug a little wider and a recess of 20–30 centimeters must be dug along its very bottom along the edge along the entire length. Liquid will accumulate in this groove, and the ditch will remain dry.
Since the cesspool, VOC, septic tank and drainage system are sealed, high groundwater levels should not affect the treatment process. However, if a VOC or septic tank is installed at the dacha, then a waste pipe or dry well is required, through which water can penetrate back into the septic tank. To avoid this, a check valve is installed on the discharge pipe.
Drainage well
It’s not difficult to make a shower drain mechanism yourself by using a 200-liter barrel (or an old one). Holes are made across its entire surface. They are arranged in a checkerboard pattern, observing safety rules (wear goggles and gloves). Before burying it, part of the barrel is cut into “petals” at the base, the resulting parts are bent outward, and then installed in the ground, where the filter layer is laid. The container is wrapped in geotextile, moisture penetrates well through it. The drain pipe is inserted through a round hole made at the bottom of the barrel. This principle has been used for water drainage for a long time, and it is still used today.
A two-meter hole for a drainage device is enough for a family of 2-3 people.
Tractor or car tires help make the foundation pit strong. Bricks and ceramic tiles are laid between them, and the outside is covered with drainage material (crushed stone, sand, pebbles). Filter holes are made on the sides of the tires, and the pipe is inserted into the slot of one of the tires located in the middle.
Sometimes, due to rough introduction into the natural processes of nature, it is easy to upset its fragile balance. Special requirements are put forward when fecal sewerage is built independently, because human waste is more dangerous than drainage from a water supply or shower.
Internal layout
Details about the main stages:
- First you need to decide where and what devices will be installed. Depending on their number and purpose, the diameter of the sewer pipe is selected.
- Internal highway markings. The direction of the thread is marked along the wall or floor from the lowest point to the highest. Measurements of pieces for assembly are taken.
- Before starting to assemble, brackets are installed into which the pipes will then be inserted.
- Directly assembling the pipeline by connecting them to each other with a single end into a socket. Before inserting them, the rubber bands are generously lubricated with engine oil. During assembly, it is advisable to use a 45-degree bend rather than a 90-degree bend, since the angle of rotation of the former is much softer. Straight and oblique tees are used to connect devices. It should be remembered that the sewer pipe is not static: it sometimes narrows, sometimes it expands. Therefore, a compensator must be installed in the vertical section. Also, every 5 meters at problem areas and turns it is necessary to lay cleaning inspections. These are special fittings with a screw-on lid through which blockages can be cleared.
- A prerequisite for reliable operation of the drain is to check it after installation. You can check the joints by flushing the entire system. Having assembled all the elbows and tees, insert a hose into the latter and supply water under slight pressure. If everything is done correctly, the joints will remain dry, and all the water will go to the outer part of the line (drain).
Important: the slope of the internal sewerage system is slightly greater than that of the external one. For a pipe with a diameter of 50 mm it is 3 cm per meter, and for 100 mm it is 1.5-2 cm.
Washbasin for a summer residence
The lack of basic hygiene items can greatly overshadow your enjoyment of staying in your favorite suburban area. Hence the conclusion: a washbasin for a dacha is a device, if not an essential one, then all the same, its presence plays an important role. We are all very familiar in practice with the inconveniences caused by the lack of water in the tap, even in a perfectly equipped city apartment; they, simply put, “poison the lives” of the owners.
In order to save yourself from inconvenience in the country kitchen and just in the yard, you just need to buy a ready-made washbasin, country house or not, there is no fundamental difference, any option will do. At a fairly high price, or try to make it yourself. The advantages of the homemade version are that it is 100% guaranteed to be more functional and beautiful than its factory-made counterpart. Dimensions and shape depend only on your creative imagination.
Before you make a country washbasin with your own hands, you should know well how
- Make a frame;
- Organize drainage of dirty water;
- Make countertops, under the washbasin;
- Install a storage water tank;
- A heated washbasin for a summer house is an excellent option. Therefore, if you decide to do it, then about
Some tips from the professionals
In order for the sewer system in a private house to work for its intended period, you must first install it correctly. This is 80 percent of success. But even after startup, it is necessary to properly monitor the system.
- Initially, correctly organize and calculate the volume of waste.
- Pump out the cesspool in a timely manner. And not only the liquid fraction, but also the sediment at the bottom of the wells.
- Make sure that no foreign objects get into the pipe that could cause a blockage. For example, small parts of children's toys, rags, etc.
- Conduct a timely external inspection of septic tanks and pits to check their tightness.
Choosing the type of construction
Before you start laying pipes, you need to decide on the type of water supply: permanent or collapsible.
Advantages and disadvantages of permanent installation:
- the pipes are underground and do not lie underfoot;
- installation is carried out once;
- if the pipes are absent for a long time, they will not steal them (thieves are unlikely to dig in the ground);
- to prepare the system for wintering, you just need to open the drain valve and wait until all the water drains;
- material costs are slightly higher than when organizing a collapsible structure;
- the process is labor-intensive, especially if you have to dig a deep trench;
- the need to lay pipes on a slope;
- If there is a hole, it is more difficult to find and repair.
If a collapsible water supply system is chosen, the pipes can lie on the ground or be raised above it
Pros and cons of a collapsible design:
- quickly assembled and disassembled if necessary;
- if the pipes were damaged, then finding and eliminating the hole will not be difficult;
- the cost of a dismountable device is slightly lower than a permanent one;
- pipes lie underfoot;
- if you are away for a long time in the summer, pipes or hoses left unattended may simply be stolen;
- the need for assembly and disassembly at the beginning and end of the season.
Shower drain
Not everyone thinks about how to properly organize waste water drainage after a shower. Some splash water over the site, others build an outflow into the sewer, and some are content with a grate through which the used water seeps into the soil. But there are other solutions: they allow you to organize comfortable living and recreation without harming the environment and the health of residents.
A metal tray is installed under the shower. It must be installed correctly, then the galvanized sheet prevents the soil under the structure from being washed away. When the bowl is installed directly on the ground, a recess is dug under it, a compact hole is obtained, where a drainage pad is laid or concreted. A pipe running through the trench is connected to a sump, and the water is discharged into the ditch.