When designing a foundation for a shed, the owner of a land plot solves two main problems. This is to reduce the construction budget and not reduce the operational life of the future structure. Therefore, the first task is solved simply - the barn and its foundation are erected with your own hands. The second depends on the correct choice of the type of foundation structure.
Do it yourself
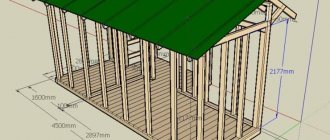
The barn itself is an easy construction, because it is most often erected as a frame structure, which means it does not bear large loads on the foundation. A frame barn consists of four load-bearing beams installed vertically at the corners of the building, tied with timber at the top and bottom. This means that it is better to build a columnar foundation for such a structure, but screw piles can also be used.
In this case, the pillars are erected precisely at the corners of the building. If you need to build a large house, then, based on the length of the span of the walls, intermediate pillars are poured in increments of 2 - 3 m between the corner support foundations. By the way, the fastest way to build foundation pillars is to use ready-made concrete blocks rather than concrete mortar.
The construction of a foundation for a barn made of blocks is not inferior in load-bearing capacity to either metal piles or a monolith. It is important what sizes the blocks are purchased. Their main purpose is to create a strong and reliable support, so the main thing in this matter is to accurately determine the dimensions of the foundation pillars, both in height and in cross-sectional size. From which it follows that first of all it is necessary to determine the pressure that will act on the foundation from the side of the building.
Roof installation options
The same materials are used for the roof truss system as for the frame.
The sheathing is made from inch boards. You need to make sure that there is no wane, otherwise the tree will quickly rot. Most often, the barn is covered:
- A pitched roof, where the slope is supported on opposite walls of different heights. Suitable for span widths up to 6 m.
Gable, in which the walls are the same in height, and the slopes meet at the highest point - the ridge. Span width from 6 m.
The angle of inclination of the roof depends on the intensity of wind and snow loads:
- the stronger the wind in the region, the smaller the angle of inclination should be;
- for snow loads the relationship is the opposite - to quickly melt away a large mass of snow, the slope needs to be made larger.
In addition to the loads, the recommendations of the roofing material manufacturer are taken into account, determining the angle of inclination and pitch of the sheathing for a particular type.
Shed with pitched roof
As a rule, the span in barns is small, so a lean-to structure is the most rational. When installing the frame, you need to ensure the minimum permissible angle of inclination for the purchased roofing material:
slate 20-35°; soft roof 5°; corrugated sheet 8°; piece material, metal tiles 25°.
To support the rafters in buildings made of blocks, a support beam - a mauerlat - is installed on opposite walls. In frame buildings, the role of the mauerlat is played by the timber of the upper frame.
Starting from opposite walls, lay rafter boards on edge. The pitch depends on the cross-section of the lumber and its length. To increase the load-bearing capacity, the elements are connected in pairs. They are secured to the support beam with a tie-in and metal plates.
If insulation is not intended, steam and waterproofing is not used, since its function is to protect the insulation from condensation coming from the lower surface of the roofing sheet. Lathing from inch boards is laid along the rafters in increments of 30-50 cm (follow the manufacturer’s recommendations). They are nailed to the rafters or screwed with self-tapping screws.
The last stage of building a lean-to shed with your own hands is the installation of roofing material:
- Slate is fastened with nails in the upper wave, metal tiles - with roofing screws in the lower one.
- To seal the joints, EPDM rubber gaskets are used.
- The sheets are laid with longitudinal and transverse overlap.
- The minimum roof overhang for thin sheet materials is 100 mm, for slate 50 mm.
Barn with gable roof
Installation of a rafter system of 2 slopes involves the installation of a ridge unit. It is performed in various ways:
- with an overlay at the apex of the corner;
with escutcheon and spacer bolt;
- with the rafters resting on the ridge girder;
adjacent to the ridge beam.
The roofing materials in the ridge are not joined tightly. The gap is necessary for air circulation in the under-roof space. To prevent precipitation from penetrating into the gap, metal ridge elements are installed.
A gable roof is more difficult to install, but it resists wind loads better. Another plus is the ability to use the space under the roof for various needs.
Type selection
The optimal columnar foundation cannot always be used. Much will depend on the type of soil on the construction site and the size of the construction project. If the soil at the site of the shed is heaving, then it is better to lay a slab or tape. Both options cope well with ground movements.
The only thing that is required from the strip foundation technology is to take into account the level of soil freezing. True, the budget may increase due to an increase in the level of laying the structure. Therefore, it is recommended to lay either a shallow foundation or a surface foundation under the shed.
As for the slab variety, this is the most expensive option, which is used extremely rarely under sheds. In addition, its costs will largely depend on the depth of the foundation for the shed. The thicker the slab, the more money you will have to invest in it.
Additional features
The shed itself is a convenient and useful building, but it can be used not only for storing equipment and garden supplies.
You can combine this building with a woodshed. To do this, part of the building is sheathed not with continuous cladding, but with gaps - for better ventilation of firewood. The roof and foundation remain the same.
You can place pumping equipment for a well in a common or separately built shed.
Allocate part of the room or use it entirely as a poultry house.
Tape
You need to start talking about strip foundations with the choice of materials. Since the structure is light, you can use various technologies that use different building materials.
For example: brick, the same concrete blocks, railway wooden sleepers, a monolith made of concrete mortar.
A brick foundation is one of the budget options. The main thing in this process is to correctly carry out the masonry with the banding of elements, which guarantees the strength of the structure and its long service life. It should be taken into account that such a foundation is usually laid on the surface. There is no point in laying bricks in the ground. If this cannot be avoided, then you will have to thoroughly waterproof the foundation walls, for example, with bitumen mastic.
The foundation of a shed made of sleepers is also an inexpensive option. The sleepers themselves are impregnated with oil, which increases their service life in difficult natural conditions. The main thing is to correctly connect them to each other, for which the joint between the two elements is made according to the principle of a half cut. After assembly, the joints are fastened with metal staples and perforated plates with self-tapping screws.
After installation, all sleepers are treated with bitumen mastic on both sides.
And the most famous technology is to pour the foundation under the barn with concrete into the formwork. The method is not the cheapest, but in some situations it is the only possible option. If a shallow or surface foundation is being poured, then there is no need to take into account the level of soil freezing.
Work progress
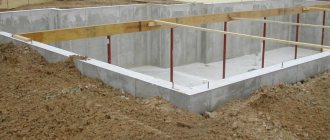
Let's look at how to properly pour a concrete foundation. First of all, the parameters of the tape are determined. Its length will be equal to the perimeter of the future building. Width and depth within 30 - 40 cm - this is a surface model, width 20 - 30 cm and depth up to 70 cm - this is a shallow version.
- In the first case, the turf is removed along the perimeter of the barn, that is, a trench 20 cm deep is dug.
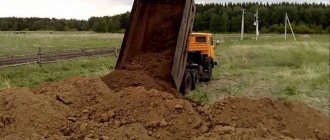
- A sand cushion is filled with a tamper to the edges of the soil.
- Waterproofing material is laid, preferably in two layers.
- Formwork is being installed, for which you can use boards, plywood, OSB boards, corrugated sheets, iron sheets and other durable slab or sheet materials.
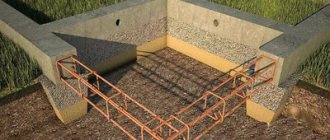
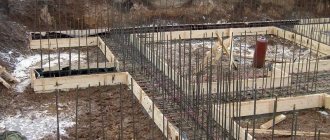
- A frame made of reinforcement is laid inside. It is knitted in the form of two lattices, which are then connected to each other by transverse pieces. The distance between the gratings is determined by the width of the trench. They should be spaced within 5 cm from the internal planes of the sheathing. If a very light barn is being built, then the reinforced frame can not be laid in the foundation.
- A concrete solution is prepared from cement with the addition of a mixture of sand and gravel. The ratio of components: cement - sand - gravel, as 1: 2: 3. By the way, the mixture can be made of sand and crushed stone.
- Concrete is poured with uniform distribution of the material throughout the entire volume of the formwork. The main task is to complete the process in one day. In this case, it is very important to remove air from the solution that gets there during the process of mixing the ingredients. This is done either with the help of a vibrator, or with improvised means: fittings, pipes, slats and others.
- After 7 days the formwork is removed, after 28 days the foundation for the barn is ready to accept loads.
Here are step-by-step instructions for pouring a strip foundation for a small shed.
Immediate progress of construction
And now we provide you with step-by-step instructions for the construction of a columnar foundation.
- In all places that were marked earlier, an embankment should be made of a mixture of sand and gravel, which should not exceed 15 cm in height - this embankment must be thoroughly moistened and compacted.
- The construction of a homemade columnar foundation begins, strange and paradoxical as it may seem, with bricks (preferably burnt, red - they are of better quality) or concrete blocks, which are also carefully laid on cement.
- If there is a very strong and irresistible desire to install a monolithic base of a columnar foundation, then you can do it differently: first, formwork is placed into which a frame of reinforcement is inserted. The formwork itself is made from ordinary wooden boards or slabs - but if you wish, you can also purchase special ready-made formwork with insulation. In any case, they must be strong and dense, so that there are no cracks in them, and there are no gaps between the installed boards. Otherwise, the concrete will leak out, which will lead to inevitable weakening of the entire structure. A weakening foundation leads to a weakening and unreliability of the building itself, no matter how light or temporary it may be.
- It is also necessary to choose the right fittings: you need to purchase a special one, the diameter of which does not exceed 7 mm.
Before soldering the reinforcement frame, it is necessary to tightly tie it with wire for reliability, although in principle, you can get by with just one thing. Soldering occurs in 10 cm increments
It is also important that there must be a certain distance between the reinforcement frame itself and the formwork walls, at least 5 cm, which is poured with concrete and forms a kind of protective layer that prevents corrosion and the formation of rust on the reinforcement. It is important to note that this entire complex reinforcement structure should not move or shift from its place, therefore, at the time of concreting, it can and even needs to be balanced with concrete, brick or even ordinary foam plastic. It doesn’t matter what the foundation will be made of: from blocks, from bricks or from a monolithic base made of reinforced concrete, it is necessary to carry out additional waterproofing upon completion of the installation of the main structures: special pieces of roofing material are placed on top of the base, on which a layer of bonded beams is then laid . These beams hold together certain corners that are used in construction when it comes to wooden structures. Usually such corners are metal, and they are much more reliable than all sorts of cuttings and notches in the boards themselves. After all this, the beams must be covered with a layer of a special solution that will prevent rotting
Plus, it can also be treated with a solution that will prevent the formation of various colonies of microorganisms or parasites living in wooden structures.
Pile - screw
This is the simplest option for constructing a foundation structure in terms of speed of work. To do this, you need to select the piles themselves by size.
For one-story wooden buildings, which include a barn, it is better to use piles with a diameter of 89 mm and a blade diameter of 250 mm. This steel element can easily withstand loads of up to 3 tons.
Installation of screw piles is often carried out on heaving soils , so their length is chosen based on this indicator. But not less than 1.5 m for light buildings. They are simply screwed into the corners of the building to the required depth, and if necessary, intermediate elements are installed, after which the piles are secured with a metal profile or wooden beams.
Floor and wall covering
As a material for the floor, as well as walls, you can use boards or all kinds of wood-based slabs. The boards are pre-treated to protect them from moisture; only water-resistant slabs are chosen, otherwise the durability of the structure is not guaranteed.
Sometimes you need to create a shed that retains heat; it needs to be additionally insulated. It is not difficult to reduce the heat loss of a wooden structure; to do this, you need to use two layers of wood, between which mineral wool or other insulation is placed. The result is a kind of sandwich that will help conserve heat without having to spend money on expensive materials.
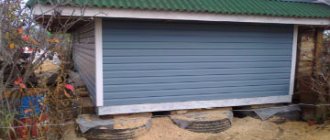
Columnar
As mentioned above, a columnar foundation for a barn is the best option. It is assembled from bricks, sleepers, vertically installed concrete blocks, or a monolith is poured with the installation of a reinforcing frame.
A block foundation made of blocks or bricks requires a special approach to preparing the installation site. To do this, the bottom of the pit or the surface of the soil must be prepared.
Make a bedding of sand with a layer of 20 cm, which is covered with waterproofing material on top. If a block post is sunk into the ground, then the pillars are also lateral waterproofed, for example, by coating with bitumen mastic.
As an option for a columnar foundation, sleepers are cut to the height of the pillars being laid and installed in prepared holes. The main task of the work manufacturer is to level the sleepers to the same level and thoroughly waterproof the areas located in the ground. This is the simplest foundation for wooden construction.
Of course, screw piles and monolith pillars have greater load-bearing capacity. A stone barn can be erected on such a columnar foundation. Although, if you correctly assemble blocks and bricks and accurately calculate their load-bearing capacity, then these materials will cope well with the loads.
The main task of building a columnar foundation for a barn with your own hands is to save money.
Warning of possible errors
Very often, when building foundations on their own, inexperienced builders make a number of mistakes that are subsequently very difficult, and sometimes impossible, to correct.
The most common ones are described below:
- An incompletely removed plant layer of soil from under the base of the future foundation threatens uneven subsidence of the latter. The roots and stems of plants, dying, will create additional pores in the soil, the location of which will be random and unequal.
- The sand cushion is not compacted enough, which also threatens uneven settlement of the foundation.
- The formwork is poorly secured. It may fall apart under the pressure of the concrete mixture.
- The reinforcement in the corners is connected “crosswise”, without providing sufficient contact between the bars. In case of high tensile stresses, the foundation in the corners may break and vertical cracks will appear.
- The installation of a protective layer of concrete is not provided. The fittings interact with air and begin to rust. Corrosion, spreading inward along the rod, destroys it and reduces its strength.
- The concrete being placed is too liquid. Often, when preparing water yourself, more than the prescribed amount is added to improve the workability of the mixture. As a result, the concrete delaminates - the coarse aggregate settles down, the fine aggregate “floats” up. It is necessary to carefully compact the concrete mixture poured into the formwork.
- It is not allowed to “dry” concrete to speed up hardening. Once it dries, it will dry out, but this will lose a significant part of its strength. On hot days, concrete is covered with film, tarpaulin or other similar materials. If necessary, water the structure with water to create the required temperature and humidity conditions.
Shed at the dacha
As a rule, auxiliary buildings and structures on the site are built with your own hands. This does not require knowledge of the same level as for the construction of a residential building with utility networks and communications. Therefore, it is quite justified to do the foundation yourself, without resorting to the services of third-party organizations. This will help reduce the cost of landscaping the site, and buildings made independently are easier to operate and maintain.
From tires
A foundation for a frame shed made from tires is an original, but quite reliable option. This design is actually the simplest. It is practically cost-free in terms of purchasing building materials.
- To do this, holes are dug in the corners of the barn with a diameter larger than the diameter of the tires by 20 - 30 cm and a depth that determines the depth of the foundation, based on preliminary calculations.
- Tires are stacked one on top of the other.
- They are filled with crushed stone of small or medium fraction (grain sizes from 5 to 40 mm). The backfill is thoroughly compacted.
- After that, backfilling is done on the outer sides of the tires with sand and soil.
- The upper rubber element is filled with concrete mortar to increase the load-bearing capacity.
Although this option is considered original, it has long been used in rural areas.
On dense soils, it is not necessary to dig deep holes for tires. One or two is enough.
They will have to be completely filled with concrete. On soft, fragile soils, holes must be made deeper, and the foundation itself must be assembled from at least three car tires. But the more there are in the pit, the higher the load-bearing capacity of the structure.
Preparation of concrete solution
The composition of a classic concrete mixture includes a uniform ratio of dry cement, sand, sand and clean water. To make the solution the desired consistency and tenacious, you need to follow a number of rules:
- the shelf life of cement must be observed;
- crushed stone must be clean, free of foreign impurities;
- It is better if the water is drinking, softened;
- the sand must be dry, without clay impurities.
Sand and crushed stone should be in a ratio of 3:5, respectively. The finished mixture is combined with dry cement (about 1 part) and mixed thoroughly. The correct mixture should have a mushy consistency, without lumps or other foreign objects. Watch the video on how to properly prepare cement mortar.
The type of foundation for a barn is decided based on many factors. It is impossible not to take into account the type of soil and the purpose of the building. Compliance with the concrete preparation technology, as well as the rules for digging trenches and installing blocks, allows you to maintain the durability of the building and make it as functional as possible.
Plate
So, let's look at how to properly pour a slab for building a shed. Usually it is erected on moving soils with minimal immersion in the soil.
Moreover, such a foundation can be laid under a shed made of blocks, bricks, under a frame structure, and so on.
In this regard, there are no restrictions, because the bearing capacity of the structure will mainly depend on the thickness of the slab foundation being poured. Therefore, under non-heavy structures, you can pour concrete mortar with a thickness of 20 cm, and under heavy structures, at least 30 cm.
- Dig a pit up to 30 cm deep exactly according to the linear dimensions of the future barn.
- A cushion of crushed stone 15 cm thick is poured into it. It is leveled and compacted.
- Fill a layer of sand to the level of the soil surface. It is also compacted with water and leveled.
- If the depth of the pit allows it, that is, the cushion was not filled to the brim, and besides, the soil in the area is clayey, then the reinforcing frame is laid in the pit on supports. If the foundation pit was not dug deep, then formwork made of boards no more than 15 cm high is installed around the perimeter of the barn. It is at this level that the frame is installed. It can be assembled from steel reinforcement, or it can be a mesh, for example, a chain-link.
- The concrete solution is poured and air is removed from its mass using a vibrator or available materials.
As for the load-bearing capacity, it all depends on the thickness of the concrete being poured and the number of levels of reinforcing mesh. For example, if a foundation is being poured for a shed made of foam blocks, and this is a small load, then the thickness of the poured layer can be a maximum of 20 cm, and one lattice of the reinforcing frame is laid in it.
If a shed is being built from cinder block, concrete block or brick, then the thickness of the screed should not be less than 30 cm, and a reinforced frame of two or more gratings installed one above the other must be placed in it.
In this case, it is very important to take into account the fact that the frame should extend 10 cm from the edges of the slab. And this is on each side.
The slab is considered the most expensive option for a foundation structure, so it is used very rarely for sheds. The main reason for the construction is mobile, heaving soils, which make, for example, columnar options unsuitable.
Is it possible to build a shed without a foundation?
Some summer residents practice the option of building a shed without a foundation. But this method is only suitable for temporary structures or for installing containers. However, even when installing a metal container, the place must first be prepared:
- Clear away debris and weeds.
- Place timber or sleepers.
- Fill the entire perimeter with crushed stone.
Sometimes summer residents install frame structures without a foundation. But for residents of the northern regions, this is not the best option. Because due to freezing of the soil, the barn will simply sag after some time.
Features in the construction of a shed on a summer cottage
Let's look at how to build a shed with a foundation from different materials:
- brick _ It is characterized by durability, strength and reliability. Requires the construction of a permanent strip or slab foundation;
- wood. Easily and quickly constructed from timber and sheet cladding materials. A simple columnar foundation is selected for it;
- framed. It is assembled like a children's construction set. Due to the light weight of the structure, the simplest foundation can be built under it. Sometimes summer residents do not make a foundation at all for frame buildings.
Attention: on difficult soils, preference is given to pile foundations; on swampy and loose soils, a slab is usually laid under the shed.
Tips/Tricks
Before pouring the supporting structure, it is necessary to prepare a good, tenacious mortar from a mixture of cement, water, sand and gravel. The following rules will help you do this correctly:
When purchasing dry cement or building mixture, you should definitely pay attention to the production date. Regular Portland cement will work here. To save cement, you should choose gravel of different diameters with large and small stones
In this case, the fine gravel will serve as a connecting link for the coarse gravel and less cement will be needed. Crushed stone should not contain debris or various impurities. Clean water should also be used, preferably drinking water. The sand must be free of clay and silt. The classic recipe for mortar: 3 parts sand, 5 parts crushed stone, 1 part cement - pour everything with water, mix until a thick, homogeneous mass is obtained.
At what distance from the fence can you build?
If the barn will be used exclusively as a warehouse or workshop, the regulations allow construction at a distance of 1 m from the boundaries of the site. But in the case of keeping animals or poultry, everything is much stricter:
- must be at least 4 m from the fence;
- from a residential building (both your own and a neighbor’s) - 12-15 m;
- from a well or well for drinking water - 30 m.
If the building is located on the north side, this protects the area from cold winds. In addition, it will not cast a shadow on the area suitable for summer cottage plantings.
When choosing a location for a shed, you need to remember fire safety. The fire gap is 15-18 m for wooden buildings, 9-12 for buildings with wooden floors and 6-8 for buildings made entirely of brick or concrete.
Material requirements
To build a shed, you need to choose materials manufactured at the factory. Since the production process is simple, they are often stamped in artisanal conditions.
You should not use such material, as it will allow moisture to pass through, will not be able to retain heat inside, and will quickly crack. As a result, the building will collapse in 2-3 years.
Factory foam blocks are always packed in plastic film, designed to protect them from moisture. It must be marked with information about the characteristics of the building material.
It is recommended to build the barn from D600 foam blocks. They have optimal strength class B2.5, which corresponds to the M-35 concrete grade.
The building will not freeze or collapse in the cold season, thanks to the following properties:
- The thermal conductivity of the blocks is low (the coefficient is 0.13-0.14).
- Frost resistance is moderate (coefficient F15-F35).
The blocks are not very heavy, so you can cope with the task on your own, or hire a small team.