If you need a high-quality forged barbecue with a roof for relaxation, then you can always find it at kazan-mangal.com.ua/mangaly-kovanye.
Lunch is prepared in the summer kitchen, tea parties are held in the pavilion, children play in the garden, adults walk along the paved paths, and in the evening, kebabs are fried on the grill under the light of lanterns.
And you still have time before the start of the holiday season to decorate the recreation area with your own hands. How to organize everything correctly - read this article.
Garden paths
A dacha is garden beds. A suburban area consists of a lawn, flower beds and paths.
How to make garden paths?
The main rule is to slow down. A good gardener puts paths where people walk, not where he wants them to. Until guests and vacationers mark the paths, do not design flower beds and paths, otherwise you will waste your time and energy.
Plots that have been waiting for years for a visit from the owners are heavily overgrown with grass, so grab a lawn mower if you haven’t been in the garden for a long time.
To make it easier for you to decide on the shapes of the paths, study the brief characteristics of the materials in the table.
| Type of coverage | pros | Minuses | How to do |
| Gravel | Fast, cheap | Inconvenient | Dig a ditch about 10 cm deep, fill with gravel |
| Concrete | Cheap, long lasting | For a long time | Dig ditches, lay wooden formwork and secure it with pegs. Cover the base with a layer of sand. Lay the reinforcing mesh and fill it with mortar |
| Tiles, natural stone | Beautiful, durable | Difficult, expensive | Dig a hole (at least 20 cm), fill in layers of sand and crushed stone, and lay geotextiles between them. Lay a layer of cement screed (3–4 cm). Lay tiles |
| Tree | Beautiful, environmentally friendly | For a long time | Treat each piece with moisture and rot protection agents and place it on a prepared base (gravel or sand). For additional protection, the soil can be lined with geotextile or polyethylene |
| Sawdust, bark | Cheap, fast | Material scatters around the area | Dig a ditch and fill it with bark or sawdust |
| Plastic modules | Cheap, convenient, fast | Short-lived | Buy plastic modules and lay them on the site |
Green roof
If you feel like planting something in your dacha, plant a roof.
Organizations that deal with green roofs describe the advantages of such a solution: durability, sound insulation, and so on. Agree, the main thing in such a roof is still beauty. This is a feature that instantly turns a simple dacha into an elite home. Well, who wouldn’t want to go to a house under a moss roof for a barbecue?
A simple option is to stretch a support mesh on the roof for climbing plants. Of course, this is a completely different solution and can only be fully appreciated at the end of the summer, but it’s still impressive.
A “classic” green roof takes a long time to complete and is quite expensive. But what a result!
- Preparing the foundation. These are the structures of the roof itself: sheathing, slabs and ceilings. Since a green roof is always multi-layered and heavy, you cannot skimp on strength. If the roof is flat, you need to create a slight slope to allow moisture to drain.
- We carry out hydro- and thermal insulation work. A layer of waterproofing materials is applied to the base. Thermal insulation is needed if it is not already available on the attic side. Choose durable polymer membranes with an anti-root layer that will protect the insulation from overgrown plants, or lay a layer of additional protection.
- Drainage. It is needed to drain excess water, but at the same time preserve the vital activity of plants. Any special material is used.
- Filtration. To allow water to penetrate the drainage system without soil, lay a layer of geotextile.
- Priming. Lay a geogrid on which you place a nutrient medium for plants, fill it with soil. Choose soil depending on what you want to plant.
- Planting. For example, planting moss is quite simple. You need to take moss (if you collect it yourself, then take it from the soil; moss from a tree will not grow on earthen soil), dry it for two days, chop it and mix it with kefir. Apply this composition to the roof with a brush or hands. After six weeks it will be clear whether the plants have taken root.
If you decide to do the work yourself, try your hand at a small roof first.
And this is what should happen in the end.
Gazebos
Landowners who install a hexagonal gazebo at their dacha, covered with a grid of wooden slats, should be fined for lack of imagination.
If there is a gazebo at the dacha, then the holiday is automatically a success: it is easy to hide from the rain and at the same time be in the fresh air. You can create something unique from ordinary wood, even if you paint and glaze the structure in an unusual way.
Simple frame + climbing plants = gazebo.
Believe me, the original small forms will be within the capabilities of the same workers who assemble standard gazebos. You can assemble a gazebo from good wood yourself. For example, in this video, a craftsman tells how to use old materials left over after building a house to make an incredible gazebo in the Far Eastern style with your own hands.
These are the kind of gazebos that can be installed at your dacha.
Pavilions
An economical option if you don’t have a country house, but you really want to go out into nature.
In good weather, the pavilions provide protection from the sun and can be used to wait out the short summer rain. The pavilion is essentially a beautiful canopy. Craftsmen will assemble it with their own hands in a couple of days, or even less. With the help of wicker furniture and light textiles, both style and mood are created. Instead of regular curtains or curtains, you can use a large mosquito net.
If you don’t want to tinker with buildings, just buy ready-made collapsible structures. Fortunately, the time of plastic pavilions reminiscent of street stalls is long gone.
Making the flooring itself
To begin with, logs are laid out on a place prepared in advance, strictly according to the diagram. The average flooring has the shape of a rectangle. Once the logs are ready, you can begin laying the boards themselves.
They should be located across the joists, and the distance between the transverse supports should be about 100 cm.
All necessary details and exact calculations must be written in your plan.
What to use as fasteners
As for fastening, choose what you like best. Self-tapping screws and nails have their positive sides that you definitely need to know about.
Nails
The main advantage of nails is their affordable price. Also, you don't need a screwdriver to work. If the owner of the site has the necessary skill, then the work will go very quickly. But you need to be extremely careful with nails.
Hammer blows leave dents in the wood that do not disappear over time.
As for the disadvantages, the design turns out to be non-demountable. If you want to disassemble some parts, it will be very difficult to do. Boards that are too dry may begin to crack when nailing. To prevent this from happening, you need to drill guides on the boards in advance so that the nail fits in easier.
Self-tapping screws
Ordinary black self-tapping screws are not suitable for street flooring. They must have a protective golden coating. Such self-tapping screws cost much more than nails, but they are the best at fastening boards together. This design can be easily disassembled if repairs or expansion of the area is needed. Self-tapping screws are screwed in using a screwdriver or drill.
How to mount correctly
Fastening should always start from the end board. If it is adjacent to the house, then you need to leave a small gap for ventilation. If you have a deck instead of flooring, then the edge of the board should extend slightly onto the joists.
The boards are attached to each other in two places. Be sure to indent from the edges, somewhere around 2 cm.
If this is not done, the boards will begin to bend over time. Experts recommend laying the wood so that the annual rings point down.
Over time, the tree will begin to shrink or expand due to weather conditions. Leave a small gap between the boards, about 4 mm. This way the wood will “breathe” and the remaining rainwater will quickly drain from the flooring.
Summer cuisine
Kebabs! This is probably the number one reason to get out into nature. The main gathering place for friends is the open-air dining room next to the summer kitchen.
A regular barbecue or fire is enough to fry meat and vegetables on the grill. If you want something more interesting, take a look at complex grill models; you can use them to prepare gourmet dishes in your dacha.
If an electric grill or roaster is installed in the summer kitchen, it will be easier to plan and decorate the summer kitchen.
How can you equip a summer kitchen?
| Type of brazier | Description | pros |
| Brazier | Roaster for cooking on coals | The most common installation for frying on a grill or on skewers |
| Grill | Grate for cooking food, heat is created using coal, electricity or gas | The stores offer a huge selection of multifunctional models |
| Roaster | Multifunctional electric oven | Easy to use, easy to move |
| Gridl | A thick, flat sheet of iron is heated by coal, electricity or gas. | Original multifunctional solution |
Useful tips
- If you are afraid of making the gaps uneven, then special plastic inserts or ordinary thick nails can help you. They are inserted between adjacent boards, thereby separating them at the same distance from each other. After fastening, the nails can be freely pulled out and placed in another place.
- Some purchased boards may not have the ideal shape. You shouldn’t throw them away right away, as they will be useful in construction. With the help of a clamp and wedges, you can straighten even the most crooked boards and use them as flooring.
- If you hate to cut the last board on the deck, then distribute them so that the width is exactly enough to cover the entire perimeter. To do this, lay all the wood on the joists, but do not fasten it. Be sure to make indents for gaps. This way you can control the width even before the main fastening of the boards.
- When you get a platform that is too large, the boards will have to be butted together at their ends. The joints must be located on the joists. If the width of the latter is too small, then double joists will have to be made in this design.
- If you bought tongue and groove boards, then there are no gaps between them. This negatively affects the speed of drying. To prevent rainwater from accumulating in one place, the boards need to be placed at a slight slope.
- The cut ends at the joints must be impregnated with protective agents so that the boards do not begin to rot due to bad weather or too high humidity.
- If you want to get a perfectly even end, cut the boards only after installation is complete. To do this, you will need to mark the cut line with chalk and carefully run a jigsaw along it. Unnecessary wood was cut away, and the flooring turned out to be perfectly smooth.
garden furniture
The finished seating area is constructed using eucalyptus or rattan furniture placed directly on the grass under the trees.
Decide for yourself which furniture to choose:
- wooden furniture easily fits into the appearance of the garden;
- Plastic furniture is easy to care for;
- metal garden kits are reliable and durable;
- wicker furniture looks great and lasts a long time;
- Upholstered furniture made of polyrattan is comfortable and can be used outdoors.
The problem with garden furniture is the capricious climate. That's why it is made of metal, wood or plastic. Reliable, but tough. Buy or sew soft pillows that can easily be hidden under the roof in case of rain.
Arrangement of the shadow side of the zone
- Swing
You can put a swing on the playground. You can buy ready-made swings or build them yourself, if possible. Since this resting place will be on the shady side, the shadow from overgrown trees will serve instead of a canopy.
- Ornamental plants
In this part of the site you can plant juniper, thuja, campsis (liana-like plant), virgin grapes or other plants that winter well in your climate.
For liana-like plants, you need to build a special support along which this plant will climb, grow and create a canopy over the swing.
- Flowers under the trees
You can plant periwinkle under the trees. It grows well, is a ground cover plant, and tolerates shade well. Looks very beautiful at any time of the year. Periwinkle prevents weeds from growing, which reduces maintenance of the area and gives it a beautiful and neat appearance.
Garden lighting
At night, ANY garden becomes magical if it is illuminated correctly.
Garden lighting is divided into two categories: functional and decorative. The first designates paths and objects, the second turns the garden into a fairy tale.
When you choose lighting for the garden, remember that, firstly, you need to choose corrosion-resistant lamps with the GS TÜV marking, and secondly, follow safety precautions when laying the cable and bury it deep enough.
| Devices | Peculiarities | How to install |
| Directional light sources with halogen and LED lamps | Used to illuminate paths and plants. Safe and low energy consumption | Choose lamps of a warm shade with a reflected light height of no more than 1 meter, so as not to blind people walking along the paths |
| Lanterns | Variety of models | Install solar-powered or motion-sensor lights to save energy |
| Candles | Create a cozy atmosphere, you can make hand-made candlesticks | Never leave an open fire unattended, even if it is just a small candle. Do not hang on trees to avoid damaging the leaves. |
| Water lamps | Original solution | Choose floating balls that can be used in or on land. The lawn illuminated with balloons looks amazing |
A budget option is DIY garden lamps. During the day, when you get tired of resting, do something creative, and in the evening look at the results.
Deciding on a place
Pay attention to the main points that should be taken into account when choosing a proposed location for a recreation area.
Wind. Determine where the wind most often blows from - this is the most uncomfortable side, especially in the fall, when it blows cool dampness. Here it is necessary to place objects that protect from gusts of wind - trees and other fences.
Sun. If the area will be frequently used during the daytime, it is necessary to provide protection from the scorching sun or arrange elements within the area so that bright sunlight does not cause discomfort to vacationers.
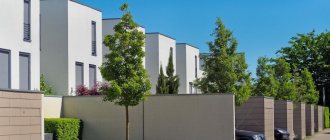
Protection from prying eyes. A wicker fence or an installed trellis with planted grapes will help to avoid the annoying glances of outside observers.
Bad weather. If located in an open area, you will need awnings to protect from rain.
Swimming pool at the dacha
Summer is not summer without swimming.
Not everyone is lucky enough to buy a summer cottage on the banks of a river or sea, but everyone can build a swimming pool. Installing a permanent pool will be expensive, and its maintenance and cleaning will take more time than swimming. The solution is an inflatable or frame pool. It is inexpensive, can be assembled in a matter of minutes, is easy to care for, and offers a lot of pleasure.
If you prepare a site for installing a pool, then it will look no worse than a stationary one.
false
Patio
It is a kind of courtyard in the yard, with a table, chairs and barbecue. It is erected in the open air and is not fenced off from the rest of the site. Additional elements may be:
- pool;
- sun loungers;
- lawns with flower beds;
- statues;
- fountains.
The specific configuration of the patio depends on the imagination and wealth of the dacha owners.
- Electric lawn mower: which one to choose?
Wooden fences
Purchase and inspection of land
And a few more ideas for the garden
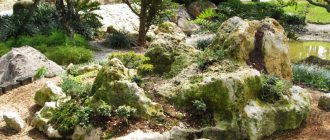
If there is free space left on your site, use it correctly. For children and adults who love an active lifestyle, build a sports ground. For beautiful photographs and contemplation, create a rock garden, plant an alpine slide, or create a small pond. To relax and do nothing, put up an original swing in the shape of a chair or pull up a hammock.
Tell us in the comments how you transformed your site.
Fire element
If you plan to spend pleasant evenings with smoke and barbecue, you can add a fireplace or barbecue to the recreation area.
Tongues of an open flame, a fire decorated into an original hearth, will decorate any place of relaxation. You can spend a wonderful evening near such a fireplace. This will also help you brighten up the evening with intimate conversations.