A patio at the dacha is a place for relaxation, parties or meetings with friends, arranged on a dacha plot, the local area of a country house, or a cottage. The site is made open or with a canopy. It is filled with garden furniture, swings, hammocks, and potted plants. A barbecue structure, a gazebo, and a summer kitchen can be attached to the recreation area.
If the project does not provide for a barbecue, then a landscaped fire pit is made in the center of the patio. Some people prefer to make a site without a fire pit or outdoor stove. Everything is illuminated by garden lanterns and street lamps. The article describes in detail the rules and stages of arranging a patio, and decoration features. Here you can see options for ready-made projects, original ideas for organizing a recreation area on the site.
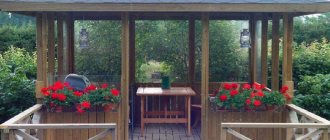
Zoned patio - covered area on piers with a simple roof and fire pit Source images.squarespace-cdn.com
History of the patio
The beautiful Spanish word “patio” came to us from the West. In Mediterranean and Latin American countries you simply cannot do without a cozy place in the open air, because there it is almost always very sunny and hot.
However, the art of decorating courtyards dates back to antiquity and the Middle Ages, when the decoration of local areas surprised with its wealth and luxury: elegant cages with songbirds, expensive vases, magnificent fountains and carpets.
Save on labor
The only way to save on labor is to do everything yourself. Hiring a contractor for construction costs a lot of money. Don't worry if you've never built anything in your life, putting together a patio is relatively easy if you follow the plan.
- Make a plan.
The first step to creating a platform at the cheapest price is to create a plan. So mark the spot where you want to assemble your patio. Spray floor paint to create an outline. It is also a good idea to place some chairs and a table where you plan to put your patio area together to ensure that this is the area where you want to place your patio. Wait a few days and make sure you choose the right location.
Create a sketch on paper and prepare measurements before moving on to the next step.
Patio design
Currently, a garden patio is considered an additional part of landscape design, allowing you to create unusual in layout and unique in style recreation areas on any personal plot.
In order to minimize the cost of time and money, you should approach its construction in stages. Namely, choose the most suitable place for the patio, decide on its purpose and design.
Decorative elements, such as furniture, accessories and other necessary cute things, are also important.
Open air cinema
To create an unforgettable effect from visiting the patio, you should equip it with a cinema. You will need an inexpensive projector and a white sheet as a screen. The projector connects to the receiver, which allows you to watch your favorite movies and TV series.
The garden cinema will have a stunning effect on guests. Its installation will not take much time, and the result will not be long in coming. It is important to consider accommodating a large group of people if you plan to invite many guests.
Classics of the genre"
Most often, patios are located at the back wall of the house. If there is a door, comfort increases significantly: you can quickly set the table or immediately remove furniture from the rain.
A patio located right next to the front door of the dacha, as shown in the photo, will become a very convenient place to relax for elderly people or single summer residents.
In this case, the terrace will offer a wonderful view of the blooming garden, and it will also be easy to quickly get home at any time.The best option
Most often, such a place is the area adjacent to the back of the house. It would be ideal to place a patio on the ledge of a U-shaped house. In this case, the site will be protected from three sides at once.
The remaining open sides are decorated with hedges or decorative screens.
It will be very convenient to have a door leading from the house to the patio. In this case, you won’t have to go around the main building every time you want to get into the courtyard.
Patio with railings
It is not at all necessary to tie the patio to the walls of the house. It is enough just to choose the most convenient place for him and fence off the recreation area from prying eyes with wooden or plastic fences.
Having created a strong paving, you need to choose the right furniture and accessories. And a patio with a canopy will become a separate room in which all family members will be happy to spend warm summer days.
Different needs - different directions
Any country property can be divided into several zones, like rooms in a city apartment. The main purpose of a patio is to serve as a relaxation and entertainment area. The planning of the patio area should begin by taking into account the wishes and needs of all inhabitants of the house.
If you like to relax, dreamily swinging in a hammock, you will have to think in advance about what it will be attached to.
If there are sports fans in the house, it is important to provide an area for active recreation.
If you prefer to have picnics and invite guests to them, you will need a place where you can put a grill or barbecue.
If you are a big fan of water treatments, then you need to find a place for a pool. In small areas, the pool will not fit into the overall design of the site, so you can limit yourself to only a small artificial pond.
Relaxation area in the center of the garden
Fences can be made not only in a rectangular shape. The catalogs present various variations of beautiful patios with unique curves that will decorate any garden plot, giving it a unique flavor.
A patio located on a specially built platform in the very center of the garden will look no less beautiful.
For meetings with friends, which often last until late, using a canopy would be an excellent solution. Under which it is very convenient to place lamps.
Bright nights
The lighting system at night plays not only the role of safety of the summer cottage, but also gives it unique beauty and comfort.
Drinking tea with family and friends in the evening on a patio surrounded by a garden illuminated by colorful lights is an incomparable pleasure.
Patio for heart-to-heart conversations
In a remote corner of the garden, away from any annoying noise and prying eyes, you can calmly retire and talk on a patio for two.
To implement such an idea, it will be enough to allocate three or four square meters and place a small table with two chairs or armchairs.
A wonderful alternative to the living room will allow you to meet a guest and have a nice conversation with him in the fresh air, surrounded by a green flowering garden.
No. 6. Organization of patio space
Once the location and materials have been chosen, you can begin the fun part - organizing the interior space of the patio. We are talking about furniture, accessories, plants, fountains, lighting, fires and other elements. You don’t have to use everything - decide what you really need and what items can convey the desired mood.
Furniture
Garden furniture is definitely a must-have. This could be a table with several chairs, sofas, sun loungers or even hammocks. As for the materials used, there are a lot of options:
- plastic furniture is inexpensive, is not afraid of moisture, weighs little, which means it can be brought into the shelter without any problems if something happens. Outwardly, it looks rustic, but you can find very nice options. Plastic quickly becomes scratched and is not very durable;
- Furniture made from artificial rattan looks solid, is not afraid of moisture and heat, is strong and durable, easy to care for and has a wide variety. Rattan is used to make cozy armchairs and chairs, various kinds of tables, sofas and even entire beds. If you complement such furniture with cute pillows, you will get an ideal option for the patio. Prices are reasonable;
- wooden furniture looks great, amazes with its variety of shapes, but is expensive and difficult to maintain;
- forged furniture is durable, beautiful and repairable, but is not cheap, and gets very hot in the sun;
- Furniture made from natural rattan or wicker looks chic, but is very expensive, and it is difficult to maintain.
Also consider placing a hammock or hanging chair within the patio. If space and natural light allow, you can also add several sun loungers.
Plants
An indispensable element of the patio is green spaces. Plants can be in pots, in flower beds, in planting pockets, they can stand on the floor, on stands, steps, any rises, they can hang down and be in hanging pots. Don't be afraid to go overboard. This is the case when there will not be many plants.
Vases and pots can be absolutely any size, style and shape. The contents of the flowerpots also depend on your preferences and the climate of the region. In some southern cities, it will be possible to successfully grow palm trees, someone will want to have cacti on the patio, and someone will plant juniper or a rose bush.
Separately, it is worth noting the organization of planting pockets for green spaces. To do this, you need to prepare holes in the flooring in advance. They are created either at the paving stage, or are cut out later if we are talking about wooden flooring. Of course, it is better to think about such landing pockets in advance in order to properly prepare these places.
What else?
In addition to furniture and greenery, to organize the patio area you can use:
- small fountains, ponds , garden sculptures and other decor. Remember, the patio is a place to relax, and everything here should be tuned to it;
- hearth . If space and funds allow, you can build a full-fledged stationary oven, where you will cook delicious dishes. If there is not enough space, then you can get by with a mobile grill or barbecue - this is also an excellent option. You can create coziness with a fire pit. They can be stationary or mobile; they will make gatherings truly warm and unforgettable;
- projector and canvas screen will allow creating a full-fledged open-air cinema. We hope you don’t even need to explain how cool it is to enjoy your favorite movie or new movie while sitting in the fresh air and sipping a cool cocktail;
- lighting - an important element of organizing a patio at the dacha, because gatherings often end after sunset. You can solve the problem of artificial light with the help of several garden lanterns, sconces on the wall, garlands, etc. A special chic is the lighting built into the floor, which will create an incredible atmosphere.
Also don’t forget about textiles: cute pillows, bolsters and blankets will be appropriate.
Place for family and friendly meetings
The size of the patio can be either very small, as in the previous example, or much larger, depending on the number of family members.
It is very cozy and comfortable to gather a large family at the dacha in the summer and have a feast at a large round table. Here you can also allocate space for a barbecue area, fireplace, grill and even a swimming pool.
The picturesque view will be complemented by flower beds, small fountains, shrubs and trees.
Original ideas in landscape design
Ideas for patios at dachas will help you diversify the exterior of a private home and improve your home area:
- Swing. Adults and children love them! Place it on the site itself or not far from it.
- Hammock. An excellent option for a patio terrace: you can relax with a book, admire nature, or sleep during the day.
See also: How to hang a hammock in a country house without trees?
- Living water. A waterfall or stream with running water will provide the perfect backdrop for relaxation.
- Bonfire. The smell of smoke and the sound of crackling logs is as calming as the sound of water.
Variety and styles of patios
In the dacha landscape there are several types of patios: corner, “G” or “U” - shaped, multi-level, located at the main entrance or at the back wall of the building.
A small artificial pond fits perfectly into the recreation area, combining perfectly with the green flowering garden.
In order to sunbathe in the sun on a hot summer day or hide from the rain in bad weather, it will be enough to build a retractable canopy.
Finishing touches
After laying all the stones and marking the site, sand is poured on top. It is spread over the entire surface. It fills cracks and smoothes out uneven surfaces. After this, the site is filled with water.
The procedure is repeated three times. After some time, the recreation area will be ready for use. If one of the doors of the house does not open onto the patio, a path is brought to the site. It is better to make it from the same material that was used to decorate the coating.
Relaxation area decorations
When wondering how to make the patio homey and comfortable, you should complement the resting place with wicker chairs, a small table, a sofa or even a hammock.
The entrance can be decorated with an alpine slide, a small fountain, flower beds, plaster or bronze figurines, and an original fence.
There is a very large selection of design options. Most often, summer residents use a rural style with picturesque gazebos, wicker furniture and wooden benches.
Creating a hearth
If there is a lot of space, it is better to install an original stove or outdoor fireplace on the patio. It's nice to gather around the fireplace in the cooler weather. For small areas, purchase a mobile grill. It is easy to prepare a delicious dish for the whole family.
Particular attention should be paid to the place for the hearth. A fire bowl is often installed here. This decoration is romantic and spectacular. The hearth area is equipped with refractory brick or stone. Often, owners of private homes choose portable fire pits.
Design features
A very beautiful solution would be to use the Japanese style, characterized by stone flooring and bamboo interior items.
Residents of the Mediterranean primarily use white patios with wooden floors and brown or brick-colored flower pots.
The Moorish style is characterized by rich, bright colors and mosaic floors.
Practice
If you've never held a cordless drill or driven a nail into a piece of wood, it's best to build a practice board before getting started.
So, take some wood and build a small step or some sort of platform to practice your skills and learn how to use different power tools.
Using power tools isn't all that difficult, but it's easy to make mistakes. Therefore, practice with the power tool on rough boards before using the deck.
- Prepare the decking area.
It is recommended to spray herbicides over the entire deck area to prevent weed growth. You can also put on weed control fabric to keep them from growing.
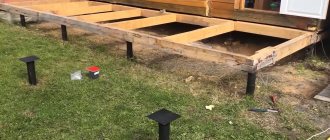
- Build the frame.
You can use regular boards to build the frame. To build the frame, you first need to lay boards on the front, back and sides. Make sure everything is level. Once the outside boards are secured, you can insert the joists into the slots in the deck block and screw everything together to build the frame. Ideally, it should not take you more than a few hours to completely build the frame.
Material selection
To create the most comfortable patio area, you should think not only about the furnishings, but also about how to choose the right materials for the paths and base of the site.
It is better to avoid sand, gravel and expanded clay, since the loose material is uncomfortable to walk on and cleaning will become more difficult.
For the base, paving slabs, clinker bricks, porcelain stoneware, natural stone or concrete slabs are more suitable.
Feuerplatz, or fire pit with benches
A slightly simplified, but also interesting option from Sensorin. In addition, the speed of execution in one hand is much higher - several stages, and everything is ready.
Marked an area around the fire pit.
Removed the fertile layer.
I covered it with geotextiles, covered it with sand, compacted it, and made markings for the frame of the benches.
Racks made of a 20×40 mm profile pipe, about 1 meter long, hammered about 55 cm into the ground, leaving 45 cm above the ground. I welded crossbars and supports for the backs onto the racks.
The surface was covered with sand-cement mixture and tiles were laid, and sand-cement was also placed in the gaps. The brick neck of the fire pit was concreted.
I painted the boards for the benches, drilled holes and secured the cladding to the frame with thick self-tapping screws.
For night gatherings I made lighting under the seats.
Lighting and landscaping
In order for the patio to be used at any time of the day, the recreation area should be equipped with lanterns or garden torches. To create a shaded and sunny area, you can use a pergola overgrown with climbing plants: virgin grapes or lemongrass.
If the adjacent wall does not look aesthetically pleasing, then it can be hidden with an abundance of climbing greenery. Or, on the contrary, emphasize it by placing flower pots on it. The corners of the patio can be decorated with tubs of cypress or lavender.
Interesting, pleasing little details can add originality and special comfort. Such as figurines, flowering vases with a romantic or national flavor.
Undoubtedly, on such a patio you can have a great time with friends or family. This place will become indispensable for a country holiday.
How to decorate beautifully?
Still, the patio is part of the landscape, so plants are considered its main decoration
.If trellises are used as fences, let climbing plants grow along them. The second landscaping option is a hedge of tall bushes or dense trees (it is best to use conifers). The patio is decorated with flowers in flowerpots and vertical flower beds. Alpine slides or beautiful flower beds are decorated in front of the entrance.
The floral theme is also used in decor:
- vases with cut bouquets on the tables;
- beautiful wreaths;
- dead wood.
In the photo the street is decorated with flowers in flowerpots
Another direction of decoration is light. With the right lighting you can create a truly magical atmosphere. Use cute string lights on your living room patio or deck, and pretty hanging lampshades and candles in your dining room. Illumination can also be outside: for example, outlining the path leading to the patio with solar-powered street lights.
Photo of a patio at the dacha
Total
Category: Gazebos and baths
Flooring
Attach the deck boards. Once the frame is finished, you simply need to attach the decking boards to the frame. It is recommended to use two screws for each beam in the frame. Make sure to leave about 5mm of space between the boards to allow water to drain downwards. To drive nails, it is recommended to have a high-quality impact screwdriver or hammer in your hands. Note that you'll be drilling several hundred screws, and it's best to have a few battery packs on hand so you can nail the entire deck in one go.
One way to do this quickly is to create a template on a sheet of plastic or other transparent material so you quickly know where to put the screws. This will allow you to drill the screws in an exact line without wasting too much time.
- Painting and sealing.
The final step is to stain and seal the wood to make your deck weather-resistant. The ideal would be to do this in three thin layers. Choose your favorite color and make sure to allow enough time between coats of paint to dry.
Recommendations
It is recommended to use galvanized screws and nails instead of regular nails and screws to avoid rust and stains.
Using galvanized screws and nails also increases the lifespan of wood decking.
This is generally the cheapest way to build a patio. You don't need to worry if you are not a professional contractor or carpenter because this project does not require any professional skills from you.
By building your patio yourself, you'll not only save a lot of money, but you'll also learn some new skills and experience the rewards of using a patio you created yourself. When it comes to savings, you can save thousands on materials and labor by building it yourself.
How to Lay a Sandstone Patio
What is necessary:
- 6 hours a day for 3 days
- About $700 for a 3 x 3 m area
Difficulty: Medium
The sandstone used by most homeowners for their patios is usually sold neatly sawn. But in a rural landscape, nothing looks more natural than “cracked” or “broken” sandstone with jagged edges.
Be resilient and patient to piece together the stone fragments.
You need a broken stone (eg sandstone) about 4 cm thick and some moss. You can read which moss is right for you in this article.
Deadlines - day by day:
Friday: Lay out the size and shape of the patio and organize the placement of stones.
Saturday: Dig out the patio area and create a base.
Sunday: Position and level the stones, then fill the joints.
So that you understand what it will look like, I’m posting ready-made options.
1. Creating a Layout
Whether you're building a patio from rectangular slabs or small pieces like the ones shown, laying out the stones before you begin installation will save you time and the quality of your patio later. Some pieces of stone may need to be cut off to create finer joints between stones.
Using string or a garden hose, mark out the shape of the yard. Starting from one edge, cover the area with larger stones, place small stones between them, leaving about 4-8 cm for the seams.
To cut a stone, turn it over and mark a cutting line on the bottom of it.
Using a grinder with a diamond blade, you can carefully cut off the edges. Also, hitting a stone against a stone or with a hammer can create natural cracks in the stones.
2. Number of stones
There are a large number of stones in the structure of the patio; for convenience, create a layout and mark each stone with numbers.
It is more convenient to designate in the order corresponding to each new row, for example, in the first row there will be stones 11, 12, 13... and in the second 21, 22, 23... and so on.
Tip: You can take some digital photos from above. This will help you recreate the picture later.
3. We dig
The patio should slope away from the house or other structure to drain water away from the foundation.
It is necessary to dig deep enough to remove roots and stones, but at least 15 cm to create a good foundation.
To create the correct slope, you can install small posts to a depth of 30 cm and mark the required slope on them. Stretch the rope between them and dig parallel to it.
This way you can mark out the entire area, dividing it into small parts.
4. Removing the top layer of soil
Using a shovel, dig out the topsoil to the point where the dark loam turns into light subsoil (usually 15 cm).
5. Installing columns
We install the posts at a distance of 50 cm from each other, creating a “grid” along the horizontal excavation. In those places where there is not enough soil, we add more.
6. Creating a foundation
The patio will be as strong as the foundation underneath it. A solid base that drains will also prevent stone movement.
Fill the excavation area with 10cm of pea gravel. Use caulking to support the slope of the patio. Continue compacting until the gravel level has dropped by about an inch and a half.
7. Evaluation of your work
Next we cover the gravel with 3 cm of sand. Using a rake, level the sand so that it is 3 cm below the edge of the ground.
Tip: To lower the sand a little, you can spray it with a sprayer or from a hose.
8. Lay down the stone
Sandstone is naturally not level, so it is important to lay it as level as possible so as not to create a danger when walking. You can use a level for this, so you can always tell if they are level with each other, and in general, if they are tilted correctly.
Place the stones as you number them. First the large ones, and then the small ones in between. Use a rubber mallet and wood to deepen them in place.
9. Check the slope
By setting a level on a couple of stones and adding or removing sand, you can create the proper slope. Once the large stones are in place, you can fill in the gaps with smaller stones. Don't walk on the stones until they are in place.
10. Seam filling
Create a natural look on your patio by planting moss or other plants that can tread between rocks.
Using a small shovel, you can remove excess sand or soil from the joints. Use a broom to remove excess sand or soil from the stones.
11. Putting moss in the seams
Dip the dry moss in a bucket of water, separating it from the general lump, and place it in the seams. It will look great around the edges and in the seams.
Fabric sails
Shade sails are simple and versatile structures for patios and backyards. There are many shades to choose from. You can also use different shapes such as triangles and rectangles. Add garlands to them for magical evenings.