A garage for one car is one of the most common types of orders in our company. Even those clients who have two cars do not always plan to place both cars in the garage. They prefer to place one of them under a canopy or simply on the site in front of the house. Consequently, there is no point in ordering the construction of a garage for two cars. Well, for families with one car, even more so, a garage for 1 car is enough. Usually we design such a garage for them with a utility part (utility unit). This is either a separate room or simply an extension of the garage box space, which is used for storing things, garden supplies, and installing a workbench.
The price of a garage for one car in the basic version starts at 473,000 rubles.
We present projects and step-by-step photos of the construction of garages for one car, built in 2010-2020 by ST-GARAGE.
To quickly scroll the page and jump to the photo, use the navigation below.
Addresses, projects and photos of garages built by us for one car:
- Solnechnogorsk district, Merzlovo village. Garage with attached utility room, 7x7 m.
- Dmitrovsky district, Vekshino. Garage with open garage box and utility room, 5x8.5 m.
- Vladimir region, Kirzhach. Garage with utility room and basement, 5x12 m.
- Solnechnogorsk district, Esipovo. Construction of a 6x7 m garage.
- Ramensky district, Vereya. Construction of a garage for one car, 6x6 m.
- Yegoryevsky district, Sukhanovo. Winter construction of a garage 6.5x4.5 m.
- Mozhaisky district, Ostritsy. Garage with utility room, 6x8 m.
- Tula region, KP "Captain". Garage for 1 car, 4.5x9 m.
- Istrinsky district, Novopetrovskoe. Construction of a 4x8 m garage.
- Lyubertsy district, Oktyabrsky village. With utility room, 6x5.5 m.
- Klinsky district, KP Velga-Park. Garage 4x9.5 m.
- Krasnogorsk district, Nakhabino. 6x10 m.
- Moscow, Sakharovo village. Turnkey garage, with utility room, 4.5x10.5 m.
- Volokolamsk district, Ostashevo. 4.5x7.5 m.
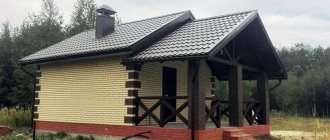
Construction of a garage with a utility block, 7x7m (September 2018)
Solnechnogorsk district, Merzlovo
Foundation - monolithic tape
Basement - concrete blocks
The walls are made of aerated concrete blocks with a monolithic belt.
The rafter system is wooden.
The roof is metal tile.
Construction of a garage, 5x8.5 m (August-September 2018)
Dmitrovsky district, Vekshino
Foundation - monolith
Basement - concrete blocks
The walls are made of aerated concrete blocks with a monolithic belt.
The rafter system is wooden.
The roof is metal tile.
Tips and tricks
Construction industry experts recommend:
- take into account the dimensions of the attic when designing a garage. After all, only at the planning stage can you increase the height of the ceilings;
- When choosing roofing materials, give preference to noise-absorbing materials. Especially if the room will be used as additional living space. Soft tiles and slate are good choices;
- when choosing a design for a staircase leading to the second floor, bet on options that are compact, convenient and safe to use;
- make concrete floors on the first floor, wooden floors on the second;
- when arranging a bathroom in a residential area, provide all necessary communications in advance;
- a living room, workshop or other room is pre-divided into functional zones at the design stage.
In conclusion, it is worth noting that a garage with an attic or attic is an excellent opportunity to provide yourself with additional square meters. They can be used in different ways: for arranging a living room, a place for guests, a workshop, a kitchen, storing out-of-season items. Some people set up billiard rooms and even saunas in the free space.
The main thing is to comply with all the basic requirements and recommendations of specialists so that the building is not only safe, but also functional, convenient to use and beautiful in appearance.
Construction of a garage for one car 6x7 m (2018)
Solnechnogorsk district, Esipovo
Foundation - monolithic slab.
The base is made of solid concrete blocks.
The walls are made of aerated concrete blocks with monolithic belts.
The rafter system is wooden.
The roof is metal tile.
Construction progress in photographs:
How to arrange an attic
After all construction work has been completed, you can begin arranging the attic. There are many options for its design. It depends on what purposes the new premises will be used for. The most common option is to arrange a workshop or storage room at the top of the building. If you need to work in a workshop in winter, it is recommended to additionally insulate the building.
A special role in arranging a room is played by its correct zoning. If the room will be used as a workshop, an area for tools is allocated here (racks, shelves and various organizers are built in it). There is also space for a work desk and a seating area. In the relaxation area you should put a small sofa and a coffee table.
Construction of a garage 6 x 6 m.
Vereya village, Ramensky district
Garage for 1 car.
The foundation is a monolithic slab.
The walls are reinforced masonry made of foam blocks.
The roof is metal tile.
The construction of this garage, like all others, was carried out in accordance with our basic principles, ensuring maximum reliability of the structure with an impressive margin of safety. The basis of the garage is a reinforced concrete slab foundation with stiffening ribs, on a sand bed. The basement part is made of heavy concrete blocks without voids. The walls are made of lightweight aerated concrete blocks reinforced with a strapping belt, made into a single monolithic element together with a beam above the gate opening. The sections of the wall that form the gate opening are made of solid concrete blocks, which subsequently simplifies the process of installing sectional automatic gates. The rafter system is assembled from reliable trusses (wood of natural moisture). The trusses cover a span of 6 meters. Metal tiles are used as roofing. We offer our clients the construction of garages in this basic configuration at an affordable price. And if desired, you can refuse any elements or structures, or vice versa, add them - in this way the project is brought to its final state and agreed upon, taking into account the financial capabilities of the client.
What is a utility block
A utility block is a room or building designed to store inventory, tools, and all kinds of accessories that are rarely used. In some households it is used as storage for food supplies.
The utility block as part of the garage can be of any size. Typically, its area is about a third of the area of the car room. A garage building with this addition takes up a little more space on the site, but allows you to maintain perfect order in the car space. For car enthusiasts who fully service their cars themselves in their personal garage with the help of numerous tools and devices, a utility room is simply necessary.
Tools in the garage utility room Source pinterest.ch
Construction of a garage 6.5 x 4.5 m.
Sukhanovo village, Yegoryevsky district
Photo of a garage made of foam blocks, for one car.
The foundation is a monolithic reinforced slab.
The base is made of solid concrete blocks.
The walls are reinforced masonry made of foam blocks, thickness 200 mm.
The roof is metal tile.
Turnkey exterior finish - vinyl siding.
The ideal garage from GarageTek in the “Fazenda” program on Channel 1
Process
The condition of the garage before the work began was approximately this.
Surely many will recognize their garage in this photo... The garage turned out to be cluttered - despite the fact that the things were useful. The garage simply lacks the proper storage system.
Leading garage expert Denis Butenko, who acted as a designer in this program, prepared a project for transforming the garage.
Before starting work, it is necessary to empty the garage of things that interfere with the repair.
We begin repair work from the floor. We carry out the necessary measurements and assessment of the condition of the concrete screed.
Installing a garage floor is a matter of particular importance. The garage is perhaps the only place in the house where the floor is exposed to a large number of different destructive influences: the heavy weight of cars, spikes, significant and rapid temperature changes, dirt, salt, water, chemicals, gasoline, oil.
These requirements are met by a concrete floor, poured according to all industrial standards from concrete of a grade not lower than M300, and covered with a protective and decorative polymer coating.
In the case of our heroes' garage, the floor screed is also not ideal. When it was poured, the beacons were not removed. This is a construction error that has been corrected. To understand whether the screed is suitable for installing a polymer floor on it, let’s check the quality of the base. The work of preparing the base for applying a polymer coating is extremely complex and requires specific knowledge and experience of the performer.
- First of all, we determine the hardness of the existing coating using special “pencils” - hardness testers and make sure that it is, in principle, sufficient to make a polymer floor.
- To guarantee its long service life, in addition to the standard system, we will strengthen the base - we will “broach” it with an epoxy primer, first removing the beacons and filling the grooves formed after removal with a polymer putty compound.
- For the manufacture of polymer floors, a very important parameter is the humidity of the base. It should not be more than 4%. Otherwise, the formation of bubbles, swelling and peeling of the coating may occur. In our case, the measurement showed 3% humidity. We can continue.
- To make it convenient and easy to maintain constant cleanliness in the garage, we will make the polymer flooring smoothly transition from the floor to the walls - the so-called “circle”. The result is a completely waterproof “trough”. Such a floor can be safely washed even with a high-pressure washer.
- After completing the “broaching” and making the “fillet,” we will do the final sanding of the floor using an abrasive grinder.
Only now the floor is completely ready for applying the polymer coating:
- The first stage of flooring is applying the base layer. We distribute the material evenly using special scrapers and application techniques.
- Immediately after applying the base layer, we begin filling the chips. They should lie evenly, for this we throw them up, giving them the opportunity to scatter evenly over the entire surface. To move around the garage we use “paint shoes”.
- After this, the floor is scraped to remove excess roughness.
- Apply the final coat of varnish. This is one of the most expensive materials, but at the same time it is the most resistant to mechanical stress (scratches from thorns), to chemicals (gasoline, oil, Moscow winter reagents) elastomer.
Our floor is completely ready for use 24 hours after the finishing layer has dried.
After all the work, the floor with the fillet takes on this look.
The artist Inna Lukanova, invited by the Hacienda program, decided to put an unusual design on the walls. She prefers to work without sketches, which is why there was a deviation from the original version we proposed. But we laid TekTraks on top of the design to organize storage on the wall without completely covering it with panels. The drawing from the walls goes to the ceiling, which was also done by the Hacienda team. The GarageTek company finishes the ceiling in the garage differently.
Lighting. Waterproof LED lamps are reliable, economical and perform their function perfectly.
The process of cutting wall panels using special equipment. Tracks (in the background) are used to organize storage on the wall with the existing finish. In this case, the finishing can be anything: tiles, plaster, wood or, as in our case, MDF panels with a decorative pattern. For each type of wall, its own fasteners are selected.
This is what it looks like to cover the walls with panels at the minimum height level in the garage. The panels have hidden fasteners, so all fastening elements and joints remain invisible to the eye.
The wall is completely ready. TekPanels are not only a finishing material, but also a supporting structure for GarageTek storage system accessories. Finishing all joints and corners is an obligatory part when covering walls, and decorative yellow molding adds brightness and completeness to the garage design.
Now it's time to fill your garage with accessories. They are lightweight, but at the same time reliable, withstand heavy loads and the test of time. Maintains appearance and functionality. Some can withstand loads of more than 100 kg. You can hang as many storage system elements as you like on one wall: the safety margin of TekPanels is huge, the main thing is not to overload the accessories themselves.
Accessories can be easily moved at any time thanks to a special fastening system: the panels have longitudinal grooves, and the accessories have mating parts that are inserted into them. The range is huge: more than a hundred wall and ceiling accessories – both universal and specialized.
A mandatory attribute of almost every garage is a wheel bracket. You can additionally purchase tire covers and side covers for wheels with rims. The bracket can be placed anywhere on the wall and can be extended to accommodate different wheel sizes.
This is what a clean and comfortable workshop area with a workbench in the garage looks like.
Every little thing has its place. The entire tool is always visible and easily accessible, but out of the way.
The panels above the workbench provide mobility: you can place cassettes, trays, hooks, tool holders, shelves and baskets on them exactly as it suits you. Everything is always at hand: easy to reach, quick to find.
Installation of a ceiling two-point lift with a locking mechanism.
Demonstration of functionality: change of winter and summer on one wall. In winter, you can organize storage, for example, of pickles in a closet, and use the second closet for warm clothes. In summer, place gardening tools and bicycles on the same wall closer to the exit. Everything moves very easily and quickly both along this wall and to other walls of the garage.
Garage storage of things in the garage in winter may look like this...
In winter, we will remove seasonal items from the ceiling that will only be needed in spring and summer.
The bicycle can be put in the far corner, and the pots in the ceiling space.
A shoe rack and a clothes hanger will also be useful in the garage.
Now we can easily and naturally adapt the garage for the summer.
Closer to the exit from the garage we have bicycles and gardening tools.
The workshop area can do the same, but does not change its position: despite the far corner in which it is located, there is more than enough lighting for work. It turns out to be a comfortable workplace both in winter and summer.
Instead of a bicycle, you can place, for example, a snow scooter on the lift in the summer.
Another useful accessory for a garage where a car is parked is a wheel stop (parking limiter). It prevents damage to the car, furniture and stored items.
In summer, fishing rods, tents, backpacks, fins, badminton and other equipment are kept at hand.
This is how a simple garage wall evolved: tracks were placed on it, accessories were placed on the tracks, and things for winter and summer recreation were placed on the accessories.
The happy main characters - Ivan and Elena - were very pleased. The GarageTek team is no less happy: after all, they have made another garage ideal.
This is how the equipped garage began to look: bright and clean, and visually it seems more spacious.
Construction of a garage 6 x 8 m.
Moscow region, Mozhaisk district
Photo of a garage made of aerated concrete blocks, for 1 car, with a storage area.
The foundation is a monolithic slab.
The walls are reinforced masonry made of aerated concrete blocks, monolithic belt.
The roof is metal tile.
Garage finishing and insulation
Next, work is carried out on cladding, insulation and waterproofing of the garage. Various materials can be used for cladding:
- eurolining;
- siding;
- professional sheet, etc.
For insulation, you can use any material offered on the construction market. But it is advisable to give preference to non-flammable mineral wool.
When constructing a “pie” of garage walls, you can use many of the options found on the Internet. After all, this is a non-residential premises. But there are two basic rules that will save you a lot of time when comparing all designs.
- The vapor barrier is installed indoors (on the warm side).
- Wind protection and waterproofing - outside. It will save the garage frame during bad weather.
The rules apply to both the structure of the walls and the roof of the building. In general, garage insulation layers usually look like this (from the outside):
- external finishing;
- wind protection;
- OSB type board;
- insulation;
- vapor barrier;
- layer for interior decoration, for example, plasterboard.
This option is shown in the photo. There may be other assembly methods. For example, a “pie” without OSB, which is needed to prevent the insulation from becoming damp. Or without wind protection.
Construction of a garage 4.5 x 9 m.
k.p.
“Captain” Photo of the construction of a garage for 1 car space.
Overall dimensions 4.5 x 9 m.
The foundation is a monolithic slab.
The walls are reinforced masonry made of foam blocks.
The roof is flexible tiles.
Design
In modern low-rise construction, all buildings are erected according to preliminary designs. This is the main condition that ensures quality, durability, comfort and a presentable appearance for all elements of home ownership.
Designing a garage is not difficult, but it must be done by a specialist - a qualified builder or architect. When designing, many nuances are taken into account, such as the design of the foundation, the thickness of the walls, the type of building and finishing materials, etc.
The main task of the designer is to create a convenient garage that will fully meet all the owner’s requirements. At the same time, it should be absolutely safe. Therefore, all structural elements of the building are carefully calculated. Particular attention is paid to the choice of wall and roofing materials.
If a garage is being designed that will be attached to the house, an even higher level of security is provided. The attached garage should be as fireproof as possible and isolated from the main building. In addition, the extension must be designed so that it becomes a structural part of the house and does not violate its architectural integrity.
Garage attached to the house Source hitas.eu
See also: Catalog of garage projects presented at the Low-Rise Country exhibition.
Construction of a garage 4 x 8 m.
Novopetrovskoe, Istrinsky district
Garage for 1 car.
The foundation is a monolithic slab.
The walls are reinforced masonry made of foam blocks.
The roof is metal tile.
Construction of a garage 6 x 5.5 m.
Oktyabrsky village, Lyubertsy district
Garage for 1 car, with utility unit.
The foundation is a monolithic slab.
The walls are reinforced masonry made of foam blocks.
The roof is metal tile.
Inspection hole
This is an optional, but very convenient element of the garage. Arranging a viewing hole may present certain difficulties. So, in an area where water occurs at a depth of more than 2.5 meters, everything can be done easily and quickly. But if the water flows higher, then the inspection hole must be provided with a drainage system.
- First, a hole is dug for the hole. This takes into account the desired depth of the finished pit, as well as the thickness of the drainage, waterproofing, sand cushion and finishing screed.
- A layer of gravel (100 mm) is poured into the bottom of the hole and compacted.
- A layer of sand (50 mm) is placed on top and compacted too.
- A trench is dug along the perimeter of the finished pit for drainage.
- Then geotextiles are laid with overlaps of 80 cm on each side.
- Next, a layer of gravel is poured into the trench and a drainage pipe is laid with a slight slope.
- The pipes are covered with gravel and covered with geotextiles.
- The floor of the pit is covered with clay.
- Lay waterproofing.
Waterproofing inspection pit Source stroyservis-74.ru
- Formwork and a reinforcing frame are installed at the bottom of the pit.
- The bottom is filled with concrete with the addition of waterproof components.
- Another layer of waterproofing is laid on the dried screed.
- The walls of the pit are also treated with clay.
- The walls can be lined with brick or monolithic concrete. The second option requires formwork and reinforcement.
- The finished surfaces of the walls and floors are covered with cladding. Any option of the owner's choice will do.
- A metal frame must be laid along the perimeter of the upper edge of the finished pit.
- A safety rail is placed on top of the frame to prevent the car's wheels from accidentally falling into the pit.
Construction of a garage 4 x 9.5 m.
K.p.
“Velga-Park”, Klinsky district Photo of a garage for one car, with a utility block.
The foundation is a monolithic slab.
The walls are reinforced masonry made of foam blocks.
The roof is metal tile.
Construction materials
Today, garages are built from the following materials:
- bricks;
- concrete stones;
- ceramic stones;
- concrete;
- wall panels.
Brick is one of the most popular building materials . Many people prefer lightweight blocks. Today, frame structures are also in demand.
A brick structure has a lot of weight, and at the first stage a strip foundation is built. Its depth varies from 0.6 to 1.2 m, while the width of the tape is 0.4 m. To make the foundation more durable, additional rubble stone or reinforcement .
The concrete mixture will completely harden in 3 weeks . The drying process can be accelerated by adding various additives. To avoid cracks, the foundation is wetted from time to time and covered with a tarpaulin . The base must be insulated and waterproofed. Using a similar technology, a plinth .
For laying walls, it is better to choose a thickness of one and a half bricks. The cubic capacity of one wall is calculated using the following formula: height*width*thickness. All planes must be added. Next, the resulting value should be divided by the volume of a standard brick (0.00195 m3). The result is the number of blocks required for construction.
IMPORTANT! The thickness of the seam for masonry made of ordinary bricks must be at least 10 mm . Every 4 or 5 rows, the wall is reinforced with steel reinforcing bars, which are laid in horizontal seams. Corners with protrusions are reinforced with vertical reinforcement.
Garage doors are installed before the walls are laid. Reliable fastening is ensured by welding metal rods to the frame. The correct location of the gate helps to check the building level.
The roof of a garage is usually a gable roof. It protects well from precipitation, and the space underneath is often used for storing hay or building materials.
The optimal garage for 2 cars made from building blocks is a prefabricated structure. The building material is light in weight. One block is equal in volume to six bricks. The project will cost the owner much less than the previous one: there is no need a lightweight version is suitable for construction .
A frame garage for 2 cars is a structure that can protect a car from bad weather and intruders. Its advantages include the following:
- use of environmentally friendly natural materials;
- ease of construction;
- speed of construction;
- possibility of performing work in any season.
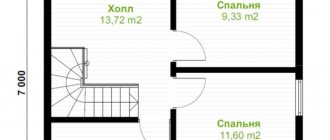
The diagram below will tell you how to choose the size of a garage for 2 cars:
If you choose the right size of garage for two cars, then such construction does not require huge capital investments. You can order an individual project from a construction company. Then you will know exactly how much building materials the dimensions of the double garage should be .
Read how to build a garage from sandwich panels. There is also an article here about what a garage tent is and where it can be used.
Construction of a garage 6 x 10 m.
Krasnogorsk district, near the village of Nakhabino.
Garage for 1 car, with a workshop and space for gardening equipment.
The foundation is a monolithic slab.
The walls are reinforced masonry made of foam blocks.
The roof is metal tile.
Varieties
Garages equipped with outbuildings are very different. It is necessary to initially determine the most suitable construction option. First of all, you need to decide how many cars the garage space should be designed for. Regardless of the size of the utility unit, the garage can be designed for one, two or more cars. Often, owners of country houses build compact structures for one car, providing additional parking space on the street under a canopy.
One car garage Source hi.decorexpro.com
On a spacious plot with a house in which a large family lives, it makes sense to build a car house for two or three cars. Such a garage should have several entries, depending on the number of car spaces.
Two-car garage Source okeanelzystore.com
Garages also differ in the type of use of underground space. A building for a car may have a basement, cellar, or inspection hole. But it can also simply stand on the foundation. For maximum optimization of the household, a garage project with a utility block and a basement is ideal. But building a basement is not cheap, and in areas with difficult soil and high groundwater levels, basements and ground floors are not built.
Recently, garage projects with a utility block and a canopy have become increasingly popular. They allow you to create a full-fledged car space with minimal waste of space on the site.
Garage with canopy Source k-dom74.ru
The utility unit can be included in the project in various ways. In most cases, it is part of a garage space separated by a partition. But there are also projects in which the utility area is attached to the garage.
Garage with attached utility room Source www.domamo.ru
It is very important to choose the right number and location of entrances to the garage. First, if the garage is attached to the house, it may have one entrance from the street and one from the residential part of the building. Secondly, the utility block can be an isolated or walk-through room. The second option is used in many modern cottages with attached garages. It is convenient because it allows you to exit through the utility block into the courtyard, and also because it is very convenient to use as storage for gardening tools.
Gardening tools in the utility room of the garage Source m.2gis.ru
Another important nuance is the presence of a heating system in the garage. A heated building is needed by car owners who use it as a workshop and, accordingly, spend a lot of time in it. It is easier to heat a garage attached to the house; you just need to connect the heating system of the house to it. But this may not be necessary, since the garage extension will be heated by the main building. Detached garages are mainly heated by autonomous heating devices.
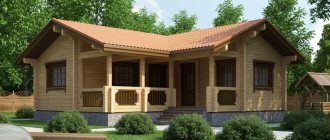
Construction of a garage 4.5 x 10.5 m.
Photo of a garage for one car, with a utility room. New Moscow, Sakharovo village
The foundation is a monolithic slab.
The walls are reinforced masonry made of foam blocks.
The roof is metal tile.
Interior finishing: plaster.
Turnkey exterior finishing - siding.
Advantages and disadvantages of frame garages
Let's list the advantages of the building:
- low price (when compared with brick);
- lightness of parts (two people can assemble a garage);
- speed of assembly;
- structural strength.
There is also an obvious disadvantage - the wood needs to be insulated and waterproofed, to make a so-called “pie”. Before that, find out its structure, compare different options and choose the best one, so as not to waste materials in vain.
The disadvantage is the flammability of the frame material. Therefore, the wooden frame is impregnated with an antiseptic. It is advisable to sheathe it outside and inside with building materials that do not burn. When choosing insulation, choose non-flammable stone wool.
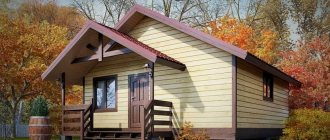
Construction of a garage 4.5 x 7.5 m (2015)
Volokolamsk district, near the village of Ostashevo
Photos of construction in stages - project of a garage for 1 car.
The foundation is a monolithic slab.
The walls are reinforced masonry made of foam blocks.
The roof is flexible tiles.
Construction of a garage with a utility block, 6.2x7.2 m (May-June 2020)
Moscow region, Lobnya
The foundation is a monolithic slab.
Basement - concrete blocks.
The walls are aerated concrete, monolith.
The rafter system is wooden.
The roof is metal tile.