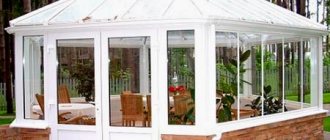
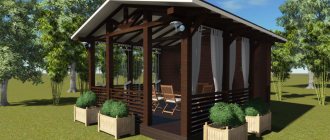
At the moment, a gazebo is not just a garden building for relaxing in the fresh air, but a building structure designed to give a feeling of joy and comfort. A glazed gazebo with a barbecue is a modern solution that allows you to enjoy outdoor recreation and food without leaving your comfort zone. Depending on the size of the structure, you can gather your closest people or a whole group of friends here. By installing a dining area and a couple of small sofas here, you can make the gazebo an indispensable place to relax, both in summer and winter.
What type of glazing suits you: warm or cold?
First of all, you need to decide what you want to achieve in your gazebo? There are only two options in this case.
Warm - implies complete protection of the gazebo from external weather conditions , including winter, by installing triple-glazed windows.
This method will allow you to achieve a comfortable temperature even at sub-zero temperatures outside the window, provided that the floor, walls and roof are insulated. It is used if you also want to use the gazebo in winter.
If you need warm glazing (plastic or warm aluminum), we recommend the Moscow company PVC Window Plant. The price ranges from approximately 3,600 - 7,000 rubles per m2.
Cold - in this case, you can protect the gazebo only from rain, wind and dust.
It will not be possible to significantly increase the temperature inside, although it can be used for the spring and autumn seasons. A cold look is aesthetically pleasing and effective, but unreliable when compared to a warm one.
- Warm is a thorough and reliable method of glazing.
- Cold - beautiful and stylish, but short-lived.
Step by step construction
After choosing a suitable location, selecting tools and creating drawings, you can begin the construction itself. This process is lengthy and requires a lot of work. The owner will have to create a foundation, form a frame and do the exterior decoration of the room. For convenience and to increase the speed of construction, it is advisable to enlist the support of several more people.
Foundation
Brick structures or structures built using masonry technology are heavy. For stability and reliability of the building, it is recommended to lay a slab or strip foundation.
You must act according to the following algorithm:
- At the site of the future building, dig a hole, the depth of which should be 1 m.
- Pour a 20 cm thick layer of crushed stone into the recess and compact it.
- Lay the waterproofing film.
- Install the fittings.
- Make a solution of crushed stone, sand and concrete in proportions of 5:3:1, respectively.
- Pour the resulting mixture into the hole.
- Install metal pipes in those places where load-bearing poles will subsequently be mounted according to the drawings.
Pay attention to landscape design ideas for a summer cottage using scrap materials.
For the solution to completely harden and seal the structure, you must wait at least a week. After this, separately using the same principle, you can build a concrete base for the furnace. The last stage is the installation of load-bearing pillars.
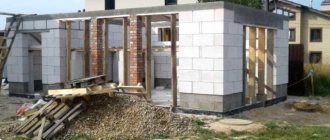
Creating a wireframe
For strength, warmth and fire safety, it is better to build a structure from brick. You will also need a universal solution of 1 part M500 cement and 4 parts fine sand, diluted with water.
Having the necessary materials, the owner needs:
- Soak the bricks in a container of water.
- Start laying from the corner: lay out the first row without mortar to find out whether the perimeter of the structure is a multiple of the dimensions of the building materials.
- Use a level to determine the evenness of the resulting surface.
- If necessary, saw the last brick in the row to match the dimensions of the structure.
- After laying the first row, form corners for the next 4-5 levels.
- Achieve a meter height of the structure.
Important! It is recommended to lay no more than 6–7 rows at a time to avoid deformation of the building.
In the same way, you can lay the frame in 2 rows to insulate the room. If you make a building with a thickness of 0.5 bricks, you will get a gazebo suitable for use only in the summer season. Don't forget to leave the doorway: otherwise, dismantling part of the wall will be problematic.
Floor
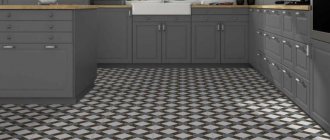
A foundation poured with concrete can already be considered a finished floor, but for decorative purposes the owner can lay another layer. If the gazebo is supposed to have a barbecue, the wood covering is not recommended for use.
Check out
Landscape design for a recreation area
Therefore, other common options remain:
- natural stone slabs;
- DSP;
- paving slabs.
Provided that the foundation is poured with concrete correctly, further leveling of the floor will not be required, and you can immediately begin laying one of the materials.
Whatever material you choose, the installation principle is the same:
- Form alternate layers of sand, gravel and river soil, 3 cm each, and compact.
- Fill in another layer of sand and cement the entire mixture.
- Using a rubber hammer, lay the slabs.
- Use a level to check whether each element is mounted level.
This method of installation allows you to make the floor the smoothest and most pleasant in terms of appearance. However, installation of slabs is not necessary if there is a good concrete foundation.
Roof and roofing
Before building this structural element, it is important to think through the drawing to the smallest detail and decide on the type of roof: the most classic and simple options are gable and hipped.
Next, follow the following algorithm:
- Form the main frame from rafters using wood or metal materials.
- Install insulating films from steam and water, as well as insulation, between the slats.
- Secure the cross bars and interior trim.
- Lay the roofing covering on the resulting structure.
- Mount skates on the protruding parts to completely fix the structure.
Decorative mill on the site
It is noteworthy that almost any material can be used for the roof if you create a soundproofing layer. To do this, it is enough to lay sheets of plywood on the counter slats and cover them with soft material, for example, roofing felt.
Glazing of the gazebo
After all the work done, all that remains is to install the windows.
To do this you need:
- Treat the wood with an antiseptic, which will subsequently be used to form the frame.
- Mount the supports on the site in 1 m increments to divide the entire structure into sections.
- Use custom frames or cut them yourself so that a gap of up to 0.5 cm is allowed.
- Secure the frame without glazing.
- Fill the remaining cracks with foam.
- Seal the grooves using silicone sealant.
- Install glass.
- Treat the edges of the windows with sealant.
- Secure the glazing using a thin piece of wood.
When building a gazebo, you may be interested in learning about the features of vertical gardening.
After this, it is recommended to install a low tide. This will help to avoid excess moisture in the seams between the frame and the glass elements, and will also prevent the formation of mold.
Video: Frameless glazing of the gazebo
Reliable warm glazing with triple glazing (Eurowindow)
An option for those who value reliability, durability and simplicity. Installing triple-glazed windows will maximize the protection of the gazebo from external conditions. The most popular option is to install casement windows that can be opened for ventilation and closed for protection.
The profile can be used from PVC (white plastic, as in new buildings) or wood. The second option is more aesthetically pleasing and cleaner, from an environmental point of view, but more expensive and less durable. Most often, it is advisable to install a standard double-glazed window with PVC and forget about it for many years. The photo below shows options with both PVC and wood.
How to close the veranda from rain and snow. Simple ways to protect your summer veranda from snow and rain
Usually, the meaning of a veranda is the additional area of a house or cottage, which often plays the role of a balcony or open area.
Quite often this is something like a greenhouse or winter garden. Often the veranda is an additional extension of the cottage.
Today, few standard projects involve the construction of a veranda simultaneously with the construction of a particular house. For this reason, many people build verandas on their own.
Most often, such a structure is already a closed roof or canopy, since it is much more convenient to enjoy fresh air and the landscape when the hot rays of the sun are not shining from above and the rain is not dripping.
Sometimes it all starts with creating such a site or simply trying to expand the living space. Open verandas look extremely tempting in the summer, allowing you to have a good rest and enjoy the freshness of nature.
However, with the onset of colder evenings, its use becomes extremely difficult and inconvenient.
Few people want to abandon a well-maintained territory that is too cold to stay in. Those who spent almost the entire summer relaxing on open verandas note that the house becomes extremely crowded.
That is why many resort to solutions such as closing verandas from unfavorable factors and even insulation, which provides this building with the actual status of part of the house.
Today, there are a large number of ways that allow you to close the veranda from a wide variety of adverse natural phenomena.
In addition, it is better to think about the possibility of insulating the veranda at the initial construction stage. Subsequent reworking of the basic design into an insulated one may require additional costs and be much more labor-intensive than the initial design.
Traditional glazing with wooden windows
Of course, the windows themselves are made of glass, but the frames are wooden. Similar windows can be seen in old houses; in the USSR they were everywhere.
It is enough to install the window, install the glass and secure it with wooden glazing beads. It’s difficult to find a cheaper and easier option. If you drive around the villages, you can cheaply buy wooden frames from someone, from which you can glaze the gazebo.
The option is quite working. And if you don’t want to spend money and a lot of time, it’s ideal.
All gazebos with wooden windows look almost the same. If you choose the right color, you can achieve good aesthetics of your room both outside and inside.
How can you close the openings of open verandas? Protection methods that require significant investments
Closed gazebos and terraces can be protected using metal profile frames. This is done using two methods. Cold is used to glaze a building for the winter. To avoid problems with ventilation in the spring and summer, it is necessary to install a sufficient number of sashes. You can install them yourself.
Despite the costs, the owner of the home and surrounding area will receive a reliable structure that will last for a long period of time.
The warm glazing method is suitable if the gazebo is used throughout the year. In this case, double-glazed windows must be used. They save heat indoors.
Photo from the site: https://dekoriko.ru/
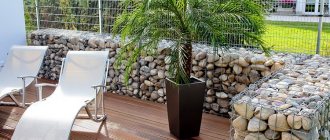
Practical people often prefer frameless double-glazed windows. The gazebo, which is protected in this way, will receive the maximum amount of ultraviolet rays. Additional bonuses include:
- expansion of the viewing area;
- strength;
- saving electricity;
- Ease of use;
- protection from mechanical stress and adverse weather conditions;
- heat preservation;
- sound insulation.
The double-glazed windows fit tightly to the wooden parts and at the same time clearly repeat their shape at the points of contact. Due to the light weight of the material, the installation process will not take much time. You can deal with it on your own.
Expensive materials include roller shutters, which can be made of different materials.
Read the article about curtains, curtains and blinds for gazebos.
Glazing of gazebos with aluminum profiles
The cost of aluminum glazing is from 2,700 - 6,000 thousand per m2. We took the prices from the Moskovskaya website, from the page: verandas / terraces / gazebos. This manufacturer produces and installs all types of glazing (except polycarbonate): aluminum, plastic, frameless, sliding, wooden windows. Focusing only on the price per m2 is quite difficult, so to find out the cost of your project, it’s easier to call or leave a request.
This glazing method involves installing one double-glazed window into an aluminum profile, which makes it possible to achieve panoramic windows. Gazebos with similar glazing look very beautiful, and the frames can be painted in the color you want.
There is an option with sliding windows - it is very practical and aesthetically pleasing, although the installation process is more expensive and complex. If the gazebo will not be used in winter, but you need reliable glazing, aluminum will come in handy. It is not as expensive as a Euro window.
Aluminum glazing will cost you about half as much as installing plastic European windows with triple glazing.
It is important to understand that aluminum glazing is cold, so such covering will not make the room much warmer.
If you want to create a comfortable temperature inside the gazebo, you can install a potbelly stove, and you will need to additionally make a chimney - if the gazebo is high, then the chimney will cost more than the stove itself.
Features of arranging a grill or barbecue
The main difference between ordinary gazebos and those equipped with barbecues is the large area of the room. This building acts as a studio with a working kitchen area and a living room. For gazebos with small dimensions, it is better to use a regular metal grill with a dome hood. It is necessary to allocate a special area for it, where the chimney can be connected to a pre-installed pipe passing through the roof to the outside.
Did you know? The first evidence of the construction of gazebos in gardens was found in ancient Egyptian wall paintings created 5 thousand years ago.
The most common grill in gazebos is a stone stove with a firebox. Such a barbecue also requires a chimney, and the main advantage of the design is increased fire safety. The only problem is that such a stove has low mobility. It will either be made of stone in a permanent place, or it will have extremely large weight, which will make it impossible to move it.
As a result, building an enclosed gazebo with a barbecue is a long and labor-intensive project. Moreover, just such a building will become a real pearl of the garden near the house and will allow you to spend unforgettable family evenings. The use of reliable materials during construction, glazing and the use of a barbecue indoors open up the possibility of using the gazebo at any time of the year.
Frameless glazing of gazebos (frameless, Finnish)
Speaking about the frameless glazing method, we mean the use of glass fixed in the sashes at the top and bottom.
Depending on the design, the doors can open, close, be fixed, move and even fold (the photo below shows a folding design). These glasses are regulated using a control located just below the glass inside the gazebo.
If you are planning to install similar protection in your dacha, then I recommend that you read about frameless glazing and study the prices. This is a really modern and interesting material that will decorate your gazebo or veranda. When I studied this issue, I found out that it is quite inexpensive, but looks 5+.
This option looks very attractive, but has a number of obvious disadvantages.
- Low sealing. Sooner or later, snow, rain and even dust will begin to fall indoors. The use of such glass wears out the entire structure.
- No mosquito nets. In the summer, it will be difficult to protect yourself from mosquitoes, except with plates or electric repellers.
- Low sound insulation. Everything is heard, everything is seen - not for everyone.
Why do you need winter protection?
The whole point of the terrace is its openness and the absence of major side fences. But for the same reason, its structures are largely exposed to adverse atmospheric influences. It is especially important to close the terrace for the winter in the late autumn, winter and early spring periods, during snowfalls, icing, direct and oblique rains. And also strong winds, often changing speed and direction, bringing clouds of dust deposited on the horizontal surfaces of the terrace.
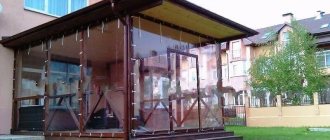
Soft glass (PVC film)
Link to a more complete article on this topic - Soft PVC windows for gazebos (PVC curtains, soft glass, film windows). The film can be used to cover not only temporary holes or openings in the gazebo, but also to fully glaze the windows. There are several options for introducing PVC film.
- Fastening through eyelets or fasteners. In this case, you buy a special film designed to fit the size of your window openings, with fastenings around the perimeter. This is a more expensive and “flexible” option that can be removed as needed.
- Fastening with staples and wooden blocks. It’s very similar to preserving a structure for the winter, only everything is done much more aesthetically. The film is stretched along the perimeter of the opening and is first fixed with staples, and then nailed or screwed onto self-tapping screws through wooden blocks.
This method is perfectly implemented in the gazebo presented in the video below. The man was not too lazy to install a potbelly stove, so in winter you can feel comfortable inside.
Roller shutter design
The main element of roller shutters is a flexible sheet of metal profile, which goes down and up, moving along guide grooves. At the top of the window there is a box into which the roller shutters are assembled by screwing onto a drum. The box can have an internal or external structure.
For small-sized curtains, manual automation is sufficient; you need to move the lever up and the roller shutter will open itself. For large canvases, an auxiliary mechanism will be required.
In order for the roller shutters to close correctly, the lower edge must rest against a stopper - a window sill or strip.
Before manufacturing, you must consult with a specialist and take accurate measurements of window openings.
The color range of profiles includes solid shades, as well as imitation of natural wood. You can use multi-colored slats in one canvas for a better combination with the external design of the gazebo. There is also a perforated profile that allows light to pass through when closed.
Polycarbonate glazing
In modern construction, polycarbonate has become a very popular material that is used everywhere. Polycarbonate can not only cover the gazebo from the sun's rays or make a roof, but also fully glaze the window openings.
Transparent material is used to allow the sun's rays to enter, and matte material is used to block one or another view.
Whether cellular or monolithic polycarbonate is used for glazing is a question for discussion in another publication. In this case, it is important to understand that such a method is possible. The photo above shows the cellular version.
Selecting a location
There is only one strict requirement for the placement of the gazebo. The structure must be located away from residential buildings for fire safety reasons. The remaining decisions depend solely on the owner: for example, you can build a gazebo both in the shade and on the sunny side of the site.
If you don’t know or trust your neighbors well, start building as far as possible from the borders of your estate. Take care also of convenience: it is better when the entrance to the room is directed towards the dacha - it is more convenient to move from building to building when preparing food or serving.
Important! If there are perennial plants in the garden area, try not to destroy them. They will further serve to create shade near the gazebo and be decorative from the point of view of landscape design.
Drawing with dimensions
Before building a gazebo, the owner should decide on the shape of the future structure.
It could be:
- rectangle;
- hexagon;
- octagon.
The first option is the easiest to implement. It is better that the length of each side is a multiple of 1.5 or 2 m. This is due to the fact that it is at this distance that the support pillars must be placed both from the point of view of the safety of the building and based on financial justification. Don’t forget about the foundation: in the drawing, add 10 cm on each side so that the base extends beyond the structure.
When planning hexagonal structure, calculate the area so that there is 4 m² of space per person. A standard gazebo of this type, when viewed from the side, has a diagonal of 3 m and a height of 2 m.
“Octagon” is the most spacious variation of the gazebo. For maximum convenience, 4 of the sides should have a length of 1.5 m each, and the rest - 80 cm. Such a room will allow you to place not only a table, a bench and a barbecue, but also a work desk and even a refrigerator.
It is also better to design the oven itself in advance. The grill must be made of heat-resistant brick, and its dimensions must fit into the overall dimensions of the gazebo. For example, for an octagonal building, the width of the oven can be 1.2 m, and the optimal depth is 75–100 cm.
Required Tools
Since it is planned to build a gazebo with a barbecue, brick will be used as the main building material. From this we get a list of necessary tools, mainly consisting of a spatula, a sledgehammer and a level. When laying the foundation, you may need a concrete mixer. A shovel is also useful for preparing the site for the construction of a building.
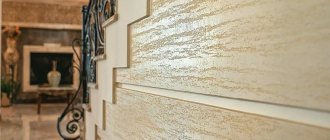
Stained glass glazing
With painted patterns, with drawings, from several pieces - all these are options for making stained glass. If the design is chosen well, it will look very beautiful indoors.
Often gazebos look inadequate and rough - a few pillars, a roof and a table. Stained glass windows make the gazebo more attractive and warm.
There can really be a lot of options. In the selection of photographs below, solutions for different types of gazebos were selected. All of these photos are potential ideas for glazing your space.
Is it necessary to cover the outdoor terrace for the winter?
Practice shows that a little time spent preserving it for a period of time that is not in use will help to avoid numerous problems and material costs in the future. So how to close the summer terrace for the winter? Methods for protecting different types of terraces can vary greatly. So, for example, a free-standing gazebo can be protected for the winter with some kind of continuous external roll covering, impenetrable to wind, rain and snow. However, this is not suitable for a terrace adjacent to the house, since it is often accessed by the windows of the first floor, through which the interior living spaces are insolated. The same is true for the open porch, with only one canopy, which serves as a vestibule for the entrance to the house and the door to the terrace for the winter.
Nuances to consider when carrying out work
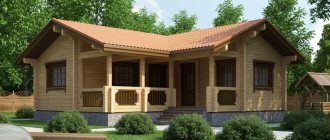
Brick, wood, plastic, timber and stone are used to build gazebos. Wooden structures are especially popular. This is due to the low price, ease of installation, long service life and installation. At the same time, we should not forget about the lack of resistance to moisture.
To prevent the gazebo from being damaged by changes in temperature and water, it is necessary to insulate the flooring, walls and ceiling in a timely manner. If you are not confident in your abilities, you should turn to professionals. Thermal insulation of all elements is one of the most important stages in preparing the gazebo for wintering.
Roofing system
Even if the owners intend to build a summerhouse with a pitched roof, one of the sides still needs to be raised by ten to fifteen centimeters in order to create an angle of inclination.
Also read: Gazebo canopy for a summer residence
Recently, a closed gazebo with your own hands has ceased to be synonymous with simplicity. More and more citizens want to have an architectural refinement, albeit small, on their property, which is why 2- and 4-pitched roofs are very popular.
When choosing a roofing material, you should give preference to lightweight ones; flexible tiles and metal tiles are suitable.
The basis of the roof of a wooden gazebo is the load-bearing system of a pitched roof. A flooring made of moisture-resistant slabs with wood fibers is placed on top of the rafters. The next layer is a high-tech membrane material that creates a vapor barrier and a water barrier. The final layer is a pre-selected roofing material.
pros
Do not confuse closed gazebos with a summer house. Gazebo designs imply the presence of large windows (glazing can occupy up to 80% of the wall space). This architectural move allows you to enjoy views of nature while inside the structure.
The main advantages of such gazebos:
- functionality, practicality, durability;
- aesthetic component;
- the opportunity to have a good rest in any season of the year;
- in hot weather it stays cool inside;
- wooden gazebos have a unique microclimate;
- ample opportunities for architectural experiments.
When building a closed gazebo, many provide for the presence of additional equipment in it. This could be a barbecue, a heater, an air conditioner, a refrigerator, a washbasin. Projects that require electricity and ventilation are also not uncommon.
Regarding the countertop and refrigerator, experienced summer residents advise the following: if the structure is located at the far end of the site, then these items really will not be superfluous. If the structure is planned to be erected next to the house, then it is realistic to do without them.
Instructions for glazing windows
Great importance is attached to the type of construction. It can be continuous or partial; in the first case, polycarbonate is installed from bottom to top.
In the second case, it assumes the existence of an obstacle. Consequently, window frames are an assembly into existing barriers.
- It is necessary to plan the placement of windows in advance and take into account their sizes. This must be reflected in the drawings of the future structure. If the gazebo has already been built, a global reconstruction will be required.
- Frames can be purchased, but they will be expensive. It's better to make them yourself. You can use wooden structures, since it will be impossible to install aluminum ones at home.
Polycarbonate is not always a good solution, because it transmits ultraviolet radiation and in the summer it can be very stuffy in the gazebo.
Vertical awnings
This is a new product among protective materials. Just like everyone else, their purpose is protection from the negative effects of the environment.
There are two types:
- Cassette types. Creates tightness in the room. They move in a U-shape. Resistant to wind and rain.
- Open types. They move in an up and down direction.
Unfortunately, this type of shelter has not gained popularity among site owners.
Instructions for covering with clapboard
In order to trim the gazebo with clapboard, you must first create wooden supports and secure the railings. The space at the top will be open, the space at the bottom will be finished with clapboard.
To attach it, you must first nail it around the perimeter of the slats. Nail the lining to them from the inside with small nails.
Different types of curtains
Curtains can also be used as shelter from wind or rain. For this purpose, it is better to choose curtains made of durable material or tarpaulin. Such a shelter is suitable for the summer period, because they are not designed for protection from snowstorms and blizzards.
Note!
- DIY metal bench: instructions with step-by-step guide (100 photo ideas)
Blinds for gazebos: wooden, metal, bamboo. Instructions for installing blinds yourself
Adding a terrace to your house with your own hands: step-by-step instructions on how to easily and quickly add a veranda or terrace (100 design photos)
This type of protection is suitable for an open terrace.
No. 4 – reinforcing mesh
If your main goal at the moment is to find a temporary material that will be used for a season, reinforcing mesh is the ideal solution. Yes, to be honest, the appearance will not be so great, but even this can be turned into a unique decoration of the site.
The installation of the material is carried out as follows:
Comments
Oh, thank you very much for the article) Otherwise, at the dacha there is a small shed and there is a table there, where we eat kebabs in the spring and summer. And when it starts to rain, you have to sit at home, because the rain falls from the side under the canopy. So my husband and I were thinking about how to cover the sides and still couldn’t find any options, either it was expensive or the wall wouldn’t let in any light. After reading the article, I suggested polycarbonate to my husband and he really liked the option. Both inexpensive and practical. Let's go buy polycarbonate this week) And we'll start building in September)
Unusual glazed gazebos in photos and videos
There are several options for closing the gazebo; we suggest looking at a few ideas in our selection:
Gazebo with stove complex in high-tech style Source alaconcept.net Transparent gazebo - if necessary, the walls can be quickly removed Source okna-vinchelli.ru
Sliding gazebo-tentSource ms.decoratex.biz Simply beautiful and compact buildingSource seattlehelpers.org Mini-hut made of logsSource krov-torg.ru
And watch the video for a few more beautiful glazed gazebos:
Frame
The frame of the building is being erected in stages as follows:
- After the foundation support pillars have dried, the craftsman takes a beam (2 pieces) and makes holes at its ends for construction pins. In this way, two longitudinal parts of the future gazebo floor are secured. Sheets of roofing material must be placed under them.
- Transverse beams are laid on the foundation pillars close to the longitudinal ones. They are tightened with metal corners 2 mm thick.
- Now, in increments of 50 cm, log boards or beams are fixed to the harness. Fastening is also done using metal corners.
- Support posts in the amount of 4 or 7 pieces are attached to the floor frame. They are additionally reinforced with timber braces.
- The entrance to the building must be framed with two support posts made of timber. The distance between them is 1 m.
Important: the front support pillars should be 20-40 cm higher than the rear ones. Later, a pitched roof will lie on them.
Gazebo frame