Five-layer hose Potok-50 (1/2* 25 meters)
1600 ₽ More details
Hot chocolate Ristora “DABB”, 1 kg
558 ₽ More details
Windshield wipers for cars
Many people believe that a pit in the basement is a rather insignificant element that is easy to make and no less easy to operate. In fact, with its help you can make life in your home safer and more comfortable. They decorate facades. In addition, following the rules for constructing such a structure will save you from many problems.
DIY aeration fields
Aeration fields, irrigation fields or even filtration fields are all names that describe a single treatment drainage facility that helps with the discharge of treated wastewater into the ground.
The operating principle of filtration fields for a septic tank is the distribution of purified water over a certain area. Properly constructed aeration fields further purify wastewater, and according to some information, by another 20-40%. This is a very good result, which means that you do not pollute the soil of your own summer cottage with such a system.
Most septic tanks operate according to a fairly simple scheme, but it is optimal and effective only if all internal units and system elements are correctly installed and connected
Constructing filter fields is quite simple. To do this, you need to dig several trenches, depending on the number of branch pipes from the septic tank. Next, fill these trenches with sand and gravel, creating a 20 cm cushion over all of them. Afterwards, install perforated pipes over the trenches, which will produce a distributed discharge of water.
What do filter field experts recommend?
There are many opinions of experts on installing drainage systems, but we have selected the most significant of them:
For aeration fields, plastic perforated pipes are used, at the edge of each of which a ventilation outlet must be installed. To prevent siltation of the perforation, the pipes are wrapped with geotextiles, backfilled with gravel, and special load-bearing platforms are built. The system is installed in an unused place in the dacha so that it does not disturb the plants with an increased amount of water in the area, and the plants do not spoil the system with their roots. The entire system is assembled with obligatory attention to the requirements of the septic tank and water discharge, as well as depending on the characteristics of the soil. By the way, the system is being built on sandy loam, loam and sandstone, always below the freezing level. For laying pipes, the same slope is selected and installed for proper distribution of water. Autonomous sewer systems or local treatment plants, the same VOCs and septic tanks from many manufacturers are an excellent alternative for a summer cottage
Autonomous sewer systems or local treatment facilities, the same VOCs and septic tanks from many manufacturers are an excellent alternative for a summer cottage
Drainage channel and pit in the concrete floor of the garage
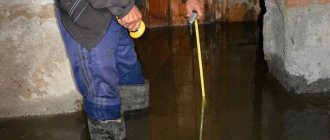
Hello friends, everyone. The garage will not be used for permanent storage of personal cars, but more for car repairs. The essence; The plans include a heated concrete floor as the main heating for the garage, there will be no radiators, t + 10 will be enough, I think there will be a drain in the center of the floor, but here’s how to make a pit for collecting water, just thoughts, photos of thoughts and examples in the photo.
TZ: the heated floor will be heated around the clock, the garage will not be used for washing, I want water drainage when the snow melts from the car overnight. I’m considering a pit without a bottom, but who knows, depending on your luck, or maybe it’s solid concrete, the pit should be very small, the size of a 200 liter bucket or barrel.
I'm waiting for suggestions from friends, preferably with a photo, and I'll choose
How to organize a drainage system
To prevent dampness in the basement, the pits should be equipped with a drainage system, which will allow water to be drained away from the building. Additional waterproofing of the well walls and connecting seam may also be required.
Scheme of a pit with a drainage system.
If the building is located on a waterproof pad, you can get by with a simple drainage system. To do this, you will need to leave a pipe with a diameter of 6–8 cm and a length of about 1 meter under the bottom of the pit. The hole in the pipe that goes into the basement pit should be closed with a special drainage grate. To drain water more efficiently, the floor must be laid with a slight slope away from the building (towards the drain hole). The bottom of the well should be covered with a layer of gravel about 3–4 cm deep. This simple procedure will prevent the earth from falling off and debris will not clog the pipe.
Additionally, waterproofing of the walls and expansion joint between the pit well and the building will be required. The walls of the well can be treated with bitumen mastic. The seam is sealed with geotextile or roofing felt. Waterproofing in combination with a drainage system will reliably protect the building from moisture ingress from the wells of the basement windows.
How is pressure calculated?
The pressure is determined by measuring the pressure (in Pa) in the suction and discharge pipes. If there is a height difference between them, then take their difference, since this value significantly affects the result.
Calculation formula:
Н = р2-р1/ρg + (h2-h1) 8Q2/gπ2 x (1/D24 -1/D14)
We take the volume flow rate Q, the diameters of the nozzles and the pressure at the ends of the flanges, measured with a pressure gauge, and calculate the pressure. If pressure gauges are installed at the same height and have the same diameter of the pipes, then the formula is much simpler:
Н = р2-р1/ρg
The difference between the pressures at two points in the drainage system is the pressure differential. It is important that it meets the permissible standards and strength characteristics of the pipes.
The static pressure of the system in meters when the machine engine is turned off must be higher than the altitude. This is a guarantee that the equipment is filled with working fluid and there is no air in it.
Drainage inside
It is important to understand that building regulations do not recognize any internal drainage. Internal drainage is installed either in industrial buildings, where it is essentially a system for collecting spilled liquid or condensate, or for draining basements from flood waters
Approximate order of work in case of a flooded basement:
- Before starting work, you need to drain the basement areas.
- Apply waterproofing to the surface of the walls and especially to seams, joints and cracks. Typically, impregnating, coating or injection waterproofing is used.
- A layer of crushed stone (15-20 cm) is poured onto the bottom of the basement. Perforated pipes are laid on crushed stone. The pipes must carry water into the stormwater system. To do this, the pipes are laid with a slope (1-2 cm per meter of pipe) and a hole is made in the foundation to allow the pipe to pass without changes.
- A layer of crushed stone (15-20cm) is laid on top of all this. And the floor is organized (concrete screed or slabs).
The disadvantage of this scheme is the loss of 40-50 cm in basement height.
Alternatively, you can create a basement floor that slopes toward a sump pit or sump with a pump. The pump must be able to handle contaminated water.
https://youtube.com/watch?v=fZSclsFzx9U%3F
How to arrange a drainage pit
At the point where the slopes converge, a pit is installed in which the flowing water will be collected. It has another purpose: in deep basements, a wide, recessed “well” helps eliminate excess groundwater pressure and the associated swelling of the floor.
The pit does not have to be arranged before pouring the substrate; it is enough to knock down the panel formwork in advance into a square with a side of about 80 cm. A small recess is dug using this shape.
The total volume of the pit should be 0.5 m3 or more if water flows actively. The working part of the catchment area is represented by a casing pipe. Its diameter should allow the installation of a float drainage pump for pumping out water, approximately 350–400 mm. The pipe can be either steel, asbestos-cement or polyethylene - there is no fundamental difference. In the walls, in a checkerboard pattern, you need to drill holes with a diameter of 12–14 mm with a distance of about 25 cm between them. Before installation, it is recommended to wrap the pipe in several layers of plastic mesh with a mesh size of up to 5 mm. 1. HDPE pipe. 2. Pit. 3. Drain pump. 4. Drainage pipe. 5. Gravel backfill The bottom of the casing pipe is solid, it can either be welded or concreted with a layer of about 7–8 cm. After installing the pipe, the formwork is removed, and the remaining space in the pit is filled with the same crushed stone that was used to fill the floor. The casing must be installed in such a way that the upper edge is flush with the zero level of the floor. For ease of passage, the water inlet is covered with a removable welded mesh made of reinforcement. In a concrete floor, the pit must be arranged in such a way that the horizontal insulation of the floor is not damaged. When pouring, the easiest way is to use a 20-kilogram bucket of construction mixtures, which is temporarily filled with water and crushed stone to prevent it from floating. If there was no provision for a pit in the basement, part of the floor should be dismantled and a sump cast using modified concrete with low water absorption.
- remove the base formwork;
- trenches are dug along the foundation with a depth slightly below the base of the building and 0.4 m in width;
- the excavation is drained and its bottom is leveled;
- apply a waterproofing coating to the foundation walls, and, if necessary, insulate them;
- geotextiles are laid with reserve on the bottom of the trench;
- they fill the top with a ten-centimeter layer of crushed stone, using it to create a slope in the desired direction;
- install a drainage line, installing inspection wells at an average distance of 20 m;
- testing the system;
- fill the drainage pipes with crushed stone;
- everything is covered with the remaining free edges of the geotextile;
- make a mixture of sand, soil and gravel and fill the trench with it;
- install a water intake at a distance of 10 m from the basement, placing it half a meter deeper than the drains are located;
- connect the well to the drainage circuit using a tee for this purpose, using a main pipe with a diameter of 150 mm;
- Fill the ditch with the prepared mixture.
In order to protect the basement from water leakage, various principles and techniques are used that directly depend on the reasons for the appearance of water.
Arrangement of the pit
The easiest way to eliminate wastewater in the basement with your own hands is to build a pit. This method does not require much energy and time - it is an economical option. That is why it is often used by summer residents or owners of private houses. In order to create a pit correctly and technologically correctly, you must follow these instructions:
- You should dig a cube-shaped hole in the center of your basement with approximately the same volume (1 m³). We take these values based on a standard basement (1.8 * 2 meters), but if your basement is larger, the dimensions of the recess will accordingly be increased;
- In the center of the dug recess, we dig a hole into which we place a stainless steel container (bucket, basin). Press well around the container;
- we line the dug hole with bricks (half a brick is enough), and cover the brick wall with an additional layer of cement (approximately 20-30 mm);
- We cover the cube-shaped pit on top with a grate. Do not forget to take into account that the gaps between the bars of the metal grate must be wide enough to insert the hose from the pump for pumping out water;
- dig small depressions in the pit itself and cover them with a slab to form outlets.
The joints between the slabs will implement the drainage function.
Drainage for drainage
This method is more complicated than the previous one, its implementation will require more financial costs and more effort and time will be required, but the efficiency of this drainage method is an order of magnitude higher. There are 3 different methods of drainage system, different in their specificity:
- Wall-mounted. For buildings with a basement or plinth, such drainage is installed immediately after construction work on the foundation;
- Plast. A system of such drainage is installed together with the excavation of a foundation pit for the building;
- Ring (trench). The drainage system is arranged in the form of a trench around the building. This method can be done on your own. It is important to note that the trench drainage method is considered the most effective and is performed at a depth of 40-50 cm below the foundation level.
Let's take a closer look at a method that can be done with your own hands and after completion of construction work - the trench drainage method:
- around the house, along the walls - we dig a recess (trench) at least 120 cm wide, for this you can use manual force or special equipment;
- On four sides of the central trench it is necessary to install bends approximately 5 meters in length. At the end of these bends, a hole should be dug with a width suitable for concrete rings;
- Geotextiles are laid at the bottom of the trench, and a pipe (corrugated) is laid on top of it for drainage. Next, inspection wells are installed every 7-8 meters;
- after the geotextiles and pipes for drainage have been laid, the trench is filled with fine crushed stone, and 10-15 cm before the surface of the foundation, we make a sand cushion. After sand, we make a layer of coarse crushed stone and concrete on top.
How to waterproof a basement
In order to prevent the basement from flooding and protect it from groundwater and melt water, waterproofing is widely used. Based on the method of application and protection, waterproofing is divided into two types - external and internal. Experts recommend applying external waterproofing (waterproofing the basement from the outside) in the early stages, namely during the construction of the foundation. Because to apply waterproofing there is access to the external walls of the basement, and after building the house and putting it into operation, to access these walls you will need to free them from the ground, and only then apply waterproofing. After the waterproofing has dried (one or more layers), it is necessary to lay sand and crushed stone and pour concrete on top. External waterproofing is applied in two ways - pasting (using rolls) and coating (bitumen mastic or polymer materials). It is also necessary to remember, that if groundwater approaches the foundation (basement) itself, it is necessary to provide additional protection in the form of brickwork. Sometimes brickwork is replaced with geotextile materials (membranes). It should be remembered that it is better to apply external waterproofing 25-30 cm above ground level. Applying external waterproofing yourself can be done in several stages:
- Mastic is applied to the external walls of the foundation, having previously cleaned the surfaces of soil and clay residues;
- Next, roll material is glued onto the mastic and then rolled with a roller for a tighter connection;
- We attach each subsequent roll to the surface with an “overlap” of 10-12 cm over the previous roll;
- We roll each roll and especially the joints between them with a roller;
- Use a utility knife to remove unnecessary residues.
It is preferable to apply mastic to fresh concrete - after all, when fresh concrete gets on the porous surface, all microcracks are filled. Internal waterproofing is carried out using mineral polymer-cement compositions; they just need to be diluted with water and they are ready for use. Such compositions can be used on any surface (concrete, ceramics, wood). Before doing the work on your own, you must first drain the basement, clean the floor and walls from various contaminants. Next, perform the following work:
- all surfaces in the basement are treated with a waterproofing compound to protect against dampness;
- apply mastic to all surfaces with a layer of 20-30 mm (if necessary in two or three stages), special attention to cracks, corners and seams;
- a metal grid (mesh) is installed on the floor and walls;
- the walls are covered and the floor is poured with concrete;
- apply plaster to the walls (about 30 mm).
If the floor in the basement is earthen, you need to cover it with a layer of crushed stone, compact it and fill it with a cement mixture. When the cement gains the necessary hardness and dries, you should begin waterproofing. There is no point in laying waterproofing products on an earthen floor - they will not perform their functions. Qualified specialists also recommend installing a ventilation system in the basement. You can create artificial air circulation (fans and hoods around the perimeter of the room) or build an exhaust structure that creates air movement throughout the basement. To build a simple natural circulation system, you need to make a hole in the ceiling and lead and install the pipe outside the room. The pipe should be covered with a metal cap to prevent precipitation from entering the basement. In combination with waterproofing, this will provide reliable protection for your basement from moisture and mold.
Causes of water in the basement
If measures are not taken to protect the basement from groundwater during construction, then eliminating the consequences of flooding will become a more expensive solution.
The first aquifer is formed in the upper layers of the soil. Moisture from atmospheric precipitation and melted snow and ice cover and nearby bodies of water gets into it. In spring there is an abundance of moisture, the groundwater level above two meters deep is considered high.
The owners erect two main barriers to prevent water from entering the house:
- waterproofing of the foundation, floor and walls of the basement, plinth, which protects the thickness of the concrete and brick layer from the gradual seepage of water through microcracks and pores of the material;
- a drainage system under the foundation, around the basement or throughout the house that collects most of the moisture and carries it outside the interior area.
The most common causes of flooding are:
- violations of the technology for arranging external waterproofing of a house;
- clogging, silting of drainage pipes or the volume of wastewater exceeding the capacity of the system;
- rupture of water supply or sewerage pipes;
- excessive condensation due to poor basement ventilation.
You can determine the high level of groundwater on a site even before building a house using a geological examination, or you can use folk signs: a high level of water in a well in nearby areas and the presence of plants such as reeds, willow, alder, and horsetail.
Cavitation processes
If the pressure at the suction pipe drops to the pressure of the saturated vapor of the liquid, then dissolved gas begins to be released in the working flow with the formation of bubbles. As the pressure in the system increases, the bubbles begin to burst, and the released energy acts on the impeller blades. The surface is subjected to thermal, electrochemical, and shock effects. The extent of damage depends on the material of the impeller. Stainless steel is most resistant to cavitation, cast iron is the least resistant. Damage is detected only after dismantling the equipment, and is manifested by a significant deterioration in performance.
To protect against cavitation during installation, calculate the maximum permissible height of liquid rise during suction, taking into account the cavitation reserve - the minimum pressure parameter at which there is no negative impact on the pump. Manufacturers determine this value experimentally over the entire feed range and enter it into the table.
The hydraulic part is calculated taking into account the properties of the liquid: temperature, density and heat capacity.
Drainage water discharge point
The location for discharging drainage water is selected first of all, based on the volume of water and the intensity of flooding. In case of seasonal water flow into the basement, it is allowed to install a drainage well or drainage trench. To construct a drainage trench, we make the last part of the outlet pipe perforated, fill the bottom of the trench with crushed stone and sand, and wrap the pipe itself with geotextile.
Approximately, to drain 1 m3 of drainage water, about 6-8 m of drainage trench will be required. For large volumes of drainage water, it is necessary to lay your own trench to the village drainage system.
Therefore, it is necessary to take measures to eliminate the causes of basement flooding, including the installation of ring drainage.
What pressure does the drain pump create?
The main characteristics of the pump include: flow, pressure, pressure, power, efficiency and rotation speed. The pressure of the working flow depends on the discharge pressure and the density of the working medium. The higher the pressure and lower the density, the higher the pressure.
The pressure of drainage pumps characterizes the energy of the fluid. The static state corresponds to potential energy, and the dynamic state corresponds to kinetic energy. The total pressure corresponds to the sum of these two components. The static value is measured with a piezometer, the dynamic value is measured with a pitot tube, followed by calculation using the formula.
As the flow rate decreases, the dynamic pressure becomes static. In most systems the dynamic head is low. For example, when a liquid moves at a speed of 4.5 m/s, the dynamic pressure is 0.1 bar.
Rules for installing a drainage system for a septic tank
With the help of a septic tank, it is possible to arrange a full-fledged sewer system, regardless of connection to the central one.
For the most part, for suburban areas this is the only option. When choosing a treatment type of septic tank, installation of a drainage system, depending on the composition and depth of freezing of the soil, can amount to up to 75% of the volume of work on installing an autonomous sewage system. The drainage system consists of perforated pipes, or drains, that can interact with the septic tank and the home sewer system. The sewer pipe is installed at an angle of 2-3 degrees at a depth of 0.45-0.65 m. The septic tank is installed at a depth of no more than two meters, otherwise the post-treatment process becomes more complicated.
To install the system, you should choose pipes with a diameter of 0.11 m. In the upper part of the drain pipes, the holes in diameter are slightly smaller than in the lower part. This is done to improve the distribution of wastewater. Their number at the very beginning of the system will be somewhat larger, while the holes are smaller in diameter, so waste liquids will not flow out immediately. The greater the distance at which the holes are located from the distribution well itself, the larger the diameter will be, and at the end of the pipes the holes are located at the bottom.
A visual diagram of the installation of a septic tank and the arrangement of a drainage system.
Basic principles for installing a drainage system
- Each of the drainage pipes, starting from the well and ending with the place where the ventilation is installed, should be no more than 25 meters;
- Between drains located adjacent to each other, a distance of at least 1.5 m should be maintained;
- Drainage pipes must be installed at a depth of 1.5 m;
- The trench for the pipe must be made at least 0.5 m wide. The most common option is a 1 meter trench.
Design features
Now let's figure out how the drainage pump works and what its main structural elements are. You already know that units for collecting dirty water (sewage pumps) are distinguished by the presence of a kind of auger.
If we talk about the general principle of the drainage pump design, then it is worth highlighting the following design elements.
- Electric motor. The main working element of the drainage pump. Its power directly affects how much liquid the unit can handle per unit of time. The electric motor starts working when connected to the mains. Or it can be put into operation using a fuel generator.
- Shaft with impeller. Comes into operation simultaneously with the electric motor. The liquid enters the pump and exits through the hoses. The movement of water is facilitated by a rotating shaft with an impeller, the operation of which is based on the principles of centrifugal force.
- Float. An important element that ensures that the unit is turned on and off automatically. Although it is possible to find a pump without a float, it is better not to use them. In the absence of a float, you will have to monitor the pumping of liquid independently and constantly. And if the pump completely goes under water, or the reservoir runs out of liquid for pumping, this will lead to pump failure.
- Filters. They protect the pump from large debris, stones, and various impurities. Mesh filters are usually used. The size of the cells in the filters determines how large impurities the pump can pass through without harming the device.
- Hoses and shredders. The shredder chops up large debris. This system is mainly used on fecal drainage pumps. Hoses are needed to redirect the liquid sucked into the pump.
When choosing a sump pump, be sure to study the technical specifications and also take a look at the maximum allowable size and the amount of contaminants that this model can handle.
Some pumps are focused on the purest water possible, and therefore are mainly used in swimming pools.
The next important point is the water temperature. Sometimes sump pumps can handle hot liquids. This leads to overheating of the motor if the pump was not originally designed to operate in such conditions.
Therefore, in technical documents, the manufacturer always indicates what the temperature limit of a particular model is. Some units are specially designed to pump water and other liquids with temperatures of 50 degrees Celsius and above.
Filter drainage well
This structure is similar to a cesspool, but with certain differences. Treated wastewater from the septic tank comes here, is further filtered and goes into the ground.
This option can be called the best solution for a summer residence. It is simple, inexpensive, copes with small volumes of water (for larger volumes it is better to use other structures), and can be installed even on soils with partial problems.
You can make a drainage well simpler - install a reinforced concrete ring in the hole, in which you also fill holes for water drainage. You can make a drainage well simpler - install a reinforced concrete ring in the hole, in which you also fill holes for water drainage. You can make a drainage well simpler - install a reinforced concrete ring in the hole, in which you also fill holes for water drainage. You can make a drainage well easier - install a reinforced concrete ring in the hole, in which you also fill holes for water drainage
What’s good is that the drainage well takes up virtually no space, and therefore if you have a small area, then there’s nothing to worry about.
How to make a drainage well with your own hands?
There are no problems in building a drainage well, and even more so for summer residents who have been with us for a long time and have been involved in even more serious construction.
You need to dig a hole and properly arrange the foundation pit. There are several options for constructing such a well, and all of them are affordable.
You can immediately settle on used bricks, which are laid in a circle around the pit, near the walls. Perforations and gaps without mortar are left between the bricks so that water can escape not only through the bottom, but also through the walls.
You can make a drainage well simpler - install a reinforced concrete ring in the hole, in which you also fill holes for water drainage. A similar option is to install a large plastic barrel without a bottom in a hole.
Aeration fields, irrigation fields or even filtration fields - all these names describe one treatment drainage facility that helps with the removal of treated wastewater into the ground
Expert advice on drainage wells
There is no need to spend money on waterproofing. Here it is not needed, and on the contrary, we will be satisfied when the water goes evenly into the ground. The drainage well is installed in an area of the site where there are no problems with high groundwater levels. It is also recommended to set the depth of the structure below the clay layer. For better absorption of water, to eliminate problems with soil heaving, as well as for maximum purification, a layer of coarse sand and gravel, 20 cm each, is placed on the bottom of the well. Perforation is carried out at a level of 50-80 cm from the bottom, water will also flow out through it. To prevent the perforation from silting, expanded clay or the same gravel is sprinkled around the circumference of the installed barrel or concrete ring. Be sure to think about choosing the right location - away from residential buildings, wells, boreholes
Also, do not violate the law with your construction. It is necessary to accurately calculate all the parameters of the structure, which must correspond to the amount of water discharged. You will also need waterproofing and insulation of the upper part of the drainage well, and high-quality ventilation. It is important to install a removable cover on the well, which will provide access to the inside.
Drainage systems differ mainly in their ability to drain a certain volume of treated wastewater
Cleaning a heavily silted well
It is difficult to clean such wells with a household drainage pump: it quickly becomes clogged with sand and cannot cope with the job. Professional equipment would have been more useful here, but the craftsmen found a way out.
First, preliminary work is carried out. Need to find:
- barrel with a volume of 200-300 l;
- surface pump or budget vibration pump;
- sand filter.
The container is installed near the well.
First, clean water is pumped out so that as little of it as possible remains, about 1 m. It is sent through a hose beyond the boundaries of the site or found another use. Now you can start cleaning the source from sludge.
The technology is as follows:
- A drainage pump pumps muddy water into a barrel.
- From there it is fed under pressure back into the well. But it is already clean - the filter does not allow sand to pass through.
- The sand is washed away by a strong jet, the drainage pump captures the muddy liquid and delivers it upward.
The process goes on almost continuously. They stop only to lift the device and rinse with clean water any deposits in the water channel, which can lead to equipment failure.
Drainage installation in basements
One of the possible solutions to the issue of water protection in the basement is to install a drainage or slope with a pit for installing a drainage pump. It is preferable to carry out work at the lowest possible groundwater level
s: in dry summer or winter.
For basements with earthen floors, it is recommended to install a drainage system - a network of drainage pipes located around the perimeter of the room. To install it, you will need to dig a trench (depth about 0.5 m) around the perimeter of the basement. The bottom of the trench is thoroughly compacted and covered with crushed stone or gravel to a height of 15-20 cm. We lay drainage pipes on top of the layer (perforated pipes, preferably covered with geotextile). The pipes are laid with a slope towards the pit or drainage well. The slope is approximately 3 mm per linear meter of length.
We fill the laid pipes with crushed stone or gravel to the floor level. A prefabricated pit or well is installed at a low point. The well is made of monolithic reinforced concrete or ready-made wells made of PVC pipes are used. We install a drainage pump in the well, which is controlled by a float.
If there are wooden floors installed on top of the dirt floor in the basement, they must first be removed.
In addition to installing drainage, it is possible to waterproof the bottom of the basement.
We carry out waterproofing as follows: For the installation of a pit, it is easiest to use a pipe D = 0.5 m, which allows you to install a drainage pump with
float, depth - up to 1 m. Recommended pit volume - 100 - 200 liters. You can purchase a ready-made pipe with perforation or drill holes in a checkerboard pattern (diameter 10 - 15 mm, pitch 20 - 25 cm). Before laying the pipe, it is recommended to wrap it in geotextile or plastic mesh in several layers.
The bottom of the pipe must be covered, for example, with concrete, a layer of 5 - 10 mm with a tamper. The pipe is installed in the prepared pit; after installing the pipe, the space around is filled with crushed stone. The top of the pipe should be at floor level. For safety, we cover the pipe with a grill, ready-made or welded from fittings. To construct a pit in an existing concrete floor, the concrete will have to be broken in the right place, a pit dug and a pit made from concrete with low water permeability.
Semi-open and partially buried basements
When the groundwater level is high, it is advisable to build semi-open or partially buried basements.
The mark of the bottom of the pit should be at least 30-40 cm above the water surface.
Drainage is installed around the perimeter of the pit. To do this, a trench about 40 cm deep is dug below the base of the basement.
When water enters the trench, it is pumped out.
Sand is poured into the trench in a layer of 10-15 cm, then geotextiles are placed and crushed stone is filled.
A perforated pipe is laid on the prepared cushion with a slope towards the outlet pipe. The top of the trench is filled with crushed stone and sand.
It is better to make the foundation for a building in an area with high groundwater levels slab, made of monolithic reinforced concrete.
Work on constructing a semi-buried basement is carried out in the following order:
- Construction of a monolithic foundation slab, including:
- backfilling a cushion of sand and crushed stone with a layer of 30 cm;
- device for concrete preparation from concrete B 7.5;
- waterproofing device for the base of the slab;
- installation of foundation formwork around the perimeter of the building;
- installation of reinforcement cages;
- concreting the foundation slab with concrete B 15.
- Pouring walls made of monolithic reinforced concrete includes:
- installation of reinforcement frame;
- installation of wall formwork;
- pouring concrete into formwork with layer-by-layer compaction using vibratory rammers.
- After the concrete walls have reached the design strength, the formwork is removed.
- Waterproofing basement walls.
- Internal and external walls are coated with hot bitumen twice, 2 layers of roofing felt or other rolled material are glued.
The thickness of the basement walls must be at least 40 cm. It may vary depending on the number of floors of the building and the characteristics of the soil.
In the corner of the basement you should build a pit and make floors sloping towards the storage tank.
An important step in the construction of a basement is its insulation. High-quality basement insulation can ensure stable indoor temperatures all year round.
Construction of a partially buried basement.
The most effective material for insulating a basement, both inside and outside, is extruded polystyrene foam. The porous material is an excellent heat insulator. It is not afraid of moisture and can withstand high soil pressure without deforming.
Insulation boards are glued to the wall using bitumen mastic or any bitumen-based adhesive.
After completion of waterproofing and insulation, the basement walls are backfilled with sand and soil, with layer-by-layer compaction.
To protect the basement walls from rain and melt water, a blind area of concrete or asphalt, 70-100 cm wide, is installed around the perimeter of the building. The slope of the blind area from the walls of the house should be 5-10%.
If there are windows in a semi-buried basement, light pits are installed.
Installation of ready-made structures
Modern construction companies today offer a fairly wide selection of ready-made structures for arranging pits. By purchasing such a product, you can easily equip pits in the basement: the only thing you will have to work on is digging a pit to fit the dimensions of the purchased structure.
Installation of the finished structure.
Today, ready-made pits are made from different materials. It can be galvanized steel, propylene, plastic or polyester. The latter option, reinforced with fiberglass, has such strength that structures made from it can easily withstand not only the weight of an adult, but even a car. Therefore, such designs are the most popular.
Replacing old elements with new ones.
Metal, in particular steel structures, also have their advantages. Thanks to the galvanized surface, they are not exposed to moisture. In addition, most are equipped with anti-vandal devices. This option is perfect for country houses in which there are no permanent residents. Iron bars for pits will protect not only windows from mechanical damage, but also the home itself from thieves.
Typically, ready-made pits on the market include the following required elements:
- Well body.
- Grills on the windows.
- Set of fastening devices.
The design and manufacture of pits involves certain technological subtleties, but installing ready-made pits is not difficult. Any man (familiar with construction) can cope with this work without the involvement of specialists.
The well body is installed in the finished pit, all communications are connected (drainage, discharge, grate on the drain pipe). After all the above work, all that remains is to install a fence or grate for the pit, and the structure is ready. All structural elements are attached to each other and to the wall with special dowels, which are included in the product package.
The finished pit is also good because it does not need additional insulation. The only drawback of ready-made structures is their price. This pleasure is not cheap. Therefore, if you are not ready to spend a lot of money, you can try constructing a pit yourself.
Classification of centrifugal drainage pumps
Pumps are divided according to the following characteristics:
- type of symmetry of the structure - horizontal and vertical;
- entrance location - lateral, axial and double-sided;
- number of stages - one-, two- and multi-stage;
- number of threads - single-, double-, multi-threaded.
A single-stage mechanism with an axial input is equipped with an electric motor with a shaft on which the impeller is mounted. A seal is placed between the discharge and suction parts to prevent fluid from leaking in the opposite direction. Such models are used if the pressure does not exceed 150 m.
Multistage installations create high pressure with relatively low fluid flow. The amount of pressure corresponds to the sum of the characteristics created by each impeller.
The type of construction is chosen taking into account the dimensions of the location and the configuration of the pipeline.
Technological features of pit construction
The easiest and fastest way is to buy a factory-made structure. In this case, you only need to dig a pit of a suitable size with your own hands and ensure water drainage.
The body is made of the following materials:
- Composite (propylene, polyester, fiberglass reinforced). The grille is able to support the weight of the car. They are practical to equip recesses installed at ground level in places where people and equipment can move.
- Cink Steel. When combined with the same grille, it serves as protection against unauthorized entry through pits in dachas and country houses without permanent residence.
Finished products come in various designs for given conditions: vehicular and pedestrian loads, high groundwater (reinforced waterproofing), installation on a thermal insulation coating of the foundation.
The standard kit includes the following items:
- frame;
- covering grid;
- installation kit.
Pits under the windows
The design should be done in stages, taking into account the prospects for changing geological, climatic and operational conditions. Data for the first 2 categories (multi-year cycles and development plan) can be obtained from your local architectural office.
An individual pit design is developed based on the following parameters:
- The width of the pit is selected 1.5 times larger than the same window dimensions.
- The depth of the finished recess after laying the materials and cladding must be at least 0.25 m below the frame in the opening.
- The area of the bottom plane for drainage is commensurate with the surface of the window block. The rectangular shape will save house space on the ground surface. The distance from the wall is within 0.8-1 m.
The main nuance is drainage. If the water is located significantly below the foundation, then the drainage occurs through a perforated pipe into a well at least 1.5 m deep. The moisture will spread into a cushion of crushed stone under the base.
High water in the soil will require connecting pipes to a drainage system or a separate well with removal outside the site. Before installing the floor, the underlying base is waterproofed and insulated. The lower plane is sloping towards the drain.
At the stage of pouring the walls with concrete, formwork is made from boards or plywood. The thickness of the monolith is chosen to be at least 15 cm. To prevent the flow of liquid from precipitation or cleaning the area, or the entry of large debris during strong winds, it is advisable to raise the upper edges of the pits by 0.15-0.2 m above the blind area. Reinforcement is rarely used in this design - you just need to ensure a rigid connection with the wall using anchors (for example, long nails driven in half). A decorative canopy will provide additional protection from rainwater.
Drainage pits
So that water in the basement can be pumped out from one point, drainage recesses are installed towards which the floor slope is directed. The walls are concreted in the shape of a rectangular well with a wall thickness of 0.13-0.15 m.
The operations are carried out step by step according to the following scheme:
- Dig a hole with a volume of 1 cubic meter. m under the pit in the center of the basement. The size is directly proportional to the area of the underground.
- Make another recess in the bottom according to the diameter of a regular bucket. A stainless steel container is inserted into it - this will be the suction pipe of the pump.
- The walls are made of solid red brick (silicate brick is less resistant to water).
- The brick can be protected with 3 cm thick cement mortar or covered with ceramic tiles.
- The top is covered with a grille made of reinforcement, which allows the hose to be lowered without the leg falling through.
In a frequently flooded cellar, pits can serve as an indicator of the rise in ground seasonal moisture. For this purpose, they install with their own hands below the floor level stainless steel (aluminum) tanks with a capacity of about 250 liters with drilled holes in the walls. When water appears, the electric pump with automatic float switches on, and it is pumped out into the storm drain. This approach prevents flooding at an early stage. Over time, the amount of water entering the basement decreases and the pump operates several times less often.
Types and designs of pits
Drainage pits are installed outside the building, near the windows of the basement or ground floors, or inside basements.
The size of the pits depends on the specific conditions and the amount of water penetrating into the basement.
Light pits
To provide natural lighting to the basement floors and to collect and remove water from the walls, windows are constructed below ground level. Such structures can be used to supply technological equipment, fire hoses, and large items to the basement.
The shape of the pits can be rectangular, semicircular or trapezoidal.
Work on the arrangement of light pits is carried out in the following order:
- A pit is being developed, which should be 1.5-2 times wider than the window. The depth of the pit should be at least 50 cm below the window.
- The bottom of the pit is filled with crushed stone, and a perforated pipe is laid on the crushed stone bed to drain water into a well or storm drain.
- The formwork of the pit walls is installed from boards or plywood, reinforcement is carried out and concrete is poured into the structure.
- After removing the formwork, the base is filled with concrete with a slope towards the drain. The walls of the pit are waterproofed with bitumen mastic 2 times.
The devices are equipped with durable grilles designed to withstand loads from moving people or cars. Grilles of pits located near windows can serve as protection against unauthorized entry into buildings.
Modern manufacturers produce ready-made structures for installing light pits made of plastic or fiberglass.
The products are equipped with the following elements: siphons, valves, baskets for collecting leaves and debris.
Drainage pits
To collect and pump out water entering the basement from one point, pits are installed towards which the floor slope is directed.
The pits are made of monolithic reinforced concrete in the shape of a rectangular container, with a wall thickness of 120-150 mm.
The size of the structure depends on the area of the room.
The work is performed in the following order:
- a hole is dug for a pit in the center of the basement;
- a recess is made in the bottom part for installing a stainless steel container where the suction pipe of the drainage pump will be located;
- the reinforcement frame is mounted and the formwork of the pit walls made of boards or plywood is installed;
- Concrete B 15 is poured into the formwork and cured until the design strength is reached.
- After removing the formwork, the bottom of the pit is concreted.
The walls of the pit can also be laid out from solid clay bricks, followed by plastering and waterproofing.
The basement floor screed is poured with a slope towards the storage tank.
To create a pit in the basement with your own hands, you can use factory-made containers with a body made of composite materials, stainless or galvanized steel.
An electric pump is installed to remove water from the pit.
Construction of a pit to drain water from the basement
It is not difficult to properly arrange pits in the basement with your own hands if their functional purpose is taken into account in accordance with the geological and climatic conditions of the site. In some cases, their presence is assumed by the installed technological equipment. Highly located groundwater or its cyclical rise will require a more careful approach to design so that the cellar can be used for its intended purpose, regardless of the season or weather outside the house.
Types and functions of pits
Perform 2 main tasks:
- water collection and removal;
- natural lighting in the basement.
Building codes do not regulate the mandatory installation in low-rise private houses, but for effective protection against the destructive effect of water on the base of a building, a carefully made recess is indispensable.
1. Pits near the windows.
The construction of a cellar is often not limited to creating a small warehouse for food - the entire internal space of the foundation is settled. In the basement basements, windows are built that extend below the soil level (blind area). For this purpose, depressions are made in the ground near the outer wall of the foundation. They allow sunlight to penetrate inside and provide additional natural ventilation. They are built in such a way that precipitation and groundwater cannot enter the window, and the moisture that has already flowed in is drained into the drainage system or wells.
Pits can be of the following shapes:
- rectangular;
- trapezoidal;
- semicircular.
Some additionally serve as technological openings for supplying equipment and large items to the basement. The minimum distance from the outer edge to the wall should not only provide illumination of the room, but also allow a fire hose with bends to pass through without fractures.
It is advisable to have organized water collection in order to protect material assets (workshop, gym, wine cellar, garage) from natural disasters or accidents on internal pipelines. Under the windows in the basement, recesses must be made if the openings are located at a distance of less than 0.2 m from the ground level. This provides protection from storm flows, melting snow and splashing when drops fall on the blind area of the building.
2. Drainage pits.
The need for them necessarily arises when groundwater appears in the basement in the spring several years after the construction of the house. The following reasons contribute to this:
- violation of technology, use of low-quality materials at the stage of building construction;
- incorrect calculation of loads, formation of cracks in the foundation, destruction of waterproofing;
- a significant increase in the water level in underlying soils (excessive precipitation/melting, the emergence of new sources, the creation of artificial barriers in aquifers due to new construction in neighboring areas);
- failure of the drainage system (clogging with debris, compression by subsiding soil, failure of the automatic drainage pump).
The project provides for an electric pump for pumping out liquid if an individual heating unit is installed in the basement. The slope of the floor should be directed towards such a recess.
Purpose of pits
The main purpose of pits installed in the basement is to collect and remove water.
These structures are able to protect structures from the destructive effects of groundwater, storm water and melt water.
Water in the basement or cellar may appear in the following cases:
- when there is a sharp increase in groundwater due to large amounts of precipitation, intense snow melting, or artificial damming of aquifers during new construction;
- the appearance of through cracks and destruction of waterproofing in the structure of foundations or basement walls as a result of design errors, incorrect calculations of loads, or violation of technology during the construction stage;
- failure of drainage systems due to clogging or failure of automatic drainage pumps.
In flooded basements, pits can serve as an indicator of rising groundwater. A pump with float control installed in the pit will turn on when the water rises to a certain level.
Installation diagram of a pump with a float.
What to do if the basement floor floods
FORUMHOUSE readers know well that building a cellar or basement is a responsible undertaking that requires competent calculations. Despite a number of benefits that the installation of “0” level premises promises, their operation can be complicated due to the high groundwater level. Therefore, you need to think about how to drain water from the basement at the design stage.
Most often, the following scheme is proposed to solve this problem:
1. Completely excavate the basement along the entire perimeter.
2. Make additional waterproofing of the basement walls.
3. Install a drainage system at the level of the base of the foundation.
4. Make a clay castle.
Despite the apparent universality of this solution, practice shows that there are no schemes suitable for all situations.
The choice of method for constructing a drainage system depends on the data obtained from a hydrogeological study of the site.
This is done like this - they drill 2-3 wells 2-3 meters deep below the basement level.
Then they look at what level water appears in the wells, and whether it will be higher or lower than the foundation level. The perched water is usually collected in the soil used when backfilling the foundation cavities.
Therefore, the installation of drainage and waterproofing should be considered in combination; one cannot be done without the other.
The drainage system cuts off water from the basement walls, and the waterproofing does not let moisture inside.
It is also necessary to divert water coming from the roof from the foundation when the snow melts, for which a blind area is built, a drainage system is installed, and a storm drain is organized.
If these measures do not help, then you will have to make a wall drainage, and pump out the water collected in the basement through a pit.
The forum member did this: he took a 500-liter aluminum tank and cut it in half. The result was a container with a bottom, 1.7 meters high and 90 cm in diameter. To the bottom of the Dodge45
I screwed on 4 corners that protrude beyond the dimensions of the container. They serve as an anchor and do not allow the tank to float. Then, in the lower part of the tank, in a circle, the forum member drilled many holes with a diameter of 20 mm. They are necessary for better water collection.
The next step was digging a hole in the basement 1.5 meters deep with a distance of 2 meters from the wall.
Then the user dug two inclined trenches to the pit, with a height difference from 60 cm to 100 cm. He sprinkled the bottom of the trenches with granite crushed stone, laid sewer plastic pipes with a diameter of 150 mm with holes drilled at random with a diameter of 13 mm and filled the trenches with crushed stone. The result was drains. The forum member installed a pump in the barrel to pump out the collected water. Then it merges into a roadside stream.
Basement water drop schedule:
- 2006 The pump turns on every 20-30 minutes.
- 2007 The pump turns on every 1 hour 30 minutes – 2 hours 30 minutes.
- 2008 The pump turns on every 2 hours 30 minutes - 4 hours.
- 2009 The pump turns on every 4 hours 30 minutes - 6 hours.
- 2010 The pump turns on every 6-12 hours.
- 2011 The pump is turned on only forcibly. The water level at the bottom of the barrel is stable - 6 cm.
A year later, a forum member buried a pipe under the road, into which he laid a sewer plastic pipe with a diameter of 150 mm and made a stainless steel receiving well to drain water from the pit.
Another option for a pit for draining water from the basement
I drilled many holes in the body for water drainage, and at the bottom of the container I attached a siphon from a kitchen sink with a pipe with a diameter of 70 mm. Then da4hik
dug a trench under the foundation with a slope towards the storage well located at the far end of the site.
I brought a plastic pipe from the pit into the drainage trench. Instead of a perforated drainage pipe wrapped in geotextile, the forum member, on the advice of his neighbors, threw trunks of cut trees onto the bottom of the trench. Water collected in a storage tank in the basement is discharged along a natural slope through a drainage ditch outside the site.
“In this way, I not only removed the water from under the house, but also partially drained the area.
All information about ground water, perched water and drainage is collected in this topic. A FORUMHOUSE user's story about how he built a basement is available at this link. A photo report on self-draining a basement is here.
And from this video you will learn how to build a basement with a high groundwater level.
Subscribe to the channel so you don't miss the next publication!
Selecting a pump based on performance and pressure
Performance is a characteristic that indicates how much water a pump can pump per unit of time.
The larger the value of this parameter, the faster the unit will cope with the work.
The pressure indicator characterizes the ability of the equipment to raise water to a height. When choosing a pump, take into account that 10 m in the horizontal plane equals 1 m vertically . If, for example, it is necessary to clean a well 6 m deep and drain the liquid 10 m outside the site through a hose laid on the ground, the lifting height must be at least 7 m.
Pumping equipment is supplied with instructions that indicate the maximum performance and pressure indicators. The last parameter for drainage pumps is small - they are designed for pumping water from shallow depths.
When choosing, take into account that increasing the lifting height leads to a decrease in productivity. The interdependence of the parameters is shown on the graph, which is in the instructions for the equipment.