Often when carrying out repair work, the problem arises of how to find the wiring in the wall. Damage to a cable while drilling into a wall or driving in fasteners can not only result in a power outage, but also cause serious injury to a worker. To search for hidden wiring at home, you can use several methods that differ in their accuracy and efficiency.
How to find and repair a broken wire in the wall with your own hands
A cable break in hidden electrical wiring is a nuisance that does not happen too often, but it forces you to spend a lot of time, nerves and effort searching for and eliminating it. It will also have a significant impact on your pocket, because you need to find a damaged area in the wall, get to it, repair it and repair it again. For this work you will have to pay a specialist a significant amount. You can save money if you can handle troubleshooting yourself. From this material you will learn how to find a broken wire in the wall and what needs to be done to fix the problem.
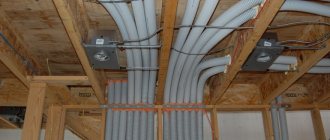
Corrugated sleeves
Nowadays, it’s probably easier to stumble upon such a corrugated tube than to see the electrical wire in its pure form. And not for nothing. The main task of such a sleeve is to provide additional protection for the wire from mechanical damage, and also (this is much more common here) to protect both the wire from the electromagnetic influence of possible surrounding emitters, and to rid the room of the induced electromagnetic field caused by the passage of alternating current through the wire.
Although the corrugated pipe standardizes all wires (thin, thick and multi-colored) into one format, it is not an important design tool. It is completely unsuitable for keeping its shape, and it will be located parallel to the floor in two cases:
- if it is fixed to the ceiling;
- and if it is attached to the floor.
Therefore, cases when a corrugated pipe is used are more likely to have a technological justification: you need to collect the wires into one bundle. Those. in this case there are too many wires that they need such structuring - this is clearly not an apartment format.
The disadvantage of such a pipe is the impossibility of visual inspection of the wiring along its entire length. And in general, it will be extremely difficult to inspect any significant area of it without damaging the corrugation.
How to splice or connect two electrical wires or cables
Often in everyday life, many are faced with a problem: how to extend or restore a broken electrical cable or wire, in cases:
- When you drilled or cut a wall or floor with a grinder, and at the same time accidentally cut an electrical wire or cable laid in the wall and not visible to the eye. In this case, as a rule, sparks are visible at the site of damage and the Machine turns off or knocks out the plugs. In addition, sockets and lighting that were connected after the damaged section of electrical wiring stop working.
- It often happens that one or two wires break off in the wiring box for a socket or switch, and the remaining length is not enough to connect them.
- And sometimes necessary to move the outlet a little higher or closer to the places where electrical appliances are connected.
Main reasons
An electrical fire can occur in the following situations:
- Short circuit. In this case, the temperature in the damaged area increases several times, melting the electrical wiring strands. Occurs due to breakdown of the insulating material (mechanical damage, microcracks, increased voltage, old electrical wiring).
- Network overload current. It is typical when connecting electrical equipment of increased power, the appearance of large leakage currents, and an increase in temperature in certain areas. These reasons also lead to overheating and subsequent fire.
- Often electrical wiring burns at the junction of current-carrying conductors. As a result of weakening or oxidation of the contact, the contact resistance of the electrical wiring sharply increases, which entails overheating and subsequent fire.
The most common cause of electrical fire is a faulty or damaged power cord for electrical appliances. If this happens, the first thing you need to do is disconnect the device from the mains, cover the fire area with a rag and put out the fire. Most apartments have flower pots, the soil from which is perfect for putting out flames.
This is interesting: What kind of introductory machines should there be after replacing the riser
Searching for electrical wiring for preventive purposes
Usually, electricians or residents start looking for cables running through the apartment when there are problems with the light.
Read also: Why is the dollar more expensive than the ruble?
Meanwhile, you should take care of this in other situations:
- Before the planned redevelopment of the apartment. For any manipulations that even affect non-load-bearing structures (for example, when dismantling a partition or moving a doorway), it is important to take into account the location of electrical communications.
- Before installing sconces, hanging pictures or other wall accessories. To carry out such work, it is important to know where the cable is located so as not to stumble upon it when drilling holes or driving nails.
- When purchasing a home. Immediately after purchasing an apartment, it is advisable to draw up a plan for the electrical networks located along the walls and ceiling. On the diagram it is also worth noting the locations of sockets, switches, and junction boxes. Such markings will help when performing major/cosmetic repairs of the apartment, as well as when arranging furniture.
To search for an electrical route, you can use homemade or professional devices, which were described above.
Drilling without dust
When drilling walls, especially the ceiling, flour and grains of sand from the drilled material scatter throughout the room. This happens because an impeller is installed inside the drill to cool the engine, which, rotating, sucks air into the drill body from the side of the handle, and throws it out heated in the chuck area. This measure makes it possible to make a drill of greater power with small dimensions and protect the drill mechanism itself from dust. And the question of how to protect your home from dust when drilling is left to the owner to decide. I present a simple design that allows you to drill without dust.
The drilling jig for dust-free drilling is a modified previous version, but the shelf is replaced by a part cut from a plastic bottle. A piece of 9-11 ply plywood measuring 80x150 mm is cut out, and a hole with a diameter equal to the diameter of the drill plus 1 mm is drilled at a distance of 30 mm from the edge along the center line. On the side where the sandpaper will be glued, a trapezoidal cut is made with a depth of 2-3 layers of plywood. The sample will serve as a kind of air intake during drilling.
A part is cut off from a plastic bottle so that the remaining part can be attached to the conductor. The width of the base of the conductor is selected based on the size of the bottle. I took a square bottle, but any 1.5 liter bottle will do. Insulating tape is wound onto the threaded part of the neck of the bottle until it reaches a size equal to the inner diameter of the suction pipe of the vacuum cleaner. When the bottle is bent, holes are formed to form the required configuration. We close them with pieces of the remaining plastic from the bottle and secure them with a stationery stapler. You can close them with tape. There is no need for tightness here. Gaps of a few millimeters will not matter, since the suction power of even a low-power vacuum cleaner is excessive.
Then, using a furniture stapler, the formed part of the bottle is secured along the perimeter of the end of the base of the conductor, on the side where the sandpaper is not glued. We make a hole in the bottle for the drill. It is better to use the melting method, since the edges forming the hole will become thicker and last longer. I melted it with a soldering iron. You can melt a hole with a nail heated on a gas stove until red.
We connect the vacuum cleaner, turn on the minimum suction power, and do test drilling.
The result will make you very happy. You will not find a single speck of dust in the circle or brick flour on the drilling surface!
With prolonged use, the drill chuck, like a screwdriver, wears out, begins to hold the drill bits poorly and it becomes difficult to clamp them. The technology for replacing the drill chuck of a drill or screwdriver is discussed in the article on the website “Drill repair - replacing the chuck.”
Source: YDoma.info
Features of conductor connection methods
A reliable connection method is welding . It uses a voltage of 12-36 V from a welding inverter or a homemade transformer. One wire (ground) is connected to the twisted wires, and the other to the carbon electrode. When the electrode touches the top of the twist, an arc occurs. It melts the wires and a metal ball appears at the end of the twist.
Read also: Tiles come off, what to do
The result of connecting wires by welding
While reliable, welding also has a number of disadvantages :
- you will need equipment: a welding machine or a homemade transformer, a carbon electrode;
- difficulties with connecting aluminum conductors: aluminum is welded only in an environment of inert gases that prevent it from oxidizing.
The second most reliable permanent connection is soldering . But soldering aluminum is just as difficult as welding - you need special solder and flux. In air, this metal is covered with a film of oxides that appears instantly. Therefore, the principle of aluminum soldering is to dissolve the oxide and treat the wire in a flux environment.
Requirements for external wiring in the apartment
First of all, it is necessary to draw up an electrical diagram of lines and elements: sockets, switches and boxes. When drawing up a project, you need to consider the following points:
- Wiring lines must be located vertically or horizontally relative to the planes of the room. Other options are prohibited by safety regulations.
- According to standards, they should lie at a distance of 15-20 cm from corners, window and door openings. Distance from floor level: sockets at least 20 cm, and switches - 60 cm.
- Do not lay cables near batteries, heaters and other elements of heat radiation. The insulating layer becomes unusable due to constant temperature and the risk of an emergency increases to a critical state.
- It is also prohibited to install electrical components under pipes where condensate accumulates.
- For rooms with high humidity, electrical wiring elements must have double or triple insulation.
- Connections and wire assemblies should only be located in junction boxes.
- In advance, on the diagram, place the distribution box in an easily accessible place.
If the system is not laid through pipes or protective panels, then special brackets are used, sold in specialized stores. They are necessary to prevent the wires from sagging under their own weight. The distance between horizontal type wiring brackets is every 30-40 cm, and for vertical ones - 60 cm.
How to drill a wall
A better tool than a hammer drill for drilling holes in brick and concrete walls has not yet been invented. But rarely does anyone have the luxury of having such an expensive tool on their household. Usually buy an electric impact drill.
Drill selection
When purchasing an electric drill, you need to be guided by the following technical characteristics.
The power of the drill must be at least 600 W. Revolutions up to 2500 per minute and the ability to smoothly adjust them from zero to maximum. The presence of reverse rotation (switch for the direction of rotation of the drill clockwise or counterclockwise). The best chuck is a quick-release chuck; you won’t have to waste time clamping drills and constantly searching for a lost key. The diameter of drills clamped in the chuck is up to 12 mm.
The presence of a switchable hammer drilling function. Of course, when this function is enabled, the drill will not become a full-fledged hammer drill, but drilling walls will be much easier and faster, and here’s why. Brick, cement and concrete withstand static load - pressure very well. But they are easily destroyed by dynamic influences - impact. Karatekas, with a strong blow, easily break a brick in two with the edge of their palm. When drilling with a drill without a hammer function, there is simply pressure from the drill and it is difficult for the cutting edge to catch on to the material, so drilling is slow and the drill becomes very hot due to friction. Drilling with impact is completely different. Upon impact, the drill punctures a part of the material with its cutting edge, and, falling with an impact into the formed recess, breaks off a portion of particles of the material. Something similar to chiseling is happening.
Drill selection
Walls made of wood, plasterboard, and foam concrete can be successfully drilled with an ordinary drill. For walls made of brick, stone or concrete, you need a carbide drill. It differs from steel by cutting edges made of carbide material welded onto a regular drill, usually Pobeda. Less commonly, artificial diamond.
The pobedite insert is clearly visible at the end of the top drill. It is enough to have 2 Pobedit drills with a diameter of 6 and 8 mm on the farm.
Using drills with pobedite surfacing, you can drill a hole no more than 10-15 cm deep. For drilling to greater depths, for example, to drill through a wall, use a drill. Drills for drilling brick and concrete walls are up to one meter long and are designed for drilling holes only with a hammer drill. Even the cutting edges of the drill are made not sharp, but rounded to increase their wear resistance. A drill with a hammer function can also be successfully drilled with a drill.
Drills come with a shank diameter of 10 and 18 mm, with special grooves of the SDS+ or SDS-max standard for fastening, but they also clamp well in a regular jaw chuck. The standard and diameter of the drill are stamped on its shank.
If you need to drill through a thick wall, for example half a meter, then the passage is carried out in several stages with drills of the same diameter, but of different lengths. This is necessary for safety and faster drilling. First, drill the wall with a 20 cm long drill to a depth of 10-15 cm, then with a longer drill to a depth of 30-35 cm and finish drilling with a 50 cm long drill. The drill for such work must be powerful enough. Of course, the drill is not designed for such a load and its use is permissible only in exceptional cases. To perform this type of work, it is better to rent a real hammer drill.
Laying open electrical networks as original decor and getting rid of old wiring problems
Repair of hidden damaged electrical wiring is often accompanied by construction and restoration work that requires considerable effort: removing finishing materials, chipping walls, further sealing them, plastering the wall surface, covering it with decorative materials. This is reasonable when repair work to restore wiring is combined with major repairs.
But if the room does not require major repairs, then in some situations it would be more rational to lay new electrical wiring on the surface of the wall.
When laying a new electrical wire, you can provide for the allocation of special lines to different rooms or devices. Also in the distribution board you can install separate circuit breakers for powerful electrical appliances: refrigerator, washing machine, boiler, microwave oven, air conditioner, etc.
It will also be convenient to allocate socket and lighting groups room by room.
Briefly about the main thing
When laying electrical wiring in a residential building, you first need to decide on the method. Hidden wiring looks more aesthetically pleasing. Because it is not visible at all, and it does not disturb the interior of the room.
But its implementation is very labor-intensive and without a special tool it will be extremely difficult to make channels in a concrete wall. Therefore, when aesthetics can be neglected, many choose open-type wiring. And when decorating a room in a retro style, it will become an indispensable attribute.
How to detect a break
To fix the problem, you first need to determine where exactly the wire is broken. If you made one hole, then you won’t have to search for long, but sometimes many holes are made before discovering a breakdown and then you will have to suffer. You can find a break in the wall using a special indicator. The voltage in the socket is checked; if the indicator lights up, then the phase is working, but zero is missing. Otherwise, the phase will not light up. To determine the location of the break, you can use the so-called “poke method”. An indicator screwdriver is inserted into each hole until the sensor indicates that there is a phase.
The load has increased
Previously, the house had a TV, a refrigerator, and sometimes an iron, a vacuum cleaner or a washing machine would be turned on. All these old household appliances consumed quite a lot of energy; residents of high-rise buildings knew that if you turn on the iron and vacuum cleaner at the same time, it would blow out the plugs.
New household appliances have much less power, they consume less energy, but there is a lot of it. Walk through your home and count everything that is plugged in all the time and everything that you plug in as needed.
In total, it turns out that the load has increased, not decreased. But the wires are still the same!
Sequence of work
- Creation of a project diagram that indicates the location of all electrical points. It is discussed in detail with the client, the cost is calculated, and a contract is signed.
- Grooving – making the necessary holes for laying cables and equipping electrical points.
- Wiring.
- Sealing the grooves.
- Connecting new lines with dismantling old wiring.
- Arrangement of a distribution board, installation of automatic machines, switches, connection of lines.
- Installation of switches, sockets, after finishing work.
The price of work does not include and is paid separately:
- connecting electrical equipment - stoves, household appliances, lighting fixtures, etc.;
- cost of materials - boxes, machines, sockets, etc.
Why the socket cracks and sparks: potential causes and repair methods
Sockets are simple and usually reliable devices. Correctly installed devices function flawlessly and therefore do not require replacement for a long time. However, there are no eternal things, so sooner or later problems arise in the electrical network circuit. Most often, owners encounter warning symptoms - the appearance of sparking and a characteristic crackling sound. This situation is extremely dangerous because it can cause a fire. Therefore, first the owner of the “naughty” mini-device needs to find out why the socket is cracking and sparking, and then try to solve the problem on his own, or call a specialist.
Properties of aluminum wires
But we propose to start our conversation with a quick analysis of the properties of aluminum wire. This will allow you to identify problem areas and understand possible problems during its installation.
- Let's start with the advantages of aluminum wire. The main one is the price, which is an order of magnitude lower than that of its main competitor - copper.
- Another advantage of this material is its lightness. This has led to its widespread use in power lines, where weight is very important.
- Well, the last advantage is its resistance to corrosion. Aluminum is almost instantly coated with a persistent oxide film, which prevents further oxidation. At the same time, this film also has negative aspects - it is a very poor conductor of electric current.
Zero disappeared, all the equipment in the house burned down: we explain thoroughly
Every electrician, especially a self-taught one, should know about the consequences of a zero break in a three-phase and single-phase network. This phenomenon can be very dangerous both for household appliances and for human life. So that you know the dangers of damage to the neutral wire and why this mode is an emergency, below we will consider in detail unfavorable situations and tips for eliminating them.
Why does zero burnout occur?
Today we regularly use a large number of electrical appliances, most of them are switching power supplies . These are televisions, radios, computers, etc. The nature of current consumption by these devices is very different from previous ones.
In the circuit, additional pulse currents arise that are not compensated at the midpoint. We add to them uncompensated ones caused by the difference in single-phase loads and we get a current close to the highest current of one of the phases, or even exceeding it.
So we have come to favorable conditions for zero burning. Most often, burnout occurs in weak places, where: the wire is damaged, the cable cross-section is too low, or poor contact.
Every day more and more electrical appliances appear in everyday life, and accordingly the situation is getting worse. Therefore, when installing electrical wiring, it is necessary to take into account the high probability of the neutral conductor burning out. This should not be neglected.
What's new in the VK SamElectric.ru group?
Preparatory steps before replacing wiring
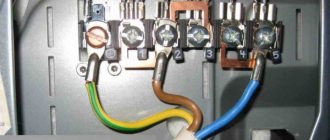
It is necessary to begin any actions to replace the wiring only when you have bare walls: you have taken out all the furniture and things, cleared the walls of wallpaper, finishing materials, etc. When the apartment and the walls are ready, we find traces on the wall from the covered grooves in which the electrical cable was laid. The apartment wiring is designed in such a way that the meter branches off into several distribution boxes, which are distributed in different parts of the apartment. In an ordinary apartment, as a rule, there are two such boxes. From the junction boxes the cable goes to sockets and lighting.
Where to look for a broken wire
If the light in the house flickers, disappears completely, sparks, smoke, the circuit breaker on the panel trips, or there is no current in some or all sockets, you should check whether the circuit breaker has been knocked out or the fuses have blown. If nothing happened to the meter, and everything is fine with your neighbors’ electricity, it means that your power supply circuit has opened.
The cause of the breakdown may be a break, loss of contact at the terminal connections, violation of the insulation protection of the wire and its malfunction. To prevent this from happening, wires from electrical equipment must not be bent, tied, twisted, or crushed with heavy objects.
The wire can be damaged in any area:
- in the conductor adhesion zone,
- in places where wires are connected to the contacts of switches, sockets, electrical panels;
- in the space between these devices and the box.
Light switch won't turn off, could there be a fire?
At one of the European electrical exhibitions at the end of the 19th century, visitors were fascinated by a light switch. Inexperienced viewers were delighted by the simplicity of control - with one movement the lighting was turned on and off. A lot of time has passed, the household switch has become a familiar household item in the apartment, and in production it does not cause surprise. This accessory can be seen everywhere. Sometimes such a device breaks down, you can try to restore it, although the device is inexpensive.
Why doesn't the switch turn off the light when you press a key?
The light switch has stopped turning off the light (that is, whether it is on or off, the light remains on). According to the advice, I replaced the switch (or switch) with a new one and stripped the wires. The problem remains the same - the light just stays on! Help - what could be the next question?
24 comments
Need more information on this issue. Did the switch work, and then suddenly stopped, or after replacing the wiring and installing it, did it stop performing its functions due to improper connection of the junction box. Maybe you have a chandelier with a remote control and the relay unit is simply soldered?
Good afternoon I came home and the light is on in the bathroom, although I remember exactly that I turned it off, and when I flip the switch it doesn’t go out, tell me what could be the reason?
The key on the switch works but the contact is not disconnected, it is stuck, this has happened before. The key can turn off, but the contacts have not opened.
You need to inspect the wires in the distribution box. Perhaps they are stuck to each other.
What if after replacing the switch nothing has changed? Is the light still on?
You need to inspect the wires in the distribution box. They stick to each other over time.
Good evening! Yesterday I turned on the switch (light), but could not turn it off! I had to unscrew the light bulbs, but the switch remained on! What should I do?
Disassemble the switch and see what’s wrong with it, and repair if possible. Or just replace it.
Tell me this is the problem, I changed the spotlight, mistakenly set it to 12 V instead of 220 V, when I turned it on, the lamp exploded, and the switch is always on. and the light from the switch does not turn off. (When pressed, it returns back to on). How to treat?!)
Same problem. How did you decide?
Good afternoon! My daughters were playing with a parrot, suddenly everything went out.. The plugs were knocked out.. We turned on everything, but the light in the children's room does not turn on.. Tell me how to fix it!
Hello! You need to disassemble the switch, look at its contacts, maybe they are stuck. As a last resort, replace it with a new one. You can start by deliberately removing the switch in another room, replacing it with the one with the problem, and if the problem is solved, then buy a new light switch.
Kind. Single-key switch in the bathroom with indicator. 4 ice lamps and a fan are connected. It worked for a year without problems. But one day I unintentionally hit the switch with static electricity with my hand. And that's it, the 4 ice lamps are on constantly, and the fan is on only when this switch is turned on. What about him? Thank you.
I have a similar problem. When the light was turned on, something banged. The light went out, the shield on the distributor was knocked out. I looked at the light bulb - it was burned out. I tried to change it - it was on, but now the light does not turn off. I don’t understand what the problem is, something with the wiring or the switch. I'm afraid that the walls won't have to be hammered, only the renovations have been done, the wiring is all new.
First, try removing the wires from the switch - the light will go out, which means the switch is stuck in the on position - it needs to be replaced.
Good afternoon We connected the web chandelier. When the switch is turned off, the chandelier still burns a little. What should I do?
The diode is on the switches!
I have a strange situation, I came out of the bathroom, turned off the light, and the light started blinking, almost like welding, I clicked the switch, in 2 positions, the welding stopped, but the lamp was still on in both positions of the switch. I pull out the wire responsible for this particular lamp from the 2-toggle switch with LED, the light goes out. I decide to install a new switch, the same one, but a new one and a slightly different color, a 1 in 1 situation. The left button in the corridor turns on the light, but the second button, which should turn on/off the light in the bathroom, does not respond to switching. The LEDs in the switch are both lit normally, not blinking, the right one is only dimmer, but that’s the quality of the workmanship. The switch - Double one way switch - illuminated from Lezard, can be found on Google right away.
Assembly
After repairing the device and preliminary checking its functionality by restoring the current supply, you should install it in its place and assemble its parts in the reverse order. There shouldn't be any particular difficulties in this matter. However, if you still have doubts, you can use the photographic material that you prepared for yourself in advance (even at the disassembly stage). Having started assembling the switch, you first need to connect the wire that we previously highlighted with a marker to one of the terminals, and after that all the remaining wires. At the next stage, the device is fixed in the socket box and the housing rim, decorative cover and light on/off buttons are installed.
When assembling a switch, it often happens that the cover does not want to be attached to the base of the switch. In this situation, you should loosen the bolts holding the housing in the socket box a couple of turns, press the cover tightly to the base and, holding the entire structure, tighten the bolts.
At this point, the process of repairing a switch at home can be considered complete.
How to extend an Internet cable with your own hands
For such a simple process as connecting a cable, it is not necessary to resort to the help of a specialist; you can do everything at home with your own hands. The easiest way is to twist the wires together. Just take two wires, strip the top layer of braid and twist them together according to the colors. We talked in more detail about the color scheme of Internet cables in this article. Then wrap electrical tape around the connected wires for better insulation and a more aesthetic appearance.
This method has a huge advantage over other types of connection: it does not require any skills or additional devices. You don't even need to crimp the cable. However, it is worth noting that with such a connection, signal loss is very likely: the quality of data transmission is greatly reduced. It is not recommended to use this method for very long lines, because such an unreliable connection can become critical for throughput. For the first time - a quick and easy way.
A more advanced version of twisting is the use of the so-called Scotchlock. Scotchlock is a very small cap for wires. The wires are simply inserted into it and the mechanism is snapped into place using pliers. Unlike simple twisting, this method holds the wires more securely, preventing them from coming apart. The pros and cons are absolutely identical to the conventional cable connection. Low stability, signal loss and undemanding tools.
Accessories and distribution equipment
Connecting TV cables to each other and connecting them to receivers is done using various devices, which are presented in the table:
After getting acquainted with all the devices and choosing the right cable, you can wire it yourself.
How to eliminate broken phase and neutral wires
After finding the point of the electrical wire break and determining the type of damage (phase or zero), you should proceed to repairing the break.
In accordance with the rules for electrical installations, it is strictly prohibited to connect wires by twisting when laying an electrical wire. When connecting wiring conductors in the wall, this rule must be strictly followed!
It is best to replace a broken wire all the way from the junction box to the place where it is attached, if this is appropriate in each individual case.
If the damaged conductors are short, they can be connected using terminal blocks. But then for this block it is necessary to install a distribution box.
To repair a faulty phase wire, you must perform the following manipulations:
- First you need to de-energize the phase wire.
- Clean the surface, remove plaster or other finishing materials from the wall section, freeing up an area for work within a radius of at least 15 cm from the point of failure.
- Disconnect the damaged core from the network without damaging the insulation on other cables.
- If the wire is copper , then the connection must be made using soldering, which will ensure the contact of the wire that an undamaged wire has. To do this, you need to take an additional part of the same material from which the jumper is made.
- First, a polyvinyl chloride or heat-shrinkable tube must be placed on the core of the damaged cable. The ends of the jumper are connected to the ends of the damaged wire, then the connections are soldered.
- The repaired area should be firmly fixed with insulating tape, after which a tube covered with a wire is carefully pushed onto it. This will maintain the tightness of the fastener.
- The soldering area can be covered with plaster; installing an additional distribution box is not required. To heat the soldering iron in the absence of voltage, you can connect it through an extension cord from neighbors or from a distribution panel in the entrance.
Aluminum wires are quite difficult to solder, so for this process you should take a special flux for soldering aluminum and the appropriate solder.
Sometimes it is more advisable to use a mechanical method to connect a broken aluminum wire.
First, 15 mm of insulation is removed from the ends of the wire to further form rings from the exposed wires. An insert with a cross-section similar to that of electrical wiring or slightly larger is prepared from aluminum wire. With the help of a washer, the grower assembles the connection: a grower is put on the screw, then a regular washer, followed by a ring of wires, again a simple washer and the nut finishes. The connection is covered with electrical tape and closed with a tube of insulating material.
This connection guarantees excellent wiring operation provided the permissible load is not exceeded.
Also, a reliable connection method is the WAGO terminal, after installation of which you need to wrap it with electrical tape and cover it with sealant.
The cables can also be connected using a junction box. To do this, it is necessary to remove the insulation from the damaged wire, then branch its ends in different directions. After this, you need to punch a hole in the wall according to the size of the distribution box, using a hammer drill with a special wide crown.
The box is inserted into the opening, after which it is securely fixed with alabaster. The wires are carefully inserted into it, while the damaged wires must be connected by color and wrapped with electrical tape. After all manipulations, the box with the repaired wires should be closed with a lid.
If the wires are placed in special tubes, then the broken wires should be pulled out, and new cables should be placed in their place using a pulling device.
If the neutral wire malfunctions, first it is disconnected from the bus, attaching the phase conductor. All subsequent repair operations coincide with the process described above.
After repairing the wiring, all channels are carefully sealed with plaster.
You can connect voltage to the restored wiring only when the material is completely dry.
Why does an LED spotlight glow when the switch is off?
Why do half the LEDs on the floodlight glow when the switch is off?
Perhaps the neutral wire passes through the switch, while the phase wire is connected directly to the lamp. if the body of the lamp (provided that the insulation in the lamp itself is damaged) or the core passing through the switch (zero) after the switch is in contact with the ground somewhere, the lamp may well burn “at full intensity”. the same effect with a faulty switch - it seems to break the wire, but not completely, it breaks through. As a result, there is a small volt on the lamp, say, 100 - 150. If this is the reason, you need to swap the power wires not at the lamp, but up to the switch.
I personally bet on an insulation breakdown in the lamp itself (the ground goes to the lamps through the body) plus the phase directly, past the switch. check. if the switch breaks zero, swap the wires coming from the panel.
Most likely, if the spotlight is receptacled, then it is either without grounding, or if it is homemade, Chinese, then on the contrary, with grounding. If it is built into a switch without wires, then the switch may have a built-in backlight LED that should be removed and the lighting will stop. It is possible that the path to the LED has burned out and shorted out. It’s hard to say anything without at least a photograph or a more accurate description of the problem.
there are two options! 1st: LED in the switch!
2nd: double switch! (confusion in electrical phase, zero)
In the beginning, you just need to test the spotlight on the table, directly connecting it to the network. Check with a tester whether there is voltage on the body of the spotlight (zero body). If there is no leak, replace the old switch, checking all wiring.
You connected it incorrectly. The switch must break the phase, your zero breaks. This also happens with LED lamps, energy-saving lamps, and fluorescent lamps.
I will answer your question from a technical point of view. Any modern electric boiler from a well-known manufacturer is distinguished by high quality and reliability. The choice can only be based on the design of the device and, of course, the price.
A question of economy. The answer may be this: very approximately, heating ten square meters will require one kilowatt of electricity.
Everything else depends on the heat losses of the house, the quality of the walls, windows, and so on. We need a very competent design of the heating system itself, taking into account all the nuances and subtleties of the structure and electrical wiring capabilities. Only after the project can you begin to select the boiler itself. I cannot give specific advice in recommendations, since I do not know the offer in your region. Let me return to the advice, it is better to choose a well-known manufacturer.
I am not an energy specialist or a theoretical physicist, but my personal opinion is that if there is energy, then it can be converted into electricity, if you have the necessary converters and devices for this. Of course, in our time it is not yet possible to create everything, something simply has not been invented yet, but is already at the stage, something is not yet allowed by our development, something is possible in general humanity will never be able to implement, but theoretically it’s all possible! And leading scientists have spoken about this more than once in their interviews with various media.
Laying open electrical networks
Repair work associated with a break in a hidden wiring usually requires complex construction and repair work: dismantling the finish, gating the walls, followed by sealing and covering a section of the wall with decorative materials.
Eliminating a broken hidden wire often requires dismantling the finishing, so it is advisable to combine such work with a major renovation of the premises
Since immediate implementation of such manipulations is not always possible, in some cases it can be recommended to lay a new wire along the surface of the wall, covering it in a special box or tube.
You will become familiar with a detailed description of the rules and technology for laying an open electrical network by reading our recommended article.