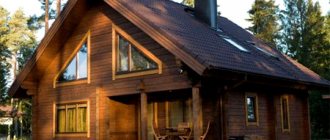
As you know, every man must do three things in his life. One of them is to build a house. This is a very important stage that requires certain knowledge and skills. To make your dream come true, you need to consider where to start, what you need to buy, and what stages of construction you need to overcome. Despite the fact that today there are new technologies and building materials, brick is often chosen as a material for a house. And this is not surprising, since it has a number of advantages, such as environmental friendliness, acceptable thermal insulation properties, fire resistance, durability, reliability and excellent appearance.
In this article we will tell you how to build a brick house with your own hands, demonstrate drawings, photos and video instructions. Even if you have no experience in bricklaying, you can complete this task.
What you need to know before construction
Design
Before you start building a house, you need to do some preparatory work. It is noteworthy that you will not be able to simply buy a plot of land and start building a house there. More precisely, you can do this, but such construction will be illegal.
First, you need to obtain a building permit from the district administration. To do this, you need to collect the necessary package of documents: an application for construction, copies of ownership, purchase and sale, passport and other documents. Among them there should be drawings of the future construction, and coordination with various services. Once your application has been reviewed, you will be issued a building permit. This can be done after the completion of construction work through the court, but still, in order to avoid problems, it is better to take care of this in advance.
Preparation also includes choosing a location, planning, and purchasing materials. It is also important to decide on the type of foundation, choice of brick, installation method and roofing material. If you prepare and think through everything in advance, then all the work will go easier and faster.
It is important to decide what work you can do yourself and what should be entrusted to specialists.
After everything is done, you can begin construction. All work can be divided into the following stages:
- Selection of tools and materials.
- Brick selection.
- Planning.
- Work on pouring the foundation.
- Walling.
- Roofing.
- Finishing work.
So, let's take a closer look at how to build your own brick house.
Laying scheme
Any scheme can be implemented efficiently only on a solid foundation. It is recommended to install wooden formwork, removable type, which will form the wall structure.
Next, the order is installed - a specialized device made of slats having divisions and angles that determine the size of the horizontal rows. It also secures a mooring cord to determine the strict vertical/horizontal alignment of the masonry.
Throughout the entire process of wall construction, it is necessary to follow the sequence indicated by the masonry diagram:
- The lowest and highest rows are installed strictly perpendicular to the wall.
- The bond brick is laid first on the base, and the masonry is also finished with it, using only solid blocks.
- Coincidence of joints in adjacent rows is not allowed.
- To prevent the formation of cracks in the wall, a tie row with reinforced mesh is placed after 5 horizontal rows.
- The laying is carried out according to the single-row or multi-row principle.
It is well known that there are two main options for building a single-brick wall - “pressed” and “butted”. The first is more difficult to implement using thick masonry mortar, and the second is using relatively rare concrete mortar.
With the “press-in” method, vertical seams are formed by laying mortar from the end of the block, supporting it with a trowel. The “butt joint” method involves creating grooves in areas of vertical seams. This option requires plastering of the surface, which creates a stronger wall that does not require reinforcement.
For single-brick masonry, various dressing options are used:
- transverse seams, it prevents the blocks from moving along the wall;
- vertical seams;
- transverse seams will not allow the wall to separate vertically, while the structure has a more uniform load distribution.
Procurement of tools and materials
Tool
Building a house is a simple task, but it requires some effort, skill and planning. But even with all this, it’s impossible to imagine construction without the necessary tools and materials. Therefore, for such work you will need the following tools:
- building level;
- level;
- construction hammer;
- trowel, trowel;
- Bulgarian;
- jointing;
- plumb line;
- construction cord;
- shovel;
- concrete mixer.
Sand for masonry mortar
If we talk about materials, then you need to purchase the following:
- brick;
- cement;
- lime;
- sand;
- plasticizer or liquid soap;
- fittings;
- plywood or boards;
- insulation (slag, mineral wool, polystyrene foam, expanded clay);
- hydroisol or roofing felt.
All this can be purchased at any hardware store.
Possible difficulties and errors in the process
Mistakes made during the construction of one-brick walls will lead to wetness and freezing of the external walls of buildings. The result is high heat loss, humidity, mold and gradual destruction of the brick. Such a house cannot provide a comfortable standard of living, and in order to correct such mistakes, huge financial costs will be required.
The most common mistakes in laying single brick walls:
low quality brickwork;- use of a solution that does not comply with GOST;
- use of low quality materials;
- violation of technological standards;
- violation of heat-protective properties, the wall turns white, as if “in frost”
- uneven seams and violation of the laying pattern.
Which brick to choose
Brick
Since you can find different types of bricks in construction stores, you should decide which brick to build a house from. The most popular and leading options are red clay and sand-lime bricks. When laying, they can be used separately or combined with each other. As experts advise, when laying, you can add insulation to the middle. Since such bricks are quite heavy, the load on the foundation will be corresponding. To reduce it, you can use a brick with cells. This is a lightweight version of regular brick, which weighs 20% less than usual.
To ensure smooth, beautiful and reliable masonry, do not buy bricks that have already been used. Your material must be intact, of the correct shape and without cracks.
Once all the necessary tools and materials have been prepared, you can proceed to the next stage - planning.
Types of bricks according to clay type
Ceramic brick
Ceramic bricks are used for construction purposes and as cladding. The material is made from red clay by firing. Materials that do not have decent aesthetic characteristics are used for the construction of walls, arches, and partitions. Brick with decorative relief allows you to create an original decor for a barbecue oven, decorate a fireplace, or simply decorate a wall.
Fire brick
Refractory brick differs from ceramic brick in that it can withstand extreme thermal loads. It is made from refractory clay, fired at more than 1300 degrees. It has a low level of thermal conductivity. It withstands temperature changes. This is an ideal basis for creating heating structures.
Sand-lime brick
Sand-lime brick is made from lime, which gives the material special strength. This is the most common type of building material for building a house, as it has good mechanical properties and a low price.
Stage two - home planning
Planning a house
As you know, you cannot build something without first planning everything. Therefore, first it is important to decide what the building will be used for. If this is a small country house in which you plan to live during the warm season, then you can build it in half a brick. If the residence is not permanent, but at any time of the year, then the walls can be laid in one brick. In this case, the building will even support several floors. Well, when you plan to build a house for permanent residence, the thickness of the walls of such a house is recommended to be one and a half bricks.
Plasterboard partitions
If you decide to build a one-story house, then the construction of the foundation can be simplified. In this case, the walls of the house will be made of plasterboard. There is no need to reinforce them. But when the partitions are built from brick, the foundation will look different. Since the future building will be made of brick, which has a high density and, accordingly, puts a large load on the foundation, the foundation for your house must be strong enough. The most reliable is a strip foundation, the design of which exactly follows all the lines of the walls and partitions of the building. Then you need to pour a foundation under each wall and partition. In this case, the entire load from the walls is distributed over the entire area of the soil, and therefore the stability of the building increases.
Project "Seville"
An excellent option for those who want to build their own cozy small house in which the whole family would be comfortable living and relaxing. Thanks to a well-thought-out layout, on an area of 94 m2 it was possible to locate all the rooms necessary for a comfortable stay and even more, while the rooms are not cramped in space.
Among the obvious advantages of the project, we note:
- the presence of a covered terrace where you can have picnics in the summer;
- spacious, bright living room with fireplace and access to the terrace;
- The kitchen combined with the living room has its own exit to the street. This is an excellent solution for those who plan to frequently organize outdoor meals, since the process of delivering ready-made meals will be as fast and simple as possible;
- There is a small pantry adjacent to the kitchen; decent food supplies will fit there;
- two spacious bedrooms and a large bathroom.
The layout ensures free movement around the house, and the absence of load-bearing walls will allow any redevelopment to be carried out as soon as the need arises.
Marking the future site
In order for your building to have the correct location, and to avoid unnecessary problems during the construction process, you need to make markings on the soil that correspond to the plan of your house. Drive pegs into the ground in places where the corners of your building will be, as well as in places where walls will be built. This must be the actual size. Then take a rope or thick rope and stretch it over all the pegs. Thus, you have made a certain guideline that will help you dig a trench for the future foundation. You can check the horizontality of the tensioned rope with a regular level.
After everything is done, all that remains is to take shovels and dig a trench according to your guidelines. To do this, you can ask your friends, relatives or neighbors for help, since it will be very difficult to do everything yourself. Moreover, when the house has several floors, the depth of the trench can be up to 2 m.
Requirements for building materials
When buying bricks for building housing, it is necessary to take into account the average climate data in the construction area. In damp climates, it is advisable not to use sand-lime brick. For cold regions, it is necessary to build cottages from traditional red brick, which has increased frost resistance.
When choosing a wall material, first of all, check the certificate for it and compliance of the characteristics with the requirements of the project. Next, the bricks are visually inspected. Those that are made according to the rules will produce a ringing sound when struck . They have a uniform red-brown color, most saturated in the middle of the product.
Lightly fired brick has a pinkish color and a dull sound when tapped. And burnt, as a rule, has scorch marks along the edges and a dark gray, almost black center.
The brick is marked with the letter “M”, indicating its strength. Next is a digital designation indicating the surface pressure in kg/cm2 that it can withstand. In the retail chain you can purchase red bricks marked with grades from M 50 to M175. The brand has an impact on the weight of the block; the higher the brand, the heavier it is.
Areas of use of bricks according to marking:
- M50, low unloaded structures, partitions and fences.
- M75-100, load-bearing walls of objects up to 2 floors.
- M100-150, load-bearing walls of objects up to 3 floors.
- M150-M175, basement and foundation structures.
- M175, external wall cladding.
The main properties of solid brick M 150 for making single brick walls:
- strength characteristics, 150 kg/cm2;
- volumetric weight of bricks, 1800-1920 kg/m3;
- thermal conductivity of red brick, 0.70 W/mS.
Foundation formwork
Formwork for the foundation trench
Based on the technology, the foundation needs to be built 10–15 cm above ground level - this is the minimum. In regions with harsh winters, the base can be even 40–50 cm. To achieve this, you need to install formwork along the edge of the trench. It can be made of plywood or ordinary boards.
In the case where the surface of the site is uneven, you need to find the highest point and push off from it.
In order for the foundation to be made in one plane, the formwork must be brought in height to the tensioned rope and supports must be made. It is important to remember that the higher the formwork is, the more often and closer the supports need to be installed. If this is not done, the mass of concrete can crush the entire structure, causing it to flow or become uneven.
In order for the formwork to reliably hold the concrete, it must be made strong: without holes or gaps, as concrete can leak through them. Planed boards or plywood are often used for formwork, but you can choose other material that is on hand.
Cushion for a strip foundation
Before you start pouring the foundation, it is important to make a cushion at the bottom of the trench by pouring small crushed stone, stones or sand into it to a depth of no more than 5 cm, after which it must be compacted. If you don't have a vibratory plate or compactor roller, you can use a homemade device. To do this, take a wooden beam with a cross-section of 150×150 mm with a height convenient for you and attach handles to the sides. Using brute force, compact the entire trench. Thanks to such a cushion, the shrinkage of the building will be much less, and the building itself will be more stable.
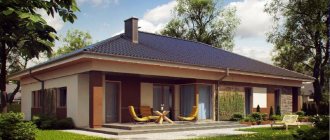
Project "Altamira"
Simple and tasteful. This is exactly how this project can be characterized. To place three spacious bedrooms, two bathrooms, a kitchen with a living room, as well as utility rooms on an area of 102 m2 - you need to be able to do this.
Strengths of the project:
- three large bright bedrooms;
- two bathrooms located in the living area;
- large living room with access to the terrace;
- there are no partitions between the living-dining room and the kitchen, so the rooms look more spacious;
- There is space for a storage room next to the kitchen, but if desired, it can be abandoned in favor of increasing the kitchen area;
- the covered terrace is a great place for outdoor dining;
- if desired, the attic can be turned into a residential attic, and the staircase can be placed in the living room near the terrace;
- The dimensions of the house (13*9 m) make construction possible even on a narrow plot.
Pouring the foundation
It is important to know that the foundation can be monolithic or prefabricated. The monolithic foundation is made immediately on site. To do this, a concrete solution is mixed and poured into the prepared trench. A prefabricated foundation consists of ready-made slabs that are laid in the ground. A monolithic foundation, which can withstand enormous loads, is much better suited for a brick house. Even if you build several floors of the house, a basement and a garage, the structure will hold securely. The only drawback of a monolithic strip foundation is that it is not recommended to use it in soft soil. The best option would be a pile foundation.
So, it's time to pour the foundation of your home. To ensure the strength of the foundation of the house, pouring should be done in horizontal stripes in one step. If you fill it partially or make separate vertical sections, then there is a high probability that these joints may crack. Therefore, everything needs to be done quickly and not without additional help. Ask a friend or relative to help you, as additional hands are simply needed in this matter.
Mixing the concrete
The first thing you need to do is mix the concrete. This is a labor-intensive process that involves making the concrete and transporting or transporting it to the location where the pouring takes place. To pour the foundation, you will need a lot of concrete. If the depth of your trench is more than 60 cm, then after you have poured the first layer of concrete, throw rubble stones there and continue the process.
After you finish pouring the formwork, you need to compact the concrete by expelling the air from it. A deep vibrator is well suited for this purpose. But since not everyone may have it, you can use a thick stick to compact the concrete with up and down movements. After such manipulations, the concrete surface must be leveled with a trowel. Generally, concrete dries within 5–7 days. But you need to start laying bricks only after a month, when the concrete has gained strength and is not malleable.
Strengthening brick cottages
To prevent excessive shrinkage, make the building stronger, prevent cracks and evenly distribute mechanical loads, reinforcing parts are installed. A special metal network of rods is used for the walls.
The first reinforcing layer consists of a grillage, which is included in the foundation design. The diameter of the rods used can reach 12 mm. In order to strengthen the wall masonry itself, a metal mesh is laid every 4-5 layers of brick.
Another metal structure is included in the interfloor slab to ensure structural strength. Builders, at their discretion, may include additional metal structures in those areas of the building that require additional strengthening.
Waterproofing works
Waterproofing the foundation
An important step before laying walls is waterproofing the foundation, thanks to which moisture from it will not penetrate into the house or basement, and the brick will not collapse. In this way, you will extend the service life of the foundation of the house and protect yourself from the formation of fungi and dampness.
Such work can be performed after the foundation has hardened. Everything is done quite easily, the main thing is the presence of a waterproofing material (waterproofing or roofing felt). It needs to be laid or glued to the foundation in 2-3 layers. After construction is completed, all excess pieces that will protrude should be trimmed. The base of the building should be coated with molten bitumen.
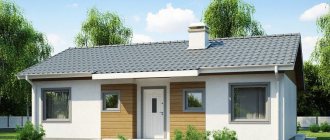
Project "Miniature"
Despite the fact that the area of the house is only 59.2 m2 , everything necessary for comfortable living and recreation is conveniently located in it. The house can be used both as a country residence, intended for temporary visits, and for permanent residence of a small family.
Advantages of the project:
- minimal building area, which makes the project suitable for small areas;
- savings on building materials and construction time;
- with such a small area there are two bedrooms, although quite miniature;
- the bathroom is located at an equal distance from the bedrooms, close to the living room and kitchen;
- the living room is combined with the kitchen; the absence of partitions makes these small rooms visually more spacious;
- from the living room there is access to a spacious terrace, which is suitable for organizing an outdoor dining area or installing sun loungers;
- In the hall there is a niche for a large wardrobe.
All walls are non-load-bearing, so redevelopment can be done after the construction of the house. For example, you can abandon a niche in the hall and increase the living room area.
The basis for masonry is mortar
Mortar
After a month, you can begin work on the construction of the brick frame of the building. First you need to make a solution, thanks to which the entire structure will hold securely. The main type of mortar is cement-limestone, limestone or cement. The basis or base for any of them is sifted sand (it is better if it is river sand). To find out how to make a solution and in what ratio to take the components, just look at the packaging, where everything is indicated. The most common proportions of sand with cement or lime are 3:1 or 4:1. In this case, the future masonry will be very strong, and it will not be difficult to make, since the solution will be inelastic.
Project "Prestige"
The name of the project fully reflects the layout of the house. The architects have provided for everything to make the life of the owner of this mansion comfortable. On an area of 185.7 m2 there are a lot of spacious residential and auxiliary premises.
Among the advantages of the project we note:
- a garage for two cars, which is connected by a storage room to the living area of the house. Some large purchases can be immediately placed on shelves in pantries, and the rest can be easily brought into the house without going outside, and from the pantry you go straight to the kitchen;
- the living room boasts a huge area (just over 45 m2), so there is room for a large company - no one will feel cramped;
- Both the living room and the kitchen have access to a spacious terrace equipped with a stove. It’s probably not worth listing recreation options for such opportunities;
- a huge glass area in the kitchen and living room, plus there is a fireplace in the living room;
- three large bedrooms, one of them with its own bathroom. The second bathroom is common to everyone.
If you imagine a house in which absolutely everything is provided, then it will clearly look something like the one in this project.
Construction of brick walls
The main points of laying brick walls
After the mortar is ready, you can begin laying bricks. You need to start by drawing out the corners. The first bricks must be laid especially carefully and carefully, since further masonry and the general appearance of the future building depend on them.
At first it may seem that such work is simple, brick to brick and you're done. But it is very difficult for inexperienced masons to make the walls perfectly smooth and geometrically correct. To do everything right, you need to try and be patient. This type of work is long and tedious, but you will gain practice that will help you further. What do you need to do?
- The first bricks need to be placed in the corners. Use a water level to check the horizon and level everything if necessary.
- You need to stretch the string along the top edge of the brick and fix it perfectly straight.
- The twine should not bend or interfere with the masonry - it should be well stretched and serve as a guide for perfectly even masonry.
- After this, lay the base row of bricks. In order for them all to fit perfectly, they need to be tapped with the handle of a trowel, while aligning everything with the twine.
- In the case when you make the outer part of the wall with facing bricks, you need to do jointing. It must be done with a fresh, uncured solution. Then the surface will be protected from moisture, and the house will look aesthetically pleasing.
- After the first row is ready, the twine needs to be moved in the same way and fixed. Then lay the next row of bricks in the same way, not forgetting about the dressing.
- After every third row, you need to use a transverse bandage of the wall.
- Don't forget about the walls. Everything is done the same way. If you want to do them later, you need to make sure that there is a bundle from the load-bearing wall, from which you can continue laying later. To do this, you need to leave a ladder of bricks in the place where the wall will be built.
- When you have reached a certain height, you need to make openings for the windows. It is necessary to provide in advance the places where the openings for the doors will be.
To ensure quality masonry, you need to check the position of each brick.
You need to check the position of each brick.
At this point, the frame of your future home is ready. All that remains is to make the roof. It is difficult to carry out all the work on your own. Therefore, ask for help from professionals who will provide you with a reliable roof over your head.
Now you can be proud of yourself, because you yourself were able to make every person’s dream come true. As you can see, building a house on your own is difficult, but possible. Therefore, if you plan to make a cozy home for yourself and your family, buy the materials and get to work!
Projects of one-story brick houses
To make life in a one-story country house as comfortable as possible, at the design stage the number of rooms and their relative positions are thought out. In this case, the architect must take into account the wishes of the customer and coordinate them with the features of the project:
- The best option . Each family member receives personal space, while the number of walk-through rooms and corridors is tried to be kept to a minimum.
- Optimal number of rooms . Designers know that the more rooms there are in a one-story building, the more difficult it is to arrange them without using corridors (which eat up useful space) and passage rooms.
- Method of use . The layout depends not only on the number of people, but also on how the house will be used - year-round or for seasonal living.
An example of a competent layout - without corridors and adjacent rooms Source moydom.net.ua
- Features of the site . The land on which construction is planned may have complex terrain; In this case, individual planning will be required. The design of a one-story house on a slope is often supplemented with a basement floor. This option increases useful meters, allowing you to place a boiler room, kitchen or recreation area here.
Choosing the layout of a one-story house
With all the variety of design solutions, the main criterion when choosing is the size of the family that will live in the house. Popular projects of modern one-story brick buildings look like:
- Project area up to 100 m2 . For a family of three to four people, housing with a minimum area of 50-70 m2 is considered comfortable. Such buildings are often L-shaped in plan. Thoughtful design allows you to conveniently place the main rooms: living room, dining room (they are often combined), kitchen, hallway, one bathroom and personal (bedroom) rooms. A 50 m2 house can accommodate a living room, a modest kitchen and bathroom, and a couple of bedrooms. The project often includes a small veranda or porch; Panoramic glazing is used to visually expand the premises.
Layout of a one-story house for three people Source mkumodels.com
- Project area 100-150 m2 . The project, with an area of 100 m2, looks quite compact, but can easily accommodate a family of three or four people. In addition to standard rooms, the project allows you to allocate space for a spacious kitchen, an additional bathroom, a small office, a garage or a workshop. The space is divided using conventional and load-bearing partitions.
- Project with an area of 150 m2 . If a family of several generations will live in a brick one-story house, a lot of space will be needed for a comfortable life. This project will allow you to equip an additional bathroom, a large garage and a veranda. Ideally, the project has two entrances - you can enter the house from the yard or from the street, and you don’t have to walk around the perimeter of the house.
Project with three bedrooms and a garage Source idei-dekoru.com
Blueprints
Brick one-story residential building - Cottage Two-story brick residential building
Brick house with garage
Project with a garage
Project of a one-story brick house 250 m2
Photo
Residential one-story house with a basement
Cozy brick house on the site
Such houses are sold abroad
Kuzminsky house
Two-story house with a simple layout
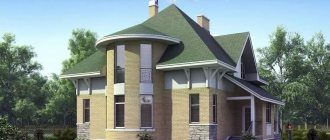
Brick house with attic
House with non-standard layout
Brick country house
Two storey with garage
Porch made of brick
Did the article help you?