A high-quality heating system is a mandatory factor to ensure a comfortable life for people in an apartment building. In order for energy efficiency to be at a high level, it is necessary to comply with the requirements for the installation and placement of radiators. There are established standards for the location of heating devices, following which you can ensure optimal temperature in the house and reduce heating costs. Before starting installation, you need to know how far the window sill should protrude above the battery, at what distance from the battery to the wall and floor to install the heating circuit, and which circuit is best to choose.
Recommendations for placing radiators
The efficiency of a radiator depends on its location.
Experts pay great attention to the correct location of heating devices. In this case, the room will be heated with the greatest efficiency.
Basic recommendations for choosing a location for installing batteries:
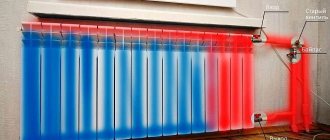
- For high-quality air circulation near the battery, it is necessary to maintain a distance of 3-4 cm between the thermal insulation layer and the heating device. When this gap decreases, air exchange becomes difficult and the efficiency of the system decreases.
- If it is impossible to create insulation, the inner surface of the wall is covered with a layer of foil. It serves as a heat reflector that directs flows into the room.
- When installing batteries under the window sill, a gap of up to 10 cm must be maintained between the radiator and the floor. The distance from the radiator to the window sill must be at least 8 cm. This is due to the fact that the board is an obstacle when warm air rises upward.
- If the house has large windows, batteries 30 cm high are used. Then condensation will not form on the glass.
- The radiator is installed at an angle of 90°. If there is a deviation from the norm, air will accumulate and corrosion will form.
- The battery should be installed exactly in the middle of the window. Then it will cut off cold air flows and will not allow them to penetrate into the room.
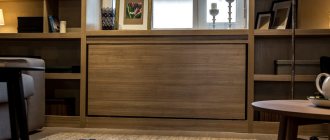
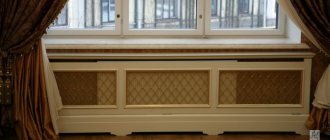
For decorative purposes, radiators can be protected with special screens. They must block the radiator, therefore they reduce the efficiency of the system, since they prevent the flow of thermal energy into the room. For this reason, it is important to pay special attention to the choice of decorative grilles for batteries.
Socket for heating pipes
Accessories for installation - corrugation for heating pipes, plinth, contour, sockets, winding, bandage
Installation of heating pipes is simply not possible without the appropriate materials and parts. And it is noteworthy that a lot depends on their quality. Corrugation for heating pipes, baseboards, various adapters for heating pipes, clamps, sockets and a heat pipe for heating - all this plays a significant role.
Decorative sockets for heating pipes
Corrugation is considered the most effective material due to its flexibility.
The use of corrugated pipes facilitates the insulation process.
More recently, conventional metal pipes were used for winding heating pipes.
Corrugated pipes can be of the following types:
- Polypropylene pipes. Such pipes are made from similar materials such as PVC or PE plastic. Such pipes are used for repair work and laying communication lines and electrical cables.
- Corrugated steel pipes. These pipes are called “corrugated heating pipes”. Such corrugations can replace pipes made of different materials as a bandage for heating pipes. They can also be used for air conditioning systems, air-type heating systems and air vents. Such corrugations have one serious drawback. Under the influence of mechanical loads, they can quickly bend. Installation of steel corrugated pipes involves the construction of a protection box (a clamp for a heating pipe).
Corrugated steel pipes
Skirting for edging
Installing pipe systems with HERZ skirting boards is the right solution from a technical point of view. If all the details of the skirting boards are precisely coordinated, this will help to install the channels for the next pipe laying.
Using plinth systems, you can hide the pipes of the water supply system and heating system. Skirting boards for HERZ heating pipes can be made of plastic or wood.
Skirting for HERZ heating pipes
Skirting boards made of plastic. If heating systems of a two-pipe or single-pipe type with a diameter of up to 2.2 cm are being installed, then brackets are used, thanks to which it will be possible to adjust the height. Even if the finishing part of a similar component, such as a floor plinth for heating pipes, is removed, the position of the pipes will be fixed by a weighty part of the holder. The weighty part is attached using dowels of sizes 6x60mm or 6x80mm.
Bypass for heating system pipes
Heating pipe surrounds are used by professionals to decorate the pipe in the place where it is adjacent to the canvas. Thanks to the pipe contours, the work will get the most attractive and finished look.
Decorative rosette
Decorative lining of heating pipes running through the floor becomes a big problem when laying parquet. There are two ways to line heating pipes.
Decorative covers for heating pipes
The first method implies the following: The pipes are wrapped quite tightly, without leaving gaps, turn to turn, using asbestos-containing cardboard. This is done at the height of the future plinth. Then the area around the pipe is covered with a heat-resistant material that has good elasticity.
To cover the cracks, use a simple cement mortar.
Then the pipe is framed on 3 sides by a plinth. Then a layer of sound insulation is laid down, and a cement mortar is poured onto it up to the very top of the baseboard. After the solution has completely hardened, the place where the pipe comes out of the floor will have to be painted to give it a nice look.
The second method is still very simple. The gap between the parquet and the pipe is filled with an elastic sealant that has good heat resistance. The place where the floor and the pipe meet is masked with a decorative rosette. Thanks to the wide range of sockets, they can be selected for pipes of various diameters. Sockets for heating pipes consist of two parts, and their connection takes place thanks to a spike. At the junctions of the two parts, the sockets are coated with glue. After the glue has dried, the sockets are connected in a way that fits around the pipe, and then pressed against the floor surface as tightly as possible. Remove any remaining glue using a soft cloth.
Socket for heating pipes - an aesthetic solution
Decorating the heating system is becoming quite popular. After all, when developing today’s fashionable interior style, you don’t want the beauty and well-being of the living space to be disturbed by pipes and heating devices. In order to hide the details of the heating system, various screens with decorative elements and boxes are used.
GOST and SNiP requirements
Correct distance from the floor to the radiator and window sill
Depending on the type of window, the distance from the window sill to the floor may vary. But GOST sets the coefficient at which heat is best retained in the room. It is 0.55 W/°C sq.m. For better effect, use plates with low thermal conductivity. Also, during installation, you need to figure out whether the window sill should cover the battery.
The provisions of SNiP regulate the following values for the distance of the battery to the window sill:
- The window sill must have a slope of at least 1°.
- There must be a layer of thermal insulation between the battery and the wall. It will protect the house from heat loss and extend the life of the heating system.
- The battery should have a protrusion compared to the window sill.
- All window sills must be located at the same level. The distance from the floor to the radiator depends on the shape and size of the device.
- The maximum length of the window sill is 3 meters.
- There must be at least 8 cm of clearance between the battery and the window sill.
The installation standards for heating radiators must be observed to ensure good heat retention in the house. If the distance between the window and the floor is insufficient, a low radiator with an increased number of sections should be installed. Then heat loss will be reduced.
What is proper electrics?
Technical issues and safety issues of the electrical system in a house or electricians in an apartment are usually considered by professional electricians to be the most important criterion for evaluating this system. This is of course true, but comfort, practicality and versatility of the electrical system are also very important.
To satisfy both the requirements of functionality and safety, the designer must carefully design the entire system, based on the requirements of standards and regulations, while at the same time taking into account the wishes of the customer. This is a very important step in the planning mechanisms for major repairs or construction of an apartment or house. Before designing, you must initially know how this or that space in your home will be arranged (rooms, bathroom, kitchen, and so on).
The importance of the gap between the wall and the battery
The minimum distance between the wall and the radiator is 25 mm; no thermal insulation layer is laid on the wall.
When installing radiators, it is important to create a distance between the heating device and the wall. The outer wall is constantly in contact with the surrounding air, causing significant cooling. When the battery is mounted on the inner surface without a gap, most of the heat will be spent on heating the wall material rather than the room. The low thermal insulation properties of concrete walls do not allow creating an optimal microclimate; about 70% of thermal energy will be wasted. By moving the heating system a short distance, air insulation will be created, increasing heating efficiency.
There are other reasons why it is necessary to create a gap according to the given standards:
- Creating a sufficient level of air mass circulation. If this condition is violated, part of the energy will be lost.
- When placed close to the wall, the device begins to heat up faster. As a result, the radiator may fail.
- Dust and debris will accumulate between the wall and the battery, which also impede heat transfer.
- In the absence of a heat-reflecting plate, the radiator will waste heat on the external walls.
- If an electric battery is installed, there is a risk of short circuit. Hydronic heating systems can be susceptible to corrosion if there is no clearance.
When installing heating devices, you must adhere to the following recommendations - the greater the radiator power, the wider the gap should be. Its specific dimensions are made up of two important parameters:
- Window sill width, niche dimensions. The possibility of creating distance depends on these individual characteristics.
- The power of the battery itself.
You can reduce the distance from the wall to the radiator by gluing foil heat-reflecting material to the wall. Then the gap can be 2.5-3 cm. In other cases, this value is approximately 6-8 cm.
Eurostandard
The height of the switch from the floor according to the European standard is 90 cm, the socket is 30 cm. However, standardization as such never existed in reality, and this concept came into our lives along with the concept of European-quality repair, replacing the “Soviet standard”. Of course, it has its advantages and disadvantages:
- Plus - the sockets are not “conspicuous” and do not interfere with anything, and the switches are located at the level of your lowered hand - they can be turned on without any effort, and without even looking. The height of the switch from the floor is 90 cm.
- The downside is that in order to insert the plug into the socket, you will need to bend over, and the switch should not be blocked by anything.
Recommendations for installation and operation of radiators
In order for the radiator to warm up well, air is removed from it through the Mayevsky tap.
The efficiency of heating and the service life of the heating system depend on the correct installation of the battery. There are a number of recommendations that you should use during installation:
- It is recommended to lubricate the gaskets with silicone sealant before installation. This is an optional step, but it will help protect the joints.
- Do not open the valves suddenly when filling the heating battery with liquid. Otherwise, water hammer may occur, which will damage the system.
- If thermostatic valves are installed in a single-pipe system, a bypass must be installed. Without it, the entire riser will be regulated, for which the owner may be fined. Ball valves are placed in front of the valves, allowing the supply and return to be shut off.
- If the radiator has more than 12 sections with a one-sided lateral connection, place the flow guide at a length equal to two-thirds of the battery (it is better to do it up to the last section). This will allow the radiator to fully warm up.
- If the radiator fills with water, it is necessary to bleed air from it. If this is not done, the device will not warm up. The air is removed every year at the beginning of the heating season.
After installing the radiator, pipes are connected to it. They are selected in advance by material, cross-section and length.
Official Location Rules
The socket and switch can be installed as you wish, with the exception of dangerous places - baths, kitchens and other rooms where there is gas and water. To regulate the location of these points in hazardous areas, several documents have been issued:
- GOST R 50571.11-96;
- SP 31-110-2003;
- Rules for Electrical Installations.
You should definitely read these documents if you are doing the repairs yourself. Housing authorities can check your apartment for compliance with standards if you have an accident or short circuit. And if it turns out that you have violated the established rules, they may impose a fine or refuse to pay the insurance amount.
Connection diagrams
There are several radiator connection diagrams that comply with the requirements and standards of GOST and SNiP. They are represented by the following varieties:
- Lateral connection. Characterized by maximum heat transfer. With this connection, the input is made from the top of the battery, and the output is from the bottom on the same side. This is the most popular connection diagram.
- Diagonal connection. Produced with significant system dimensions. Water enters the radiator through the top and is discharged from the bottom on the opposite side.
- Lower connection or “Leningradka”. It is produced in small one- and two-story houses, as well as when installing pipes hidden under the floor. The efficiency of such a system is 5-15% lower than with a lateral connection.
Diagonal
Lower
Lateral
When pipes are in a rough screed, heat loss increases due to contact with concrete and the ceiling covering of the lower floor.
What do you need to remember when installing electrical equipment according to European standards?
- Sockets must be installed based on a simple formula: one socket per 10 square meters.
- An outlet in the bathroom is allowed, but it must be more than 60 centimeters away from the bathtub or shower stall. All outlets must be waterproof and connected to uninterruptible systems.
- Grounding is a mandatory measure.
- Under no circumstances should sockets be installed under or above sinks.
- The wiring system should contain as few contact points as possible. All contact points must be located in the distribution panel and connected to the phase and neutral busbars.
According to the European standard, the diameter of the socket for a household socket plug must be 0.8 mm larger than in traditional connectors. This ensures tighter contact and reduces heat levels in cases of overload.
Step-by-step installation algorithm
Silicone tape promotes better sealing of connections.
After calculating all the necessary values and choosing a connection method, you can proceed to installing radiators. All work must be carried out in accordance with the requirements of SNiP. You must also follow the manufacturer's instructions. If the instructions are violated, there is a risk of loss of warranty service. According to regulations, you do not have to remove the protective film from the devices during installation. This way the device will be protected from dust and scratches during installation work.
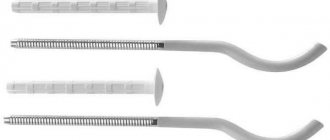
Items required for connection:
- Hooks with plastic dowels - at least 3 pieces. Needed for mounting to a wall or floor.
- 2 side plugs with right-hand thread. They are designated D.
- 2 plugs with left-hand thread with the letter S.
- Stub.
- Silicone sealing thread or flax.
- The elements required by the scheme are taps, valves, valves.
- Pipes. Metal or polypropylene are selected. Metal products are distinguished by high quality, durability and long service life. Polypropylene pipes are cheaper.
Tools you will need:
- Electric drill and drill bit. Selected according to the hardness of the wall.
- Screwdriver.
- Building level.
- Key.
- Tape measure and a simple pencil.
Depending on the design of the radiator, an air vent is selected.
The general installation procedure for various parts of the heating system is also regulated by SNiP.
- Making markings for brackets. This is done using dowels or cement mortar. There must be at least three brackets in total.
- Installation of plugs, adapters, Mayevsky taps and other parts.
- Installation of the radiator itself. It is necessary to connect its pipes to the heating system.
- Installation of an air vent. It should be automatic.
- Removing the protective film.
If these requirements are met, the installation of the system will be of high quality and durable.
For efficient operation of the heating circuit, it is important to make the connection correctly, which varies depending on the type of mounting. There is wall and floor.
Wall mount
Wall mounting material
Wall mounting is easier to make than floor mounting.
Installation is carried out as follows:
- Preparing the mounting site. First, the heating circuit pipe is connected. The wall behind the radiator needs to be covered with foil material.
- Preliminary marking of the mounting location for the clamps.
- Installation of fasteners using dowels. The depth into the wall must be at least 6 cm to securely fix the battery.
- Mounting the radiator onto the brackets. Fixing and leveling the device.
- Connection to pipes. Checking the tightness of all connections.
- Test run of the system.
During installation, it is important to make horizontal alignment of the battery. Otherwise, air will accumulate in the device, which reduces the heating intensity and leads to corrosion.
It is also important to comply with the location of the battery. It must be installed strictly in the center of the window.
Fastening elements are different. They can be made in the form of suspensions, brackets and other structures. Regardless of the type, they have the same task - securely fixing the radiator to the wall. Instructions for attaching the clamps are included along with the elements themselves.
What distance should be between heating pipes
The distance between the pipes of heating radiators is determined by building codes. Compliance is essential to ensure your home is safe, provides maximum heating, and complies with the law. What are the consequences of deviation from the rules prescribed in special documents - SNiPe? Will incorrectly installed radiators have negative consequences? This will result in administrative liability for the foreman and the owner of incorrectly installed radiators, and in the worst case, it will lead to a breakdown of the central heating system.
Heating
What rules are prescribed in SNiP regarding the distances between pipes in a living room, greenhouse, etc.? Below are the basic standards that must be observed if radiators are installed in the house.
Types of heating system
Where can I find official information?
SNiP 3.05.01-85 entitled “INTERNAL SANITARY SYSTEMS” (incomplete name of the document) regulates in detail the laying of water supply pipes, including heating ones, as well as the relative position of the radiator, floor, and underwater pipes. You only need to pay attention to a few points, since this document is a universal paper for different types of plumbing fixtures, as the name suggests.
Radiator installation diagram
The “HEATING” section begins with paragraph 3.18 and ends with number 3.33. The most significant points are 3.20 and 3.22. This is where the relationship of the radiator with respect to all elements of the room, as well as the distance between adjacent pipes, is described.
Distance between pipes and floor
The most important thing is to calculate the correct location of the radiator grilles and pipes relative to the floor. It is depending on the distance to it that the heating efficiency is determined, as well as the level of safety of the heating system and individual pipe.
Distance between pipes and floor
Currently, SNIP defines the following standards:
- distance to the floor at least 60 mm;
- from 50 mm, counting from the bottom edge of the window sill boards;
- at least 25 mm from the plaster of the vertical surface (walls).
These indicators are calculated on the basis that the adjacent materials that surround the heating are non-flammable. If one or more of them may catch fire, the basic rule to consider is: at least 10 mm from the combustible surface to the radiator or pipes. Then heating through the water supply will not lead to a fire.
Medical institutions and educational institutions are distinguished by their specific communications. In them, at least 100 mm must be maintained from the radiator to the floor, and the product must be 60 mm away from the wall. This approach increases the safety of a weakened or child’s body, even if the heating water supply is disrupted.
SNiP 3.20 implies that the distance to the window is calculated based on the window sill. But he also indicates in the line below that in the absence of window sill boards, attention should be paid to the bottom edge of the window. 50 mm are set aside from it if the system is being laid.
The indicated values apply to all types of radiators, the only exception is made only for units in medical institutions. The distance between the heating pipes in the floor is at least 150 mm - this is the only heating option that differs from others in terms of parameters.
Important! Clause 3.20 also implies that the supply network of pipes, when open, allows for additional communications. This is a very important requirement when installing heating, since often polypropylene and metal pipes are placed too tightly and incorrectly, leading to overheating.
How to position heating pipes correctly
The distance between heating pipes when laid in parallel should not be less than 200 mm, as specified in paragraph 3.22. The rule applies to both smooth and finned pipes, provided they are connected to an adjacent radiator.
In this case, the main lengths of the indents from the elements of the room change:
- the pipes extend 25 mm from the plaster;
- the distance from the floor is at least 200 mm.
Laying pipes in parallel requires special care. Moreover, this is the most convenient way to locate a particle of the system. To correctly carry out parallel laying of pipes, it is better to follow the instructions and photos.
The special arrangement also applies to the fastening elements (clips, clamp, etc.) that support the heating. For example, the distance between the clips of polypropylene heating pipes is determined depending on their diameter and the temperature of the water inside. With a diameter of 40 and a degree index of 40, the clips are spaced at a distance of 900 mm. A table showing how the clips are located can be found in the construction documentation, but not in SNiP.
Heating of non-residential premises (greenhouse)
In non-residential spaces, the rules for installing pipes are less strict. Practical benefits rather than safety are taken into account here. Polypropylene and metal pipes are laid according to strict regulations only if they conduct gas, which is used to heat the greenhouse. Water radiators and polypropylene pipes are not subject to strict regulations unless it is a commercial site.
The optimal distance between heating pipes in a greenhouse is a gap of 120 mm, where there are no trays with plants. Such passes help to evenly warm the soil without drying it out. Parallel laying is the most effective. With it, the greenhouse will produce the most fruit, since the trays are heated evenly.
To summarize: the importance of correct installation of the heating system
SNiP was invented for a reason. Its main function is to streamline and regulate the construction process, protect citizens from failures and make heating easier. Compliance with the standards specified in the document is a mandatory rule according to which radiators must be installed. Violation of the standards will result in improper heating of the premises, constant overheating or even explosions of heating pipes.
a brief description of
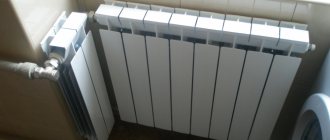
Today, buyers have a huge selection of batteries on the heating systems market. They differ in design options, as well as in materials of manufacture. It should be noted that radiators are:
- Floor-standing. They are installed directly on the floor, as they are equipped with small legs, which are made taking into account the standards for the gap between the floor, window sill and radiator.
- Mounted. Their sections are attached using special metal hangers to the internal walls of the house near the window openings.
Connection
How to install correctly
Now about how to hang the radiator. It is very desirable that the wall behind the radiator is level - this makes it easier to work. Mark the middle of the opening on the wall, draw a horizontal line 10-12 cm below the window sill line. This is the line along which the top edge of the heating device is leveled. The brackets must be installed so that the top edge coincides with the drawn line, that is, it is horizontal. This arrangement is suitable for heating systems with forced circulation (with a pump) or for apartments. For systems with natural circulation, a slight slope is made - 1-1.5% - along the flow of the coolant. You can’t do more - there will be stagnation.
Correct installation of heating radiators
Wall mount
This must be taken into account when installing hooks or brackets for heating radiators. Hooks are installed like dowels - a hole of a suitable diameter is drilled in the wall, a plastic dowel is installed in it, and the hook is screwed into it. The distance from the wall to the heating device is easily adjusted by screwing in and unscrewing the hook body.
Hooks for cast iron batteries are thicker. This is a fastener for aluminum and bimetallic
When installing hooks under heating radiators, keep in mind that the main load falls on the upper fasteners. The lower one serves only to fix it in a given position relative to the wall and is installed 1-1.5 cm lower than the lower collector. Otherwise, you simply will not be able to hang the radiator.
One type of brackets
When installing the brackets, they are applied to the wall in the place where they will be mounted. To do this, first attach the battery to the installation location, see where the bracket “fits,” and mark the location on the wall. After placing the battery, you can attach the bracket to the wall and mark the location of the fasteners on it. In these places, holes are drilled, dowels are inserted, and the bracket is screwed. Having installed all the fasteners, hang the heating device on them.
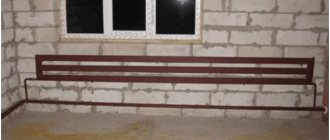
Floor fixing
Not all walls can support even lightweight aluminum batteries. If the walls are made of lightweight concrete or covered with plasterboard, floor installation is required. Some types of cast iron and steel radiators come directly with legs, but not everyone is satisfied with their appearance or characteristics.
Legs for installing aluminum and bimetallic radiators on the floor
Floor installation of heating radiators made of aluminum and bimetallic is possible. There are special brackets for them. They are attached to the floor, then the heating device is installed, and the lower collector is secured with an arc to the installed legs. Similar legs are available with adjustable height and some with a fixed height. The method of fastening to the floor is standard - with nails or dowels, depending on the material.
Basic materials used for production
Currently, the main criterion that separates all low radiator models available on the market is the material from which they are made. Along with the traditional ones used in the last century, new types are appearing with better performance properties.
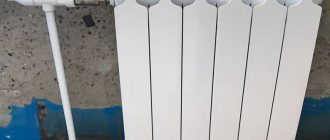
Cast iron radiators
Elements made of cast iron have the longest history of use. They are distinguished by high heat transfer, long cooling and heating, large mass and their low resistance to shock loads.
The increased roughness of the inner surface of the cast sections of a cast iron battery contributes to the accumulation of dirt and rust deposits on its walls, which over time significantly reduces heat transfer.
Note! Despite the fluidity of cast iron, the manufacturer produces heat exchangers with a height of at least 390 mm. This is due to the disadvantages mentioned above. There are batteries made at a sufficient artistic level, which allows you to decorate the interior of rooms
There are batteries made at a sufficient artistic level, which allows you to decorate the interior of rooms.
This is a decoration you can install at home
Steel heat exchangers
Products made from this iron-carbon alloy can be smaller in size than cast iron. They are a plate structure, the basis of which is metal pipelines. This aspect significantly reduces the required amount of coolant in the system and, as a result, increases its efficiency.
In the photo - steel panel batteries
Heat exchangers made from steel have a number of positive and negative aspects. Their weight is significantly lower than cast iron, they are more compact and have greater heat transfer. Disadvantages include susceptibility to corrosion and poor resistance to water hammer.
Steel heating radiators are low in height and have poor repairability. If one of the sections of a cast iron battery is damaged, it is easy to replace or eliminate it.
The steel product will have to be replaced entirely, which will lead to additional costs. The price of such units is one of the most significant in the segment.
Aluminum radiators
Low aluminum heating radiators have a range of advantages over their competitors.
- minimum weight of all similar products;
- good heat dissipation;
- and the plasticity of the metal allows you to obtain products of elegant shapes.
The size of the devices does not affect their characteristics
Note! Aluminum does not have great strength characteristics, which can lead to the formation of leaks due to water hammer in the system that occurs when it is filled or drained. The average service life of such products does not exceed 12-15 years. The cost of radiators made of aluminum is low
The cost of radiators made of aluminum is low.
Bimetallic batteries
One of the latest types of heating devices recommended for use in individual heating systems of private houses are the so-called bimetallic batteries. They are made on the basis of steel or copper pipelines equipped with aluminum plates.
Reliable strength of two metals in bimetallic devices
Their advantages include the following:
- sufficient corrosion resistance;
- significant (up to 100 atm.) operating pressure that they can withstand;
- low volume of coolant required for heating.
Such designs also have disadvantages:
- less heat transfer compared to aluminum products;
- the highest cost among all low radiators.
Panel heating systems
If you decide to get a heating system for your home that is completely devoid of visible elements, panel heaters can come to the rescue. These are really low horizontal heating radiators. Their height from the floor does not exceed 20 cm with a thickness of 30 mm.
Such products are located along the walls and covered with decorative overlays (panels). Using this option, you can get a heating system with a height of 100 mm, operating like a standard one with high radiators. The significant disadvantages of this heating option are the high cost and complete unsuitability for repair.
Heat transfer of one section
Today there is a wide range of radiators. While most are similar in appearance, thermal performance may differ significantly. They depend on the material from which they are made, on the dimensions, wall thickness, internal cross-section and on how well the design is thought out.
Therefore, it is possible to say exactly how many kW in 1 section of an aluminum (cast-iron bimetallic) radiator only in relation to each model. This data is provided by the manufacturer. After all, there is a significant difference in size: some of them are tall and narrow, others are low and deep. The power of a section of the same height from the same manufacturer, but of different models, may differ by 15-25 W (see the table below STYLE 500 and STYLE PLUS 500). There may be even more noticeable differences between different manufacturers.
Technical characteristics of some bimetallic radiators
Please note that the thermal power of sections of the same height may have a noticeable difference. However, for a preliminary assessment of how many battery sections are needed for space heating, we calculated the average thermal power values for each type of radiator
They can be used for approximate calculations (data are given for batteries with an interaxial distance of 50 cm):
However, for a preliminary assessment of how many battery sections are needed for space heating, average thermal power values were calculated for each type of radiator. They can be used for approximate calculations (data are given for batteries with an interaxial distance of 50 cm):
- Bimetallic - one section produces 185 W (0.185 kW).
- Aluminum - 190 W (0.19 kW).
- Cast iron - 120 W (0.120 kW).
More precisely, how many kW can you have in one section of a bimetallic, aluminum or cast iron radiator when you choose a model and decide on the dimensions. The difference in cast iron batteries can be very big. They are available with thin or thick walls, which causes their thermal output to change significantly. Above are the average values for batteries of the usual shape (accordion) and those close to it. Retro-style radiators have significantly lower thermal output.
These are the technical characteristics of cast iron radiators from the Turkish company Demir Dokum. The difference is more than significant. She could be even bigger
Based on these values and average standards in SNiP, the average number of radiator sections per 1 m2 was calculated:
- the bimetallic section will heat 1.8 m2;
- aluminum - 1.9-2.0 m2;
- cast iron - 1.4-1.5 m2;
How to calculate the number of radiator sections using this data? It's still simpler. If you know the area of the room, divide it by the coefficient. For example, a room of 16 m2, to heat it you will need approximately:
- bimetallic 16 m2 / 1.8 m2 = 8.88 pcs, rounded - 9 pcs.
- aluminum 16 m2 / 2 m2 = 8 pcs.
- cast iron 16 m2 / 1.4 m2 = 11.4 pcs, rounded up - 12 pcs.
These calculations are only approximate. Using them, you can roughly estimate the costs of purchasing heating appliances. You can accurately calculate the number of radiators per room by choosing a model, and then recalculating the number depending on the temperature of the coolant in your system.