Brick walls containing lintels evenly distribute the load on load-bearing surfaces, support the weight of higher floors (up to 2 tons) and prevent the building from collapsing.
Read more about the need to use jumpers in a brick wall, installation rules, regulations and other nuances in this article.
Bar lintels: types and installation
When erecting the walls of a building, one of the most important engineering tasks is the correct design of window and door openings.
And to solve this problem we cannot do without such an element as a bar lintel. In our article we will talk about the main types of jumpers, their markings according to GOST, and also describe installation features in different situations.
Beams for covering the top edge of window and door openings
Strengthening openings with reinforcing mesh
POROTHERM block (Porotherm) is a large format porous ceramic stone. POROTHERM blocks are used for both external load-bearing walls and internal walls - interior partitions
You have decided to get a brand new garage on your property. Perfect solution! But before you buy materials, think for a minute. And it’s not at all about what materials to buy. Formulate for yourself the answer to the question “why?” In order to park the car?
The phrase clinker tiles has long been heard by everyone who has thought about a good renovation in an apartment or about building a country house. But does everyone know how it differs from non-clinker and, in general, what other types there are?
Now it has become fashionable to use brick-like panels with insulation for the exterior decoration of a house. In fact, this is not just fashion, it is a thoughtful solution for those who value beauty and do not like to overpay. What are the features of this solution? “Baltic Ceramic Company” will tell you.
The Losinoostrovsky brick factory began its work in 1934, when the first brick production workshop was launched.
You have probably already noticed that the facades of houses are very different not only in color. Now the choice of facing materials is greater than ever, and it has become easier to get confused in this variety. Well, let's look at what functions the facade of a country house performs; this will greatly help us decide on materials.
Probably, if you have already been interested in bricks, the phrase “strength grade” is familiar to you. Today we will tell you what it is, where it is important to take it into account, and most importantly, what the strength of bricks and tiles should be.
Part Information
Design and varieties
As we noted, lintels are parts of window and door openings. The main task of any such element is to cover the upper part of the opening and distribute the load from the supporting structure located above.
The horizontal beam will support the weight of the masonry and ceilings above the window
Note! To minimize the risk of deformation associated with different coefficients of elasticity, thermal conductivity and shrinkage, lintels are most often made from the same materials from which the structure itself is built. In this case, naturally, the load-bearing capacity of the part must be increased.
By design, this part can be either load-bearing or non-load-bearing:
- The load-bearing transverse beam located above the opening takes the load from the ceiling, which is placed above the window or door. (see also the article How to use timber floor beams)
- The non-bearing beam experiences load only from the masonry, which is placed above, i.e. within one floor.
The classification of such elements can be based both on the material from which the jumper is made and on its configuration.
Based on the material, the following groups are distinguished:
- Reinforced concrete slabs and beams are the most common type. They are beams made of reinforced concrete with high mechanical properties. They are widely used in capital construction due to their manufacturability.
- Metal ceilings - used to cover wide openings, as well as where a significant load is applied to the window or door. Most often they are assembled from a rolled profile (I-beam or channel).
Metal floor diagram
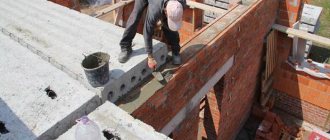
- Brick ones are quite difficult to manufacture, so they are used relatively rarely in private construction. As a rule, they are masonry made of ordinary bricks, which are assembled in installed formwork.
- Wooden - beams or boards of great thickness. They can be used both in the construction of houses and cottages made of wood, timber, and in brick buildings, as well as in structures made of gas and foam concrete.
Also, speaking about the design of industrial lintels (this primarily includes concrete products), experts divide them into slab and block:
- A block-type lintel is mounted in load-bearing walls if the wall structure takes the load from the ceiling located above. This type of jumpers is the most popular.
- The slab-type structure is installed in a self-supporting wall, onto which the weight of the floor slabs is not transferred.
Markings and sizes
As we noted above, block-type concrete parts are most often used in industrial and residential construction. According to GOST, a bar lintel must have a width of no more than 250 mm, and its length is determined by the dimensions of the opening to be blocked. As a rule, parts with a length of 1500 to 6000 mm are used.
Dimensions table
Each jumper must be marked accordingly. The marking contains information about the main characteristics of the element, and therefore, even without seeing the beam itself, we can determine by its article number whether it is suitable for use in a given situation.
Let's look at the features of marking using the example of such a part as a block lintel 2PB -16 - 2 P.
Numerical and alphabetic indices indicate the following:
- 2 – characteristics of the cross-section of the jumper.
- PB – type of part (PB – bar, PP – slab).
- 16 – length in decimeters. This element has a size of 1600 mm.
Note! The actual size may differ from the nominal size by 6 mm (for beams up to 2500 mm) to 10 mm (for slabs and bars 4000 mm long or more).
- 2 - strength class of the concrete from which the element was made.
- P – index indicating the presence of loops for carrying the unit using a truck crane.
As you can see, there is enough information to make a decision about the possibility of using the element to cover a window opening.
Features of aerated concrete
Aerated concrete is a fashionable and in-demand building material, used primarily in private housing construction. It belongs to the family of cellular concrete, porous materials with specific parameters. In this group, aerated concrete stands out for its most balanced set of qualities, which make it a leader among all alternative types. The reason for this success was the composition - the components for making aerated concrete are the same as for ordinary, traditional material. The basic components used are Portland cement and sand, to which lime and aluminum powder (gassing agent) are added. When water is added, a chemical reaction begins (aluminum powder and lime in the presence of water), during which active gas evolution is observed. The structure of the material becomes porous, replete with small (2-4 mm) bubbles of carbon dioxide. This is the fundamental difference between aerated concrete and other cellular concrete, which is a mixture of ordinary concrete with porous granules from one or another additional component.
The pores of aerated concrete make it a light and warm material, optimal for building a private house. However, it is not suitable for the construction of multi-storey buildings or industrial structures. This was one of the reasons for the rejection of aerated concrete when it appeared on the market. Builders are accustomed to working with durable and reliable materials and treated aerated concrete as ordinary rigid insulation. Only in the 90s of the last century, when active construction of private houses and cottages began, aerated concrete again became of interest to developers. Its working qualities turned out to be the most balanced and allow for considerable savings during construction and further operation.
Advantages and disadvantages of aerated concrete
The advantages of aerated concrete are:
- light weight, making it possible to reduce the power and size of the foundation and reduce construction costs;
- laying aerated blocks can be done with your own hands, without the participation of lifting equipment;
- low thermal conductivity, providing savings on heating the house;
- smooth and precise block geometry with minimal tolerances, ensuring fine-seam masonry (joint thickness 2-5 mm),
These advantages (except for the geometry of the blocks) are also characteristic of other cellular concrete. However, aerated concrete is superior to them in terms of a combination of parameters. In addition, it is cheaper than other materials, which becomes an important selection criterion for developers.
However, aerated concrete has many disadvantages:
- low strength and load-bearing capacity. This fundamentally distinguishes the material from traditional concrete, which can withstand enormous loads. The pores of aerated concrete collapse under pressure, and the material sags. This is unacceptable when carrying out serious and responsible work, therefore, a restriction on the height of buildings has been introduced for aerated concrete (up to 3 floors);
- hygroscopicity. This quality is common to all types of concrete. However, the porous structure here becomes the main risk factor - moisture is absorbed into the array and begins to accumulate in the pores. When the temperature drops, it freezes and begins to expand, destroying aerated concrete from the inside like a slow explosion;
- inability to resist multidirectional loads (bending and stretching). This is a common disadvantage of concrete, requiring reinforcement of building structures.
Often, the advantages of a material simultaneously become its disadvantages. For example, the low thermal conductivity of aerated concrete, which provides a comfortable microclimate and savings on heating, often becomes the cause of harmful phenomena - the appearance of cold bridges. These are areas whose temperature is lower than the rest of the wall. Cold bridges can be seams that are too thick (hence the importance of precision and care during installation), masonry elements made of ordinary concrete or metal, and other parts with high thermal conductivity. The appearance of such an area is an extremely undesirable event, since condensation begins to settle on it. Aerated concrete gets wet, and the consequences of this process can be very sad.
Window opening design
Pouring into formwork
If you are building a house with your own hands, then sooner or later you will have to face the task of covering window openings. There are several ways to solve this problem, and below we will try to give a brief description of them.
The first method involves constructing a lintel made of reinforced concrete using poured technology.
The instructions in this case are as follows:
- At the first stage, we install the formwork in the window opening. For formwork we use boards, the thickness of which should be at least 25-30 mm.
- We support the formwork on vertical wooden beams, which we place inside the opening itself.
Photo of formwork during installation
- Inside the formwork we place a reinforcing mesh made of steel rods with a diameter of about 6-8 mm.
Advice! The reinforcement should be laid on small supports, which will provide a gap between the metal and the lower plane of the poured concrete beam.
- Having additionally strengthened the formwork with transverse bars, we begin pouring the concrete mixture. It is best to use crushed stone as a filler (the ratio of cement, sand and crushed stone in the solution is approximately 1: 2: 4.5).
- We carefully compact the concrete to get rid of air bubbles.
The formwork can be removed pretty soon
As practice shows, it is possible to remove the formwork and begin laying bricks on such a lintel within 48 hours.
Laying the finished part
Using ready-made concrete lintels can significantly save time and simplify work. However, it is worth noting that the price of the product in this case will be slightly higher, and to lift parts to a height it is advisable to have a crane at your disposal.
Installation in the opening: if you have a strong assistant, then you can do it without a tap!
If this does not scare you, then the work is carried out according to the following algorithm:
- First, based on the dimensions of the opening, we select the dimensions of the timber lintels so that the edges of the beam extend into the wall at least 250 mm (this parameter is called the embedment depth).
- Then we erect the masonry in such a way that support platforms are formed for laying the horizontal timber floor.
- We lay a layer of mortar about 20 mm thick under the lintel.
- We lower the concrete part to the selected location and settle it to the required level. Remove excess solution with a trowel.
- If necessary, we form a ceiling over the opening from several such parts.
Further laying of bricks or building blocks can be carried out immediately after the settling and leveling of the lintel is completed.
see also
Comments 50
Thanks for the link.
Please. A person has enough strength to answer all the questions asked about GB (within reasonable limits, of course).
Yes, I see that you are a consumer!;-D
The downside is that I don’t like the service life of the blocks themselves. It’s very short :-( Yes, the brick is cold.
Please link to studies on the short service life of autoclave GB. Chat with Gleb Grinfeld (executive director of the National Association of Autoclaved Aerated Concrete Manufacturers), he still has experience and his own books on GB. www.forumhouse.ru/threads/298788/ Please note that I am not a seller of GB, I use it as a building material for my own home.
I also made lintels in my house. And they put jumpers on the corners and fittings. Even if you tell the owner how to do it correctly, guest workers refuse to do this
Moreover, they persuade the owners to do as they want. You need to talk to jamshuts like this - single out one commander with whom you communicate (often this is the eldest in age), don’t listen to the rest - they’ll sit on your ears and won’t work.
They refused to pour it for my neighbor, they put it on the corners. Yes, and bent walls too. I did it for him. And this team has already installed about a dozen houses in our village. What can we say about the quality
We have a new village, everything is being built at the same time, I’ve seen enough of the super-crews and the cracks in the new houses.
similar. It’s also a new village. The houses aren’t even 10 years old.
Our oldest houses are hardly 3-4 years old.
If you do, then it’s a family nest;-) With a brick guarantee of 200 years or more.
Brick over 200 years old and more!:-D
I won’t try to convince you otherwise, just look on the Internet for such an indicator as the frost resistance cycles of bricks and dispel your misconceptions. Masonry from F15 to F50 (freeze/thaw cycles), mostly F35, as well as autoclaved GB.
Like timber. The service life of wood is 70 years:-(
It’s just a shame that these blocks have a short service life :-( It’s a pity to throw away millions for 50 years. In 200 years, all that will be left of these blocks is dust! :/
My box with a foundation, a ceiling, an integrated heating system, basic utilities and sewerage, a roof without finishing the walls so far costs less than 1.5 lamas, which can never be achieved with a brick building, I’m generally silent about the heat loss of a brick building.
You build for yourself. -D But it’s not scary (+ resentment) that so much time and money spent will only last for 50-70 years:/
No, not for myself. Children, grandchildren. Doesn't scare me. The absence of life after death, corrosion of a car body, wear and tear of pants, deforestation, GMO products, ozone holes can also be frightening...
All sorts of things, not without it.
I understand that you are building with 1 helmet. -(
Yes, one and a half helmets (one day a week my 12-year-old son helps at a construction site, while he’s studying). For heavy work - pouring concrete for the UWP, floors, I asked a relative to help.
I wish you more time and a lot of effort. I know what it is! Good luck.
Thank you! There really isn't enough time. Construction is carried out without interruption from the main work.
True, the price of 1 brick is 100 rubles:/
Not a bad scale!;-) How to heat with a coal-fired boiler with automatic equipment? :-D And the service life of the house is 50 years:-(brick is better!;-) There is a brick block in the 1st brick of 14 bricks!:-D I dream of something like this build;-)
GB is fragile, but it is a large item. That’s why I chose it for construction (I build it myself, without hiring workers). The service life of a house made of GB is 75 years, brick is 100 years. In Riga there are unfinished GB houses built in the 30s (we draw our own conclusions). Heating is gas, and later it is planned to add a heat accumulator and add a geothermal circuit. It is possible to use helopanels in place of the geothermal circuit, but this is already exotic.
How many floors and total area? -)
There will be 2 full floors, often ribbed ceilings, roofing with soft tiles. The building area is 125 m2, the total area of the house is about 220 m2.
Purely out of curiosity... I understand how they were made above the window openings. What about the doors? How is the bottom row (the one supported by the board) held?
Due to adhesion to concrete (believe me, you can’t tear it off with your teeth without completely destroying the GB block).
Mmmmmmmmmm... If I didn’t see it, I wouldn’t believe it! Noted, thank you. Cool!
Good masonry. Everything is very neat.
Thank you. The seams were additionally passed to reduce the blowing factor of the masonry.
What kind of covering is planned?
I saw it, it’s interesting... But I’m also interested - is it possible to put channels or beams or will it be a collective farm?
Do you mean resting the GB blocks on the corners above the window? It’s possible, you just need to recess the sides a little into the walls. Disadvantages - it does not protect against cracking in loaded areas, it is quite difficult to finish, you need to make sure that the floor beam does not rest on such a lintel (if the building is being built without an armored belt, the brick belt is not an armored belt). Pros: speed of construction.
I meant about the overlap... I’ll probably create a separate thread
Metal floors have low fire resistance ratings (no matter how strange it may sound). Even a wooden floor resists fire for up to 20 minutes. I can't advise.
I found something similar - www.kolumb.ru/smp-prosto.php how would you rate it?
Prefabricated monolithic floors from Itong, Columbus, etc. They have every right to life. However, their cost stops them. Look at this option, designed back in the distant Soviet times (sheet 1): www.forumhouse.ru/entries/comments/4224/ You may be interested. The difference with the ceiling that I poured is that the fillers (GB blocks) are simply buried in the body of the ceiling, so you only have to fill in the load-bearing beams, as well as the reinforced belt along the load-bearing walls. By the way, pay attention to the test data - it was not possible to squeeze one block out of the ceiling even with a load of 5 tons on it, such is the adhesion force of concrete and GB.
Fine! Most people do this!
I don’t argue, but in more than 40 houses around us there is only one with similar jumpers, and those factory-made, U-blocks, which cost much more.
We also rarely use U-blocks, and rarely lay the blocks on the bottom of the boards, like yours. Usually they put up sidewalls from partition walls, tied them together with anchors or just scraps of reinforcement, with frames and concrete inside. But yours looks prettier and nicer. Good luck!
Thank you, the design you described has its own nuance - freezing above the window lintel, because... the window profile does not provide a sufficiently high thermal resistance.
This is if you just plaster it - I mean the slope.
Apparently I didn’t quite understand the description of the jumper pie. I can't say anything without a cut.
Conclusion
Bar lintels - according to GOST they must be made of high-strength reinforced concrete - are a mandatory structural element of almost any window opening.
Of course, as we already noted in the article, such a part can be made independently, but if finances allow, then it is better to use a factory product. At least you will be confident in its mechanical properties, and therefore in the reliability of your windows and doors. The video in this article, in addition to the above, will show some nuances on this issue, watch it!
What is a reinforced concrete lintel
Most often, reinforced concrete lintels over window and door openings are divided into:
- non-load-bearing beams that can take loads from the wall above;
- load-bearing reinforced beams that take the slab load;
- large load-bearing part (purlin);
- a weakened thin bridge (pencil) used on weak partitions. Typically this type is used for doorways;
- a girder-shelf (crossbar) on which slabs or similar materials are placed.
Lintels in stone houses
Reinforced concrete lintels for doors have a width that is a multiple of the width of the masonry. Therefore, they are easy to choose for any object. The dimensions of reinforced concrete door lintels range from 1.2 m to 2.2 m. If the walls are very thick, then slab lintels can be found. To install lintels over doors in a brick wall, slab lintels should be used. Conveniently, the width of such jumpers is equal to the width of the wall. In this case, several timber beams will be required.
The concrete lintel above the door requires proper preparation of the “shoulders” before installation. She relies on them. Typically, wood, solid brick or 300 grade cement mortar is used for preparation.
Basic production of lintels over windows
To make a reinforced concrete lintel you will need a small set of tools:
- fittings;
- metal corners, a set of nails;
- boards;
- wire;
- And also cement, sand and crushed stone for mixing concrete mortar.
Before starting work, you should correctly select the desired type of jumper.
So, for small, lightweight structures, it is recommended to use the usual simple option (as shown in the photo of the lintels above the window), which will significantly save the family budget.
And the technology for manufacturing reinforced concrete window lintels is quite simple:
- The lintel is poured directly above the desired opening. But keep in mind that you will first have to prepare the formwork.
- The work takes place on the ground and is subsequently installed in place. The second option will add a little complexity to the work, since you will have to hire a crane to install the jumper in the right place.
Video
For information on pouring reinforced concrete lintels in practice, watch the following video:
Jumper Installation Using U-Blocks
Scheme for manufacturing a monolithic lintel
Reinforcement frame for window lintel
Prepared formwork
Lintel after pouring concrete
Removing formwork
DIY formwork for lintels
Before making a lintel over the window directly at the opening site, you will have to tinker with the formwork, which will have to reliably withstand a large load from concrete.
There is an option to create a form from wooden boards that will serve as a shield. It is better to take a board with a maximum thickness of 25 mm, which is fastened with self-tapping screws and a screwdriver. When the formwork is no longer needed, it can be easily removed by unscrewing the screws.
The first step is to install the shield horizontally in the opening, and it should rest against the support. Then a mesh of reinforcement is placed into the shield and secured with self-tapping screws.
For greater convenience and tension stability, experts recommend attaching the shield to the reinforcing mesh with special wire. This fastening will help the shield fit tightly and be accurately attached to the window opening.
Preparing the box
Manufacturing of formwork
Work on arranging the lintel begins with the manufacture of a wooden frame (box), which is used to pour the concrete mixture and obtain a building element of a given shape. To install such a box, you will need one bottom and two side wooden panels, from which you can subsequently assemble the formwork.
The linear dimensions of the finished panels must correspond to the dimensions of the window opening, and the side panels must cover it both in height and width. The bottom shield is made exactly to the size of the opening being closed. In the sides of the formwork, holes are prepared in advance for the binding wire, through which the panels will be held in a given position. The bottom and side surfaces of the boards are then lined with polyethylene film, which is attached to the formwork using glass nails.
Laying reinforcement
- The assembly of the box usually begins with the installation of the lower shield, which is carefully adjusted both in width and length to the dimensions of the window opening. The correctness of its horizontal installation is controlled using a building level, after which several supports are installed under this shield (taking into account maintaining the leveled position).
- Side shields are placed in a certain sequence; in this case, one of them is first fixed on the wall (using self-tapping screws, for example) and only then fixed on the already mounted lower panel. Note that for walls made of silicate or gas silicate blocks, this task is significantly simplified, since the panels can be fixed to their surface using ordinary nails.
- The second side panel is also fixed first on the wall, and then attached to the bottom of the box using self-tapping screws. When securing the formwork, you should not skimp on self-tapping screws, since when dismantling the structure you can unscrew all the fasteners and use them for other purposes.
- To avoid the “collapse” of the panels under the pressure of the concrete solution, the side walls of the structure are fastened together with binding wire. Such wire (pre-cut into pieces) is threaded in a double ring into previously prepared holes in the shields. After this, a suitable sized reinforcing rod is inserted in the center of the twist, with which it is tightened.
- Then the ready-made reinforcing mesh is placed into the formwork. It is placed in such a way that the reinforcement bars do not touch the walls of the box; At the same time, small pebbles are placed under its lower row.
To fill homemade lintels, it is best to use concrete mixed with fine gravel.
We insulate a reinforced concrete lintel
It is no secret that the opening between the masonry and the lintel must be properly insulated. As a rule, insulation with a thickness of at least 100 mm is used. It is placed in the formwork opening and filled with concrete mortar.
Typically, mineral wool is used for insulation purposes. In this option, it is necessary to lay the window slopes (openings) using bricks so that the window itself rests against it. And for greater reliability, the structure should be secured using polyurethane foam.
A simpler way to insulate the lintel under the window is to use extruded polystyrene foam, which is known for its strength. It is better to take sheets 30 mm thick.
To securely fix the window in the opening, it is reasonable to pour polyurethane foam into the space formed between the frame and the insulation.
Advantages of using steel angle
For the manufacture of lintels, reinforced concrete monolithic and prefabricated lintels are used - slabs, bars, beams, prefabricated products made of cellular concrete. However, for some building structures, only lintels made of rolled steel are suitable, including angle bars.
Advantages of using a corner:
- operational installation;
- the ability to lay bricks and blocks on metal lintels immediately after installing the rolled products;
- strength and reliability of metal products, subject to the correct choice of assortment, depending on the type of masonry and the planned load.
Rules for making jumpers
When creating a reinforced concrete lintel, it is necessary to strictly adhere to the described technology. There are also some nuances and rules in the work:
- For greater strength of the reinforced concrete belt, the diameter of the reinforcement mesh should be 14 mm.
- It is recommended to strictly adhere to the dimensions of the reinforced concrete lintel: the height should not be more than 1/20 of the length of the opening itself, and the width should correspond to the width of the wall (without indents).
- It is more reliable to use ready-made lintels, or to make your own formwork.
- Used formwork should be removed only after at least 25 days, for greater strength of the concrete solution.
- When pouring the solution into the formwork, you should compact it carefully to avoid voids.
- When making lintels, it is better if the window is quarter-length.
Making lintels for windows is a very simple process that you can easily do yourself. The main task is to calculate the necessary materials and prepare them.
Strengthening openings in frame buildings
For a frame building, the presence of lintels in the upper part of the openings is strictly necessary. The requirements described below are valid for frames made of both metal and wood.
If the width of the opening does not exceed two steps for installing the frame racks, the nearest side rack elements are connected by two horizontal crossbars, and then two vertical spacers are added between them, setting the required width of the opening.
If the opening width is equal to three or more distances between the frame posts, it is decorated with crossbars in the same way. For additional support of short racks above the opening, they are unloaded onto adjacent ones using diagonal braces running from the center outward. In all cases, the cross-section of the crossbars should not be less than the size of the rack elements of the frame.
If the opening exceeds the width of five times the distance between the posts, the verticals closest to it should be double. The internal pair is connected to each other by a horizontal jumper, and the external one is the same, but higher by half the height of the opening. The space between two horizontal crossbars is filled with a diagonal stiffening mesh based on the principle of floor trusses.
What is needed to fill jumpers?
I used:
- fittings diameter Ø 12 mm;
- wire rod diameter Ø 6 mm;
- knitting wire diameter Ø 1.4-2 mm;
- edged board 25×200 mm;
- nails 70 and 100 mm;
- cement grade 400;
- river sand;
- crushed diorite stone fraction 20 mm.
I used reinforcement with a diameter of Ø 12 mm, since I plan to build a second floor or attic with a concrete floor and I was on the safe side so as not to calculate the load-bearing capacity of the structure; there will also be a seismic belt under the ceiling; I will describe how to make a seismic belt in the next article.
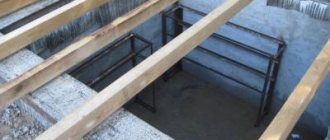
Filling jumpers
The photo shows how the formwork for the lintel is installed over a doorway measuring 800x2100 mm, the width of the interior wall is 200 mm, the minimum depth of the lintel support is 200 mm. Since the width of the board matches the width of the wall, there is no need to knock down the shields.
First, the height of the door is measured, taking into account the space for foaming and slopes. Since the board is 2.5-3 mm thick, you can immediately measure according to the height of the door. After removing the formwork, you will have a gap equal to the thickness of the timber used. Next, mark the level of the opposite side from the foundation base or from the first mark using a hydraulic level. After the marks are made, we nail pieces of boards in the shape of the letter - T, the upper edge of which passes under the mark. For this I used 100mm long nails.
Next you need to prepare 3 shields, for this I have 3 boards. Along the edges I have half a stone that will cover the ends of the formwork, the first board is 800 mm long and 2 more 1200 mm each, since the support depth is 200 mm and we must have a reserve. To extend the durability of the wood for further use, I wrapped the formwork boards with cling film, which costs $1 per roll. We lay the bottom board, 800 mm long, on already nailed T-shaped supports; there is no need to nail it to the supports. Next we install the side shields. First, we nail them along the edges to the wall, and then we knock the corners together diagonally from top to bottom. To facilitate the dismantling of the structure, 70 mm nails were driven along the top, on which a binding wire was attached to tighten the top of the lintel formwork. You can use pre-prepared timber, I used this method to save used wood, which can still be useful during the construction process.
Process
The arrangement of lintels, with the formation of a unit and taking into account support in the wall, must take place according to the rules described in SNiPs. Since reinforced concrete lintels are used most often in modern buildings, the process of their installation consists of the following nuances:
- For laying, a ledge is made with a width of at least 25 cm, and on each side of the opening, the length of the structure should exceed this width by 50 cm.
- For installation, use a truck crane to lift the lintel - it will lift and lower it to the desired support point, onto which uncured concrete mortar has already been applied.
- With prefabricated options, formwork is arranged, formed along the width of the opening, a reinforcement cage is knitted and the lintels are poured in a monolithic manner, leaving them until completely dry.
Metal jumpers are lightweight. Presented in the form of channels and various forms of rolled steel, their advantage is that during operation they can be cut to the required length.
This option is also suitable when other types of lintels are categorically unsuitable for the wall of a particular opening, or a new one made from other materials cannot be installed (the old opening is expanded or a new one is cut out). Metal can bend, so supports are made to support them. In the rest of the process: concrete is poured, as with reinforced concrete.
Brick lintels are mounted to the main wall along the top of the opening , and then connected to each other using a shelf from which clamps hang, placed in vertical seams. The clamps reliably reinforce the lintel, and it turns out strong.
Experienced craftsmen choose longitudinal, wedge, beam or vaulted installation methods. Concrete mortar for laying is mixed in small portions so that it does not harden quickly.
Recently, in most cases, builders have placed the professional BAUT reinforcement system into brick lintels.
A simple and reliable way to install a brick lintel - in the video:
How to reinforce lintels?
Using my door as an example, the following were prepared:
- 4 reinforcement rods with a diameter of Ø 12 mm, size 1200 mm;
- 6 wire rod quadrangles with a diameter of Ø 6 mm, size 100 by 100 mm;
- knitting wire.
The frame was knitted with a regular 100 mm nail. Since hooks must be ordered, for the convenience of tying the frame, 2 reinforcement pins, which are narrower than the size of the reinforcement, are driven into the wall.
The frame was knitted with a regular 100 mm nail. Since hooks must be ordered, for the convenience of tying the frame, 2 reinforcement pins, which are narrower than the size of the reinforcement, are driven into the wall. To start knitting, take 2 reinforcement pins and place them on the prepared pins driven into the wall, and mark a step of 200 mm with chalk or a marker. Along these marks we string prepared quadrangles from wire rod, distributing them according to the marks made with a marker, and tying the frames with knitting wire. Having tied the frames at the top, we place the remaining 2 reinforcements at the bottom and continue tying.
After our structure is ready, we immerse it in the formwork.
Let's move on to preparing the solution for the jumpers. I did this: for a bucket of cement grade 400, 3 buckets of sand and crushed stone. The mixing was carried out in a homemade trough, which was made from a galvanized standard sheet 1000x2000 mm and 4 boards, 2 boards 2.5x200x950 mm and 2 2.5x200x2000 mm. The trough was reinforced with knitting wire at the corners and boards along the bottom.
After the solution is ready, fill a couple of buckets and lift the reinforcement frame so that it does not touch the formwork from below, after which we fill it completely.
Materials and tools for the device
To install lintels in brick walls, you will need the following consumables and tools:
construction hammer, hacksaw, electric drill, screwdriver;- set of installation accessories;
- trowel, putty, brushes, spatulas, bucket for mortar;
- edged boards of the same thickness, with metal or wooden supports;
- metal corners, self-tapping screws, reinforcing mesh or metal rods, nails with wide heads, binding wire;
- polyethylene film, roofing felt;
- composition for concrete in finished form or separately: cement, sand, gravel, water, slag.
Separately, gloves, overalls, rags, brushes and “levelers” for concrete may be useful so that the poured solution is well compacted when distributed, filling the pores of the wall and formwork attached to the surface.
Lintels for window and door openings: calculation, DIY production
During the construction of buildings, one of the most difficult problems is installing the lintel of a window or doorway. It must meet all requirements and be strong to prevent sagging of the wall and deformation of the window frame or door frame. Despite the apparent simplicity of the work, installation of jumpers requires experience and knowledge. Learn how to properly make a lintel with your own hands in door or window openings later in the article.
Calculating the lintel load for window and door openings peremychki-svoimi-rukami-2
In construction, a lintel refers to an ordinary concrete beam that is laid on the walls and serves as the basis for laying the next row of bricks or cinder blocks. The design of the opening must meet certain requirements:
The supporting sections of the wall must normally bear the load of the support beam. The deflection of the beam (its residual deformation) must correspond to the permissible values for windows or doors that will be installed in the opening. If a wall made of brickwork is preserved entirely, the lintel is temporary. After the mortar dries, the masonry is able to support itself, forming a normal opening, so the lintel no longer performs any function. In other situations, beam parameters are calculated based on the applied load. This parameter should include:
The weight of the jumper itself. This is especially true for heavy reinforced concrete products. The weight of the wall above the opening. In this case, it is necessary to take into account the self-supporting ability of the masonry. Wall weight distribution. The load carried by the wall from the support of lintel beams and floor slabs. The width of the linear lintel must be equal to the thickness of the wall, and the height is determined depending on the load-bearing capacity of the lintel. The length of the beam used to cover the window opening depends on the material from which the masonry is made. For brick, the depth of the lintel inside the wall must be at least 100 mm, for cinder block and blocks made of other porous materials - at least 300 mm. By multiplying this figure by 2 and adding the width of the doorway, you can calculate the length of the lintel.
It is worth noting that a finished reinforced concrete product is not always used as a beam for window or door openings. The use of wooden beams or welded metal structures is quite common. Sometimes they cast a reinforced concrete lintel with their own hands “on site”. Formwork and a steel reinforcing structure are installed above the opening. Then concrete is poured into the formwork. This method is notable for the fact that it is possible to make a lintel of the required dimensions, even for non-standard opening sizes.
DIY lintel installation in brick and block buildings
The simplest solution to the issue of constructing lintels for window and door openings would be to place their dimensions directly under the floor slab. However, this option is simply not possible. The fact is that between the opening lintel and the beginning of the reinforcing belt there must be at least 7-8 rows of bricks or 2-3 rows of blocks.
The simplest task in installing the top of a window or doorway is working with walls that are not supporting the floor. If the brickwork does not meet the support requirements, then the rows of bricks are reinforced with reinforcement. Special staples are placed between each brick that covers a window or doorway. They are made from wire with a diameter of at least 4 mm. Reinforcement is placed under them and laid along the masonry. This technique will allow the bricks to stick together better.
If the building is being erected from foam blocks, installing lintels over the windows yourself is even easier. It is built from blocks on a special support. As a support, boards with a thickness of at least 40 mm are used, under which supports are installed. After the solution has set, a groove is made on top of the blocks that form the jumper. Its thickness must be at least 300 mm, and its depth must be at least 200 mm. A reinforcing structure made of reinforcement with a diameter of 10-12 mm is placed in the groove. Then the solution is poured. Recently, manufacturers of building materials have been offering ready-made U-blocks, which have the shape of a channel. Working with such blocks is much easier than with regular ones. After the concrete hardens, the blocks will serve as a monolithic structure.
Another way to install a lintel on a window or doorway is to cast a concrete lintel yourself. Unlike installing a gutter from blocks, the formwork is removable. It rests on the walls of the opening. The formwork is installed from boards or pieces of chipboard. When the structure is installed, a frame of reinforcement is laid into it and concrete is poured. The formwork is removed only after the concrete has completely dried. Although this is the most labor-intensive way to install a lintel under a window or door opening, it is more cost-effective. This process eliminates the need for special equipment to lift heavy reinforced concrete structures.
Making lintels for window and door openings with your own hands in frame houses
The structures of frame houses are less durable than brick or block ones, so correct calculation of lintel parameters for them is mandatory. The configuration of the window opening and the installation of its structural elements depend on the ratio of the opening width to the pitch with which the wall panel racks are installed.
Ideally, the width of the opening should correspond to the installation step of the racks, but often this is simply impossible. When using beams of a smaller cross-section for some reason as racks, the installation step of the structural supports may be smaller than the standard size of the window, therefore, for the construction of lintels for such openings, it is necessary to construct additional supporting elements.
If the width of the window opening is greater than the step width of the racks, but does not exceed twice the value, installation of the opening lintels is carried out as follows. Between the two outer posts along the height of the opening, two horizontal crossbars are installed. In the place where the post would be, vertical spacers are installed between the crossbars and the top and bottom beams. If the resulting opening is still too wide for installing a window, then two more vertical spacers are added to it at the same distance from the edges, creating the required width.
If the width of the window opening is more than three spans, then it is mounted in the same way. However, braces are installed to support the short vertical struts. They are placed symmetrically from the center to the edges. Thus, one brace should connect one short brace in the middle and two full posts.
If the width of the window opening is five times greater than the width of the installation step of the frame racks, the operation is performed as follows. The outer frame posts must be double. External ones have the usual height, and internal ones should be the height from the floor to the top crossbar of the opening. The lower and upper crossbars are reinforced with a diagonal mesh, similar to floor trusses.
Strengthening the opening in load-bearing walls
Often, when remodeling an apartment or house, it becomes necessary to make a doorway in a load-bearing wall. This is especially true for block houses, in which all walls are load-bearing by default. Work with such structural elements must be carried out very carefully, since the calculated loads on them did not take into account the presence of openings. If in a private household the owner can carry out redevelopment at his own peril and risk, then in apartment buildings such work must be agreed upon with the supervisory authorities.
The process of dismantling an opening in a load-bearing wall begins with strengthening its arch. To do this, you need to mark the opening itself on the wall. Then cuts are made along the arch line with a depth of at least 100 mm. If the wall is brick, then it is better to make the cut at the junction of the rows of bricks. Firstly, it is much easier to do, and secondly, it is better to leave a full brick. The cut can be made using a grinder. Its length should be 100 mm greater on each side than the width of the opening. Steel angles measuring 100x100 mm with a shelf thickness of 8 mm are inserted into the cuts.
After the corners are inserted, holes with a diameter of 8-10 mm are drilled in each of them every 250 mm. The holes on each side must match. Reinforcing bars of the appropriate diameter are inserted through them. At the exit from each hole, the rods are welded and cut flush. Now you can carefully begin dismantling the wall. After 2-3 rows of bricks have been removed, two corners at the end are welded together using steel strips. They are welded every 200 mm. After this, you can safely knock out the entire opening. To prevent its side ends from starting to collapse, they are strengthened with the help of corners. To do this, you can use corners 50X50 mm with a shelf thickness of up to 5 mm. They are also connected by steel strips. Steel embedded parts are welded to the corners from the sides and secured to the wall with anchor bolts. The threshold of the new opening is reinforced with reinforcement and filled with concrete. Now the opening will be strong enough to withstand any load that the ceiling puts on it.
Support depth and maximum opening length
Depending on the design features, the installation technology, the depth of support of the lintels on aerated concrete blocks, and the basic operating rules may vary.
| Jumper type | Maximum opening length | Support on masonry | Design features |
| Reinforced aerated concrete load-bearing structure | 174 cm | 25 cm | Does not require additional insulation |
| Load-bearing structure made of reinforced concrete using permanent formwork in the form of U-shaped blocks | 300 cm | 25 cm | Does not require additional insulation |
| Monolithic reinforced concrete load-bearing structure | According to beam length | 35 cm | Needs additional insulation |
| Execution by reinforcement | 120 cm | Inserting reinforcement behind the opening by 0.5 m | It is advisable to carry out ordinary reinforcement over openings |
| Monolithic non-load-bearing reinforced concrete structure | 200 cm | 35 cm | Needs additional insulation |
| Non-load-bearing design based on metal corners | 120 cm | 20 cm | Needs to be buried in the masonry |